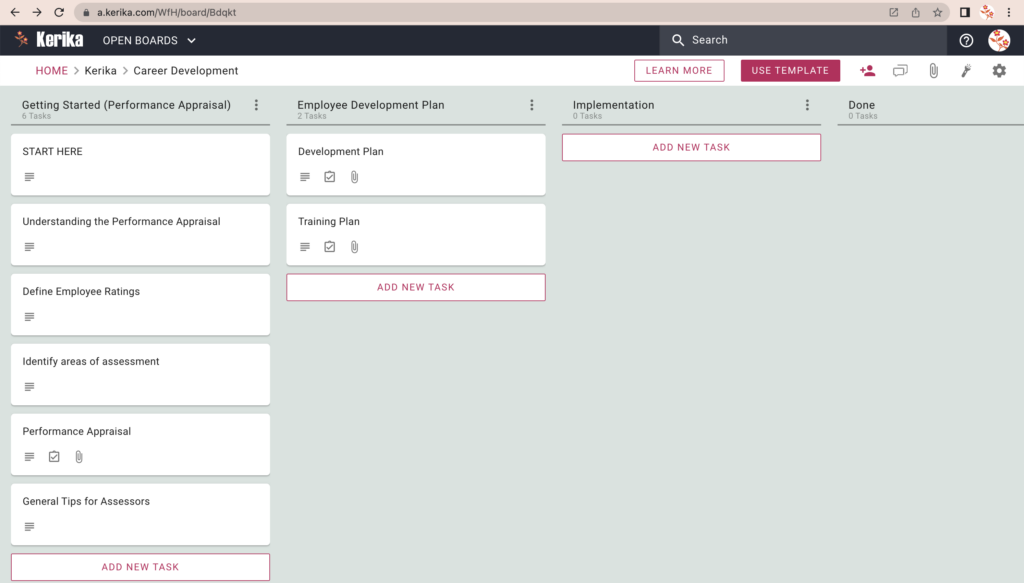
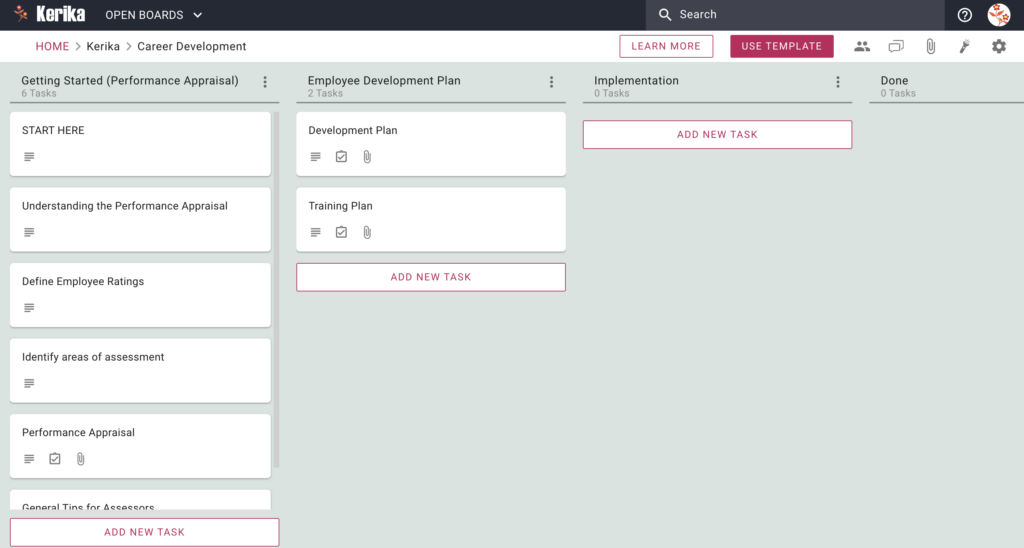
This template can be used to set goals and deliverables, assess performance, manage career growth, and get needed training to master knowledge and skills.
Performance management and career development is an ongoing process: it’s not done just once a year; it requires continuous follow-up, adjustment when needed, and giving feedback.
Your main deliverables:
Matching an employee’s performance to desired objectives
Identifying and addressing performance gaps
Implementing personal development plans
Assessing the employee’s performance after implementation
How to use this template:
Click on the USE TEMPLATE button on the top-right of the app and create your own Task Board; Kerika will set it up as using this template.
If you are going to do it with others, add the people to this board’s team as Team Members. (Use the Board Team button on the top-right of the board.)
If you have other stakeholders, e.g. management, add them as Visitors to this Board Team: they will be able to see what’s going on, but not make any changes.
Start with the leftmost column, and pick up tasks one by one:
The tasks are in order, so start at the top.
Set the status of the task to IN PROGRESS so everyone knows that it has started.
Assign the task to yourself or your Team Members: you can assign tasks to more than one person.
Set a due date! This really helps in getting stuff done; Kerika will then alert you when things are slipping.
As work proceeds, use the chat feature to communicate within the team.
As you take photos or create contracts, be sure to add them to the tasks as attachments; Kerika will make sure they stay with the tasks so they are always easy to find.
Once a task completes, move it to the Done column.
To succeed on social media, you need to create content that people will find interesting and engaging. But making good content takes a lot of time and effort, and a great workflow can make all the difference. A workflow helps you be more efficient and make sure everything you’re doing is in the right order, and that you’re not overlooking anything important.
Kerika can get you started in seconds with a great workflow for managing your social media content.
Let us show you how you can use this template to create content that connects with your audience and helps you grow your business or personal brand.
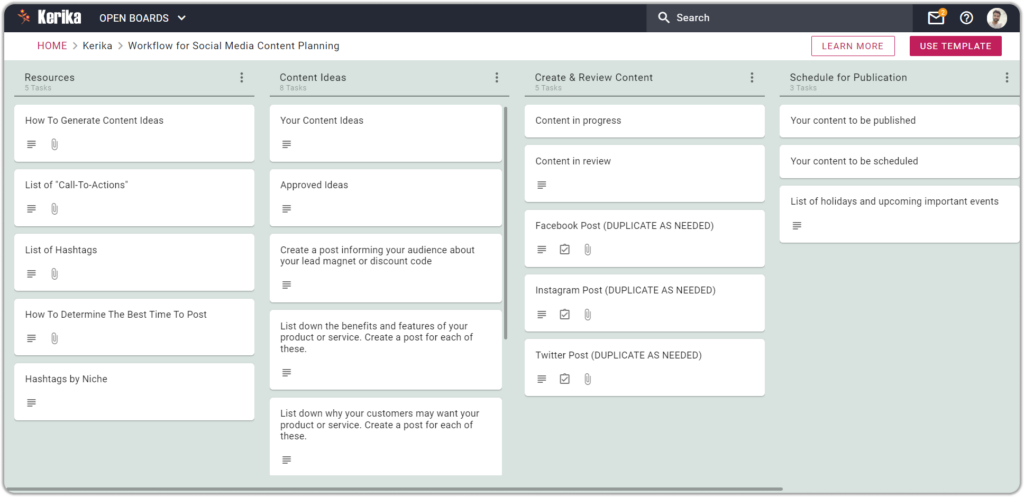
This template organizes your workflow using cards and columns. Each column represents a different step in the workflow starting with Resources on the left edge of the board, and ending with Done on the right edge.
Let’s learn how you can use these columns for your Social Media content creation process:
Resources: If you want to create content quickly, you need to make sure your resources are easily available. This might include things like pictures, videos, or documents.
You can add more resources in this column too by creating a new card or adding more information to the existing cards. By taking the time to build resources, you’ll create quality content easily and quickly.
Content Ideas: While creating content for your social media channels, you may struggle to come up with new ideas. A good solution for this problem is to have a list of ideas you can work on anytime.
This is why this column is useful to list down your content ideas, discuss them with your team, and see which content idea is the best to go ahead with.
Create & Review Content: The success of your content depends on how well you manage and review it before posting, and this column is to manage your social media content and review it before posting.
You can mark your content as READY, IN PROGRESS, NEEDS REVIEW, and more. The status flags help to keep everyone on the same page, especially folks who may be working remotely.
Schedule for Publication: You want to use the best time to post so that you can get the most engagement from your audience. You also want to be able to track when you are publishing and scheduling your posts. Use this column to schedule when you will post your content on social media. By planning the timing of your content’s release, you can increase its visibility and performance.
Best Practices of Great Teams
If you are working just by yourself, you are ready to go. But if you are working for an agency or the Marketing department of a company, there will be others you need to get involved in this project.
Set up your Team Members
Kerika makes it really easy to organize your team: if there are people who will be actively involved in the video production, e.g. photographers or content writers, add them as Team Members on this board.
They will be able to make changes to this board in real-time, as they get their pieces ready, and everything that they do will be instantly accessible to everyone else that’s on this board’s team.
Set up your Visitors
There are often people who need to be informed but aren’t necessarily going to contribute in an active way. For example, there may be a product owner who needs to keep track of videos that are relevant to their product, or a senior manager who wants to be kept in the loop.
Add these stakeholders as Visitors to this board team: they will always have a real-time view of what’s going on, but they won’t be able to move any cards or make any changes (in other words, mess up with your careful workflow!) and you won’t have to keep giving status reports. That’s a double-win.
Oh, and Visitors are always free. So let’s call that a triple-win.
Understand the Workflow
In a Kerika board, every column represents a particular stage in a workflow, and every card represents a specific task (e.g. a video that needs to be produced).
Start at the top-left:
Open the first card in the first column
Read the instructions inside
Check out any resources that are attached to the card
Take action.
Some tasks are best handled by you, and others should clearly be handed off to coworkers.
Update the cards as work gets done
A card can be assigned to one or more people, and this can change throughout the course of the project: something is initially assigned to you and then gets handed off to someone else.
As cards get worked upon, update the status of each card: start with READY, then IN PROGRESS, and so on. This makes it easy for everyone to always have a clear idea of where things stand.
Set due dates. This will help you make sure nothing slips.
Use Kerika’s chat instead of email: this will keep your communications quick and focused.
Move cards along the columns as the work progresses.
Get to Done
The team’s goal is to get all your cards all the way over to Done, on the right end of the board.
Sometimes things that were initiated need to be discarded: maybe something turns out to be a bad idea? In that case, the card should be moved to the Trash column. (If you change your mind later, you can always retrieve items from the Trash.)
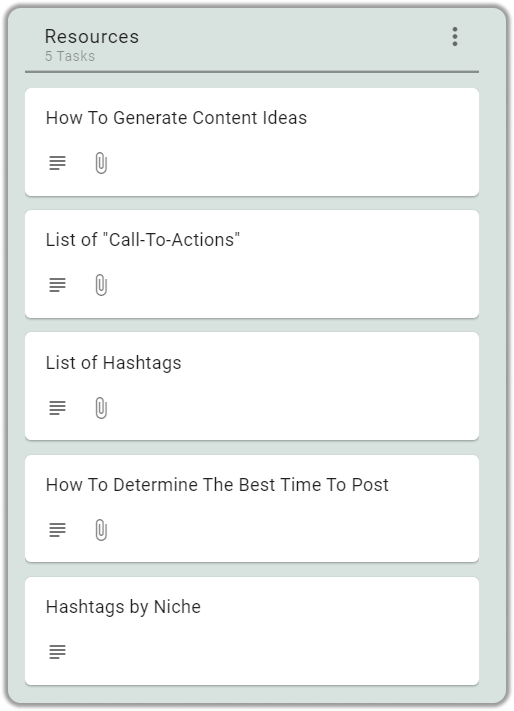
Start with Resources
The Resources column, which is the leftmost column in this template, contains five cards:
Resources
How To Generate Content Ideas: If you’re struggling to create interesting and compelling content, this card has some useful tips and insights to help you overcome this challenge.You will also find articles and videos about how to make a good post and learn how to create engaging content that captures the attention of your audience.
List of “Call-To-Actions: CTAs, or calls to action, are important in social media posts because they help guide your audience towards taking a specific action, such as signing up for a newsletter, visiting a website, or making a purchase.In this card, you can find useful articles, videos, and some great examples of CTAs that will help you get started!
List of Hashtags: Hashtags are a great way to help your audience find your posts on social media. They are also used to create a community around a topic or event.In this card, you will find useful articles, and videos, that will help you find relevant hashtags! You can also use this card to list down your hashtags for later use.
Hashtags by Niche: To help you get started with hashtags, we have listed some of the most useful hashtags in this card. Please feel free to use relevant hashtags in your social media posts and increase the chances of your posts being seen by your audience.
Generate Content Ideas
The Content Ideas column, the second in this template, contains five cards:
Content Ideas
Your Content Ideas: Coming up with content ideas is a time-consuming process. That is why it is important to list down whenever you come across a good content idea.In this card, you can list all of your content ideas. And when it’s time to create content, you can simply open this card and pick the idea you like.
This will help you avoid feeling stressed out about trying to come up with something to create on the spot.
Approved Content Ideas: Sometimes, before you can share something online, you need to make sure it’s okay with your boss or the copyright team to make sure everything is legal.
In that case, you can list your approved ideas in this separate card.
Tips for post: It’s important to know what kind of post to create because different types of posts can have different effects on your audience. For example, a lead magnet post will attract more new visitors and customers.
This card will help you identify the type of content that will be most beneficial to your business.
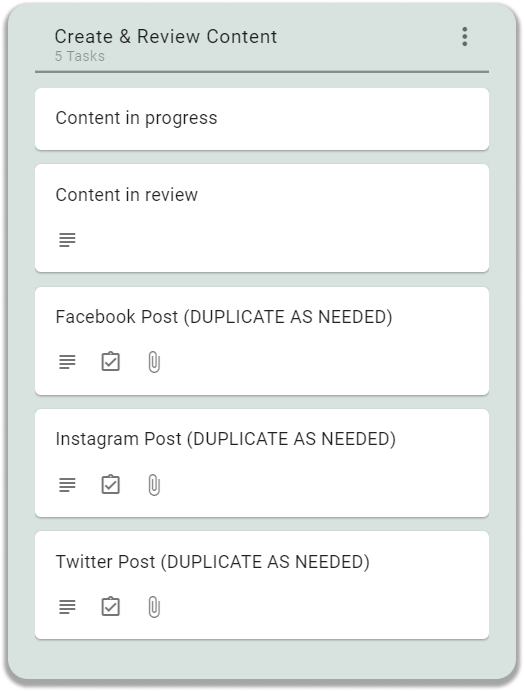
Create & Review Content
The Create & Review Content column, which is the third column in this template, contains eight cards:
Create & Review Content
Social Media Guidelines, Policies, and Community Standards card: When you use social media platforms to promote your business, it’s important to follow their rules, also known as “community guidelines.”
You have to follow these community guidelines to avoid getting into trouble or getting banned from their platforms.This card has some main key points and useful links for you to keep in mind while posting on social media platforms.
Why is it important to review content?: It’s important to review your content before publishing it on social media for the quality and integrity of your social media presence.In this card, you will learn the importance of reviewing your content to help you be careful while publishing your content.
Facebook Post Template, Instagram Post Template, and Twitter Post Template cards: These three cards offer very useful templates to create posts for their respective social media platforms. These templates are useful for social media posts for several reasons. They can save time, provide inspiration, overcome creative blocks, maintain a consistent brand image, and create professional-looking posts.
(Example) Facebook Post For Christmas, (Example) Instagram Post for Black Friday, and (Example) Twitter Post for Father’s Day card: These cards are great examples of how you can create social media posts using each template. Open these cards to see how we’re using these templates to create social media posts for Christmas, Black Friday, and Father’s Day.
Schedule for Publication
The ‘Schedule for Publication’ Content column, which is the fourth column in this template, contains two cards:
Schedule for Publication
How To Determine The Best Time To Post card: When you share things on social media, you want as many people as possible to see them. One way to make sure more people see your posts is to share them when lots of people are online and using social media.
In this card, you will find an article and a video that can help to decide which time is for you to schedule and post your content.
List of holidays and upcoming important events card: Holidays and events can provide a great opportunity to connect with your audience and create a sense of community. By creating posts that relate to these events, you can show that you are in tune with their interests and values.
You can refer to this card whenever you are wondering when the next important public holiday or event is.
This card will make sure you don’t miss them.
Like what you just read?
Here’s the template: just one click, one the USE TEMPLATE button, will set you up with a new Kerika account and your first board, in just seconds.
You can try everything free, with your entire team, for 30 days.
A product launch is a critical moment for any company. It is the moment when a new product is introduced to the market and becomes available for purchase. A successful product launch can drive sales, create buzz, and generate excitement for a company and its products.
But before you launch your product, there’s a lot of preparation that needs to happen. Here’s a quick guide to launching your product successfully.
Click to view this Template
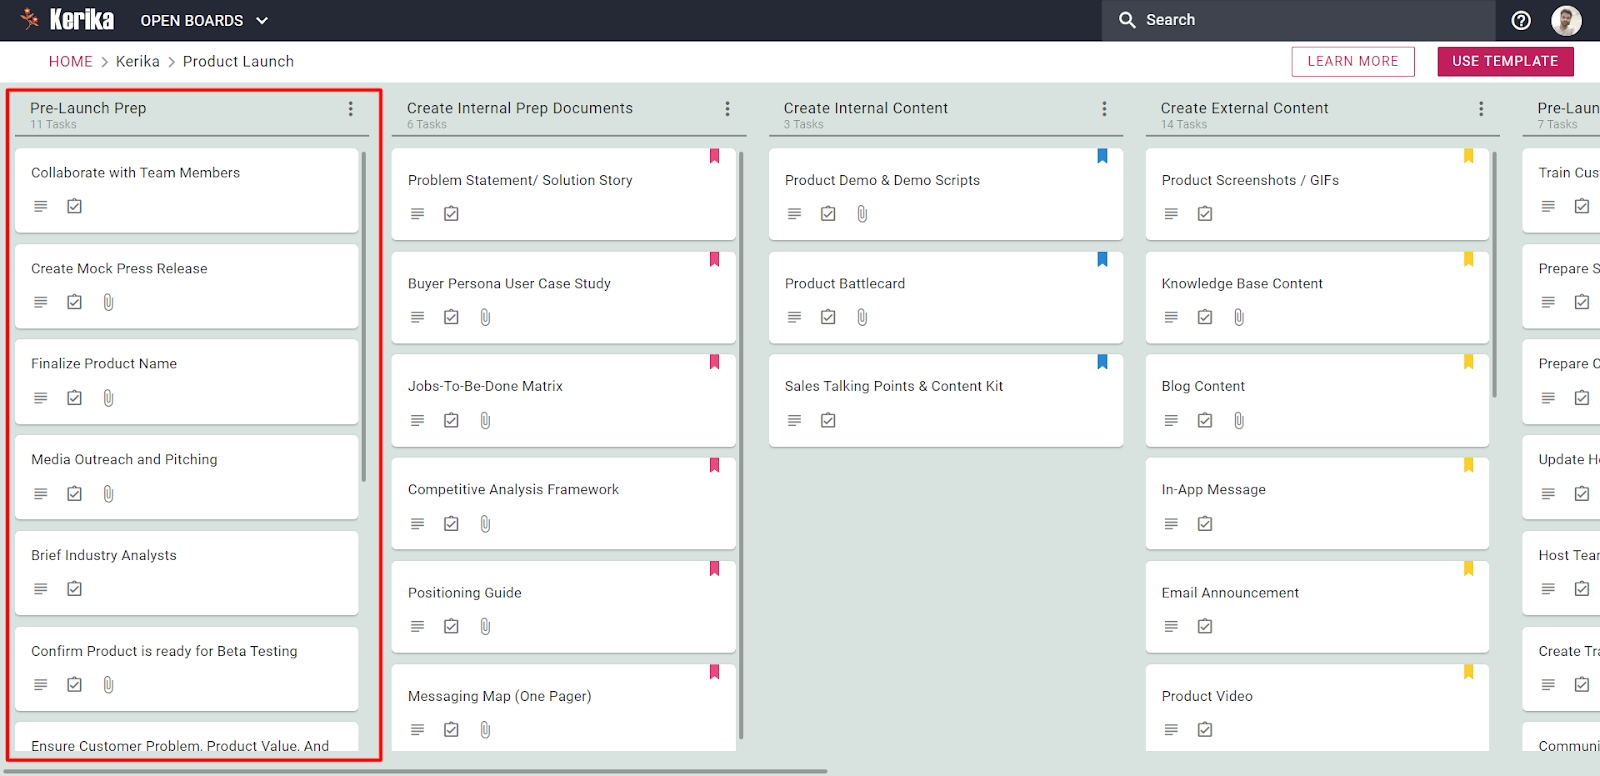
Pre-launch preparation.
As you prepare for your product launch, there are a few key things to keep in mind. First, you need to make sure that your product is ready for launch.
This could include collaborating with team members, creating a mock for a press release, finalizing the product name, planning media outreach and pitching, briefing experts and analysts, and more.
Check out the pre-launch preparation of this company.
Pre-launch Prep
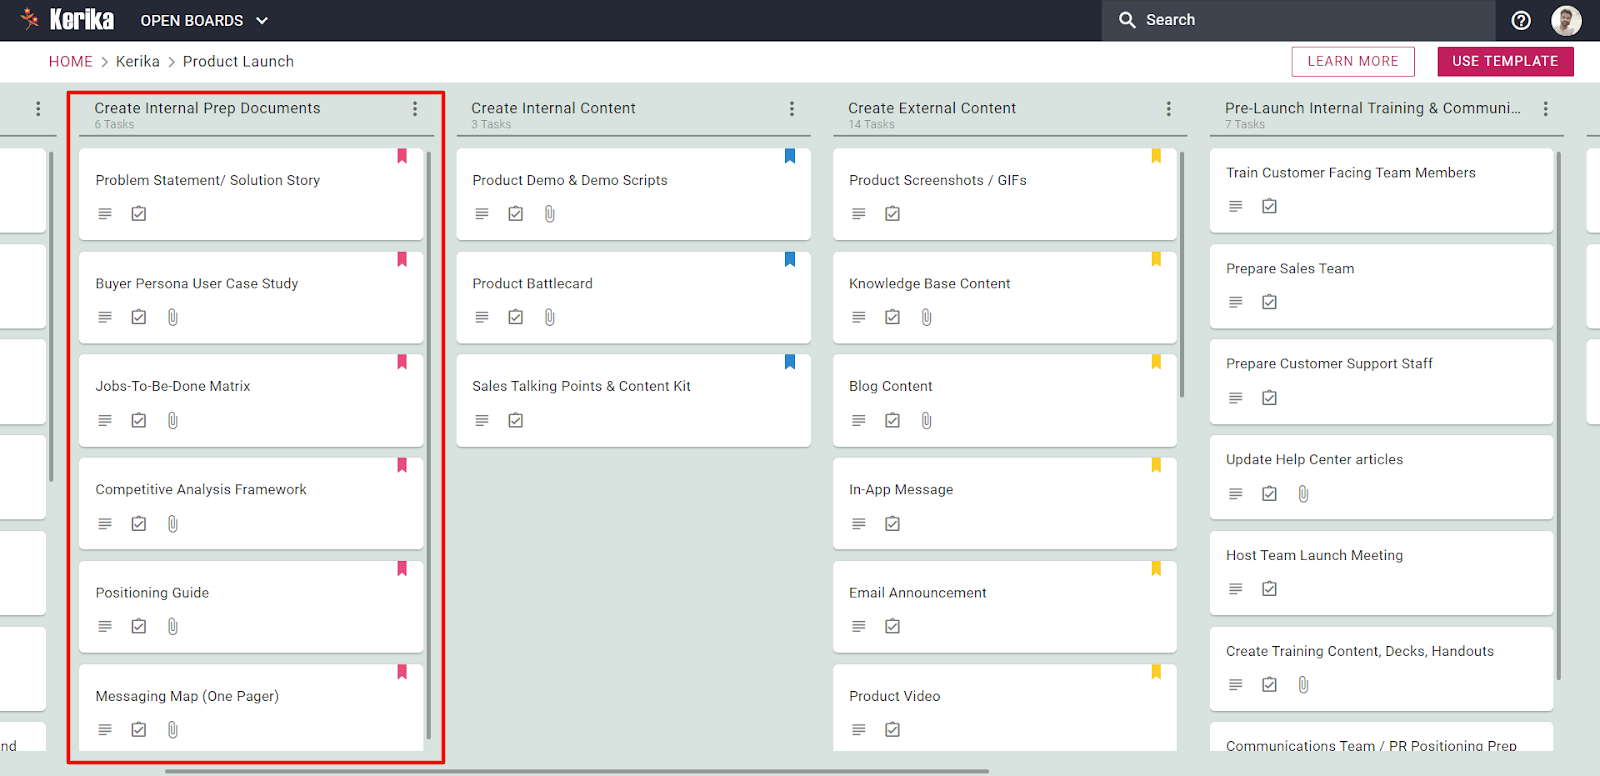
Internal preparation documents:
Before launch day, you have to create an Internal preparation document that outlines everything that needs to be done.
It will help you stay organized and on track on the launch day. This prep document could be about what problems your product solves, building a buyer persona, and creating a growth strategy framework.
Internal Prep Documents
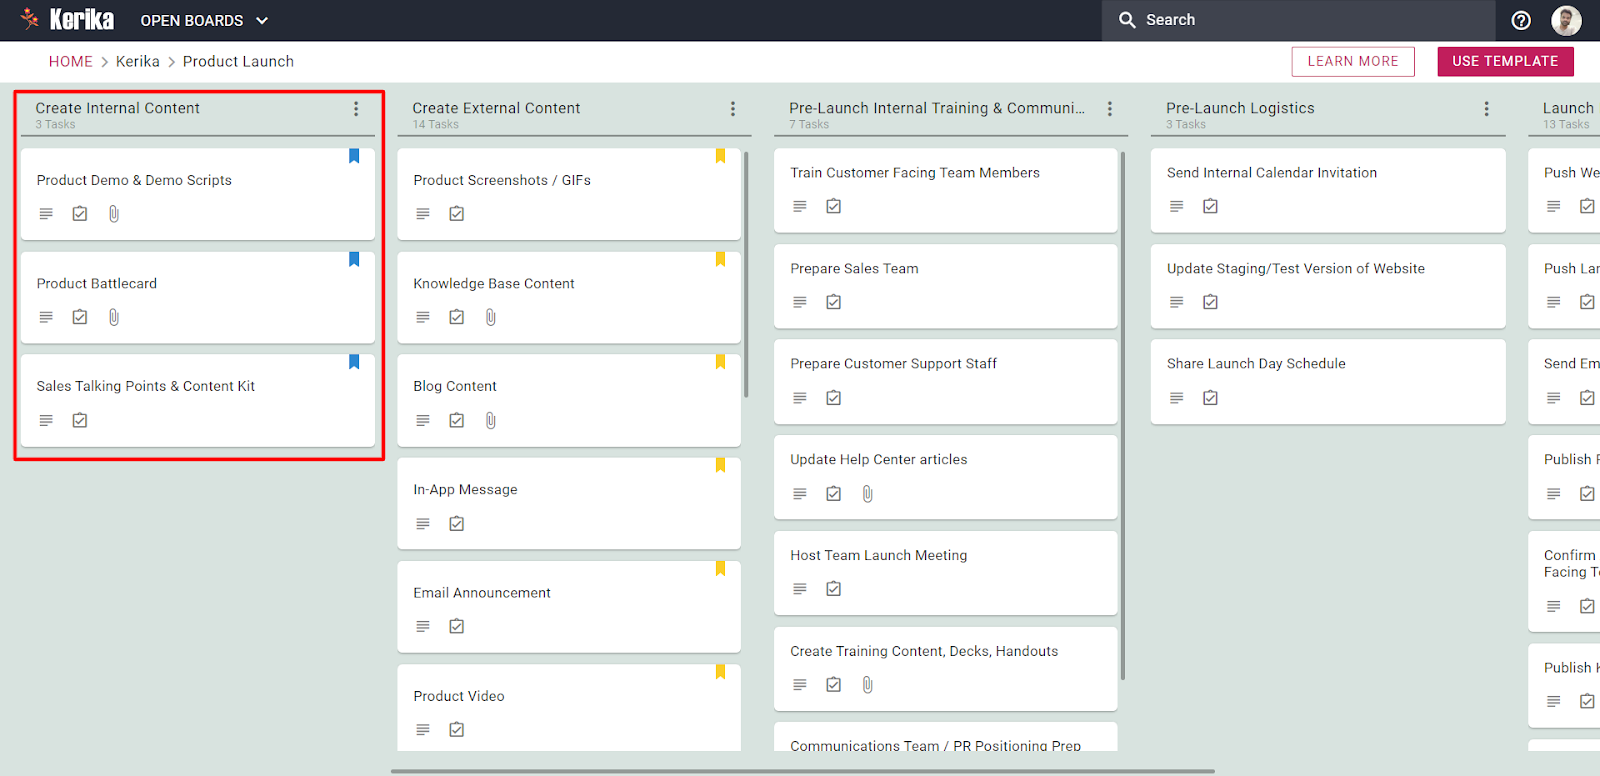
Create internal content.
This could include creating scripts for product demos, product battle cards, and creating content for talking points. This will ensure that your team is prepared for the lunch and ready to answer any questions that come up about the product.
Create Internal Content
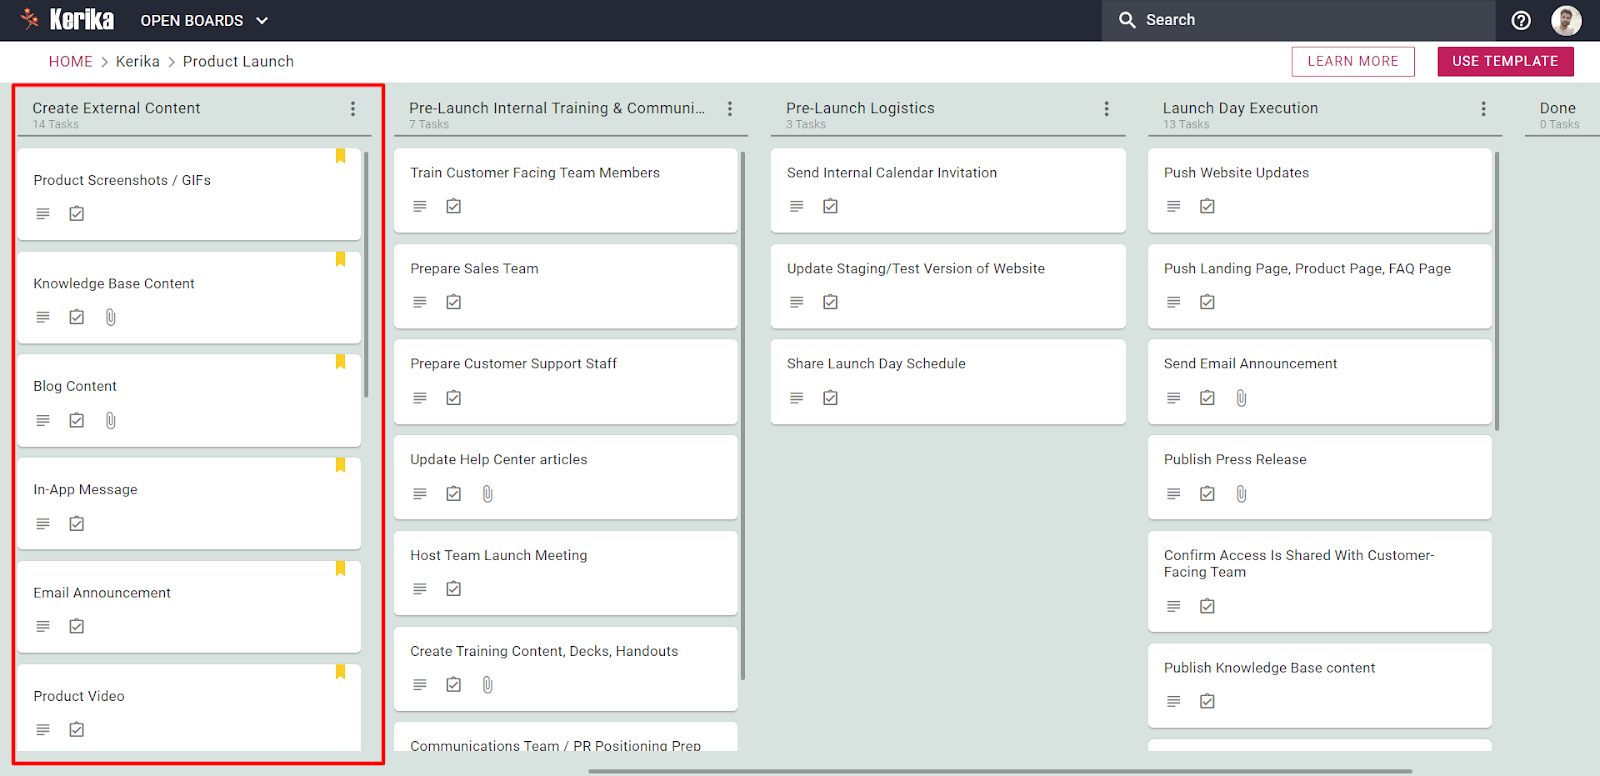
Create external content
This is the content that will be used to promote your product, like product images and videos, content for the knowledge base, blog content, in-app messages, email announcements, landing page, etc.
Create External Content
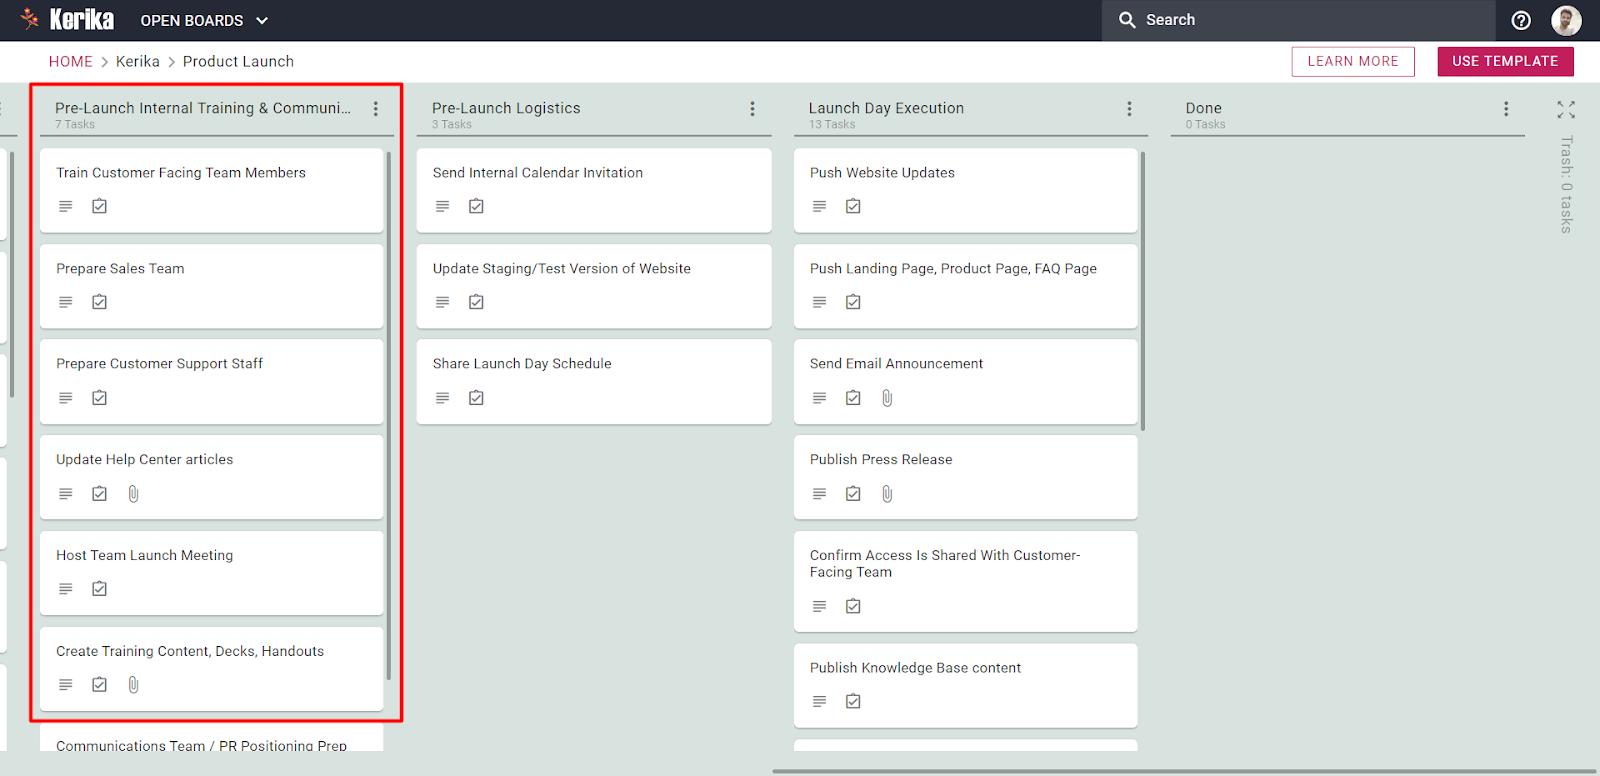
Pre-launch internal & communication
Make sure everyone on your team knows about the product launch and what their role is. This will help prevent any confusion on launch day. This could include preparing the sales team, customer support team, content training, and PR team.
Pre-Launch Internal Training
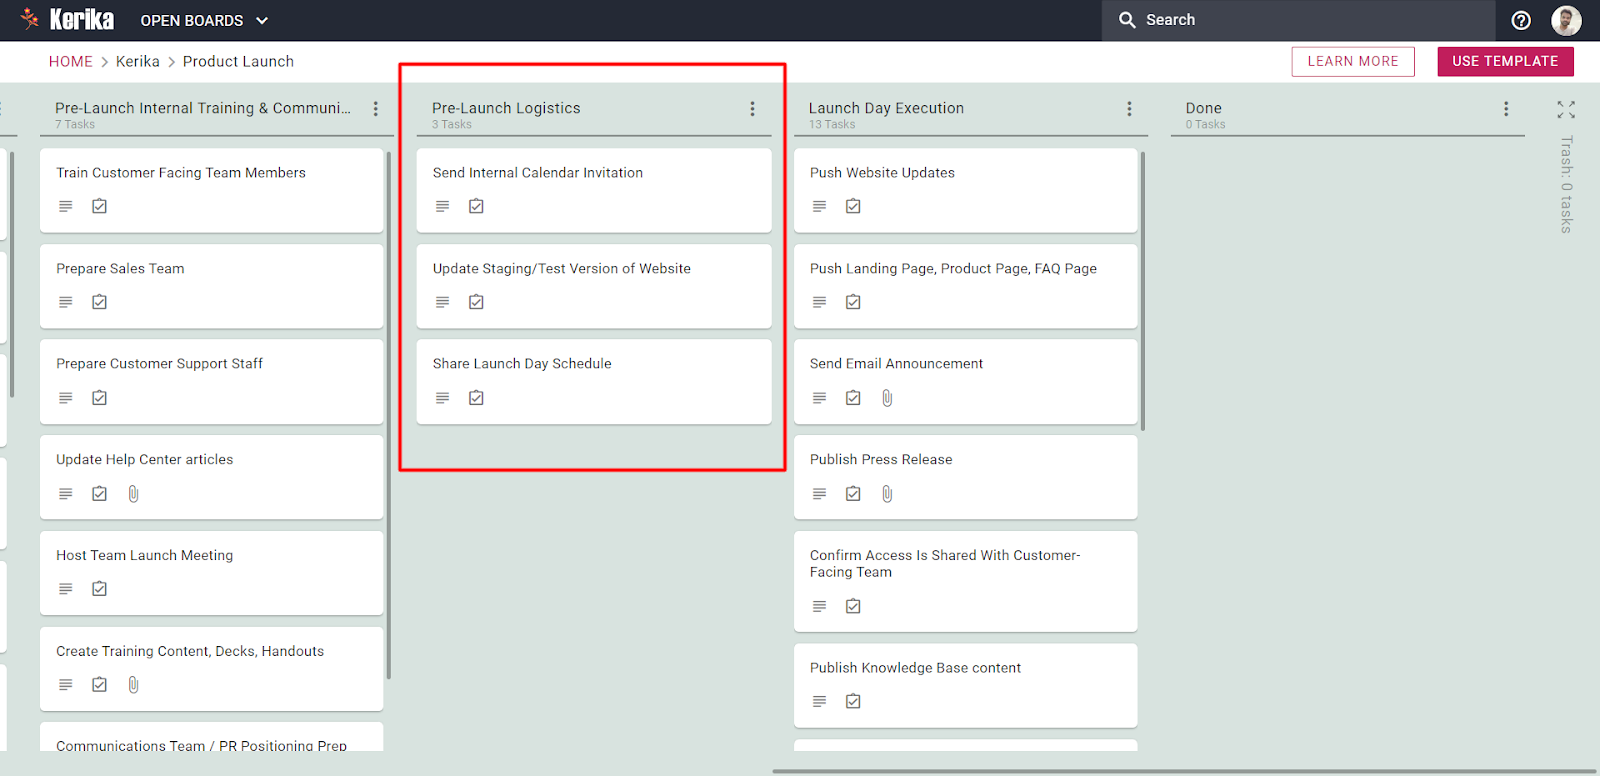
Pre-launch logistics.
This includes things like sending internal calendar invitations, updating staging/test versions, and sharing the launch day schedule. Basically, everything needs to be done to make sure the launch goes smoothly.
Pre-launch Logistics
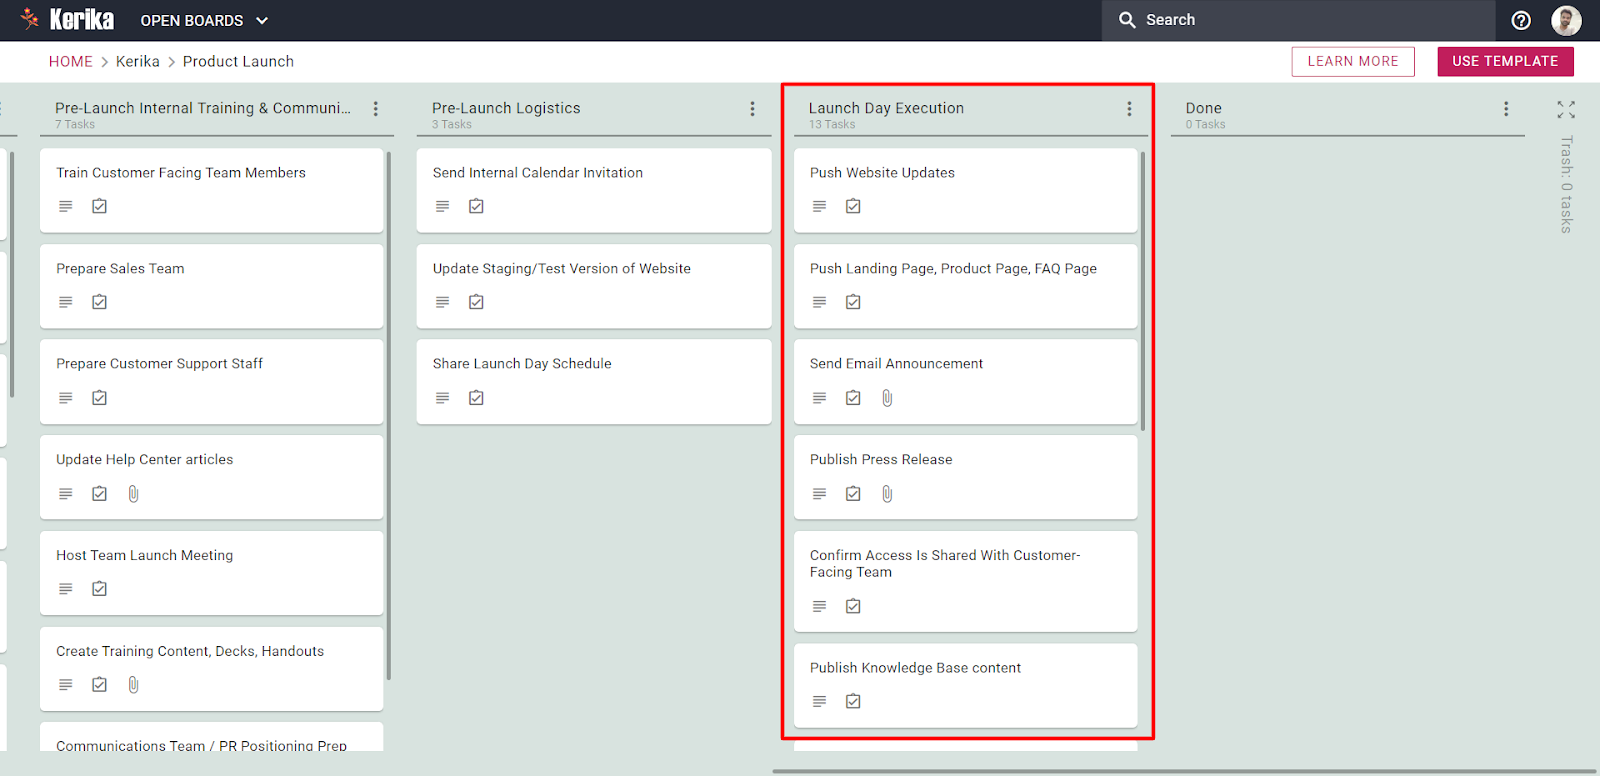
Launch day execution.
On launch day, make sure everything is ready to go. Do a final check of all your content, make sure your team is prepared, and then go live!
This includes pushing website updates, making landing pages, product pages and FAQ pages live, sending email announcements, pushing press releases, publishing a knowledge base, etc.
If you’re a business owner or a freelance content writer, it’s important to have a content strategy. Without a solid content strategy, you end up wasting a lot of time managing your content.
By having a solid plan and sticking to it, you won’t have to spend time coming up with new ideas or scrambling to meet deadlines. One of the best ways to build a content strategy is to use a content planner.
Whether you’re working alone or with a team, a good content planner can really boost your productivity. So, let’s see how this company uses a content planner to plan and publish its SEO content.
Click to view this live Template
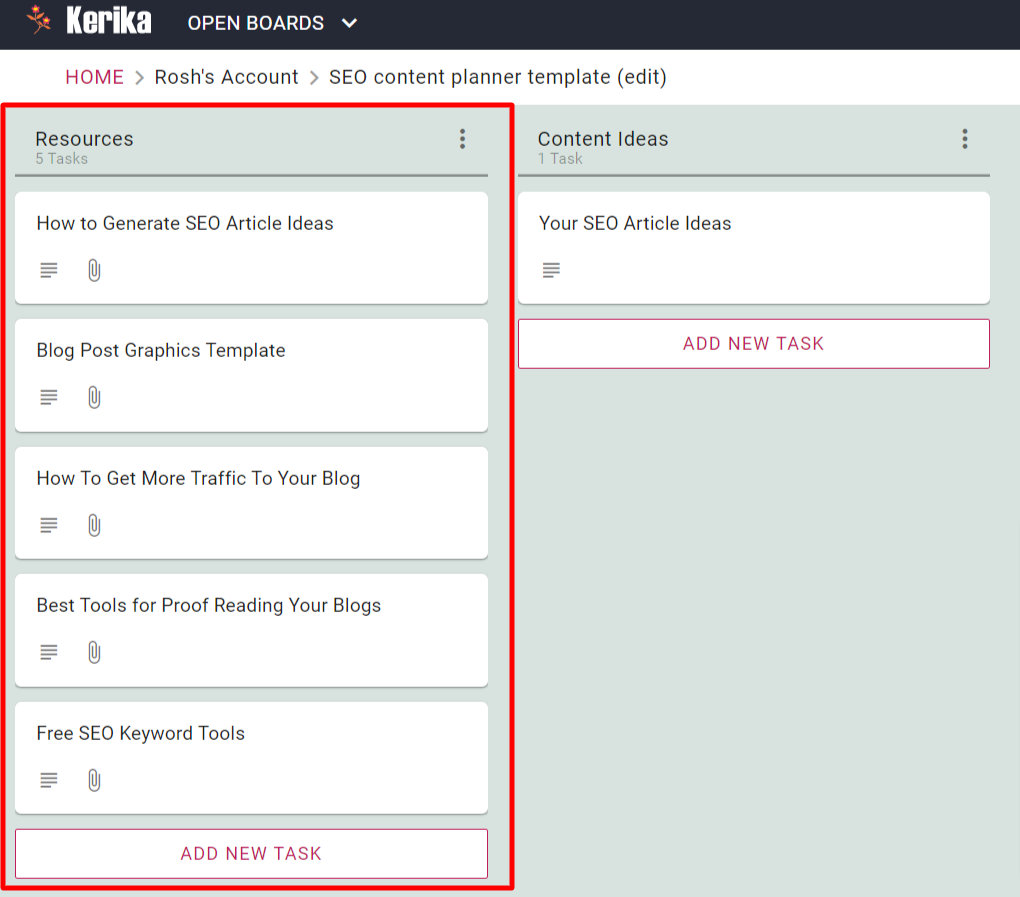
1. Gathering resources
If you’re a serious content writer, then you already know the importance of gathering resources before you start writing. After all, you need to have something to write about!
One of the best ways to manage your gathered resources is to use a content planner. A content planner can help you organize your thoughts and ideas, and it can also help you find new and relevant information to write about.
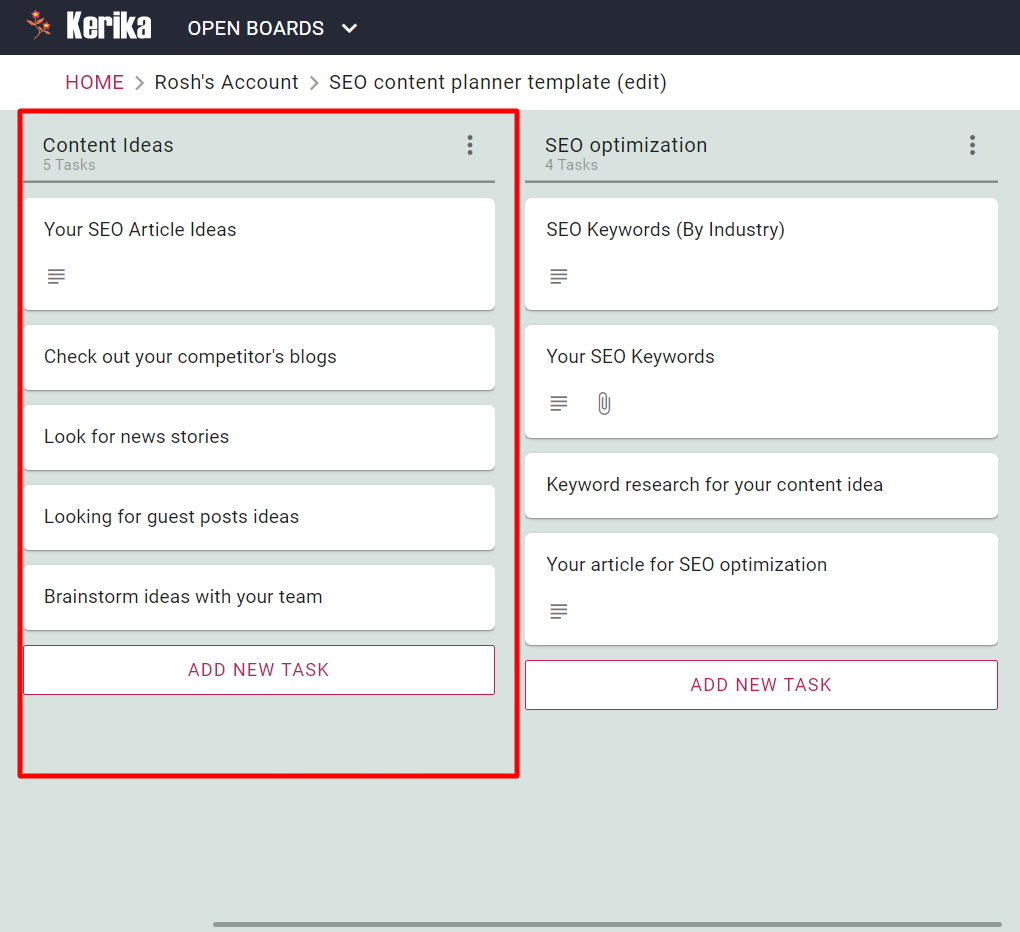
2. Research Content Ideas
Before you start writing, you need to have an idea of what you want to write about. Make a list of content ideas that you think would be popular with your audience.
You can get content ideas by checking out your competitors, looking for news stories, looking for guest post ideas, and brainstorming ideas with your team.
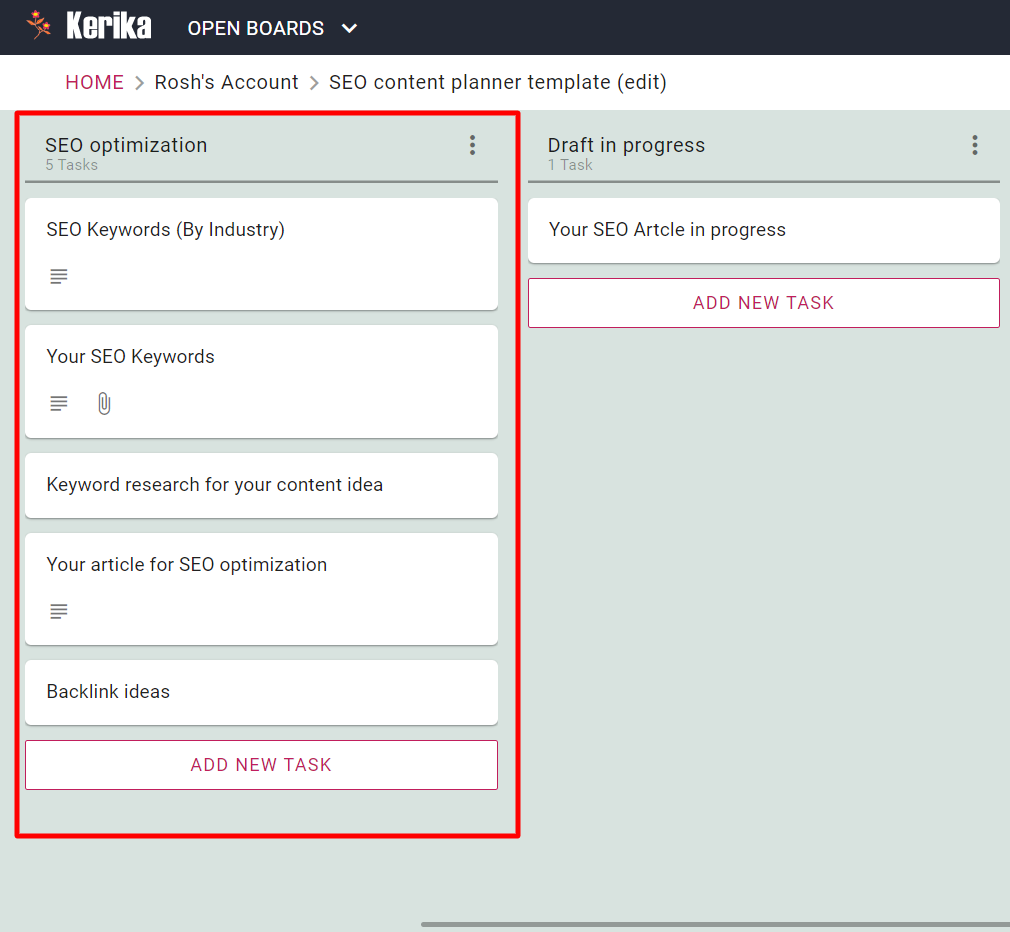
3. SEO optimization
Without SEO-optimized content, your articles and blog posts will never be seen by search engines, and you will never get the traffic you desire. Therefore, you need a solid SEO strategy.
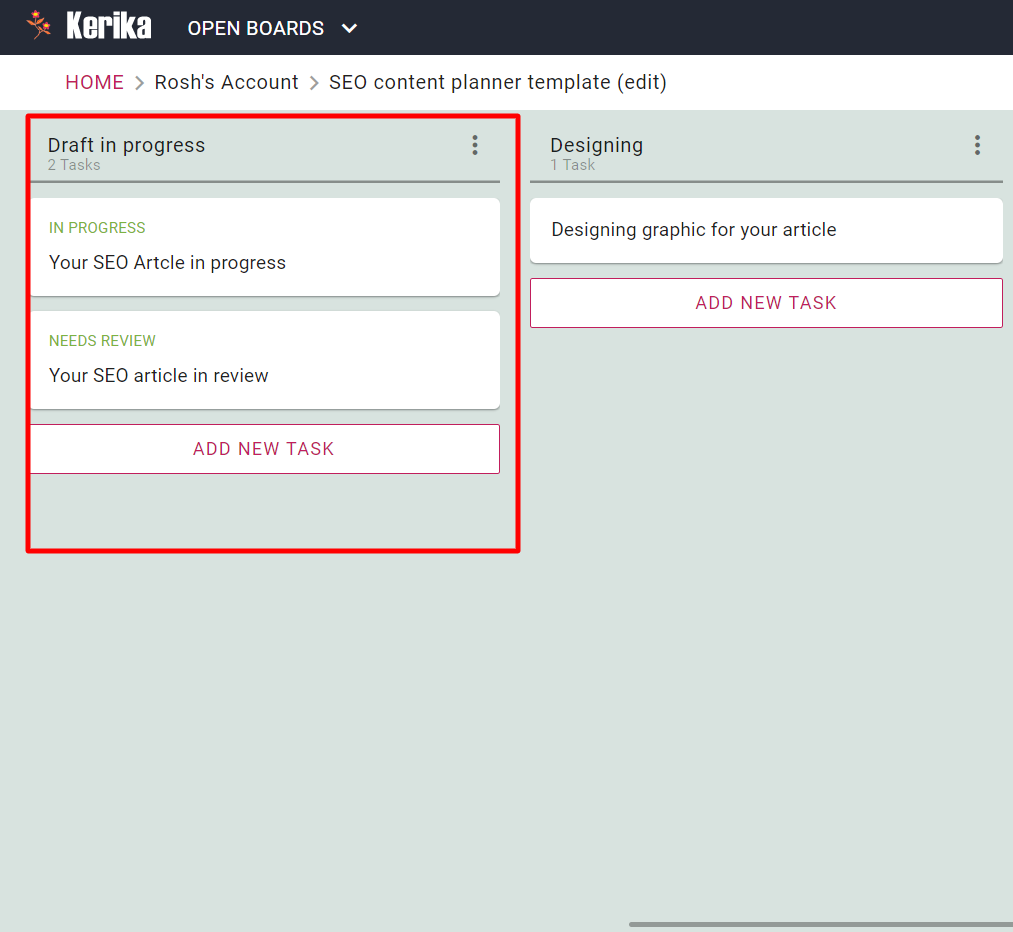
4. Drafting
Now it’s time to start writing your content. Keep your keywords in mind as you write and try to include them naturally in your text.
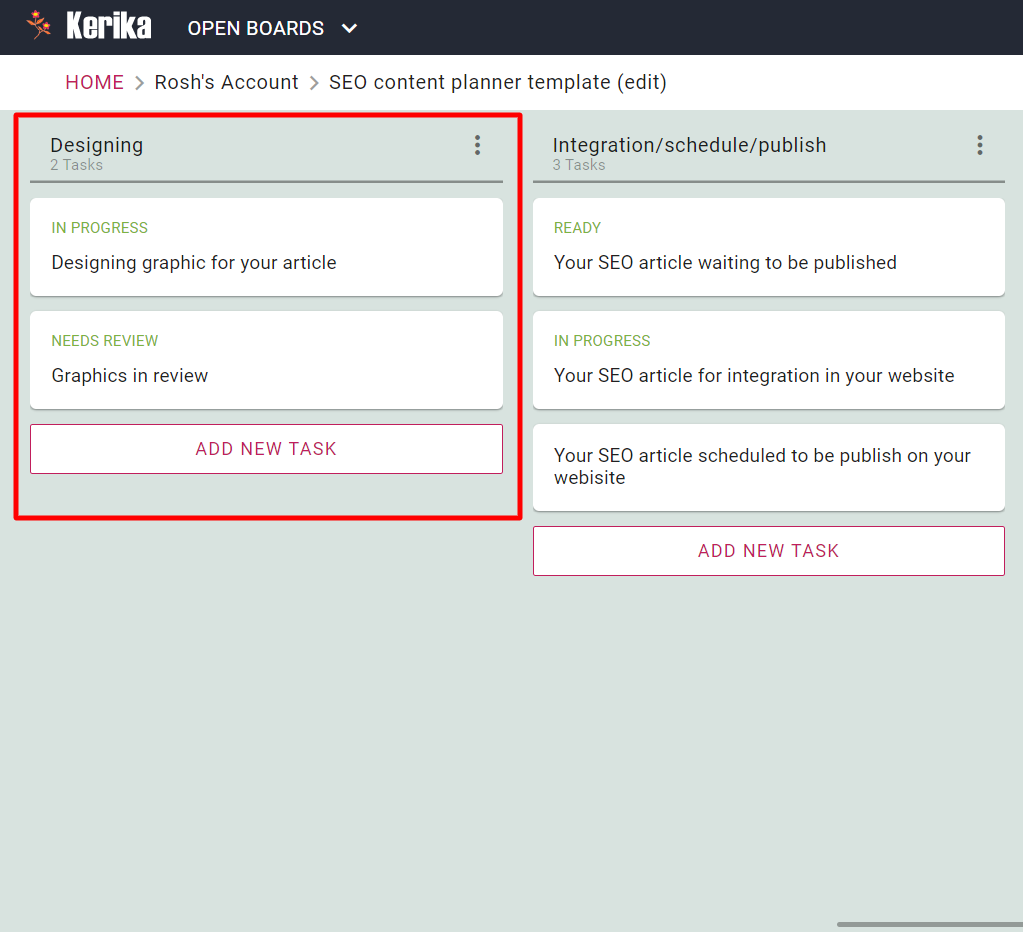
5. Designing graphics content
Graphics in blogs capture your reader’s attention, communicate your message more clearly, and overall make your blog more visually appealing.
Once the article is ready, the next step is to add graphics to it. Graphics are important to capture your reader’s attention and make your blog more visually appealing.
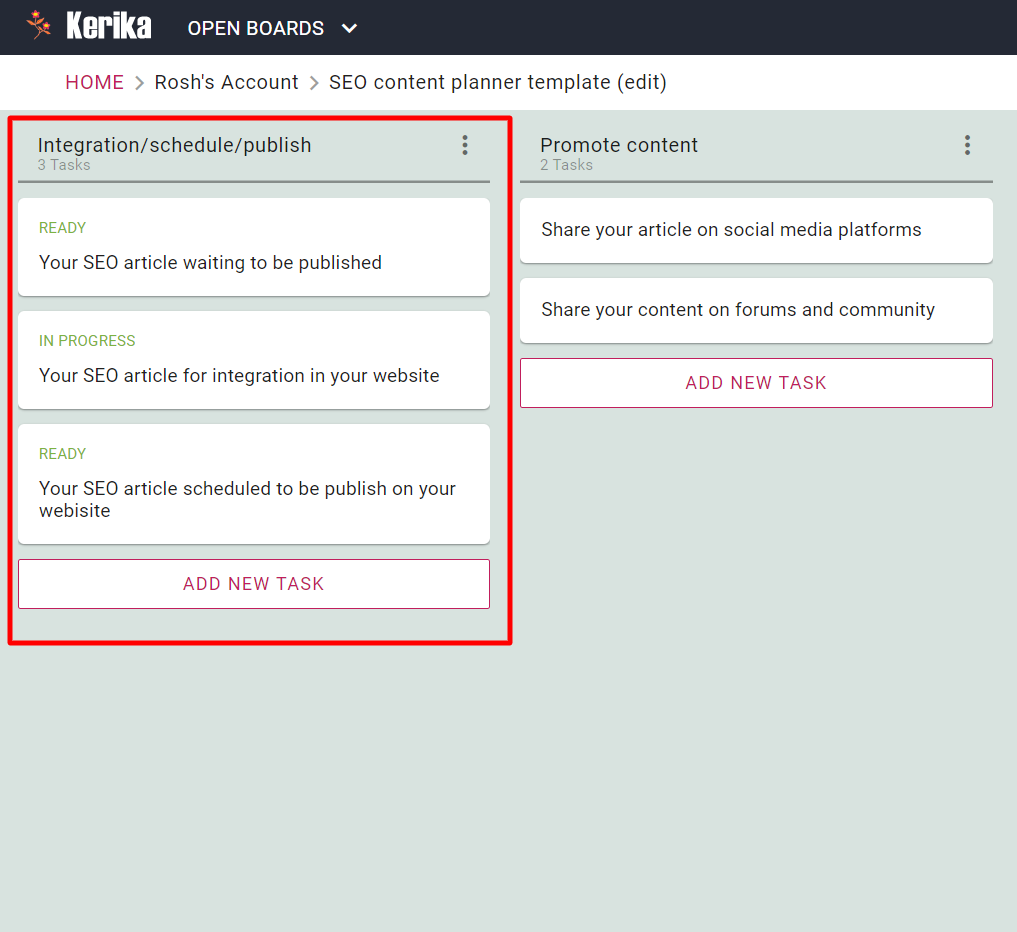
6. Integration/Schedule Content
Once you’re finished writing, you need to integrate your content into your website. You can do this by adding a blog to your website or by scheduling your content to be published on your website later on.
7. Promote Content
Finally, you need to promote your content. You can do this by sharing it on social media, writing guest posts on other blogs, or by paying for advertising.
We have added an exciting new feature: if you were previously using Trello, you can import that data, completely, into Kerika!
We have been testing this as a convenience feature and based upon positive feedback we have expanded this for everyone.
New users will be offered this as an option when they set up their Kerika accounts:
How new Kerika users can import boards from Trello
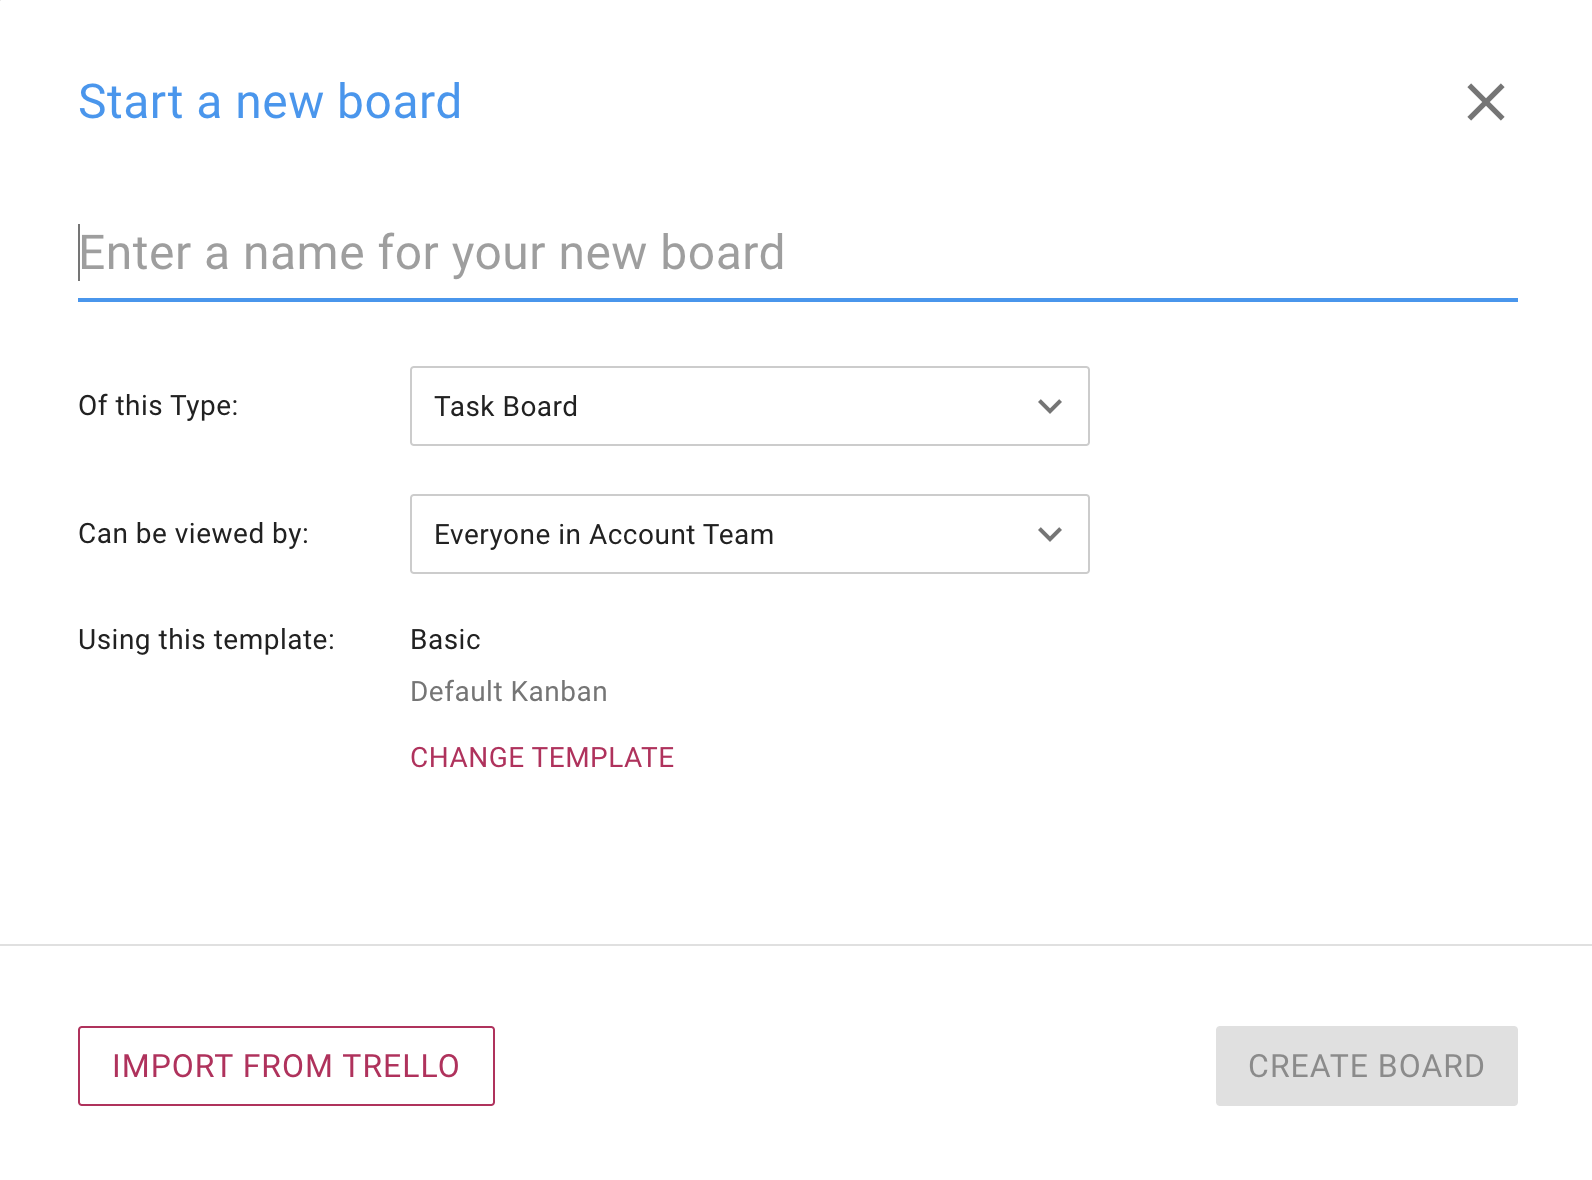
All users will have this option whenever they want to create a new Kerika board:
All users can import from Trello when creating a new Kerika board
We built this feature because we have heard from many people switched over from Trello and really liked Kerika’s user experience, features, and support. In the past they had to manually recreate their work inside Trello; now that’s all automated!
Everything is handled nicely: your Trello cards, lists, people, task details, etc. come over. Once you are done, a single click can then send out invitations to all your old Trello colleagues to join you in Kerika.
We have updated our Privacy Policy because we have decided to use Microsoft Clarity, at least on an experimental basis, to understand better how visitors navigate our website.
Microsoft Clarity uses cookies (see here for more details), and you can reject or block them if you want; it won’t affect your use of the website or the app.
We have a lot of different website pages, but we still need a better understanding of how people actually view them, and which parts seem to be most important to our users.
Google Analytics provides some of that information, but not enough, and it looks like Microsoft Clarity will help us optimize our website content.
Let us know if you have any questions or concerns.
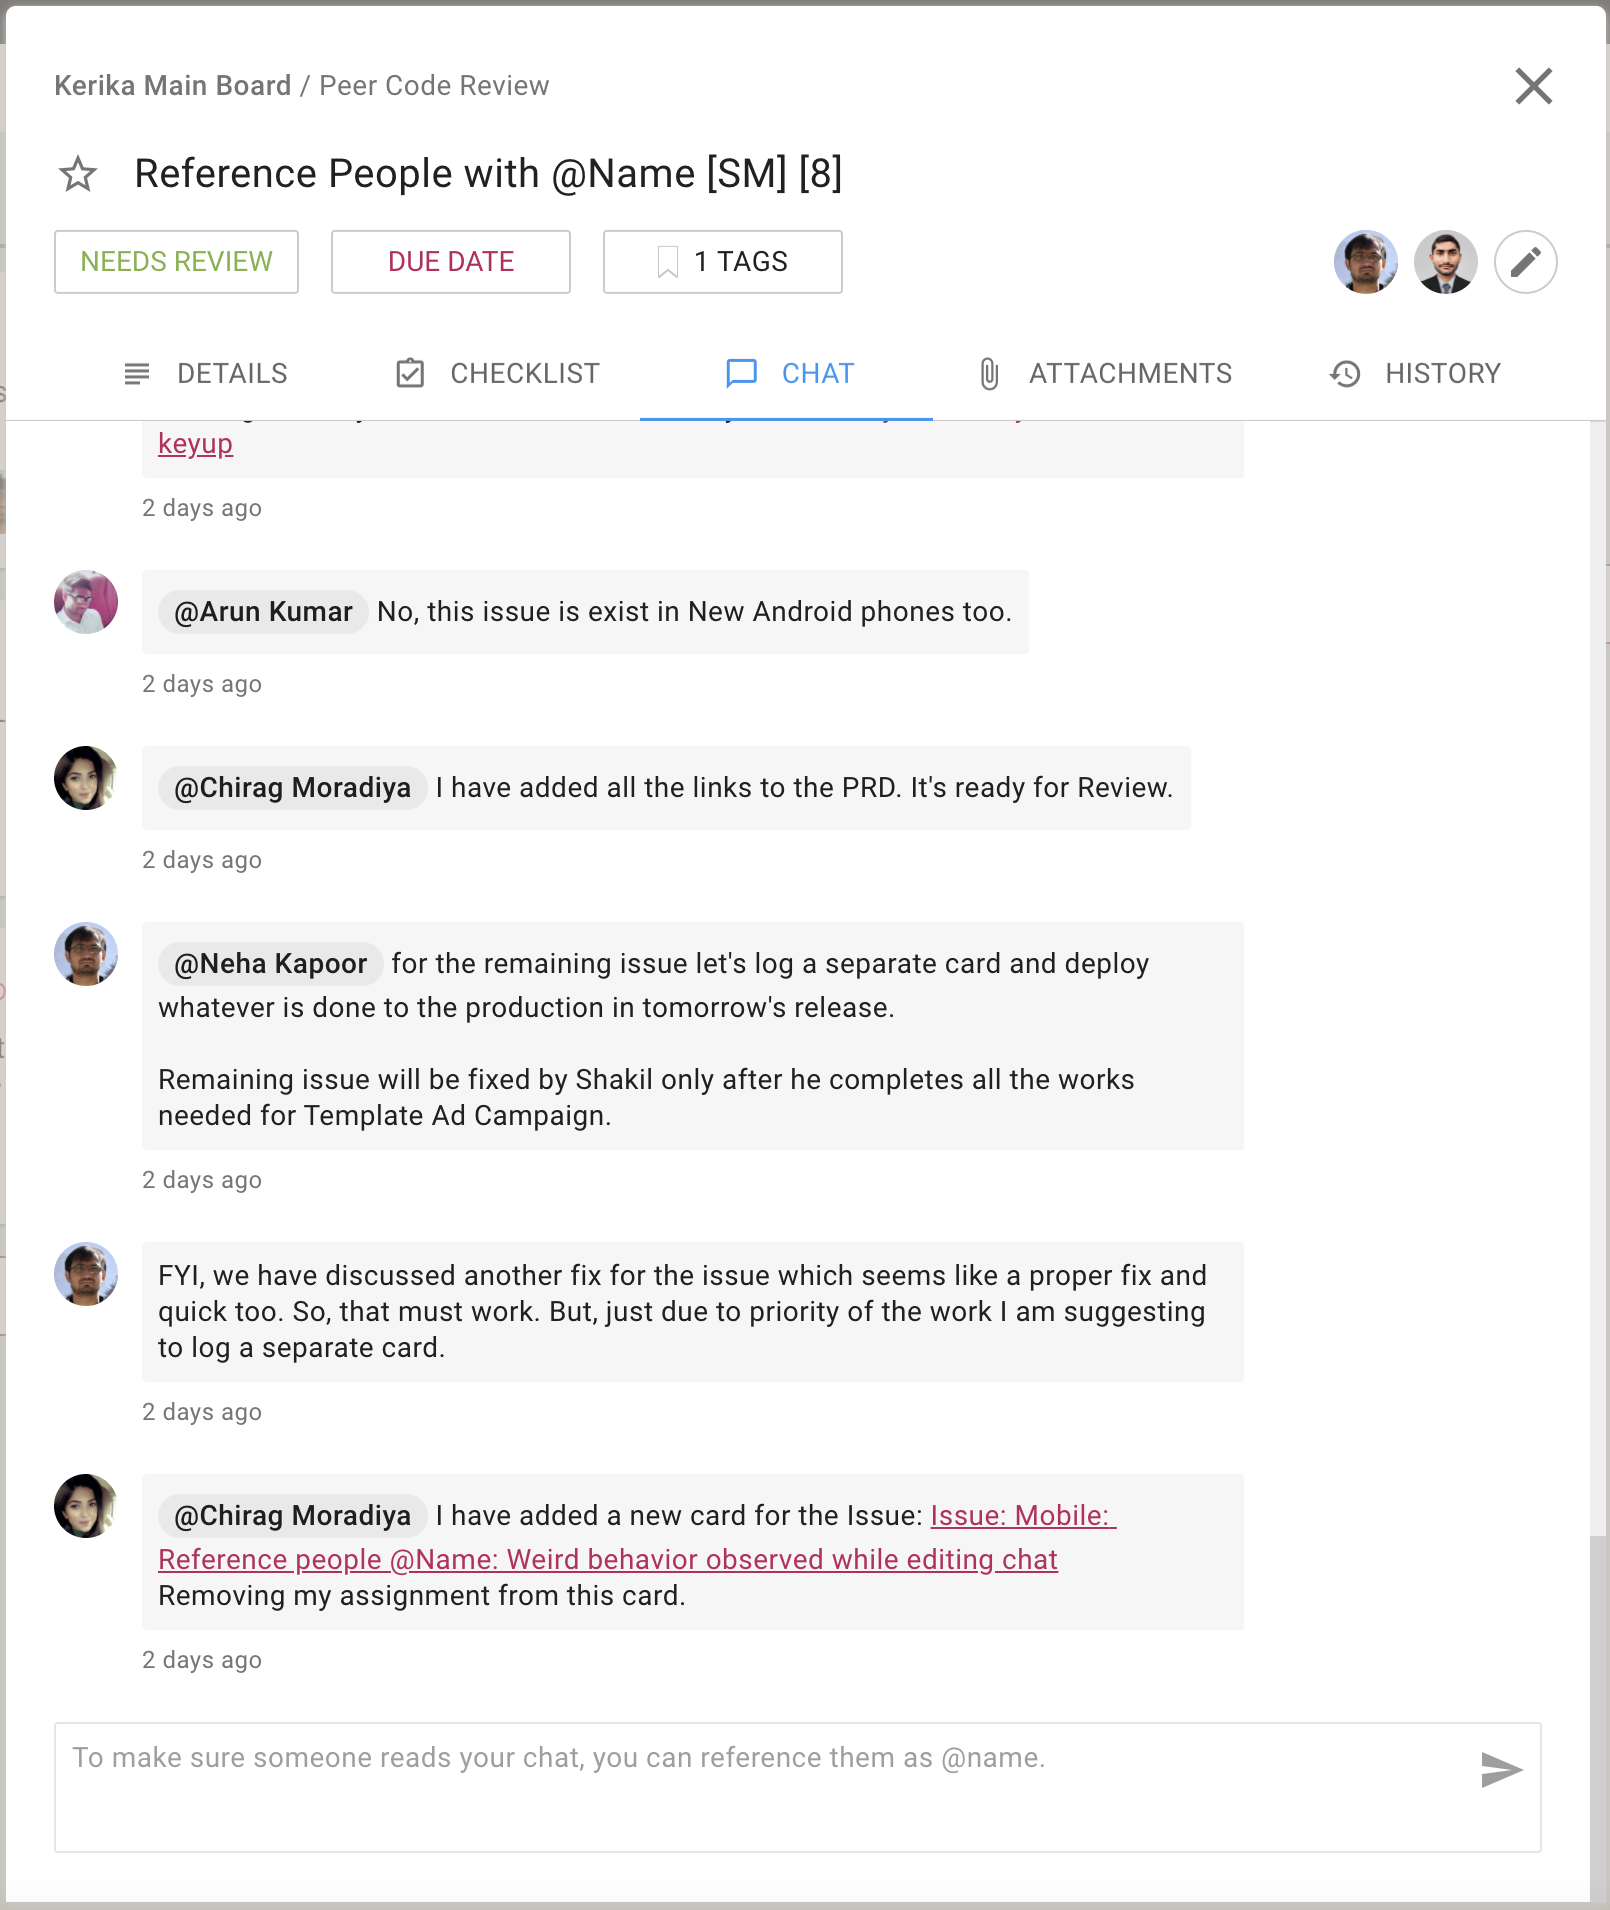
With our latest update we have made it easy for you to ensure that someone on a board team always sees your chat message, even if they are not assigned to that card.
The old rule was that everyone who is currently assigned to a card would get new chat pushed to them as emails. Now, you can make sure someone gets that email notification right away, even if they aren’t assigned to a particular card:
Directed chat
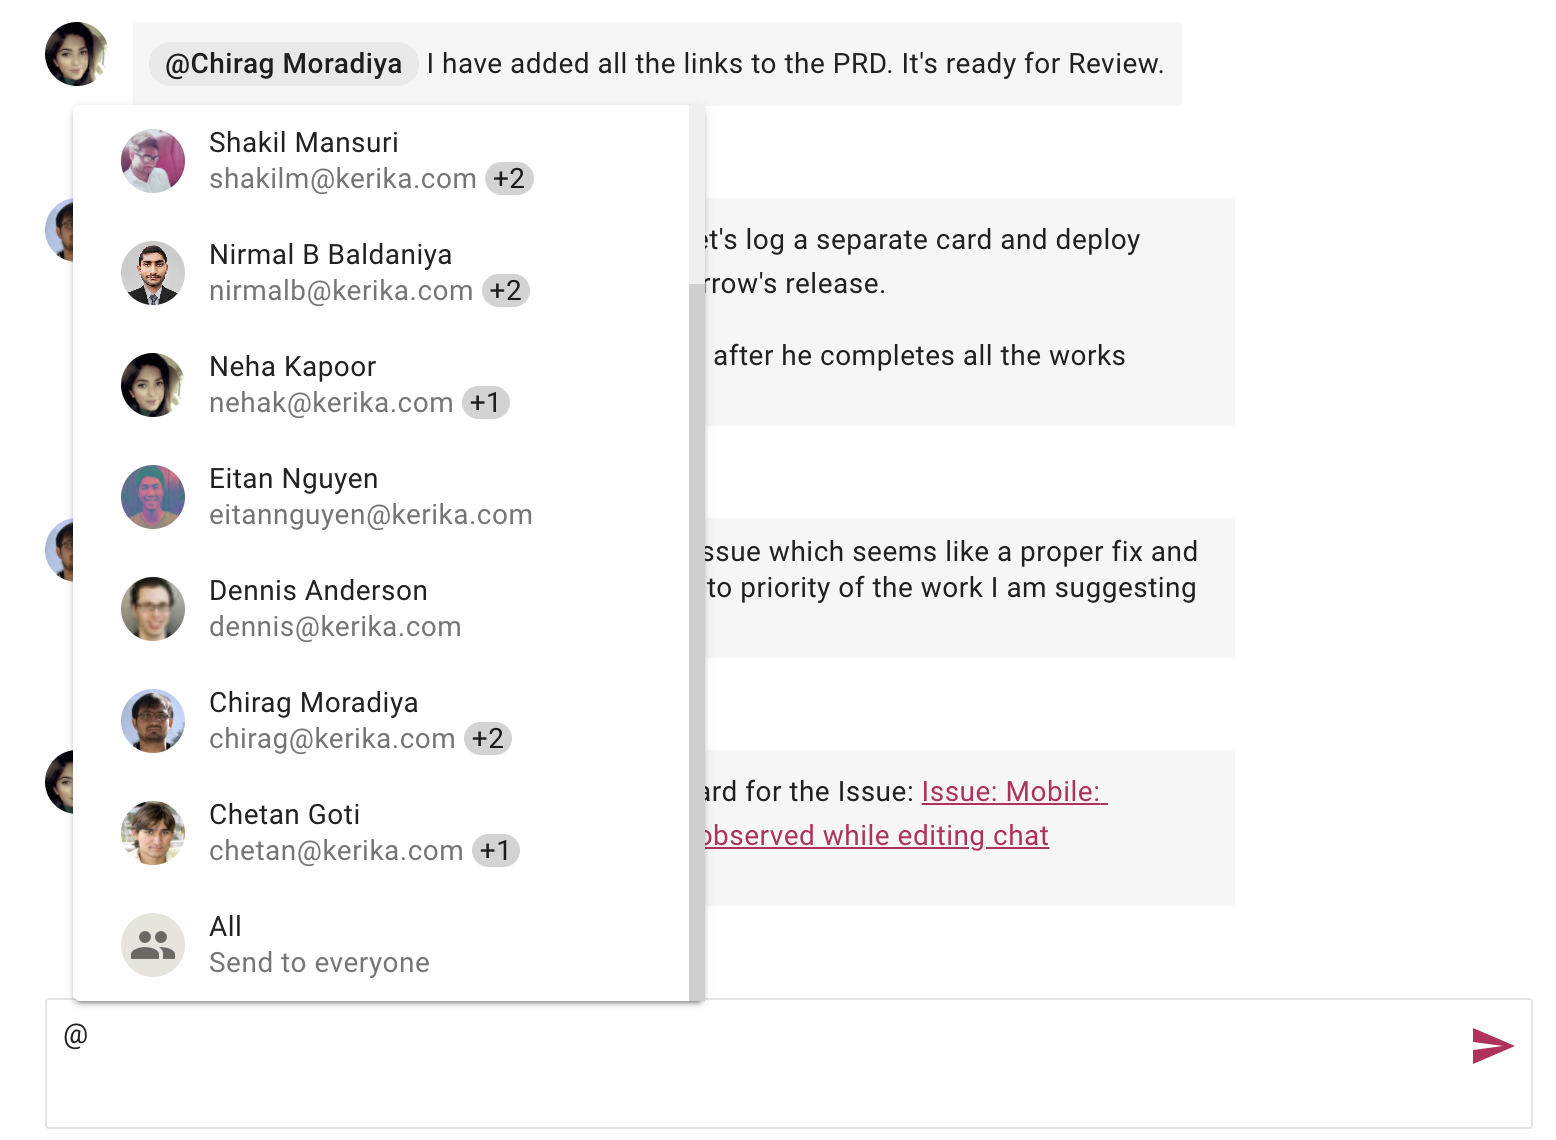
Using this feature is simple: just type the letter “@” anywhere in your chat message and Kerika offers all the matching suggestions:
Sending new chat
“@All” lets you push your chat to every Board Admin and Team Member — something you should do only rarely to avoid annoying people!
Try this feature and let us know if we can improve it.
Here’s a simple template that you can use to plan your work week: for yourself, and the team.
Click to view this template
How to use this template:
As tasks land on your desk through the day, add them as separate items (cards) in the left-most To Do column.
At least once a day make sure everything in the To Do column is sorted by priority, with the most important items on the top of the column.
Every Monday plan out your week by dragging tasks from the To Do column to one of the days of the week (Monday, Tuesday, etc.)
When you plan your week, consider any deadlines for your tasks. Not all tasks will have firm deadlines, but if they do, you should open the task and set a due date.
Click on your face/avatar in the top-right corner of the app and use the Sync Calendar option to make sure your due dates from Kerika also show up in whatever calendar you use: Apple, Microsoft or Google. This needs to be done only once: after you connect your personal calendar with your Kerika account, any changes in due dates that you make in Kerika will automatically show in your calendar as well.
Consider whether this is a personal calendar or a team calendar: if you want to plan out the week for an entire team, add them as Team Members to this board by clicking on the Board Team button. This is a great way to keep an entire team in sync.
If you are using this as a team board, when you pick up tasks one by one make sure you set the status of each to In Progress, or whatever is relevant. This makes it easy for everyone on the team to know what’s happening, which is especially important in these days of remote work.
When a task completes, mark it as Done! If you decide that a task doesn’t make sense anymore (maybe it is no longer needed?) you can move it to the Trash.
At the end of the week, hopefully, everything in the Monday through Friday columns will be moved to Done.
At the beginning of the next week, you can repeat the process: pull items from the To Do column into the other columns as you plan your next week.
New tasks will, of course, show in the middle of the week: the best thing to do is add them to the To Do column unless they are urgent; this will help you and your team not get disrupted too often during the middle of the week.
Try this template and see if your workweek gets less hectic.
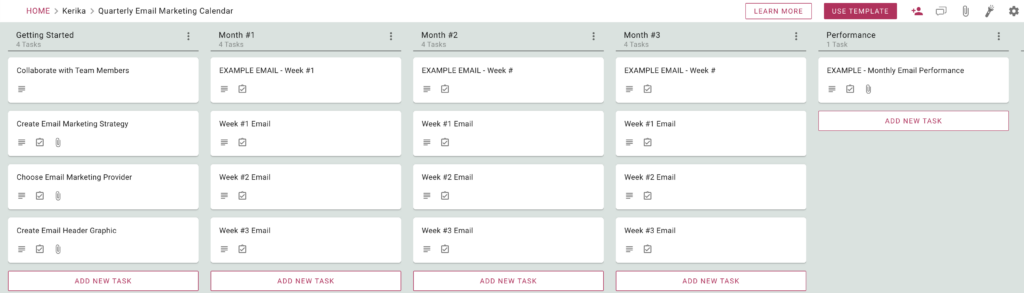
Here’s another new marketing template for our users: a complete Task Board for folks that need to manage an email marketing calendar for their business or nonprofit.
Click to view this template
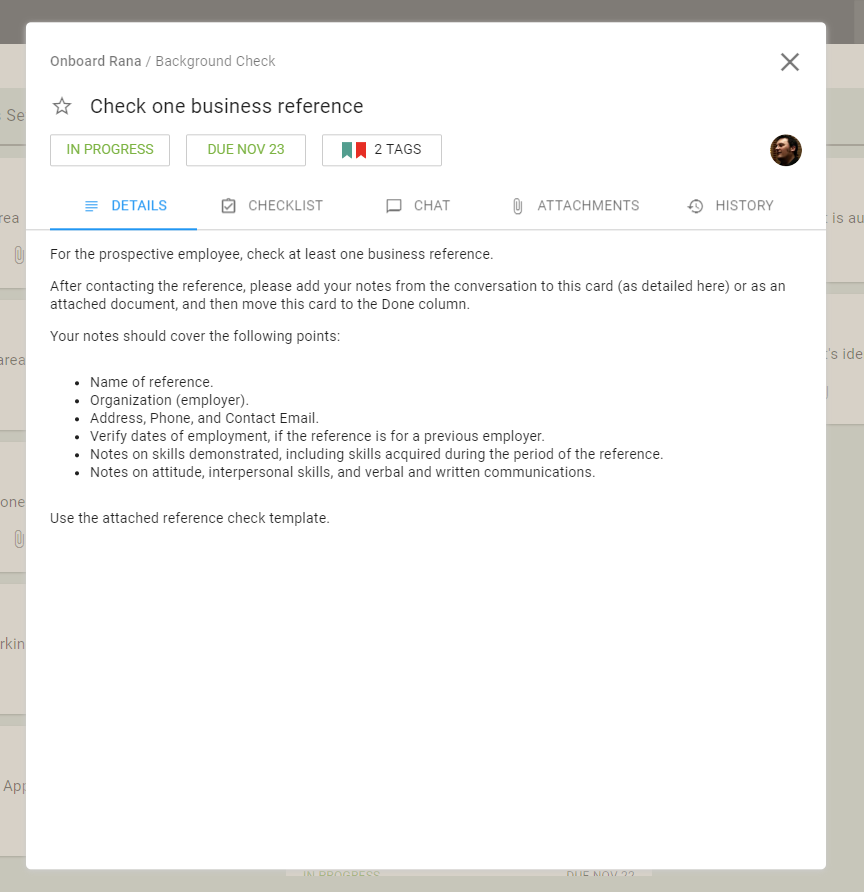
As with all other templates we have been building, this one comes with tasks that are ready to go, with details of the work:
Example Task
Handy checklists of subtasks so you don’t miss anything:
Example Checklist
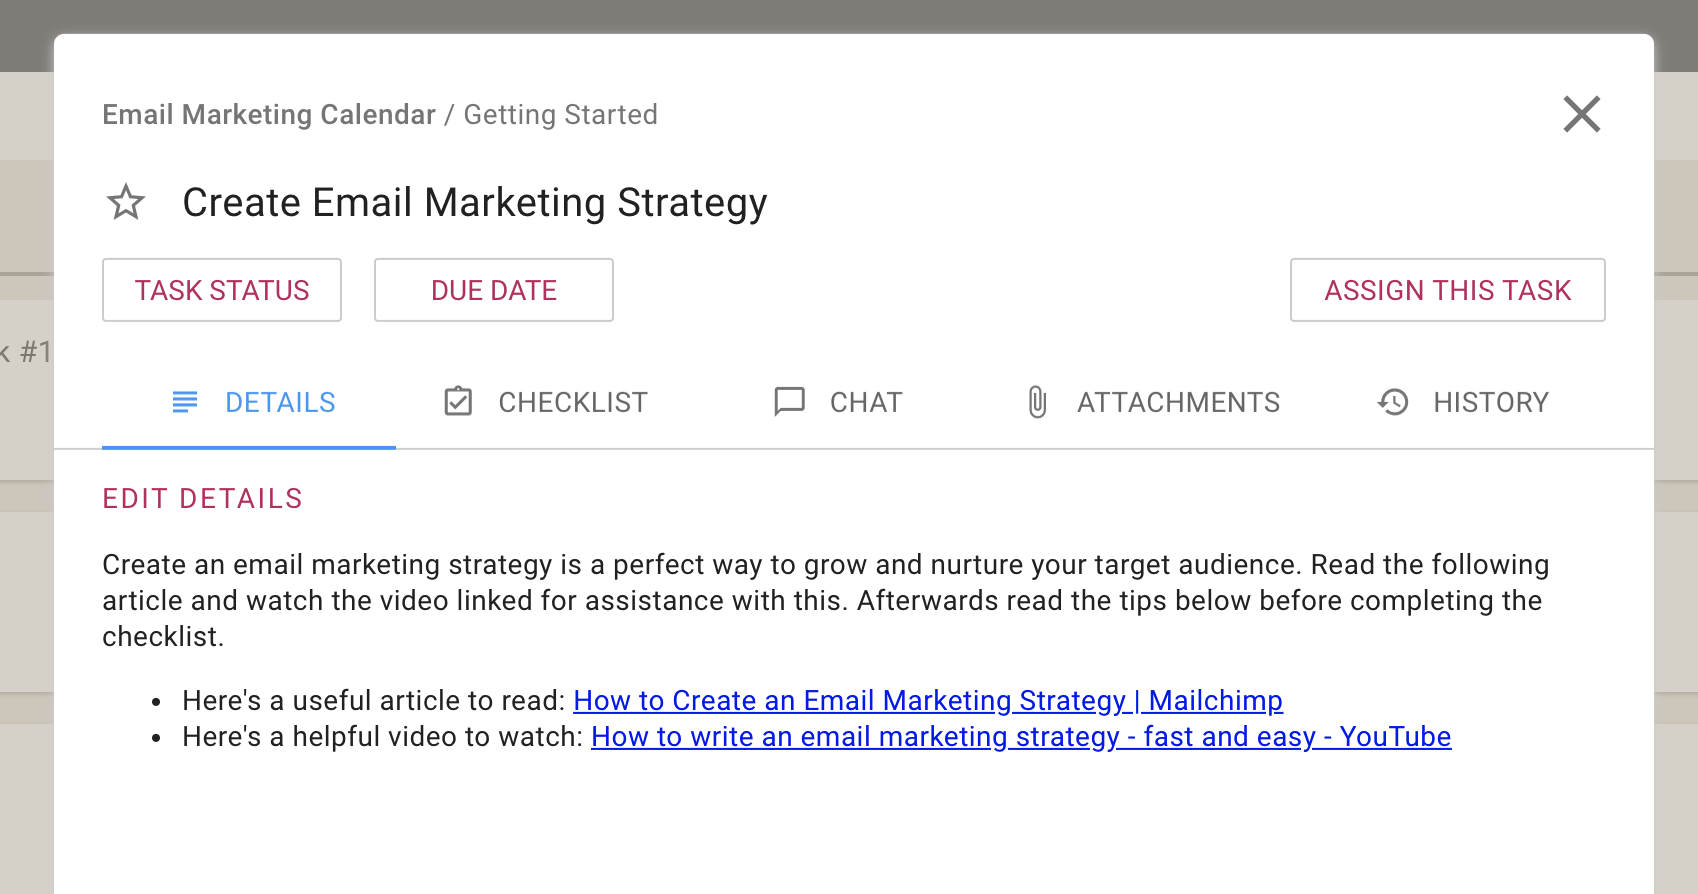
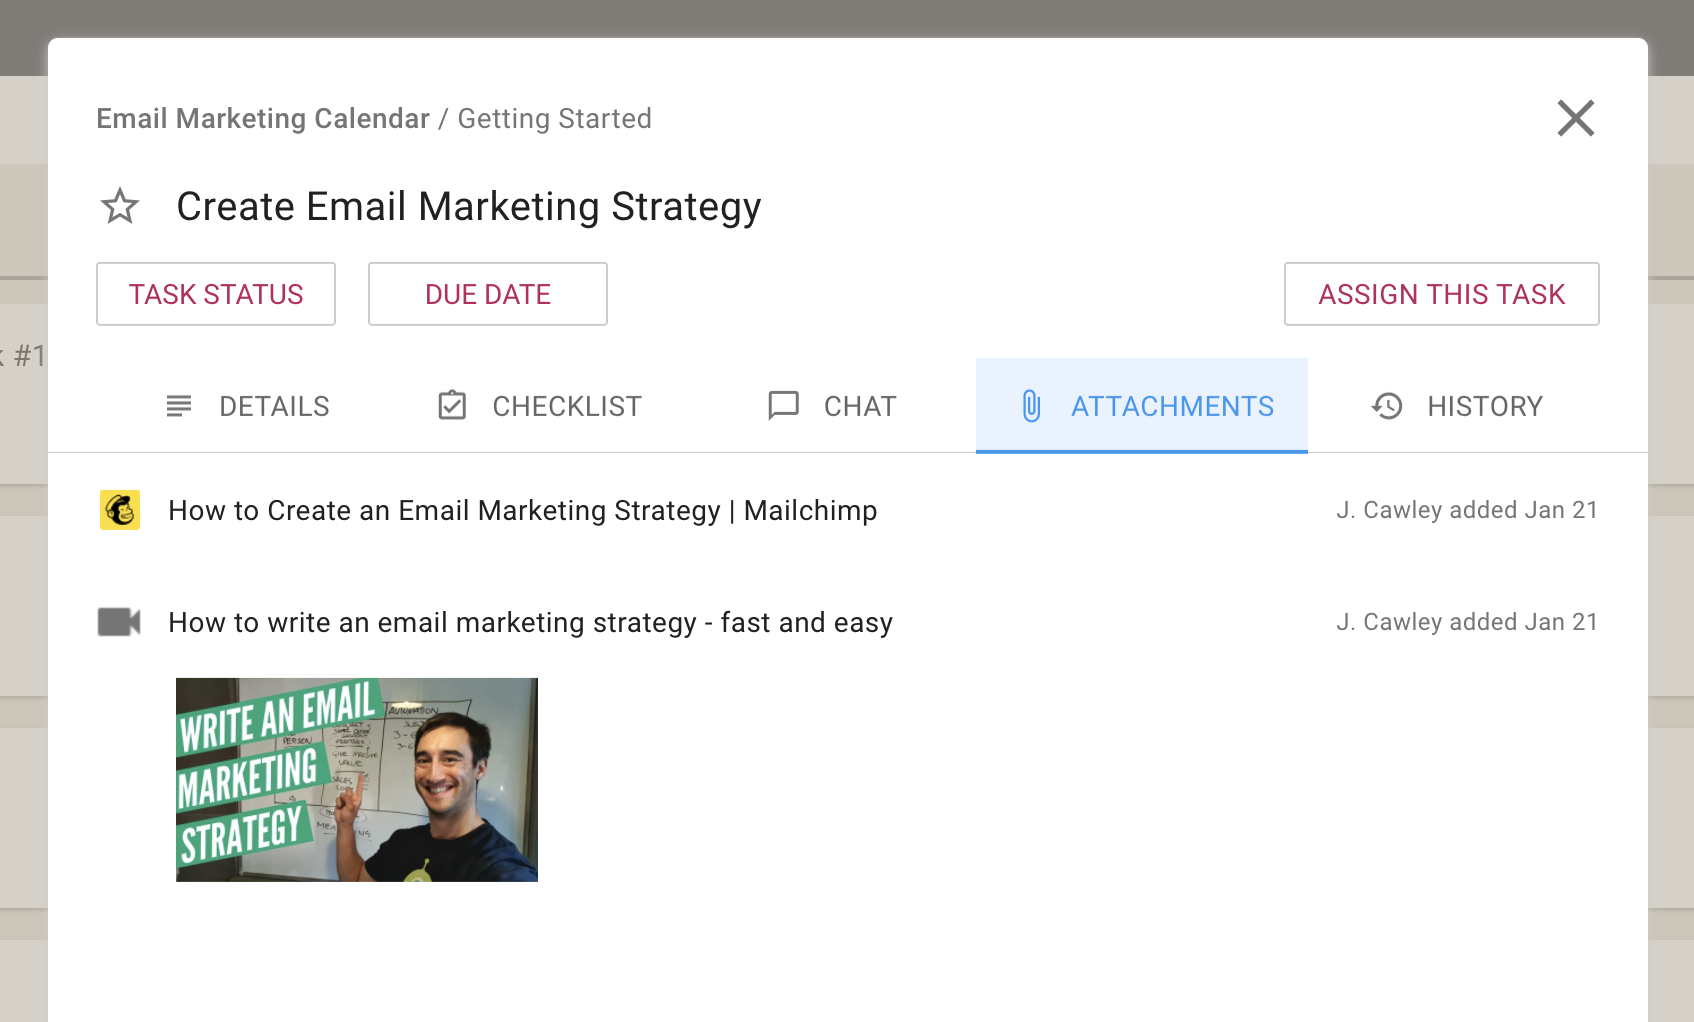
And links to useful resources for completing the task:
Example Attachments
Check out this template and let us know if we can improve it!