Monthly Archives: August 2014

Box vs. Google: what’s different, if you are a Kerika user?

We got an email this morning from a user that we decided to answer here, because the topic is relevant to many of our old users…

We are wondering what the differences between Box vs Google are going to be. Also, if we move over to a Kerika+Box account, will we have to rebuild what we have set up in Kerika+Google?

To answer the first question: the Kerika user interface is the same, whether you use Kerika+Box or Kerika+Google.

And, we fully intend to keep the user interface the same across these two cloud storage platforms — and any others that we might support in the future.

That said, the Kerika user experience, which is more than just the user interface, is a little different due to the quirks of Box vs. Google.

For example, Box makes it really easy to sign up as a new user, and keep your old email account.  You can do that with Google, too, but it’s a lot more cumbersome.

Box also works really well with Microsoft Office files: Box doesn’t try to convert your files into it’s own proprietary format, i.e. it doesn’t have its version of Google Docs, so if you like working with Microsoft Office, Kerika+Box is probably the better choice.

(Note: it’s possible to use Kerika+Google and not have your files converted to Google Docs, by setting a user preference, but that kind of misses the point of using Kerika+Google in the first place…)

If you like to view and edit your files right in the browser, then Kerika+Google is the better choice because Google Docs is getting better all the time.

For both Kerika+Google and Kerika+Box, we try to make sure all your Kerika-related files are neatly stored within your own cloud platform, but that’s a little better on Kerika+Google than with Kerika+Box:

Google allows Kerika to create as many nested folders as we need, which means that you only see a top-level folder called “Kerika.com” when you view your Google Drive, and all your projects, across all the accounts you work with, are all stored inside here.

Box doesn’t allow us to create nested folders in the same way, so you will see a lot more top-level folders in your Box account as your Kerika collaboration network grows.

So, the same user interface for both Kerika+Google and Kerika+Box, but a slightly different user experience with pros and cons for both Google and Box.

And the user interface will remain the same in the future: we have no intention of adding features that will only work with Google or Box — only features that will work well with both.

Now, for the second question: if you create a new Kerika+Box account, you will need to create new projects in this account because it is not connected in any way to your Kerika+Google account.

This may be a bummer for some of our old users who have a lot of projects built up using their Kerika+Google accounts, and now want to switch over to using Kerika+Box.

The reason this limitation exists is that the underlying cloud platforms are completely different, and come from two companies that are competing with each other rather than collaborating in any way.

This makes is impossible for us to move content from a Kerika+Google account over to a new Kerika+Box account, even if they are owned by the same user, since even if we tried to move over all the cards, boards and canvases, we wouldn’t be able to automatically move over any related files.

Sorry about that :-(
Using status indicators on Task Boards and Scrum Boards: Done!

(The sixth, and last, in a series of blog posts on how you can make use of the status indicators on cards, in Task Boards and Scrum Boards.)

In our last post we talked about how to use the “Is blocked” flag; today, let’s take a look at “Done”.

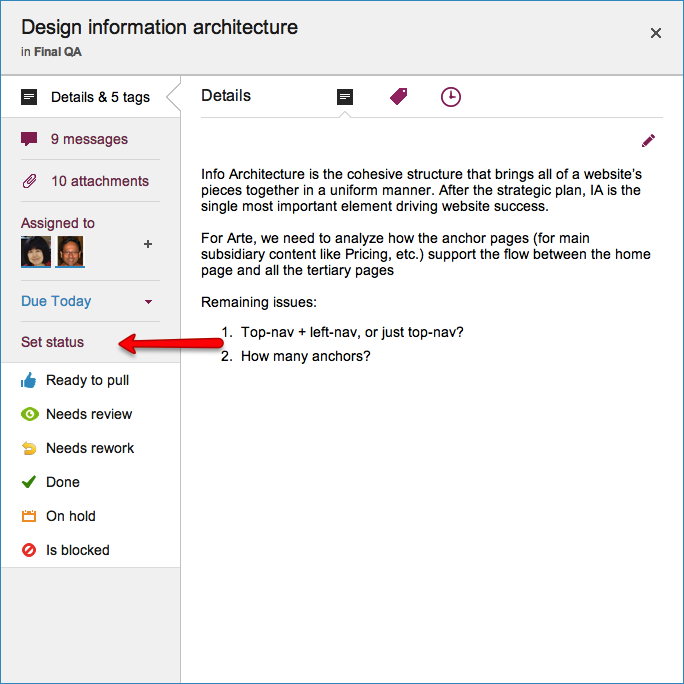
Setting status
Setting status

“Done” is where you want to get to: it’s a special column that’s always to the right edge of every Task Board and Scrum Board.

(You can always chose to hide the Done column, of course, just like you can hide every other column on the board.)

Marking a card as “Done” is simply a quick way of moving it to the Done column, which can be handy when you have a very elaborate workflow — and we have seen folks whose boards have up to 20 columns!

In the near future when we add Work-In-Progress (WIP) Limits for Task Boards and Scrum Boards, the Done column, of course, will not be subject to WIP.

We are also planning on adding more metrics to help Project Leaders and Account Owners understand how well their projects are going, and these will naturally make use of the Done count.

All posts in this series:

Using status indicators on Task Boards and Scrum Boards: Is Blocked

(The fifth in a series of blog posts on how you can make use of the status indicators on cards, in Task Boards and Scrum Boards.)

In our last post we talked about how to use the “On Hold” flag; today, let’s take a look at “Is Blocked”

Setting status
Setting status

“Is blocked” sounds similar to “On hold”, but it should be used in a different context: Blocked is a red flag to the team — it indicates that you are unable to proceed with a task, and you need help.

The essential difference between Blocked and On Hold is that:

  • You, or perhaps your boss, chose to put something On Hold.
  • You were forced to mark something as Blocked.

For teams working in a Kanban or Scrum model, the highest priority for a Project Leader should be to unblock cards.

Unblocking cards (and hence, people) is the most useful thing that a Project Leader can do to help move work smoothly.

This is why “Is blocked” is shown in red on a card, so that you can literally raise a red flag!

All posts in this series:

Using Status Indicators on Task Boards and Scrum Boards: “Needs rework”

(The third in a series of blog posts on how you can make use of the status indicators on cards, in Task Boards and Scrum Boards.)

In our last post we talked about how to use the “Needs review” flag; today, let’s take a look at “Needs rework”.

Setting status
Setting status

In an ideal world, cards would only move from left to right: starting off on the left-most column, e.g. the Backlog in a Scrum Board, and moving in stages to the Done column.

In the real world, however, work can sometimes need rework, and that’s what the “Needs rework” status indicator can be used for.

The amount of rework that’s needed will vary widely, depending upon the project and the team:

If someone new has just joined a well-established team, that person may need some time to understand exactly what’s expected of them at each stage of the project’s workflow: they may, for example, be too quick to move a card from “Planning” to “In Development”, without realizing what’s expected of a card that’s fit to exit the Planning stage.

This new person may find that her work gets pushed back to the left, marked as “Needs rework”.

It’s imperative that whoever pushes back work as “Needs rework” also provides some precise description of what rework is needed.

This is most often done using chat, but sometimes a marked up document, screenshot or other materials may be more useful, particularly if the task is complex.

But, simply marking a card as “Needs rework”, without providing a good explanation, is never a good idea: it will generate ill-will within the team, discourage the new person, and simply result in more work for everyone.

Some times of work will always require a lot of rework: e.g. design.

Mockups of new products or features, or copy for new advertising, will go through a lot of rework before it is considered ready to move along a workflow.

This is quite normal, which brings up another critical point: good Project Leaders will ensure that there is no stigma attached to cards being marked as “Needs rework”.

If people are made to feel, however subtly, that their work is of poor quality because many of their cards are frequently marked as “Needs rework”, this will have a very bad effect on individual and team morale.

It’s really incumbent on the Project Leaders to ensure that people understand that “Needs rework” is simply a status indicator, not a judgment of someone’s abilities!

All posts in this series:

Using status indicators on Task Boards and Scrum Boards: “Ready to Pull”

(The first in a series of blog posts on how you can make use of the status indicators on cards, in Task Boards and Scrum Boards.)

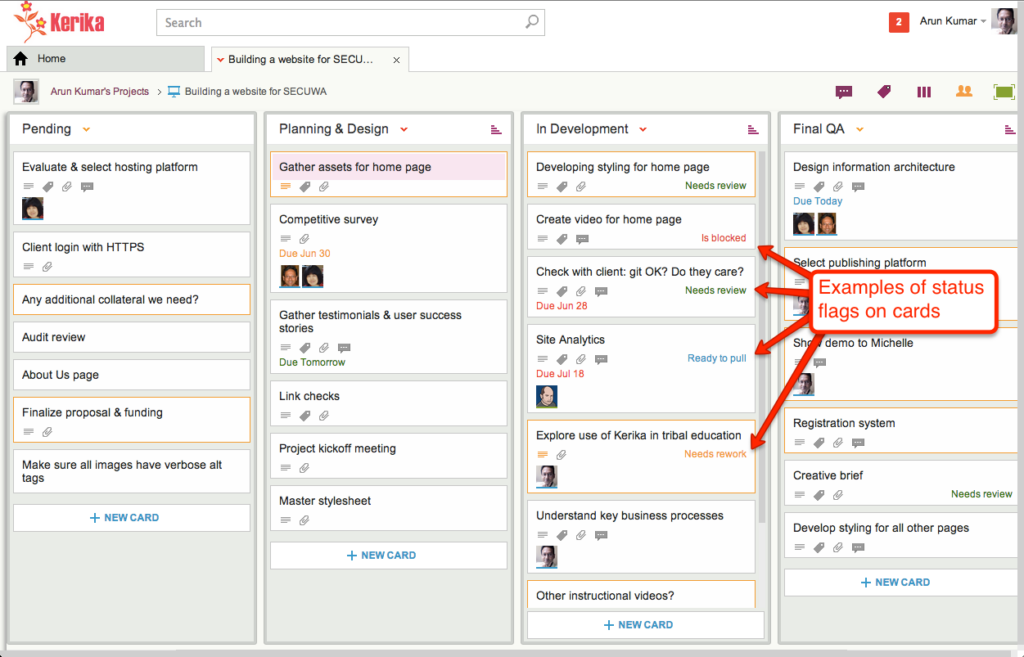
Kerika makes it really easy to flag cards on a board, if you need to alert your team members; here’s an example:

Examples of status flags on cards

There are several statuses that you can report on cards (in addition to “Normal”, the default setting), and we will try to provide some advice in these blog posts on how best to use them.

First up: “Ready to Pull”

Setting status
Setting status

Ready to Pull is great if your team works in a “pull” environment, rather than a “push” environment. Here’s the easiest way to differentiate between the two:

  • In a “push” environment, work gets pushed onto people — quite literally. For example, Project Leaders (or even Team Members) decide that a particular card should be handled by a particular person, and they assign that card to that person: in other words, they push that work onto people.
  • In a “pull” environment, people only assign work to themselves: as they get freed up from whatever they are working on, they look at the board and pick up whatever task is waiting to be pulled (i.e. done) — in other words, they pick up a card that is marked as “Ready to Pull”.

There are advantages and disadvantages to both models, and it’s really a question of how your team prefers to work.

Particularly in organizations that are still transitioning from traditional (Waterfall-style) project management, the push model can be the easiest way to adopt a tool like Kerika: it helps retain the traditional role of a Project Leader as someone who is responsible for the assignment of work among the team.

This is definitely the easiest pathway for organizations that are still in the process of transitioning to a Lean or Agile model — a process that can take months in most cases.

There are, however, some disadvantages to the push model:

  • It can delay the organization’s cultural transformation to Lean/Agile: people feel less empowered, and can be more passive if they wait for work to get pushed to them by others.
  • A less empowered team is often slower to take the initiative.
  • Someone who has had work pushed onto them may feel less ownership of the outcome.
  • It provides a misleading picture of what’s actually getting done: this, in our experience, is the biggest shortcoming of the pull model!

When work gets pushed onto people, you can find that individuals have 10 or more items currently assigned to them. There’s no way they could be working on all 10 items at the same time, so one of the biggest advantages of Kerika — providing an accurate, real-time view of what’s getting done, and by whom — is somewhat negated.

The pull model is truer to the spirit of Kanban: it allows people to work at their own (true) pace, and empowers them to pick up new work as they get freed up — or blocked.

The Kerika team itself has transitioned from push to pull: with push we never had a true sense of what’s getting done; with pull, we do!

There are disadvantages to the pull model:

  • It requires more training and cultural change up-front: even for a team that generally feels empowered, it is a big shift in thinking and process to move from push to pull.
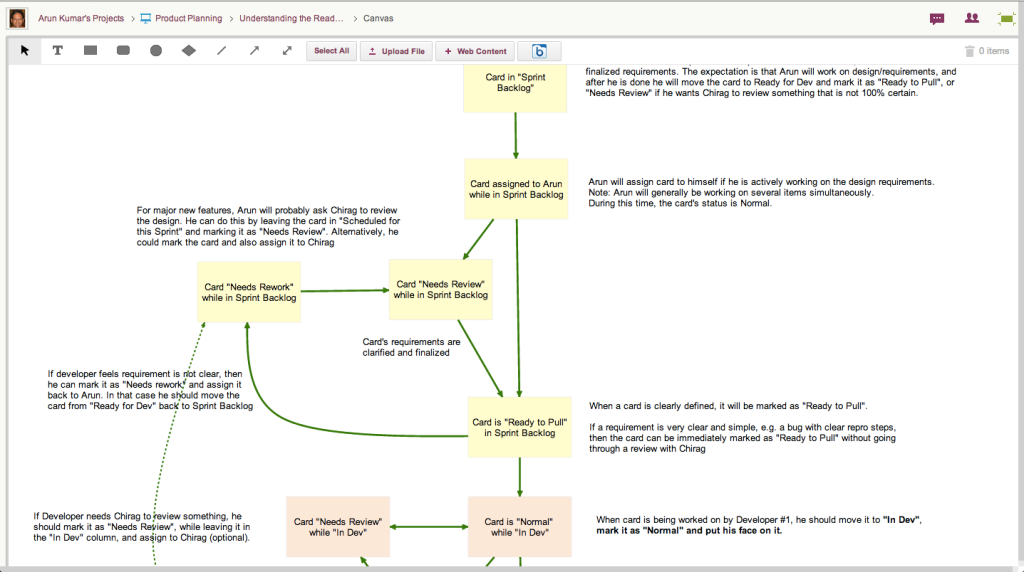
  • It can require a more complex workflow: for example, here’s a partial (!) view of the workflow that we adopted as part of transitioning to Pull, to make it work within our constraints:
Understanding the Pull Model

Pull is best implemented in conjunction with Work-In-Progress (WIP) Limits, which is a feature that we will be adding shortly to Kerika.

So, how should you use “Ready to Pull” as a status indicator?

If you are working in a push model, there’s nothing to do: you don’t need this feature.

If you are working in a pull model, whenever a user is done with a piece of work, she should mark it as “Ready to Pull”, and then take her name off the card.This will clearly signal the rest of the team that the work item is ready to be taken on by someone else.

All posts in this series:

Partial searches just got easier in Kerika

Thanks to feedback from users at Washington State’s Department of Fish and Wildlife (hat-tip to Ryan Koval & team!) we improved our Search feature to make it easier to do wild-card searches.

Wildcard searches let you easily find anything, anywhere in Kerika, by just typing in a little bit of text — as little as a single character — and get back results that match on that text.

(Of course, typing in just a single character will return too many results to be useful… :-) )

In general, there are two ways to do partial searches:

  • By implementing wildcards in the query that the Kerika user interface delivers to the Solr search engine that we have implemented.
  • By using a NGram Filter or an EdgeNGram filter.

Using filters could result in a huge increase in disk space utilization, and a significant drop in performance, so we opted for the wildcard approach instead.

To implement the wildcard query, we manipulate two variables in Solr: PARTIAL_MATCH_BOOST and EXACT_MATCH_BOOST.

  •  If you search with just one keyword, we show you the exact matches first, and then partial matches: we use PARTIAL_MATCH_BOOST and don’t use EXACT_MATCH_BOOST.
  • If you search with multiple keywords, we show you the results that match across all keywords first, using EXACT_MATCH_BOOST, and don’t use PARTIAL_MATCH_BOOST.

There are more ways of fine-tuning search, of course, but for now we seem to have made enough of an improvement to keep our users happy!

Internet Explorer remains the odd man out on tablets

We have been putting in a ton of effort to improve the Kerika user experience on tablets: while Kerika runs OK in the Safari and Chrome browsers on iPads, the experience is somewhat uneven across other tablets, particularly Android and Windows tablets and “convertibles”.

It’s a little frustrating to find so many oddities about Internet Explorer 11 (the latest, greatest version from Microsoft) when it comes to Windows 8.1 tablets and convertibles.

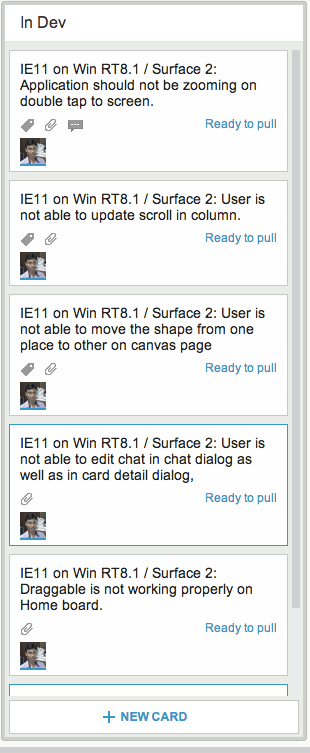
Looking at our internal Scrum Board for our tablet work, we are struck by the many ways in which the touch and swipe gestures in Internet Explorer are different from the Webkit-based browsers (Safari and Chrome):

IE11 problems

I met my old lover
On the street last night
She seemed so glad to see me
I just smiled
And we talked about some old times
And we drank ourselves some beers
Still crazy after all these years
Oh, still crazy after all these years