Category Archives: Kanban & Lean

Posts related to Kanban and Lean methodology.

Switching a board between Kanban and Scrum: a new Kerika feature

When we first started working on Kerika, it seemed to us that everyone who wanted to use an online project board fell into one of two camps that didn’t overlap:

  • Kanban users, who wanted a simple Task Board, perhaps with nothing more than To Do, Doing, and Done columns.
  • Scrum users, who wanted to share Backlogs across multiple Scrum Boards, with each Scrum Board representing a different Scrum iteration (i.e. “Sprint”).

Folks who wanted to work in Kanban-style – typically business users – seemed to have little use for Scrum, and people who wanted to work in Agile-style – typically IT folks – didn’t show much interest in Kanban.

So, we built Kerika with support for Task Boards, for Lean/Kanban users, and Scrum Boards, for Agile users.

What we are seeing more recently, however, is spectrum of usage patterns and styles within organizations:

  • A project that starts off as a Kanban Board might need to become a Scrum Board in the future: as the team works on the project, it may conclude that a series of Sprints/iterations is a better model than a continuous flow/Kanban model, and they may need to transform their Kanban Board to a series of Scrum Boards.
  • A team might start off working with Scrum Boards, thinking that Agile is the ideal model for their work, and then find that a Kanban model of continuous flow is better suited for their needs, in which case they may need to change from a Task Board to a Scrum Board.
  • A Scrum team may need to pull items from multiple Backlogs: there may be items from a Marketing Backlog and from a Product Development Backlog that need to get worked on in the same Sprint, so the team may need to switch from one Backlog to another.

This kind of flexibility wasn’t available in Kerika before — and is certainly not available in Trello, Asana, Basecamp or any other tools that compete with Kerika — and that’s exactly the problem that we have fixed with the new release!

Use the Project Info button, on the top-right of the Kerika menu bar, to switch a board from Kanban to Scrum, or vice versa:

Settings
Settings

If you check the “Use a shared Backlog” box, you can then select the Backlog you want to use for your board: if you had been working in a Kanban board, it automatically switches over to a Scrum Board.

At any time you can switch between any of the Backlogs that exist in the Account, that you have permission to access.

If you want to go back to working in Kanban-style, just uncheck the “Use a shared Backlog” box and the Backlog will disappear from view.

It’s now that simple to choose between Kanban and Scrum!
Lunch & Learn Agile, for State Government Employees

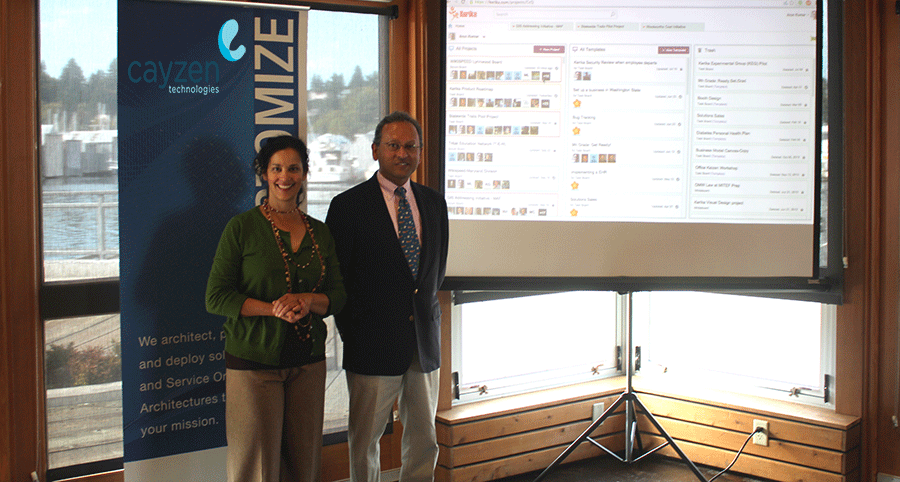
Cayzen Technologies organized a Lunch & Learn Agile event at the Harbor House at Percival Landing in Olympia, Washington, featuring Arun Kumar, CEO of Kerika.

Arun’s topic was Implementing Lean across Distributed Teams, and we would like to specially thank Mayra Pena from Cayzen who organized the event:

Arun Kumar & Mayra Pena

The event was attended by folks from Washington State’s Employment Security Department and Department of Health, among others, and there was a lively discussion.

Here are the slides from that presentation:


If you would like to see the sample Kerika board that featured in the demo, go to https://kerika.com/m/H51M

Thanks for attending!

Arun speaking at Lunch & Learn Agile

Work-In-Progress Limits: a new Kerika feature!

We are thrilled to announce a great new feature: Work-In-Progress (WIP) Limits for Kanban Boards and Scrum Boards.

WIP Limits are a very helpful tool when you are working in a true Kanban style: where work gets “pulled” as people become free, rather than work getting “pushed” onto people before the people ready.

To understand the difference between “push” vs. “pull”, think back to that famous episode of “I Love Lucy” where Lucy and Ethel take up jobs at a chocolate factory, and quickly find themselves unable to keep up with all the work that’s getting pushed onto them:

This is a perfect example of the perils of “push”: as the chocolate gets prepared upstream, the work becomes ready even though the people aren’t ready for the work.

If you push work on to people who aren’t ready to take it on, you will quickly have disastrous results. (It’s funny only when it’s on TV and it involves Lucy.)

At the very least, you will have an imperfect understanding of what each person is actually doing, if people upstream in the project’s workflow simply push work downstream as soon as the upstream folks are done with it.

A pull model is different: people “pull” work and assign it to themselves when they are ready.

Each person typically has a small number of items they are juggling at any time: it may be as few as two items, depending upon the complexity of the work, but it is rarely as few as just one item.

(You nearly always want to have one “background” task ready to be picked up whenever your “foreground” task gets blocked for any reason.)

When a person is able to take on a new task, she can “pull” a card from the column to  the left of her on a Kerika board.

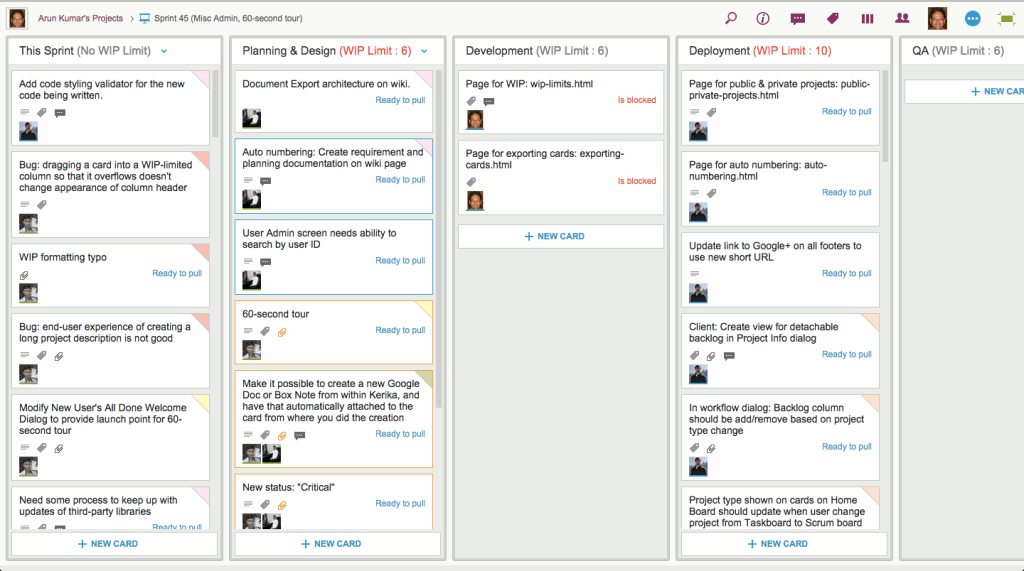
Here’s a simple example, reflecting the workflow for a software project:

WIP Workflow Example

This project includes people with different roles: designers, developers and QA, and each group has determined it’s own WIP limits, based upon the team’s capacity and velocity.

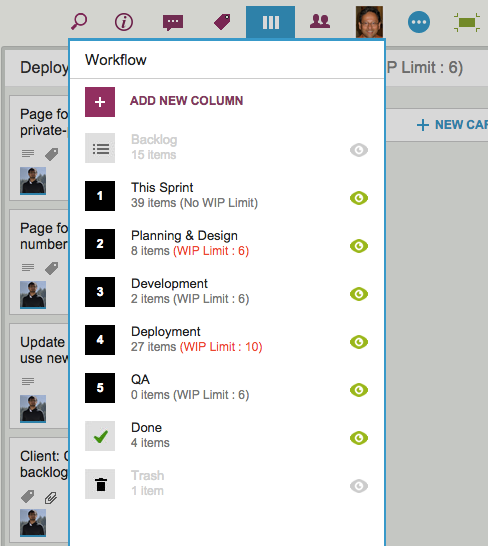
In this particular example, we can see that the Planning & Design and Deployment columns have currently exceeded their WIP limits (and, in the case of Deployment, by a large margin!)

When this happens, Kerika alerts you to the condition by showing the affected columns with red text in the column headers:

Example board with WIP exceeded

WIP Limits as “soft limits”: Kerika doesn’t stop you from exceeding a column’s WIP Limit, but it does provide a very clear, visible warning to everyone that a bottleneck is about to form.

When bottlenecks start to form, the Project Leader should intervene and help manage the upstream flow so that the WIP Limit can come back to its acceptable amount.

WIP Limits originated in Kanban, but Kerika lets you use them for Scrum Boards as well!

To use WIP Limits, click on the Project Info button that’s at the top-right of the Task Board or Scrum Board:

Settings
Settings
  • WIP Limits can be set for every column on a board except for the Backlog,  Done, and  Trash.
  • WIP Limits can be turned ON or OFF at any time: turning WIP Limits OFF doesn’t cause the old values to be forgotten.

Pretty cool, huh?

Presenting at OFM’s Fall Forum last week

Ben Vaught, from the Washington State Office of the CIO, and I had the pleasure of presenting at the state’s Office of Financial Management’s Fall Forum last week, held over two days at the Thurston County Fairgrounds in Olympia.

Ben talked about the use of visual processes as part of the Washington Business One Stop initiative he has been working on for a while, and towards the end of his talk he showed some pictures of the WIKISPEED garage in Lynnwood, where I first met Ben and Michael DeAngelo, Deputy CIO for the state.

My talk was supposed to have been on Visual Management in government and administrative processes, but seeing pictures of the old WIKISPEED garage, which used to be covered with stickies on all walls (including the massive garage doors!) before the team adopted Kerika to knit together their global community of volunteers, was a wonderful throwback moment!

When it came to my turn, in addition to showing the use of Kerika for cross-agency GIS projects, such as those led by Joy Paulus, I was also able to show examples of Kerika in use by Sherri Hrubi, Danica Ersland and Melissa Wideman, who all work together in OFM’s HR Division.

Several other people presented, including Irene Hill and her design team from the Department of Licensing, Howard Cox from the Department of Enterprise Services, and Eric Gardner from OFM’s Forecasting Division.

Exporting Kanban and Scrum Boards: a new Kerika feature

We have a great new Export feature for all Task Boards (i.e. Kanban Boards) and Scrum Boards.

The Export feature is simple, elegant and powerful, and is available to all Project Leaders, Team Members and Visitors on the project team.

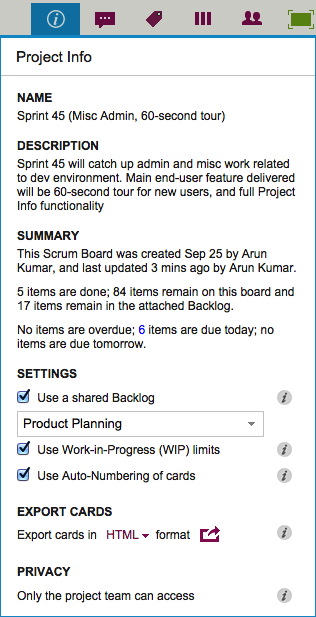
To access this feature, simply click on the Project Info button that’s shown at the top-right of each Kerika Board, and you will see the Project Info display (that we have talked about in an earlier blog post):

Export
Export

CSV format is useful if you want to want to take data from Kerika and put it into Excel or some other analysis tool;

HTML format is useful if you want to print material from Kerika, or insert it into Word, PowerPoint or similar tools.

With both CSV and HTML exports, hidden cards are not exported: this means that if you are currently choosing to hide some columns (by using the Workflow button), or hide some cards (by using the Tags filters), then the cards that you are not viewing right now will not be part of the export.

When you export a board in CSV format, you get the following data, for each visible card:

Example of CSV export

Column Name: e.g. Backlog, In Progress, Done, etc.

Card Name: e.g. “Create PR news release”.

Card Description: e.g. “We need to create a PR news release once our latest version is ready…” (Rich text will be converted to plain text, since CSV files can only deal with plain text.)

Status: e.g. Needs Review, Needs Rework, etc. (If the card doesn’t have a special status, “Normal” will be shown.)

Due Date: the date the card is due, if a date has been set.  (If the card doesn’t have a Due Date, “Not Scheduled” will appear.)

Assigned To: a list of names of the people the card is currently assigned to.  (If the card isn’t assigned to anyone, “Not Assigned” will appear.)

Exporting could take a while: the exported data are put into a file in your Google Drive or Box account — depending upon whether you are using Kerika+Google or Kerika+Box — and when the process completes, you get an email with a link to the file containing your data.

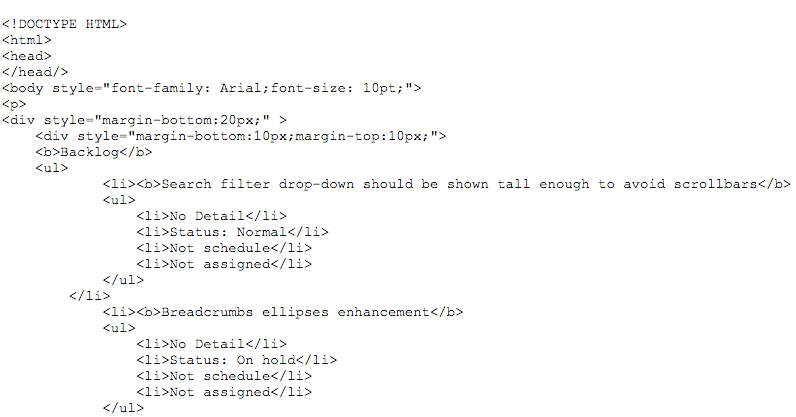
It’s a similar experience if you do a HTML export; however the format of the data is different, giving you an indented set of attributes for each card, like this example from a Kerika+Box project:

Example of HTML export
Example of HTML export from Kerika+Box

One caveat about exporting HTML: if you open the results in Google Docs, Google shows a preview of the output, and that doesn’t look good: instead of rendering the HTML, Google actually exposes it.

Here’s an example from a Kerika+Google project:

HTML preview in Google Docs
Example of HTML export from Kerika+Google

The export feature can be used for many different purposes, of course: the most common scenario we envision is people wanting to include material from Kerika in their analysis and presentations.

And, of course, one use would be for government agencies that have to respond to Freedom of Information Act (FOIA) requests, or other Sunshine laws.

Project Info summary of your Kerika Board: a new Kerika feature

We are thrilled to announce a new feature in Kerika: a very useful Project Info display that summarizes of your project.

You can access this by clicking on the new Info button that appears in your Kerika toolbar, at the top-right corner of your board view:

Project Info display

This view is available to everyone who is part of the project team:  Project Leaders, Team Members and Visitors.

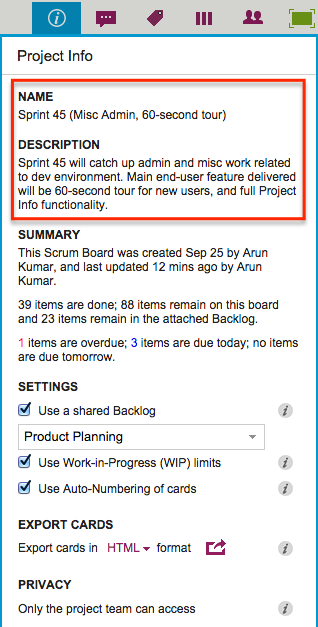
There are several sections in here: at the top is the Name and Description of the project:

Name and Description

The Description is a new attribute of Kerika’s boards: it lets you provide context about the project that can help orient new team members, and it can also help with your Searches in the future.

The Name and Description of a project can be modified at any time by Project Leader or Account Owner.

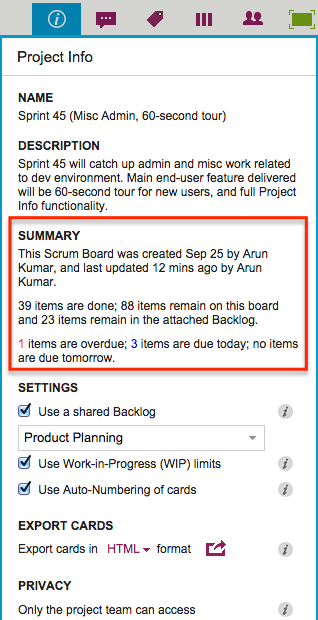
Next up is the Summary of the project:

Summary
Summary

The summary varies by the type of board (Whiteboards, Task Boards or Scrum Boards), but it provides useful information in all cases:

  • It tells you when the board was first created, and by whom.
  • It tells you when the board was last updated, and by whom.
  • And for Task Boards and Scrum Boards it tells you how many cards are done, and how many remain.

Since each card typically represents a work item, this is a quick way to find out how much work remains on a board, without having to count up all the cards in each column.

For Task Boards and Scrum Boards, this view also shows you how many cards are due today, due tomorrow, and overdue.

And for Scrum Boards, it shows you how many cards are in the Backlog that you are using, so you get a sense for how far along you are with the overall project, not just the current Sprint.

All Kerika Task Boards and Scrum Boards now have support for Work-In-Progress Limits: these can be turned on or off by the Project Leader or Account Owner:

Settings
Settings

Another huge new change: we are making it super easy to switch a board from being a Kanban Board to a Scrum Board, and back again.

Task Boards and Scrum Boards also have a new auto-numbering feature that can help you manage very large boards, e.g. if you are using Kerika for an internal Help Desk.

For both Tasks Boards and Scrum Boards, there is now a great new Export feature that lets you export cards from a board in CSV or HTML formats:

Export
Export

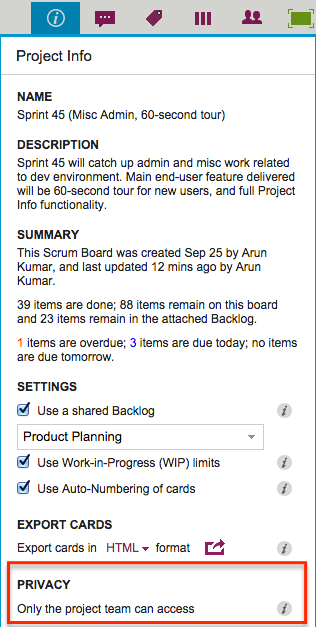
And, finally, you now have the option to make individual projects open to the public to view (but not change): a handy feature for open-source and volunteer-based projects like WIKISPEED:

Privacy
Privacy

Kerika @ PMI Olympia Chapter

Arun Kumar, Kerika’s CEO, and Beth Albertson, Solutions Architect from Washington State’s Department of Social and Health Services will be jointly presenting at the November 18, 2014 dinner meeting of the Project Management Institute’s Olympia Chapter.

The topic will be  Using web-based work management for distributed and agile teams.

If you are interested in project management, and are close to the Olympia, Washington area, please sign up for this dinner event!

PMI
PMI dinner

Kerika @ Washington State Lean Transformation Conference

Come join us at the Washington State Lean Transformation Conference, to be held October 21-22, 2014 at the Greater Tacoma Convention & Trade Center  in downtown Tacoma at 1500 Broadway Tacoma, Washington!

Arun Kumar, Kerika’s CEO, will present a special Breakout Session on One team, many places: creating collaboration networks for distributed workgroups

The vision of Lean Government is about collaborating across offices, across agencies, and even across sectors. In an era of flat or even declining budgets, it’s become essential to get Lean across the state, not just across the room.

The old technologies never really supported distributed Lean and Agile, but that’s all changed now: a new generation of browser-based work management tools makes it fast and easy to build Lean and Agile teams that connect professionals across agencies, and across sectors so that expertise from the private sector, academia, and nonprofits can be leveraged to deliver great results in Washington.

This breakout session will feature a look at some great cross-agency projects and cross-sector projects: initiatives that have succeeded in delivering in a way that was unimaginable only a couple of years ago.

The session will be presented at 12:15PM in Room 318 on October 21, and again at 10AM in Room 318 on October 22.

If you are working in state, county or local city government and are interested in Lean and Agile, be sure to join us: the cost for attending is just one can of food, which will be donated to a food bank 🙂

Managing really large (and really old) Kanban Boards

Kerika’s Task Boards are so easy to set up and use that teams sometimes make the mistake of sticking everything on the same board, week after week and month after month, until the board becomes really too big to be useful.

The Kerika software itself doesn’t buckle under the weight of hundreds of cards on a single board (and, to be honest, we are also guilty of sometimes doing very large Scrum iterations that turned over a few hundred cards  -.-), but just because the software works fine doesn’t mean the practice makes sense.

The most common way for a Kanban board to get overcrowded is for it to be used for too long: the Done column gets bigger and bigger, as more work gets completed each week, until you end up with a very lop-sided looking board with perhaps 20-50 items in “To Do”,  and maybe 1,000 items in “Done”.

When presented with a board that contains hundreds or even thousands of items in Done, it’s hard for individual team members to get visual satisfaction from seeing cards move over to the Done column on a regular basis: as work gets done, it seems to vanish into this endless pile of other work that’s already been done.

Teams and, especially, Project Leaders should not underestimate the value of this visual satisfaction of seeing a well-balanced board, with about the same number of items in “To Do” (or Backlog, or Pending, or whatever you choose to call your parking lot) and in the “Done” column, with an even-looking distribution of items in the columns in the middle.

(The simplest Kanban board may just have three columns: To Do, Doing, and Done, but Kerika makes it easy to have far more complex workflows, and to capture your organizations’ best practices as a collection of process templates.)

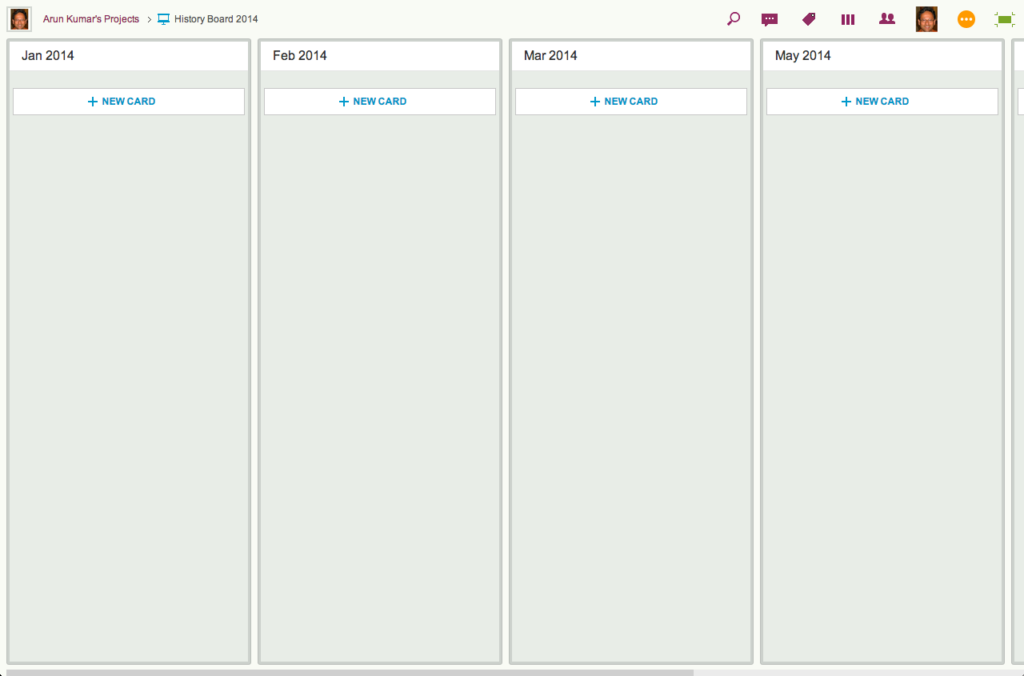
If a Kanban board is going to be used for an extended period, say several months or more, then we recommend create a parallel History Board that can be used to track the historical achievements and progress of the team. Here’s how this scheme works:

  • Create a board called “History Board 2014”. (The name isn’t particularly important.)
  • Organize this boards with columns that look like this: Jan 2014, Feb 2014, Mar 2014…
An example of a History Board

We will use these columns to hold all the cards that were completed in that particular month. So, for example, the Jan 2014 column would contain everything that was completed in January 2014.

  • At the end of every month, pause for a moment to celebrate your team’s accomplishments for that month. (Order in some beer and pizza and maybe pause for longer than a moment…)
  • Move all the items that in Done onto the History Board: use Kerika’s cut-and-paste feature, which will let you move a bunch of cards intact, along with their history, chat, attachments, etc., from the Done column of your main Kanban board to the appropriate column in your History Board.

Laptop users will find their right-mouse click menu handy for this: click on a card in the Done column, do “Select All” from the right-mouse menu, and then do a “Cut”. Once you have cut (or copied) anything into your Kerika Clipboard, a Paste button will automatically appear at the top of each column, on each board where you can make changes.

So, Cut from Done on your active board, go over to your History Board, and then do click on the Paste button at the top of the appropriate column, e.g. the August 2014 column.

This simple method lets you achieve two objectives at the same time:

  • It’s an easy way to trim the size of your active Kanban board: by taking out the “Done” stuff each month you can stop it from ballooning in size over time.
  • It’s an easy way to create a comprehensive historical view of everything your team has achieved over time: go over to the History Board and you can see how work got done over an entire year. (Might be useful at performance review time 😉

A side-benefit: your active Kanban board will load a lot faster if it doesn’t get overloaded.