Our AI Helper just got better at creating new boards and templates: although it looks the same as before, behind the scenes it now can do Web searches to find relevant material to use for building what you need.
This means that you can now make more general requests to the AI Helper, like “make a board for me to learn about AI agents”. To build this board, the AI Helper will automatically do a Web search to find the best articles out there that cover AI agents, and then build a learning board for you.
We have made substantial improvements to the previously released AI Helper to make it more useful for anyone who wants to start a new Task Board or Template.
Creating New Boards
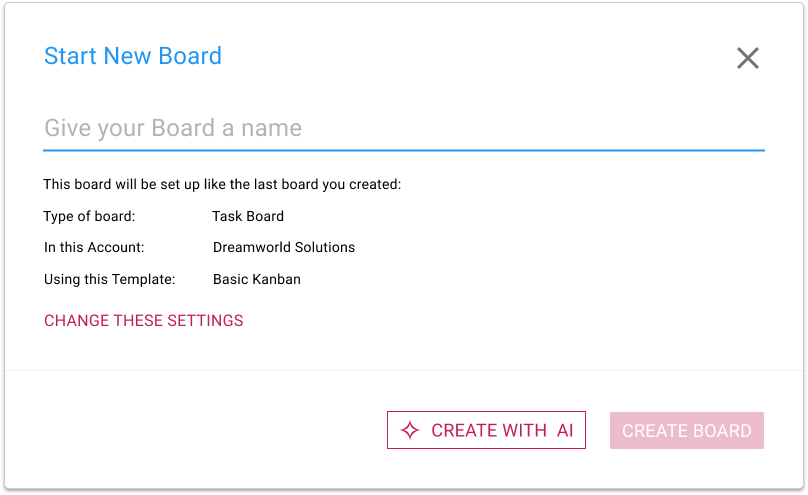
The AI Helper is always available when you want to start a new Task Board:
What’s different now is that clicking on the CREATE WITH AI button will open a new AI Helper pane on the right side of the window:
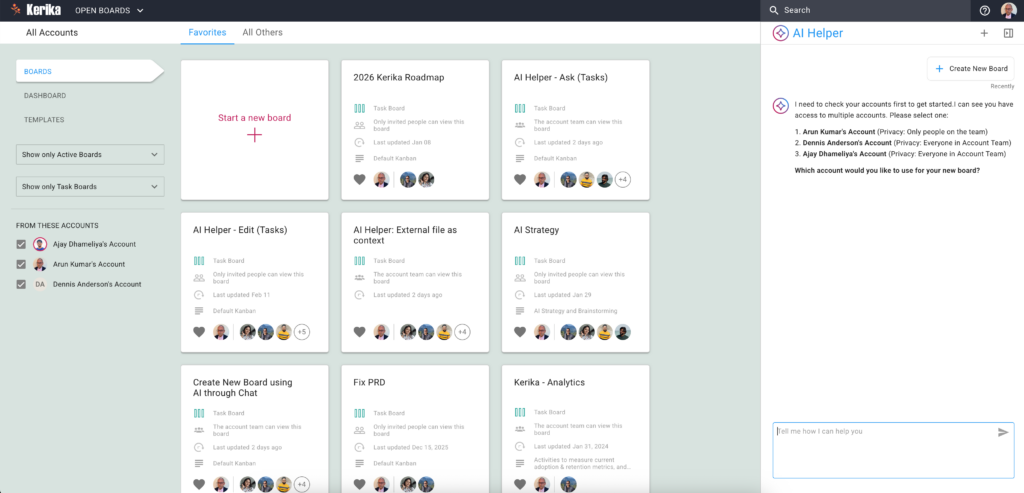
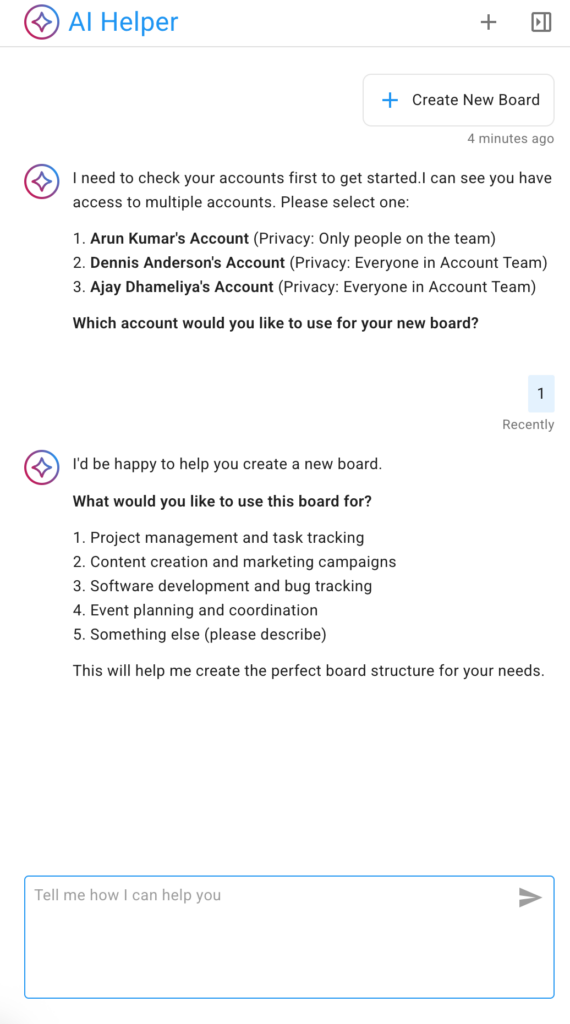
If you have access to multiple accounts — for example, if you are working with different organizations or companies that all have their own Kerika accounts — the AI Helper will first ask you which account you want to create the new board in.
(If you are working in a single account, which is true for the vast majority of Kerika users, the AI Helper skips this step.)
The AI Helper offers some suggested areas, as shown above. You can choose one, or simply provide more specifics about the kind of board you want to create.
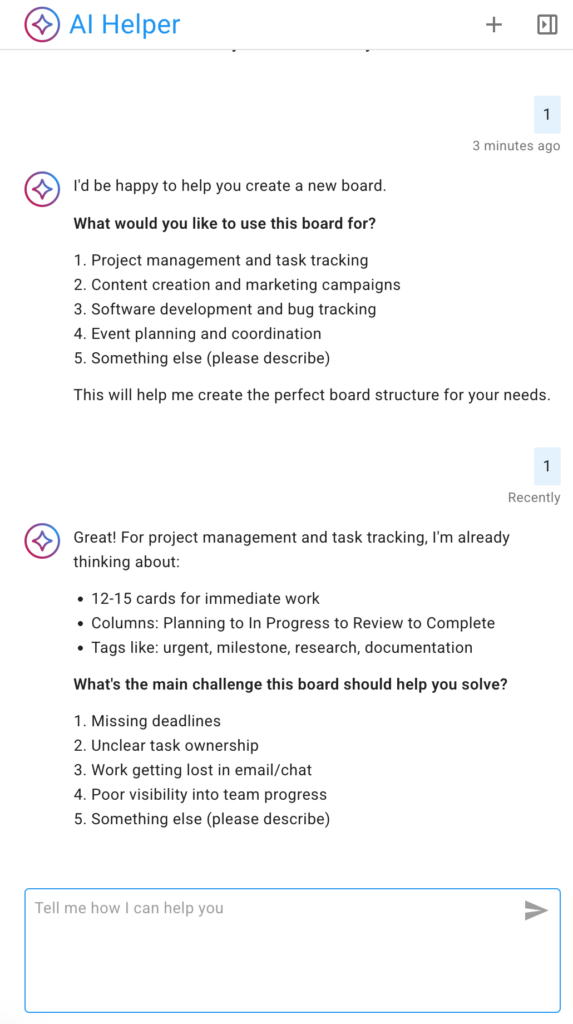
In the example below the user selects the first suggested category: project management and task tracking:
Unlike our first (experimental) version of an AI Helper, the new version is much more interactive: it provides suggestions and prompts to help the user think about what the new board should do, and, in particular, what kinds of management and collaboration problems they are currently facing.
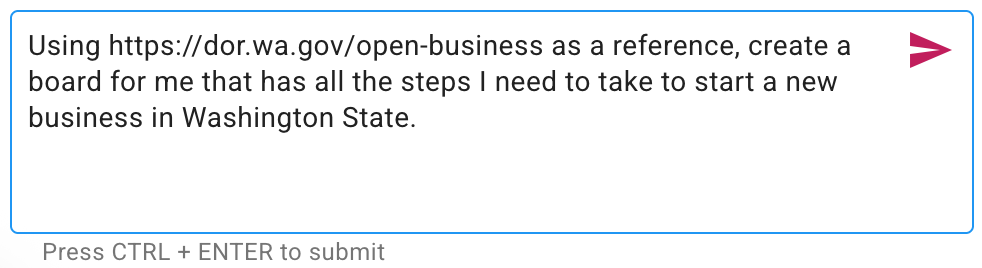
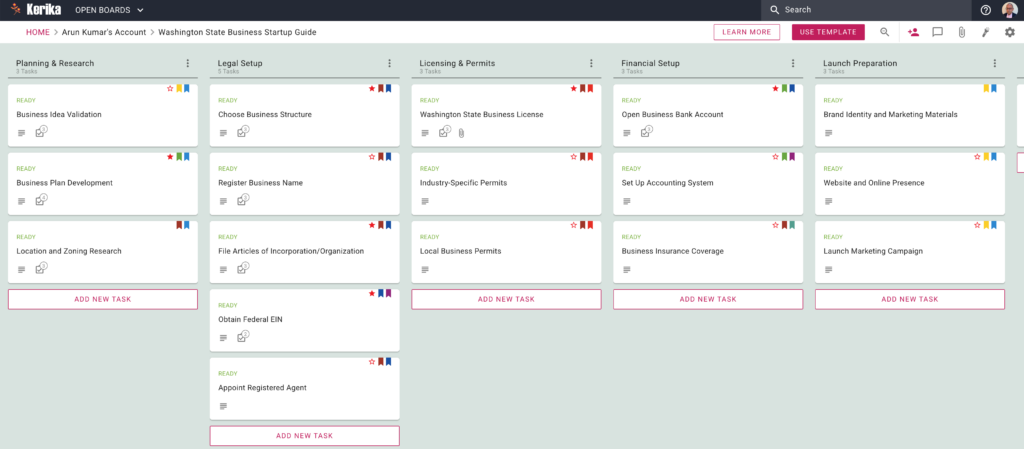
If you have something very specific in mind, you can skip the back-and-forth with the AI Helper and provide a specific request, like this example for a board that contains all the steps necessary to start a new business in Washington State:
Given a specific enough request, the AI Helper can quickly suggest a board that will meet the user’s needs:
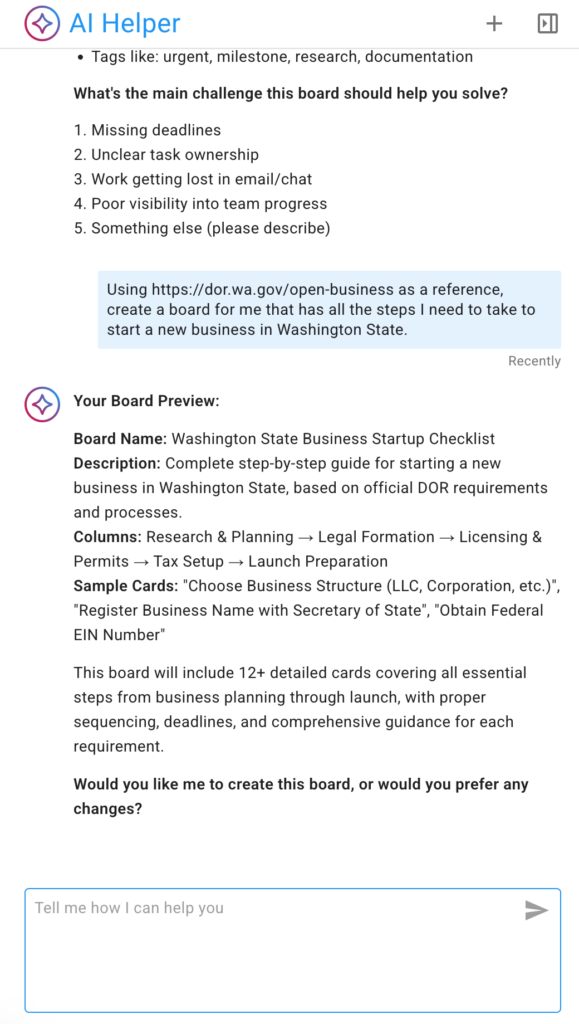
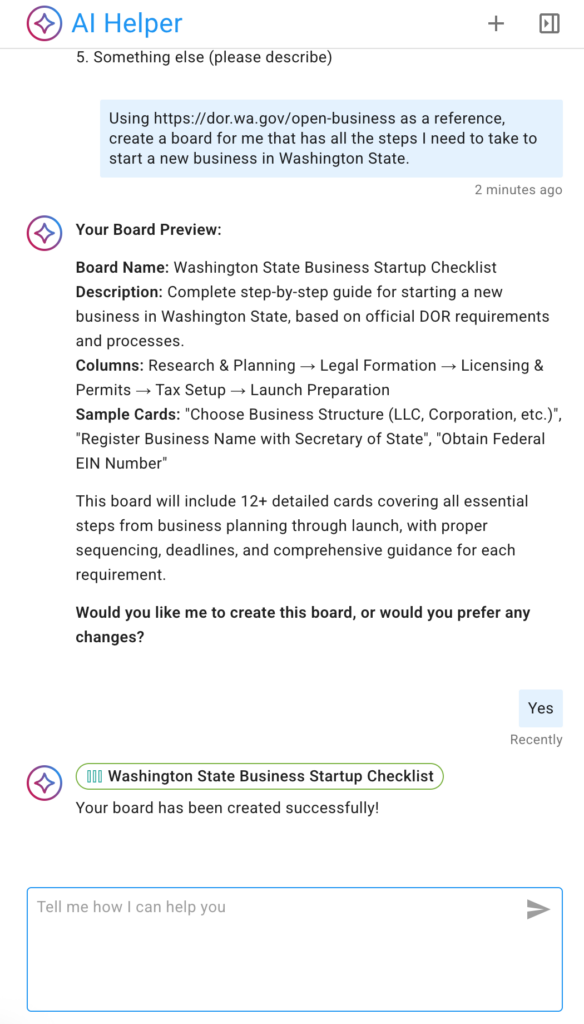
The AI Helper doesn’t immediately create a new board; instead, if first offers a preview so the user can confirm the new board will meet their needs.
If the preview looks good, the user can ask the AI Helper to make the new board (this step can take a little time):
Once the new board is created, the AI Helper give a quick link to it:
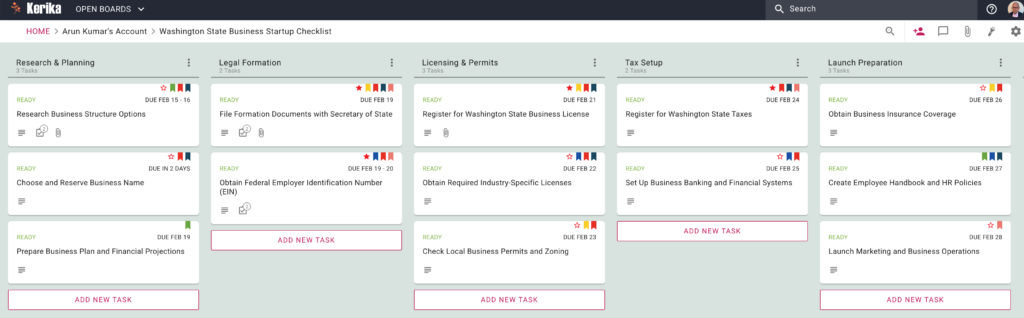
Here’s the new board created by the AI Helper: as you can see, the AI has also created appropriate and helpful tags, assigned the work to the user (since the user hadn’t said anything in their request about working with a team), and even estimated how long each task might take and assigned due dates accordingly.
Click to see a larger image
Creating Templates
Creating templates works in the exact same way: for example, the user could have asked for a template to be created using the same reference source (Washington State’s Department of Revenue Guide for Starting Businesses).
This is what the output looks like:
Click to see a larger image
Mobile & Tablet
The AI Helper is available on phones and tablet as well; the user interface is, naturally, a little different to accommodate the more limited screenshot
Please give this a try and let us know what you think!
At Kerika we have been experimenting with using AI for software development for some time now: Microsoft’s Copilot has been used by our developers to help with their coding, and it has definitely proven helpful. We are now adding AI to some of parts of our user interface.
Using AI help build a new board
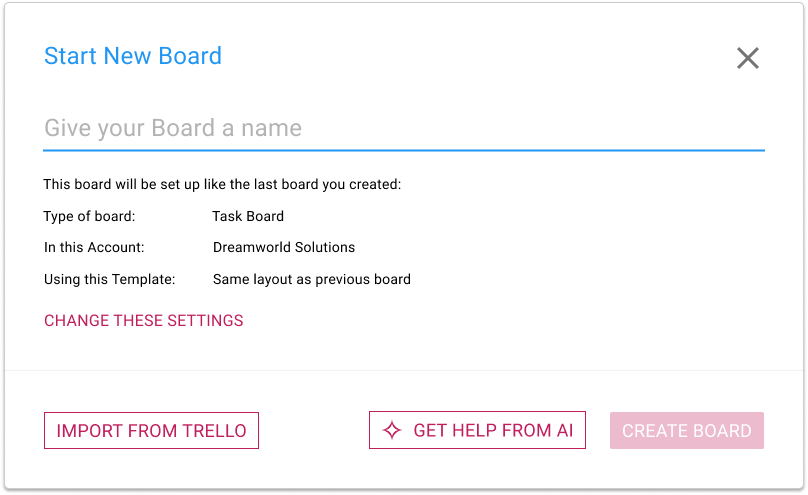
When you want to start a new Kerika Task Board, you will see that there’s a new option for GET HELP FROM AI:
AI Helper in Start New Board
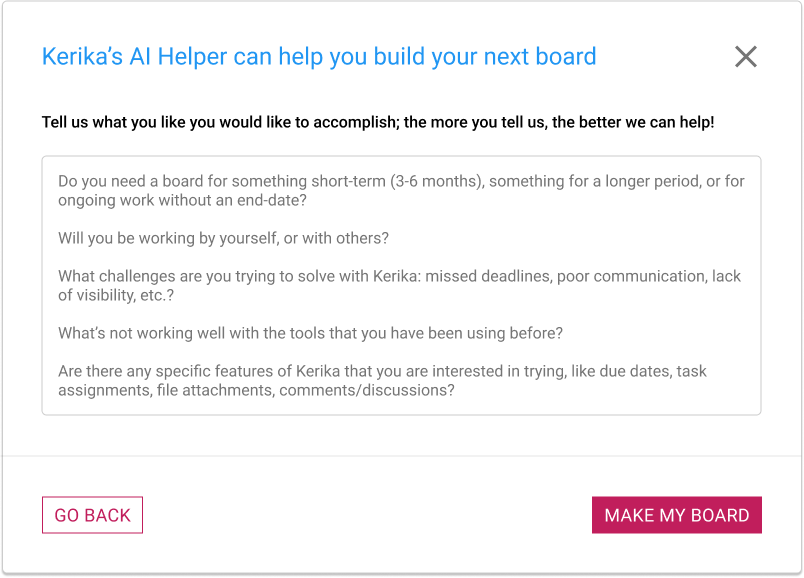
Clicking on this button brings up a dialog where you can tell our AI what you want your new board to do:
How you can specify what the new board should do
It’s very important to provide as much detail as possible! The more you tell about Kerika’s AI about what you want your board to do, the better it can help. Some suggestions for what you should tell the AI:
Do you need a board for something short-term (3-6 months), something for a longer period, or for ongoing work without an end-date?
Will you be working by yourself, or with others?
What challenges are you trying to solve with Kerika: missed deadlines, poor communication, lack of visibility, etc.?
What’s not working well with the tools that you have been using before?
Are there any specific features of Kerika that you are interested in trying, like due dates, task assignments, file attachments, comments/discussions?
Using AI takes some time, typically 1-2 minutes to build your board. You can do other things with Kerika in the meantime; you will be notified when your board is ready. You can also cancel your request if you change your mind.
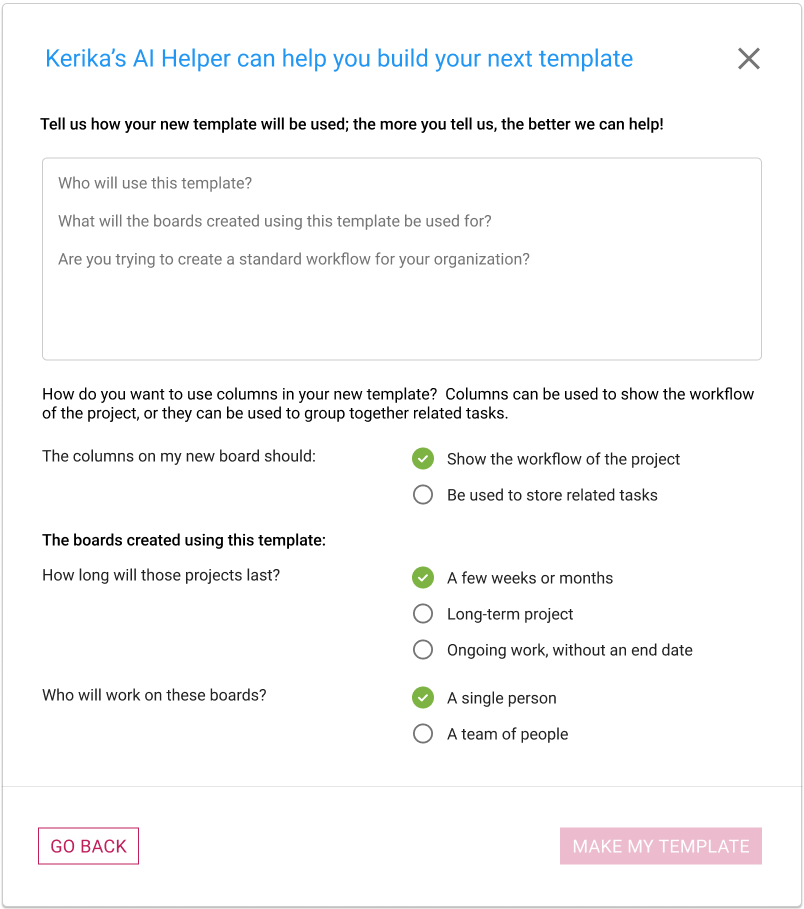
Using AI to help build a new template
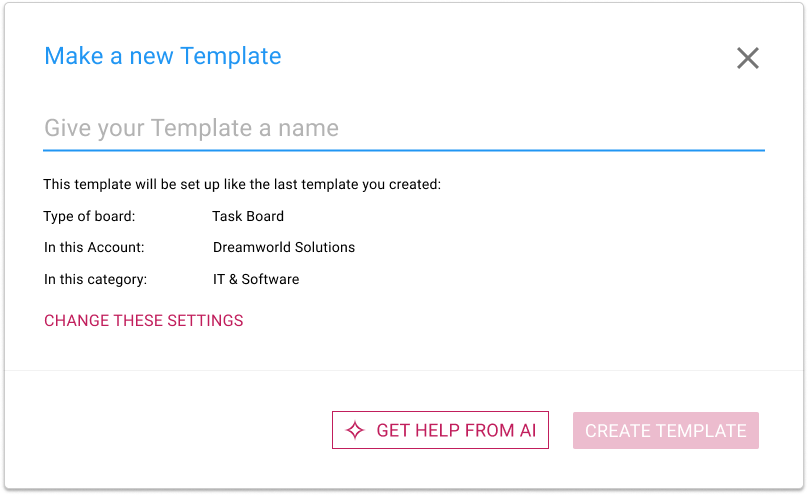
Similarly, you now have the option of getting help from Kerika’s AI in making new templates:
If you choose to get help from AI, you are asked to provide details about what your new template should do, and how it will be used:
With templates there’s a little more detail that we ask for, and as with using AI to create new boards, the amount and quality of the instructions you provide to Kerika’s AI will make a big difference to how well the AI can help you make a new template.
Making a Board similar to a Sample Board
This last one is for new users only: when people sign up as Kerika, they are given the option of browsing our many sample boards (which are organized by job function) so they can get an idea of what Kerika can do before they start their first board.
Ever since we build our sample boards we have observed that they are very popular, and that people would make copies of them to either play with, or use as a basis for building their own boards.
Making a copy to play with is fine, but making a copy to create a starting point for your new board is not very effective.
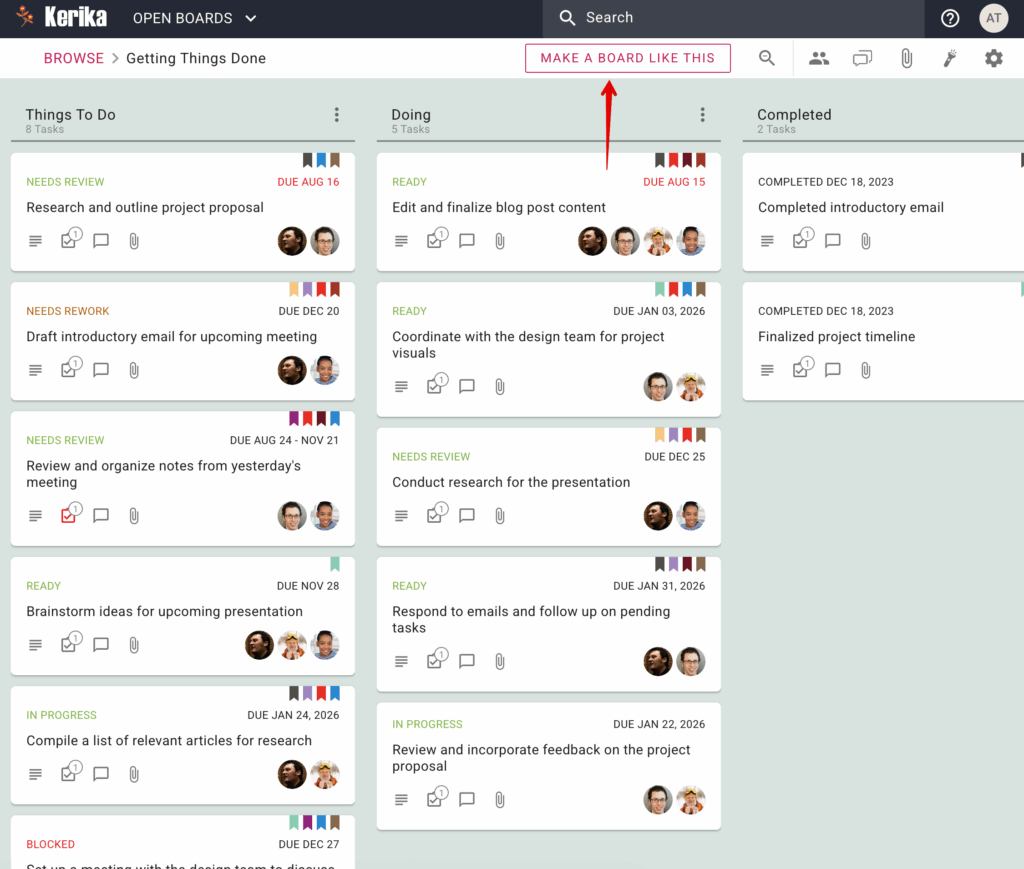
To make it easy for people to handle both needs, we now include a MAKE A BOARD LIKE THIS button that’s shown whenever a new user is viewing a sample board.
The MAKE A BOARD LIKE THIS option shown to new users when they are viewing a sample board.
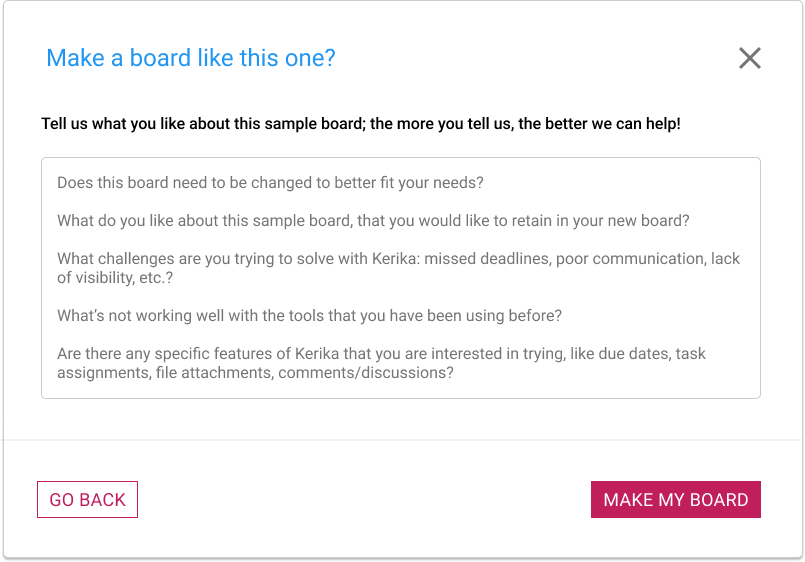
Clicking on this button brings up a dialog where the new user is asked what they would like to do with their version of this sample board:
Make a board like this
If all you need is a copy, just tell that to the AI: “Make a copy of this board”. But if you want a version of the board that’s personalized to your needs, make sure you give plenty of input to the AI!
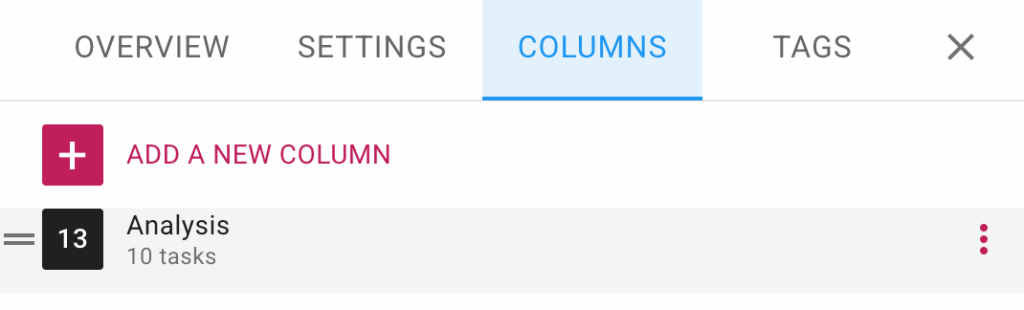
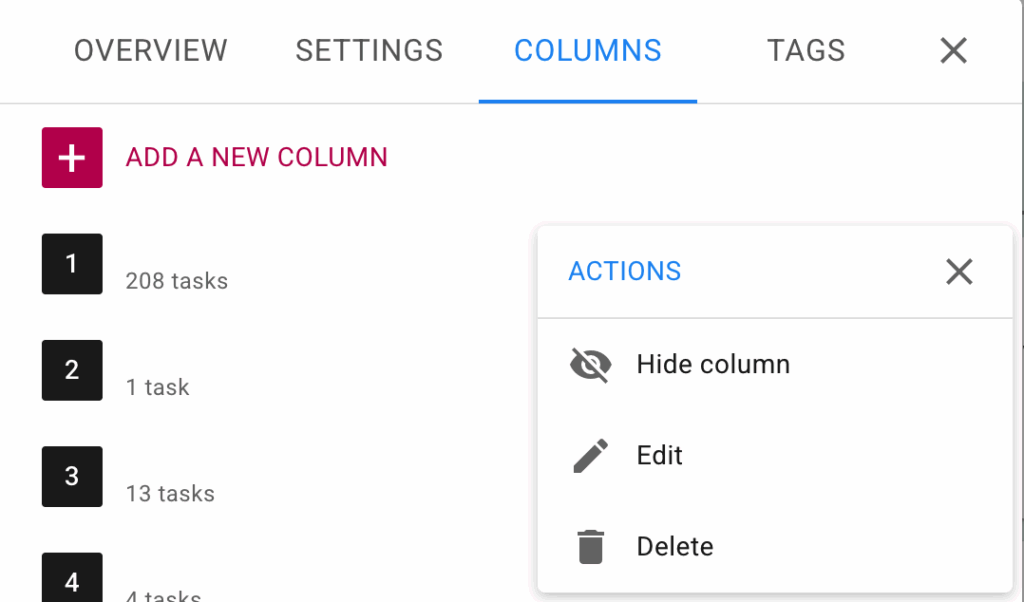
If you are working on a Task Board, the Board Settings dialog’s Column tab can now let you hide or show columns.
To use this feature, open the Board Settings dialog by clicking on the gear button that appears on the top-right corner when you are viewing a Task Board, and then switching to the COLUMNS tab.
When you hover over any column in the list an options button (three dots) will appear:
Click on that and you will see the Actions menu.:
The Columns tab of Board Settings dialog for Task Boards
This makes it easier to manage boards with large numbers of columns.
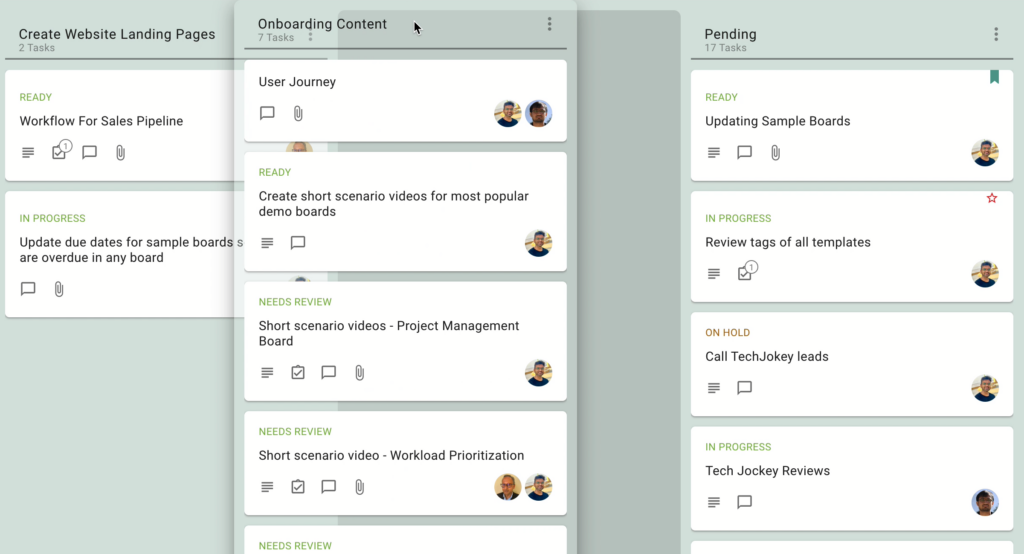
We made it easier to make changes to the workflow of a Task Board: now a Board Admin can simply drag a column on the board to the left or right to reorder the board.
A ton of bug fixes, most of them so obscure that no end-users ever spotted them, but since we track our error codes seriously we make sure we fix stuff that no one even knew fixing. Some of the bug fixes are truly obscure, here’s a few from our latest version that’s easier to explain:
There were some problems related to how our iOS app was updating that were a result of Apple deciding not to support Progressive Web Apps anymore. (Thanks for nothing, Apple.)
When a person renamed a file attached to a task or board, the file was appearing as having unread updates (orange highlight) to the user who made the change.
For our Kerika+Microsoft users, we needed to make sure the correct OneDrive icons were appearing where files were attached to tasks and boards.
Also for our Kerika+Microsoft users: OneDrive files are better support for users of our Whiteboards feature.
When a text field could potentially be auto-filled using the browser’s saved values, if a user selected a saved value it wasn’t displaying properly. (Thanks to a breaking change in one of Chrome’s many, many updates — seriously, why are they releasing new versions every week?)
Dates shown for non-English users will now appear in the locally selected languages.
If a user opened a task on the mobile apps that had been found by doing a search, editing the task’s title was showing HTML characters.
Handling situations better where two people were making changes to the same task at the same time: users are warned if someone else has made changes that would get overwritten if they saved their own changes.
Improvements in the new user experience: this is, frankly speaking, a never-ending quest for us!
Fixed a situation where a new user who didn’t complete their signup returned later to Kerika: the language selection that’s the first thing that a new user does wasn’t working properly.
We made it easier for people to stop getting their 6AM task summary emails; we really should have done this a long time ago.
Fixed a long-existing bug that finally surfaced that omitted some tasks from the 6AM emails.
We are thrilled to announce a partnership with Twine, a global expert network that major companies are using to outsource all kinds of work:
Designers
Animators
Musicians
Filmmakers
Photographers
Marketers
Developers
Illustrators
Twine has over 500,000 registered members already, and is growing fast — and we are thrilled to be partnering with them to help Twine’s freelancers and clients get more done using our Task Boards.
Twine’s users are exactly the kind of folks that Kerika was designed for: creative people, developers, freelancers and businesses that need to come together quickly to execute on a project. In an environment that’s that fast-moving, having access to a task management tool that’s designed specially for remote and distributed teams, with a design that’s simple enough for anyone to get going with, is essential.
And that’s where Kerika can help Twine’s community.
As part of this partnership we will develop custom templates that can help Twine projects get going faster. And that’s just a starting point: we hope, over the coming months, to deepen this relationship!
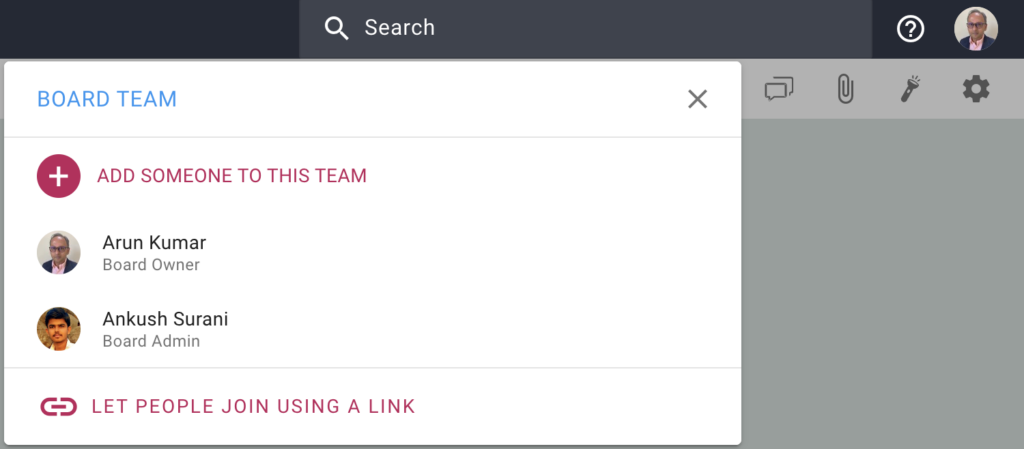
Board Admins can now invite people to join their boards as Team Members or Visitors by simply sharing a unique link that’s created for each board. We added this function because some of latest users include schools that want to add large groups of parents to boards with a single action. Here’s how it works:
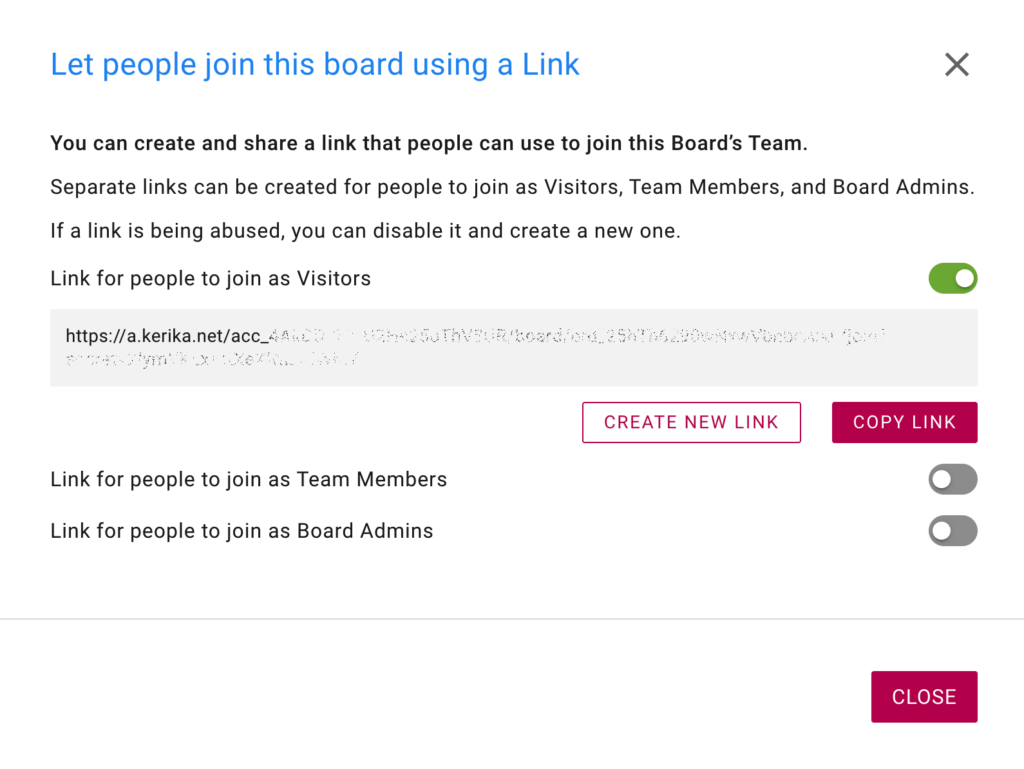
When you open the Board Team dialog (as a Board Admin), you will see a new option at the bottom, called Let People Join Using a Link:
Let People Join Using A Link
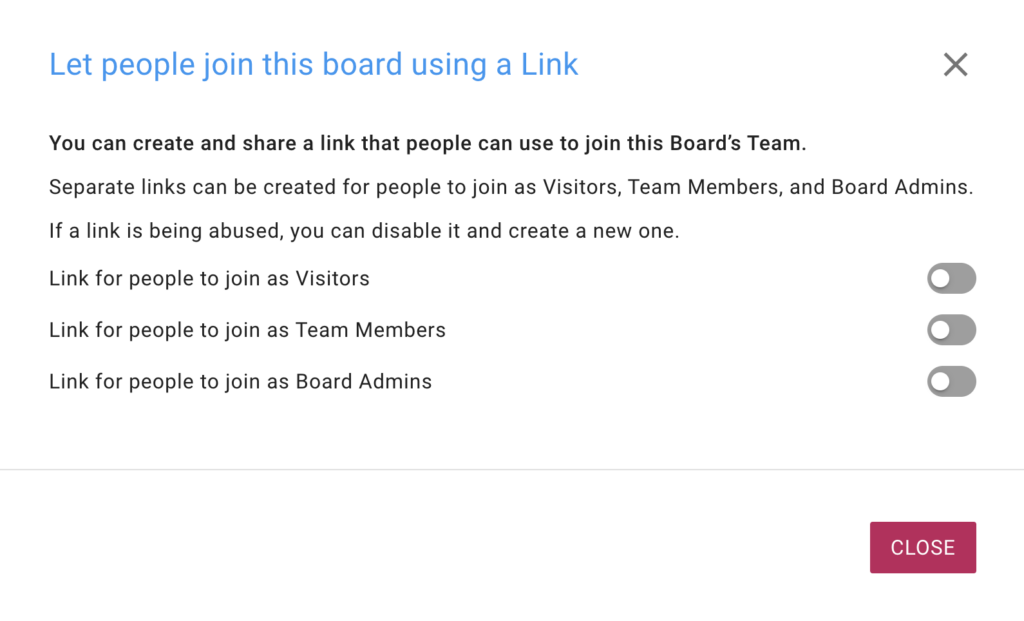
Clicking on this will bring up a dialog that let’s you create links for adding people as Board Admins, Team Members, and Visitors:
Creating Links
For additional security, separate links are created for each role: Board Admin, Team Member, and Visitor. When you turn on one of these options, Kerika will create a special link that you can then send to a large group of people to join you board.
Link Created
(We obscured the link in the screenshot above, for our own security!)
When you create a link, it’s also automatically copied to your clipboard for easy pasting in an email or chat.
If you are concerned that the link may have been compromised, perhaps because the people you sent it to have carelessly passed it on to others, you can always turn it off: turning off a link will automatically make it useless for future use.
We are making a change to the names of the Done and Trash columns on Task Boards, to make it easier for new users to understand what these columns represent.
The Done column will become Completed and the Trash column will become Deleted.
Looking at the demographics of our new users, we found that over 80% had never used any kind of boards before, and we think the new names will be easier for them to understand.
This is just a naming change, there’s no difference in functionality.
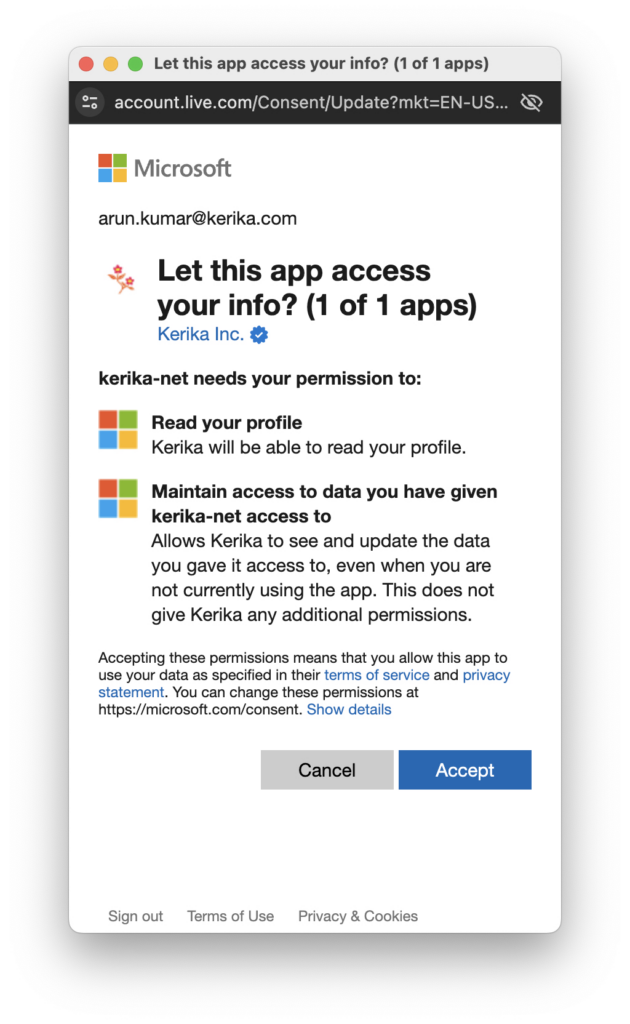
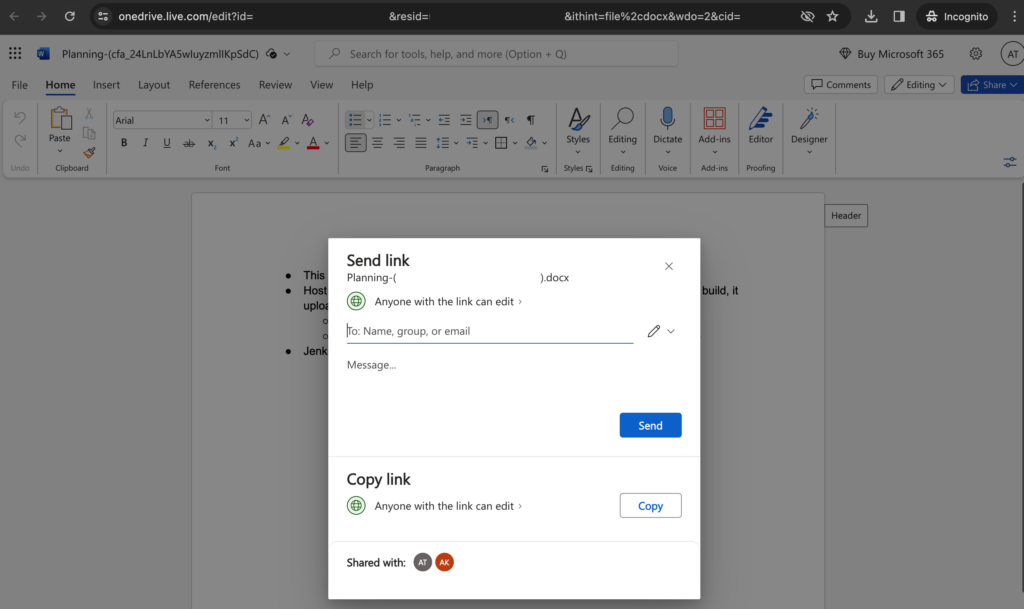
We have made a very big extension to Kerika, by integrating with Microsoft 365: now you can sign up using your Microsoft ID, and have your files stored in your own OneDrive account!
Kerika+Microsoft works the same was as Kerika+Google and Kerika+Box: you can use your existing Microsoft account to sign up and login to Kerika; there’s no need to create and remember a new password:
When you upload files to your board for the first time, you will be asked to choose a preferred cloud storage: if it’s Microsoft, then you will be asked to give Kerika access to a single folder in your Microsoft OneDrive:
Microsoft Authorization
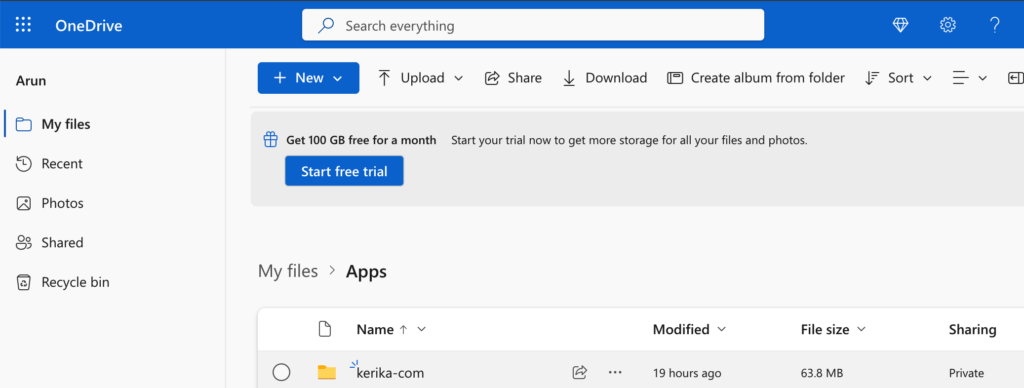
After you allow Kerika access to your OneDrive, Kerika will create a single folder in your OneDrive that it will use for all of your Kerika-related files:
Kerika in OneDrive
That one top-level folder is all that Kerika will ever use: inside there Kerika will automatically manage all the subfolders you need to sort your different Kerika accounts (yes, some folks have more than one Kerika account!) and your board.
Kerika doesn’t go snooping around or altering any other part of your OneDrive!
As folks join or leave your board team, access to all the files on that board will be automatically managed by Kerika, freeing you up from all the admin work that other tools make you do.
You can even create new Office 365 documents from inside Kerika, and have them shared automatically with your board team:
Create New Microsoft Documents
And we have always had the ability to sync your Kerika due dates with your Outlook calendar, so that completes everything you need to get the most of Kerika+Microsoft!