Category Archives: Technology

Posts related to technology in general.

How to install Kerika from the Google Apps Marketplace: step-by-step directions

If you have a premium (i.e. paid) version of Google Apps running in your organization, your Google Apps Administrator will need to authorize Kerika for your domain, before anyone within the organization can use Kerika.

Here’s step-by-step directions on how to do this:

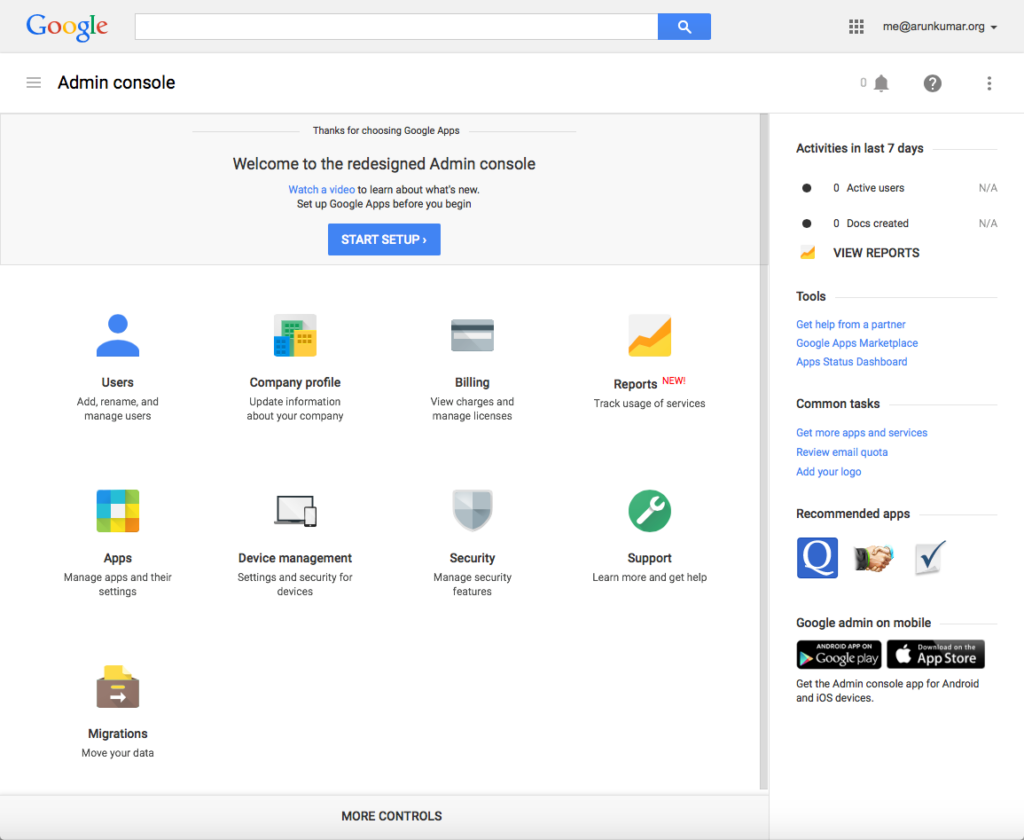
1. Go to your Google Apps Admin console.

Go to http://admin.google.com, and log in as the Google Apps Administrator for your domain:

Start at Google Admin console


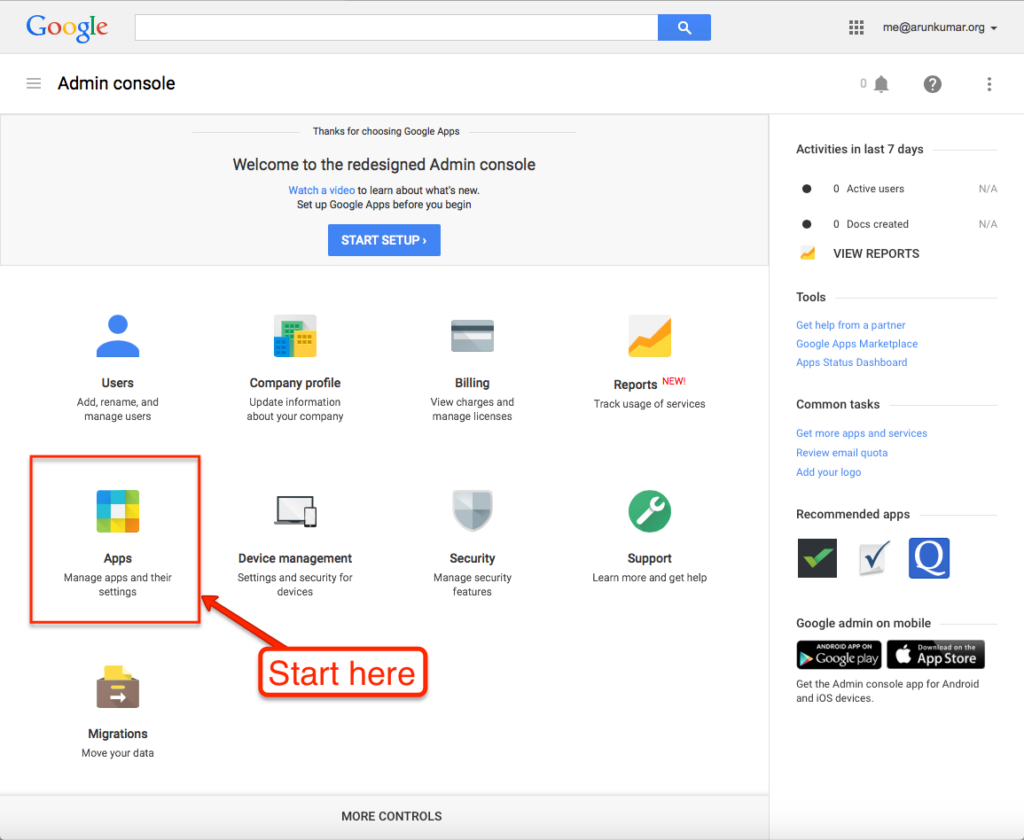
2. Click on the “Apps” button.

This is where you can manage all your Google Apps, as well as third-party apps like Kerika that integrate with your Google Apps:

Click on the Apps button


3. Go to “Marketplace Apps”.

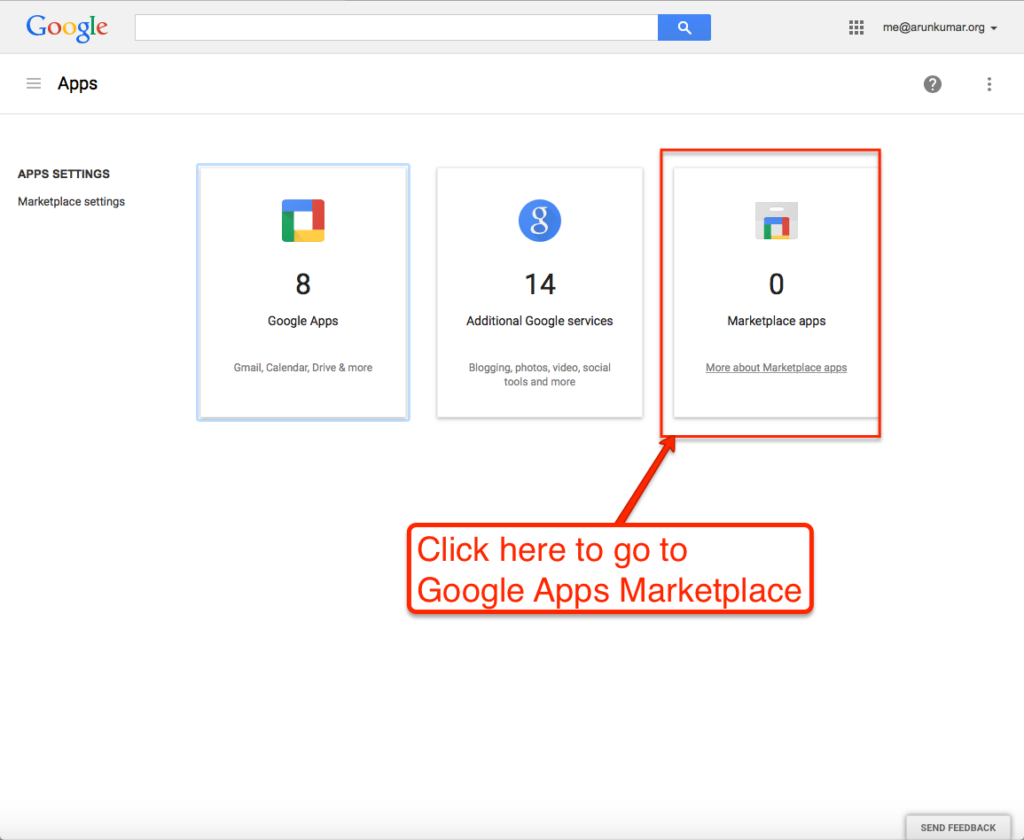
Google separates out its own apps from third-party apps, so you want to click on “Marketplace Apps”:

Go to Google Apps Marketplace


4. Click on “Add Services”.

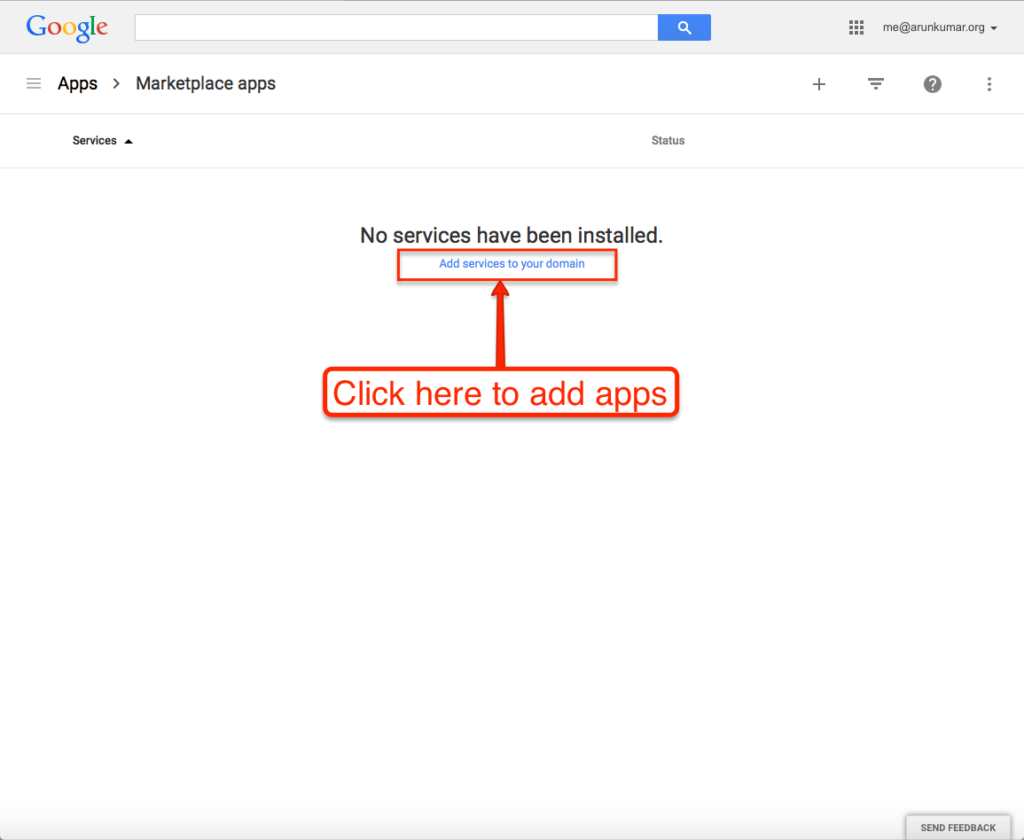
All the apps you currently have installed for your domain will show up here (in this example, none have been installed so far); click on the blue “Add services” link:

Add services to your domain


5.  Search for Kerika.

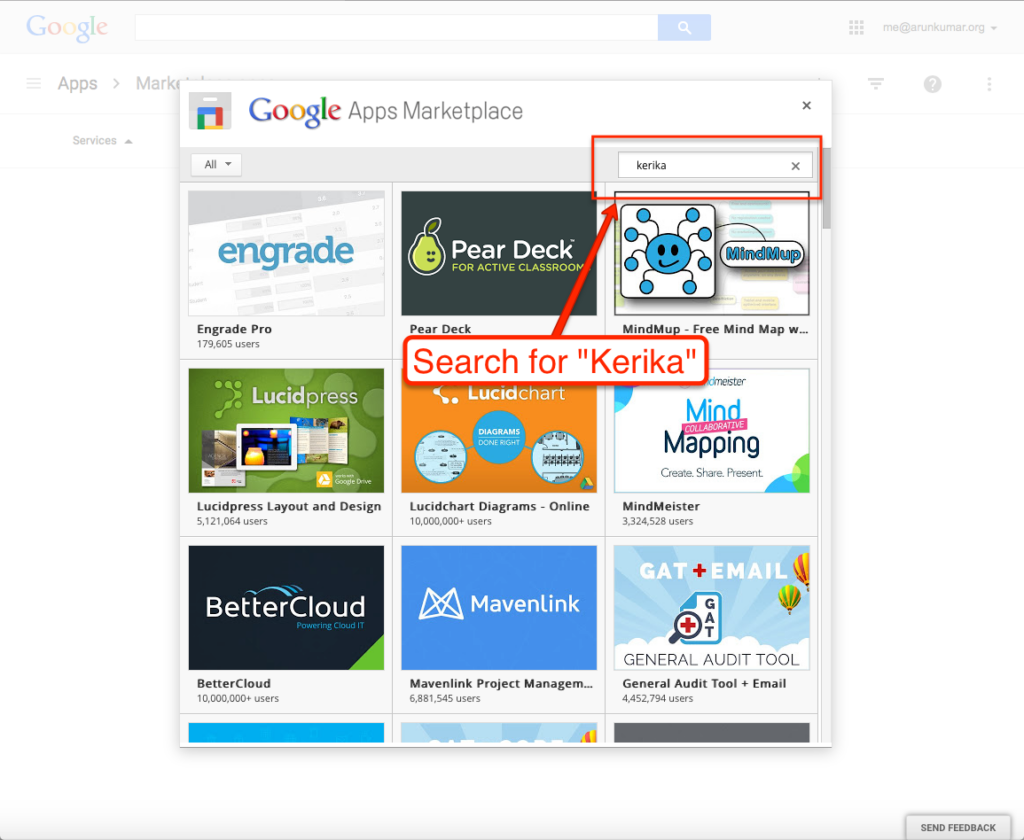
Search for “Kerika” in the Google Apps Marketplace:

Search for Kerika
Search for Kerika


6. Click on “Install App”.

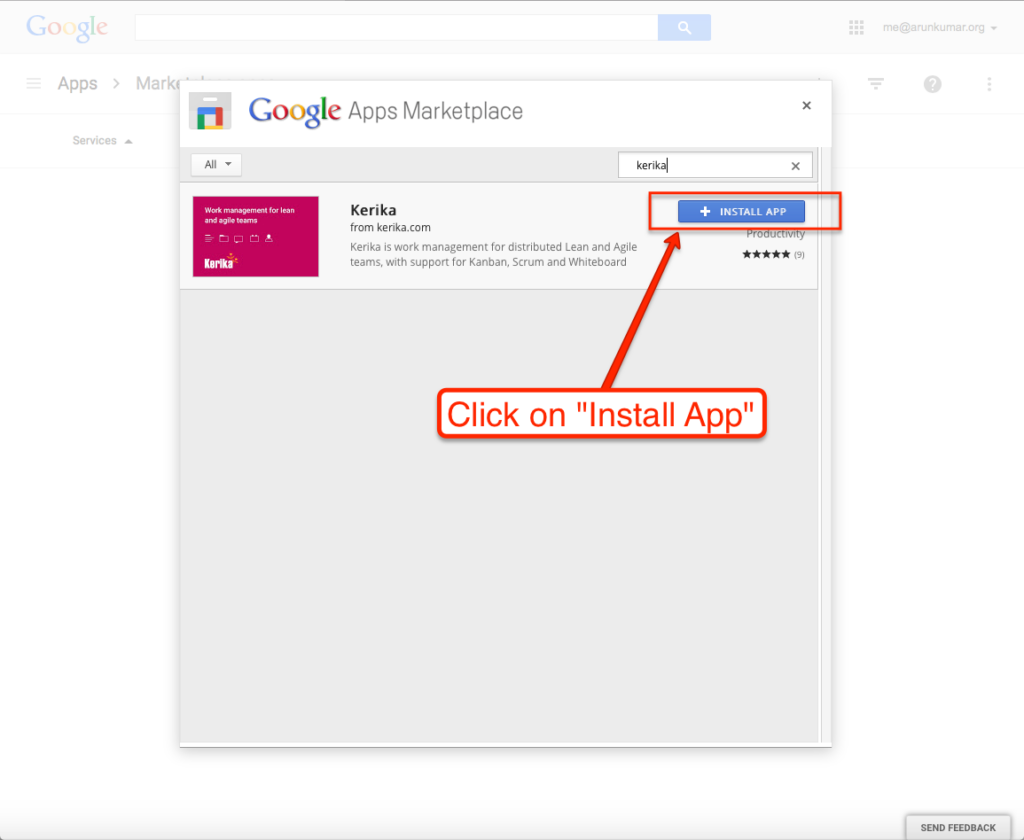
Kerika’s entry will show up in your search results; click on the blue “Install App” button:

Click on Install App


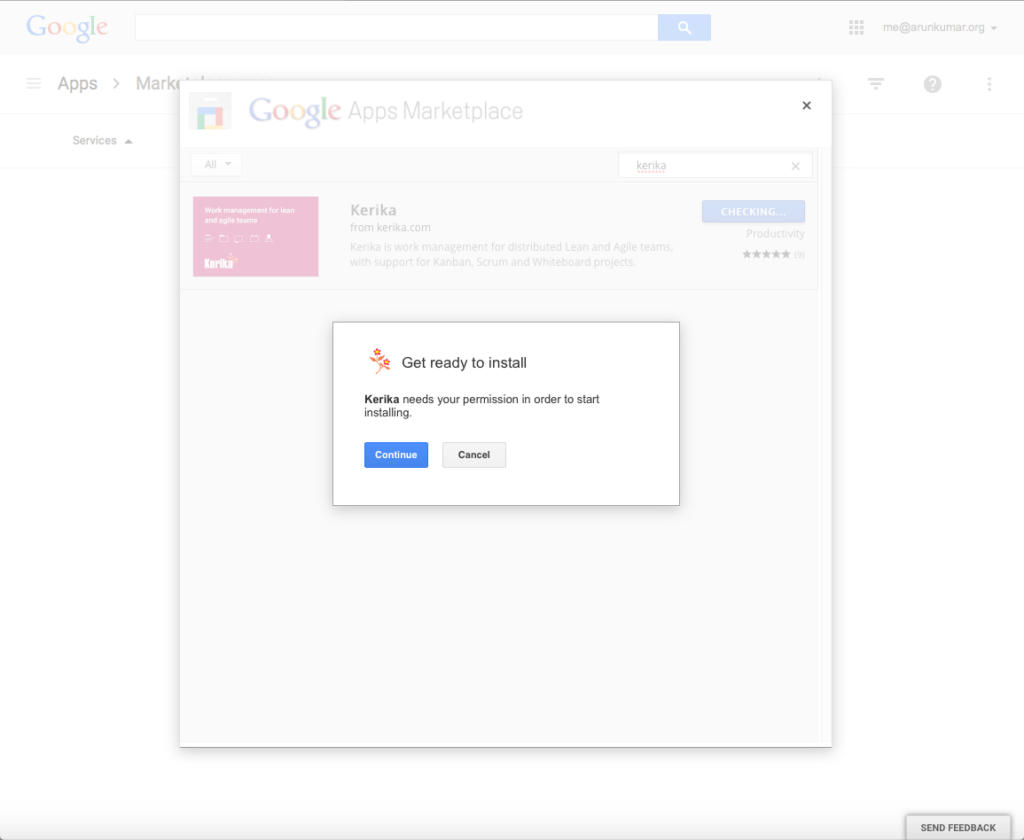
7. Get ready to install

What you see next:

Get ready to install


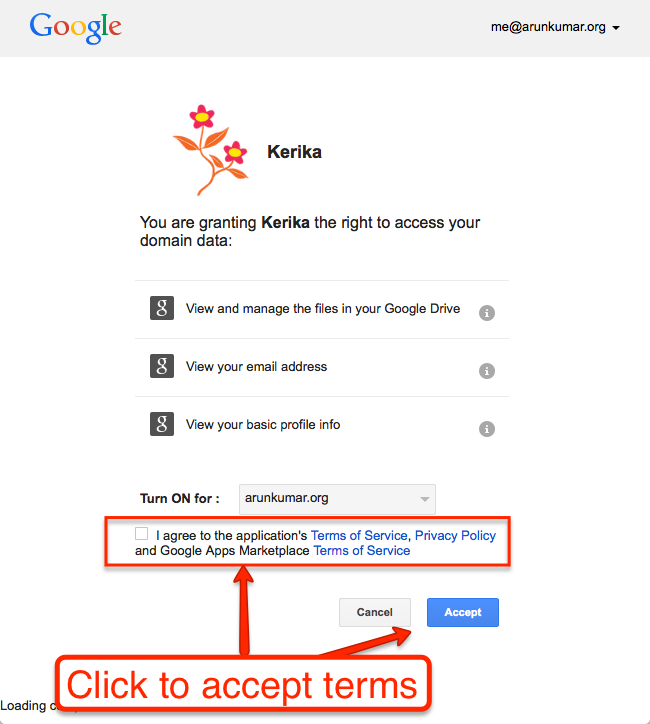
8. Accept the Terms

Kerika uses your Google Drive to store your project files; you can learn more about how Kerika works with Google:

Click to accept terms


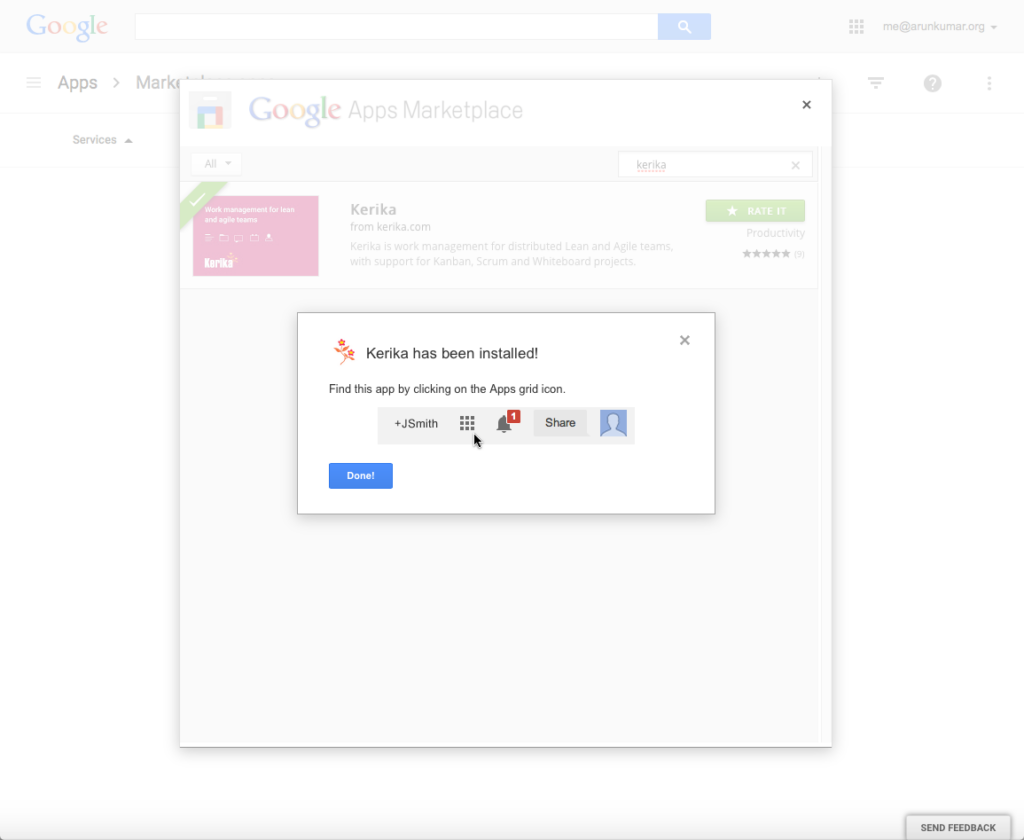
9. Success!

Success!
Success!


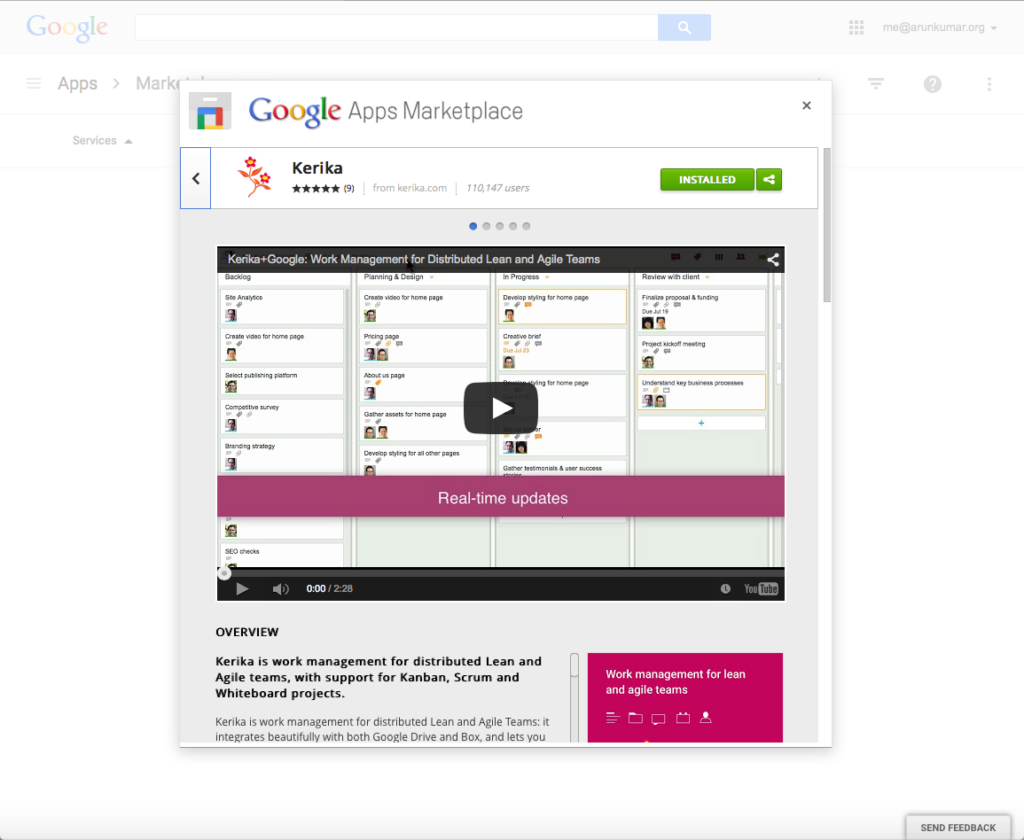
10. All done…

All done
All done


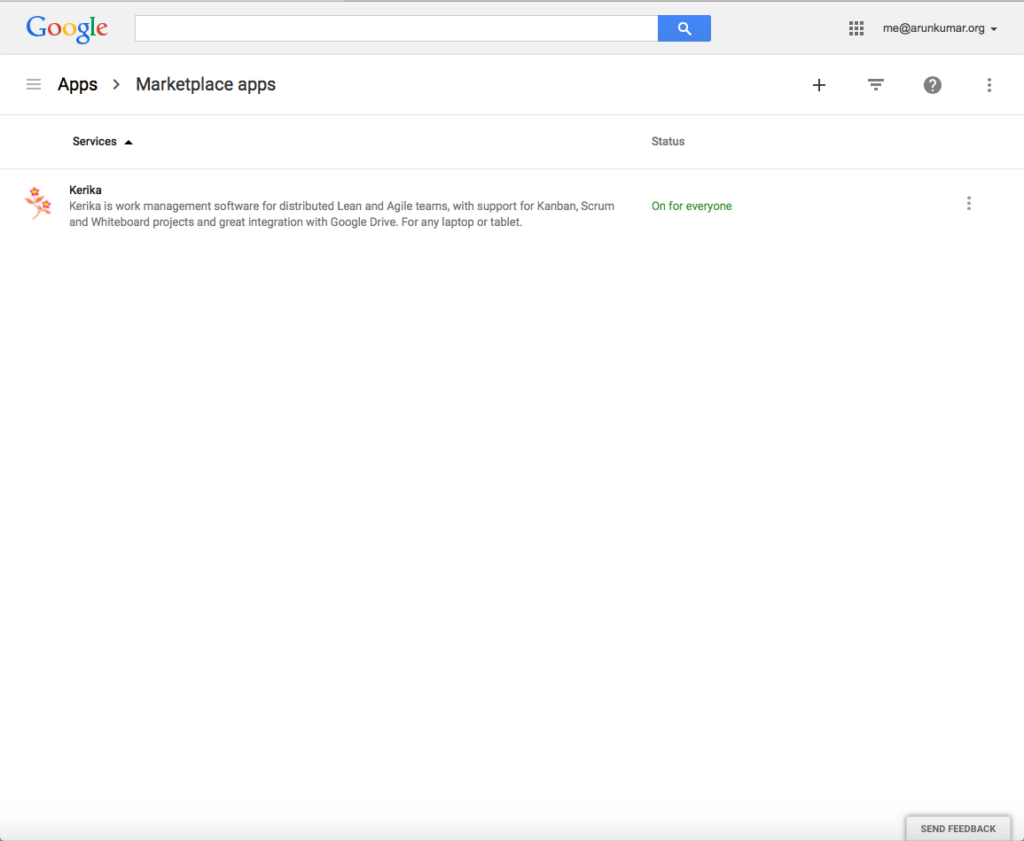
11. Kerika now shows up in the list of apps for your domain

Looking good
Looking good


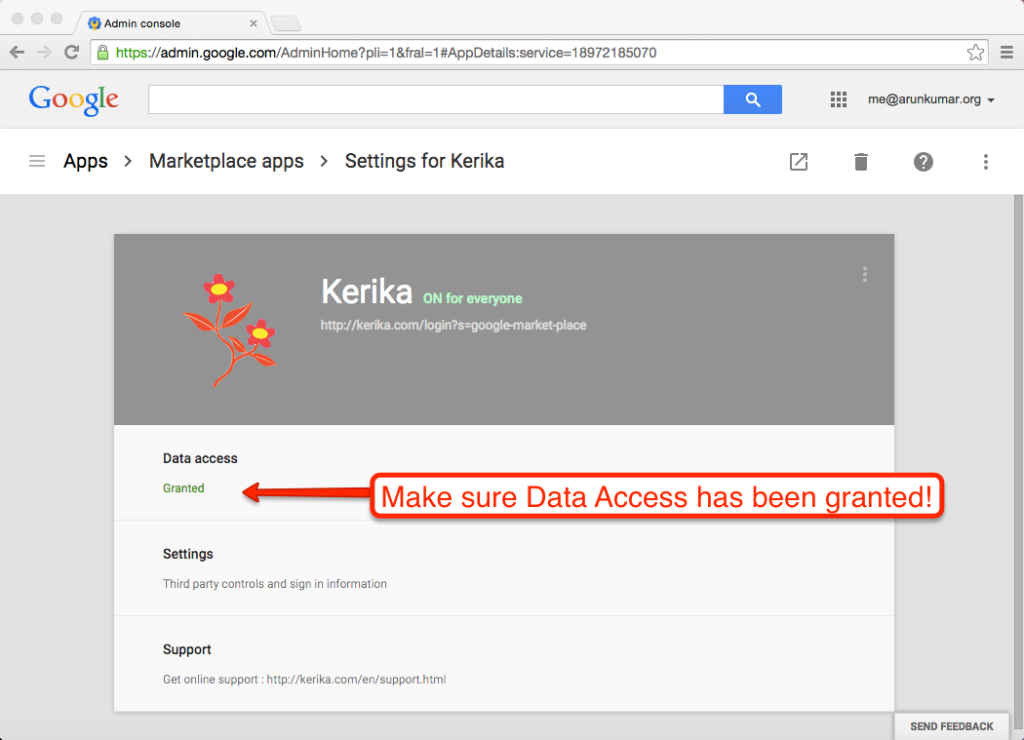
12. Still having problems?

Make sure you have granted Kerika “data access” to your Google Drive:

Make sure data access has been granted

We are going to drop support for Internet Explorer 9

We have been one of the last jazzy Web apps out there that was still running on Internet Explorer 9, but that’s going to change: with our next release, due in a month or so, we will be asking Internet Explorer users to upgrade to IE10 or later.

The main reason for this change is that all “modern” browsers — and IE9 qualifies as “modern” only when it stands next to IE8 — do a lot of work within the browser itself that Kerika currently does: stuff like managing and manipulating the DOM structure of the Kerika application.

This means that the Kerika client-application — the bit that you actually see and use in a browser — is unnecessarily complicated, and somewhat slower, than it needs to be, because we are doing some work that IE10+, Chrome, Firefox and Safari all do within the browser itself.

Dropping support for IE9 will enable us to provide a faster user experience, with less complexity in the code.

Why Box can seem too “chatty” with their email notifications

Some of our Kerika+Box users have been complaining about the number of email notifications they get when new projects are created: this has to do with Box, rather than Kerika, but it’s helpful to understand what’s going on, and what you can do about it.

When you create a project in Kerika, Kerika creates a dedicated folder for the files that will be used in that project.  This folder is shared with whoever needs access to that Kerika project.

Every Kerika user can set a personal preference:  you can choose to share your new projects with your account team automatically when they are created, or just with people as and when you add them one by one to a Kerika project.  By default, this is set to “share with account team” since this helps people discover new projects within their organization.

One downside of this: whenever you create a new project team, especially if it owned by a service account, a new Box folder will get created for this project and shared automatically with everyone who is part of that account.

This was resulting in way more emails than anyone wants to see, so we have made a change in the way we work with Box:

  • When people get added to a Box folder, through Kerika, they will no longer get an email notification.
  • However, the Account Owner will still be notified; there doesn’t seem to be any way around this.


Don’t smile (too much)

When you chat on a card, on any Task Board or Scrum Board (or on the canvas on a Whiteboard), the chat message gets sent to the right people as emails.

And who are the “right people”? Well, anyone who is assigned to that card will get the chat sent as email, and Project Leaders can optionally get chat pushed to them as email as well. Everyone else can catch up with the chat when they visit their board.

When chat messages get pushed to you as email, you can reply to them just like regular email (all you need to do is a simply “Reply”, not a “Reply All”).

But, don’t go crazy with emoticons!  Most smileys work OK, but not every emoticon will get encoded correctly (using UTF-8).

So, it’s natural to be happy when you are using Kerika, and it’s OK to smile while you work, but don’t use too many strange emoticons in your email replies!

🙂

Reaching the edges of a diamond

When you are drawing on a canvas, either for a Whiteboard project or a canvas that you have attached to card on a Task Board or Scrum Board, Kerika gives you some basic shapes you can use to sketch out your workflow, process diagrams and other ideas:

Drawing shapes on canvas

You can connect shapes using lines and arrows (single- and double-headed), and as you move the shapes around, the lines and arrows automatically adjust so that they terminate properly on the edge of the shape.

It turns out we had a bug where the lines didn’t properly connect to the very edges of diamond (rhombus) shapes:

Problem with lines on edges of diamonds

This was quite literally an “edge case” (sorry about the pun): when the line travels along the edge of the diamond shape, as the shape is moved by the user, a function is used to calculate the exact intersection of the line and the shape.

(This function is the only proof we have ever seen that anyone actually needs to use trigonometry in real life.)

When the line travels right up to the corner of the diamond shape, because the line is connecting the diamond to another shape that is of precisely the same height and width, and the two shapes are aligned perfectly (either vertically or horizontally), the function returned two possible intersection points.

We have fixed this problem in our latest release. It should make for neater looking flowcharts!

Using Kerika, but not using English

Right now, the Kerika user interface is entirely in English, but we have users worldwide and many of them use Kerika with other languages, e.g. Greek, Japanese, Korean, etc.

When you export data from a Task Board or Scrum Board that includes non-English characters, the foreign characters are actually preserved correctly as part of the exported data, but if you need to then import data into some other program, like Microsoft Word or Excel, you need to make sure the other program correctly correctly interprets the text as being in UTF-8 format.

WHY UTF-8?

UTF-8 is a coding standard that can handle all possible characters, so it works with languages like Greek, Japanese, etc. which don’t use the Roman alphabet.

For a long time now, UTF-8 has been the only global standard that works across all languages, because of its inherent flexibility in handling different character sets.

When you do an export of data from a Kerika Task Board or Scrum Board, we create the CSV files in UTF-8 format, and include what’s called the Byte Order Mark (BOM) in the first octect of the exported file.

Including a BOM is the best way to let all kinds of third-party programs know that the file is encoding in UTF-8: it’s a standard way of saying to other programs, “Hey, guys! This text may contain non-English characters.”

And for the most part, including a BOM works just fine with CSV exports from Kerika: Google Spreadsheets interprets that correctly, Microsoft Excel on Windows interprets that correctly, but not…

EXCEL ON MACS

Many version of Excel for Macs, going back to Office 2007 at least, have a bug that doesn’t correctly process the BOM character. Why this bug persisted for so long is a mystery, but there we are…

The effect of this bug is that an exported file from Kerika, containing non-English characters, will not display correctly inside Excel on Mac, although it will display correctly with other Mac programs, like the simple Text Edit.

There’s not much we can do about this bug, unfortunately.

THE TECHNICAL BACKGROUND TO ALL THIS:

BOMs are used signify what’s called the “endianess” of the file.

Endianess is a really ancient concept: in fact, most software developers who learned programming in the last couple of decades have no idea what this is about.  You can learn about endianess from Wikipedia; the short summary is that when 8-bit bytes are combined to make words, e.g. for 32-bit or 64-bit microprocessors, different manufacturers had adopted one of two conventions for organizing these bytes.

For Big-Endian systems the most significant byte was in the smallest address space, for Little-Endian systems the most significant byte was in the largest address space.

(If you have a number like 12345, for example, the “1” is the most significant digit and the “5” is the least significant. In a Big-Endian system this would be stored as “1 2 3 4 5”; in a Little-Endian system it would be stored as “5 4 3 2 1”. So, when you get presented with any number, you really need to know which of the two systems you are using, because the interpretation of the same digits would be wildly different.)

(About a dozen years ago Joel Spolsky, former PM for Excel, wrote a great article on the origins and use of BOM, for those who want to learn more about the technical details.)

Why this affects Kerika at all? Because when you do an export of cards from Kerika, the export job is run on a virtual machine running on Amazon Web Services.

We have no idea what kind of physical hardware is being used by AWS, and we are not supposed to care either: we shouldn’t have to worry about whether we are generating the CSV file using a little- or big-endian machine, and whether the user is going to open that file with a little- or big-endian machine.

That’s the whole point of using UTF-8 and a BOM: to make it possible for files to be more universally shared.
We are dropping the “Embedded View” feature for canvases

We used to have a feature where you could add a URL to a canvas or Whiteboard, and then choose to show that either as a regular bookmark, or as an embedded IFRAME.

We are dropping the embedded IFRAME feature, because most of the time it doesn’t work, and even when it does work, it’s not a great feature to have:

  1. You can only IFRAME a website if that site lets you. And, increasingly, most sites don’t.
  2. IFRAMEing a third-party website on a Kerika page is a potential cause for worry, from a security perspective, because we are letting that third-party website right into the Kerika page.

Linking images on a canvas to external websites

One little-known feature of Kerika’s Whiteboards: if you have an image (picture) on a canvas, you can also add a link to a Website, so that anyone clicking on the picture would be taken straight to that website.

(It’s one of several little-known features that we hope will become well-known, with our recent redesign of the Canvas toolbar; we have built too many really cool features that not enough people are aware of!)

One common use of this feature is to create an external-facing page that includes a logo: you can add the logo’s image to your canvas, and then point that logo to your company’s website.

It’s simple: just select the image, and then click on the “Link to website” button on the Canvas toolbar.

Link image to website

Lock Canvas: a new feature

With our latest release we are adding a feature that will make it easier for folks to create, and maintain, very elaborate Whiteboards: any team member can lock a canvas to discourage other team members from making changes.

This isn’t a very complicated function; it has a very simple purpose: if you have been working hard on a particular canvas, which could be a stand-alone Whiteboard, part of a series of nested canvases in a Whiteboard, or attached to a card on a Task Board or Scrum Board, you may become worried that other team members might come by to visit your board and carelessly make changes to your pristine creation.

(After all, we creative types can get really possessive about our beautiful canvases :-)!)

To discourage others from making changes, just click on the lock button that appears to the far end of the Canvas toolbar:

For Team Members, this is a “soft lock”: any canvas that’s locked by one Team Member can be unlocked by any other Team Member, so you are not really shutting out people from making changes, merely discouraging them by signalling that you would like to preserve a canvas in a particular way.

Canvas locked by Team Member

But for Project Leaders, this is a “hard lock”: if a Project Leader locks a canvas, it can be unlocked only by another Project Leader. (Remember: projects can have more than one Project Leader!)

Canvas locked by Project Leader

So, if a canvas gets to a truly pristine state that you want to preserver forever, have the Project Leader lock it, and the rest of the team will be able to view it but not make changes.

And, of course, if canvases are embedded (nested) inside each other, each canvas can be locked or unlocked, as you like, giving you maximum flexibility.

Switching between open projects

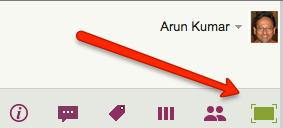
When you have expanded your view of a Kerika board to fill up the browser, using the “Max View” button on the top-right corner of the Kerika app

Max View button
Max View button

Another button appears on the top-right, to help you quickly switch between all your open project tabs, as well as get to your Home Page:

Switching between tabsThis button is color coded to help you understand, at a glance, what’s going on in all your open projects:

  • If any of your open projects has an overdue card, then the button appears in red.
  • If any of your open projects has updates that you haven’t seen yet, the button appears in orange.
  • If any of your open projects has new cards that you haven’t seen yet, the button appears in blue.

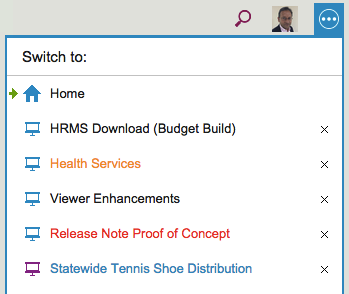
Clicking on the button shows a list of all your open projects, along with your Home Page:

Switching between tabs

The little green arrow (shown above at the top) points to the currently open tab, the one that you are viewing right now.

Projects have a blue icon; templates have a purple icon: in the example above, Statewide Tennis Shoe Distribution is a template, while all the others are projects.

  • Boards with unread updates have orange titles, like Health Services above.
  • Boards with overdue cards have red titles, like Release Note Proof of Concept above.
  • Boards with new (unseen) cards have blue titles, like Statewide Tennis Shoe Distribution above.

You can reorganize your list of open tabs by simply dragging them up or down this list.

(But, the Home Page is always on the top; that can’t be moved.)

You can also close an open project tab that you are no longer interested in by clicking on the “X” to the right edge of the entry.

So, there’s a simple visual consistency in Kerika’s design:

  • Blue = New
  • Orange = Changed
  • Red = Overdue