Monthly Archives: September 2025

Organizirajte verzije datoteka bez gnjavaže

Upravljanje višestrukim verzijama datoteka može brzo postati neodoljivo. Vjerojatno ste se zatekli kako buljite u datoteke s oznakom “final”, “final-2” ili “final-really-this-time”, pitajući se koja je posljednja. Uobičajena je frustracija pri žongliranju ažuriranjima projekta.

Učinkovitiji sustav u potpunosti eliminira ovo nagađanje. Automatskim praćenjem i zamjenom starih verzija datoteka, možete osigurati da vaš tim uvijek radi s najnovijom datotekom, bez nereda ili zabune.

Evo vodiča za učinkovito organiziranje i ažuriranje datoteka u kontekstu specifičnog zadatka i na razini ploče:

  1. Prilozi kartice sa zadacima
snimka zaslona koja prikazuje Kerikino intuitivno sučelje kartice zadataka za jednostavno upravljanje datotekama. Slika ističe karticu 'Privici' na određenom zadatku ('Dizajn korisničkog sučelja'), sa strelicom koja pokazuje na ikonu 'Učitaj novu verziju'. Ovo pokazuje kako članovi tima bez napora mogu zamijeniti zastarjele datoteke izravno unutar zadatka, osiguravajući da svi surađuju koristeći najnoviju verziju i eliminirajući zbunjujuće duplikate poput 'final-v2.docx'. Ovaj besprijekorni proces podržava fokusiranu suradnju i pojednostavljuje tijek rada projekta.

Kliknite ovdje za pregled ove kartice zadatka

Kartice zadataka mjesto su gdje se događa sva magija kada je u pitanju organiziranje datoteka povezanih s određenim zadacima. Evo kako ažurirate datoteku:

  • Pronađite svoju datoteku: Otvorite karticu zadataka na kojoj je priložena datoteka.
  • Učitajte novu verziju: Kliknite na Prenesi novu verziju ikona pored postojeće datoteke. Time se stara verzija automatski zamjenjuje novom, a povijest ostaje netaknuta. Nema potrebe brisati staru verziju ili preimenovati datoteku.
  • Prednosti: Ažurirana datoteka odmah se povezuje sa zadatkom, tako da vaš tim može nastaviti suradnju bez preskakanja.

Kartice zadataka osiguravaju da vaša ažuriranja datoteka ostanu relevantna za zadatak koji imate, držeći sve na istoj stranici.

  1. Prilozi za ploču
Zamjenski tekst: Snimka zaslona koja ilustrira kako Kerika pojednostavljuje upravljanje dokumentima na razini projekta putem privitaka na ploči. Slika prikazuje glavni prikaz Kerika ploče sa strelicom koja ističe ikonu 'Priloži datoteke ovoj ploči'. Skočni prozor 'Privici ploče' prikazuje datoteke na razini projekta, a druga strelica pokazuje na ikonu 'Učitaj novu verziju', pokazujući jednostavan proces ažuriranja. Ova značajka pruža središnje, lako dostupno mjesto za ključne resurse kao što su povelje ili predlošci, osiguravajući da cijeli tim ostane u skladu s najnovijim informacijama, jačajući suradnju za distribuirane ili hibridne timove.

Kliknite ovdje za pregled ovog priloga ploče

Prilozi ploči idealni su za datoteke koje utječu na cijeli projekt, kao što su projektne povelje ili zajednički predlošci. Ažuriranje datoteka ovdje je jednako jednostavno:

  • Dođite do Privitaka ploče: Kliknite na Prilozi ikona na izborniku ploče.
  • Ažurirajte datoteku: Odaberite datoteku koju želite zamijeniti i kliknite Prenesi novu verziju dugme. Starija verzija se neprimjetno zamjenjuje, tako da nema zabune oko toga koja je verzija aktualna.
  • Prednosti: Vaš cijeli tim dobiva trenutni pristup najnovijoj verziji, bez obzira odakle rade.

Prilozi na ploči osiguravaju organiziranost i ažurnost datoteka za cijeli projekt bez stvaranja duplikata.

Zaključak

Učinkovito upravljanje datotekama pojednostavljuje tijek rada projekta i poboljšava suradnju. Uklanjanjem zabune višestrukih verzija datoteka, možete održavati svoj tim organiziranim i usredotočenim na ono što je uistinu važno.

How to use status flags on Task Boards and Scrum Boards

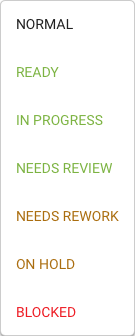
Card Status Values

Cards on Kerika’s Task Boards and Scrum Boards can have a status flag; this is used to communicate the state of the card to other people working on the board — Team Members and Visitors.

(These flags should reflect the current state of the card, not the importance or other attributes: that’s handled by the Tags and Priority fields, and will be covered in a separate blog post.)

Normal

This is the default for all cards: it simply means that this card has no particular status. Cards are not expected to stay NORMAL for very long: as soon as they are complete they should progress to READY or NEEDS REVIEW.

Ready (To Pull)

The concept of READY TO PULL comes from Kanban, and reflects a “pull rather than push” approach to how work is taken up when people are freed up from their current assignment.

Pull vs. Push deserves its own blog post, but the difference can be summarized as follows:

In traditional project management, with a command-and-control model that places a single project manager in charge of everything, work gets “pushed” to people, usually without any regard to their availability.

This is commonplace across all sorts of teams: for example, a QA person is assigned a card when a developer is finished with it, because the natural next step is for the card to go through QA.

The problem with this approach is that it shows an unrealistic view of the status of the entire project, and often hides the real bottlenecks within a team. In our example,

Easily Update Files With Newer Versions

If you’re using any other project management tool, chances are this has happened to you: you’re deep into a project, staring at a folder full of files labeled “final,” “final-2,” and “really-final-this-time,” trying to figure out which one is the latest version. Sound familiar?

But if you’re a Kerika user, updating files becomes refreshingly simple, seamless, and efficient. Unlike other tools, Kerika automatically tracks and replaces old file versions, so your team is always working with the most up-to-date version with no confusion and no hassle. Let’s dive into how it works:

How It Works: Updating Files in Kerika

In Kerika, files and attachments can be stored in two main areas: Task Cards and Board Attachments. Each area serves a unique purpose, giving you flexibility and control over your project files.

Let’s explore how you can seamlessly update files in both sections without creating a cluttered mess of versions.

1. Task Card Attachments

Upload new version preview
Click here to preview this task card

Task Cards are where all the magic happens when it comes to organizing files related to specific tasks. Here’s how you update a file:

  • Locate Your File: Open the Task Card where the file is attached.
  • Upload a New Version: Click the Upload New Version icon next to the existing file. This automatically replaces the old version with the new one while keeping the history intact. No need to delete the old version or rename the file.
  • Benefits: The updated file is instantly tied to the task, so your team can continue collaborating without skipping a beat.

Task Cards ensure your file updates stay relevant to the task at hand, keeping everyone on the same page.

2. Board Attachments

Board Upload Preview
Click here to preview this board attachment

Board Attachments are ideal for files that impact the entire project such as project charters or shared templates. Updating files here is just as straightforward:

  • Navigate to Board Attachments: Click the Attachments icon on the board menu.
  • Update the File: Select the file you want to replace and click the Upload New Version button. The older version is replaced seamlessly, so there’s no confusion about which version is current.
  • Benefits: Your entire team gets instant access to the latest version, no matter where they’re working from.

Board Attachments ensure project-wide files stay organized and up-to-date without creating duplicates.

Kerika’s smart file management is here to simplify your project workflows. Say goodbye to the chaos of endless file versions and hello to effortless collaboration. If keeping your team organized and productive sounds like a win, give Kerika a try today!

Sharing Files With Teammates Is Now Easier Than Ever

When you’re working with a team – whether it’s designers, developers, marketers, or anyone else – sharing files can quickly become a hassle. From design mockups to campaign assets and technical documents, ensuring everyone has access to the right files at the right time can feel overwhelming.

But with Kerika, file sharing is effortless. Whether it’s sending a design file to your creative team or sharing a project roadmap with stakeholders, Kerika keeps everything organized and accessible, making collaboration seamless and stress-free.

Let’s explore how Kerika transforms file sharing for teams of all kinds:

How It Works: Sharing Files in Kerika

In Kerika, files can be shared in two main areas: Task Cards and Board Attachments. Each serves a specific purpose, ensuring your files are shared with the right people in the right context.

Task Card Attachments

Task Card Attachment Preview
Check out how this task card works

Task Cards are perfect for sharing files that are tied to a specific task. Here’s how file sharing works in Task Cards:

  1. Attach Files Directly to the Task: Upload files or link resources directly to the task
  2. card. Your teammates can access these files without searching through emails or separate folders.
  3. Instant Access for Everyone Involved: Anyone inside the board has immediate access to the attached files, keeping collaboration smooth and efficient.
  4. File Sharing Benefits:
    ● No confusion over which files are relevant to the task.
    ● All task-related materials stay together, so your team always knows where to look.

Task Cards make file sharing focused, relevant, and effortlessly organized.

Board Attachments

Board Attachments Preview
Check out how this board attachment works

For files that affect the entire project, Board Attachments are the way to go. Here’s how file sharing works at the board level:

  1. Upload or Link Files for the Whole Team: Add files or external links to the board that everyone can access, like project charters, shared templates, or reports.
  2. Centralized File Sharing: All board members can access these files instantly, ensuring that key project resources are always within reach.
  3. File Sharing Benefits:
    ● Perfect for team-wide updates or resources.
    ● Keeps your project running smoothly by ensuring everyone has access to the same information.

Board Attachments make it easy to share files that matter across your entire team.

With Kerika, file sharing is no longer a bottleneck in your projects. Whether you’re collaborating on specific tasks or managing project-wide resources, Kerika makes it easy to keep your files organized and accessible.

Ready to take the hassle out of file sharing? Try Kerika today and see how it simplifies teamwork for you and your team!

Archived vs Active Boards: Organize Your Workspace With Ease

Managing multiple projects can quickly clutter your workspace, making it hard to focus on what’s important. With Kerika’s Archive Feature, you can keep your Home view clean by moving completed or inactive boards out of the way – without deleting them.

Let’s explore how archiving boards works in Kerika.

How to Archive Boards:

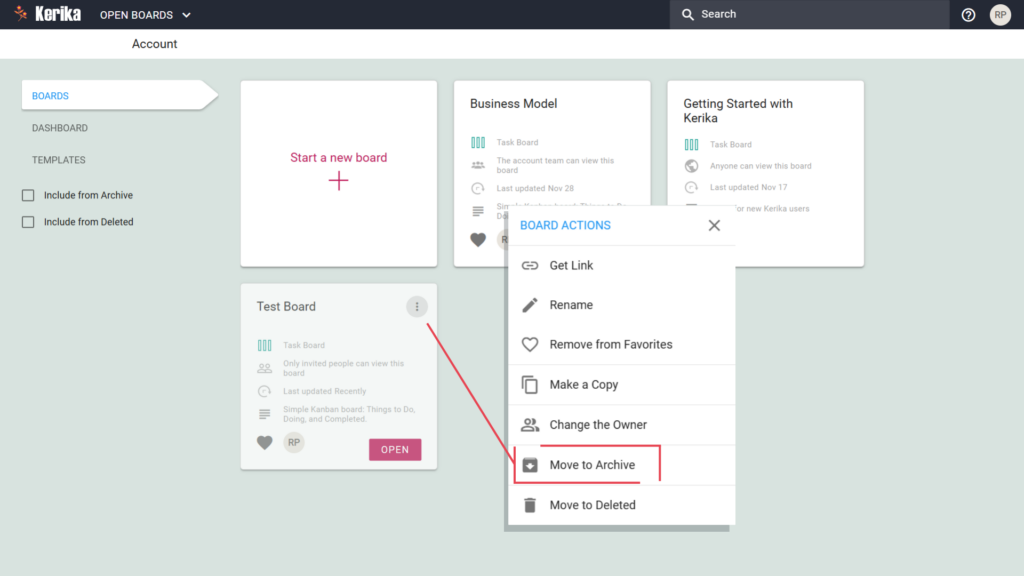
1. Move a Board to Archive

Move a Board to Archive

  • Click the three dots on the board you want to archive
  • Select Move to Archive from the dropdown menu

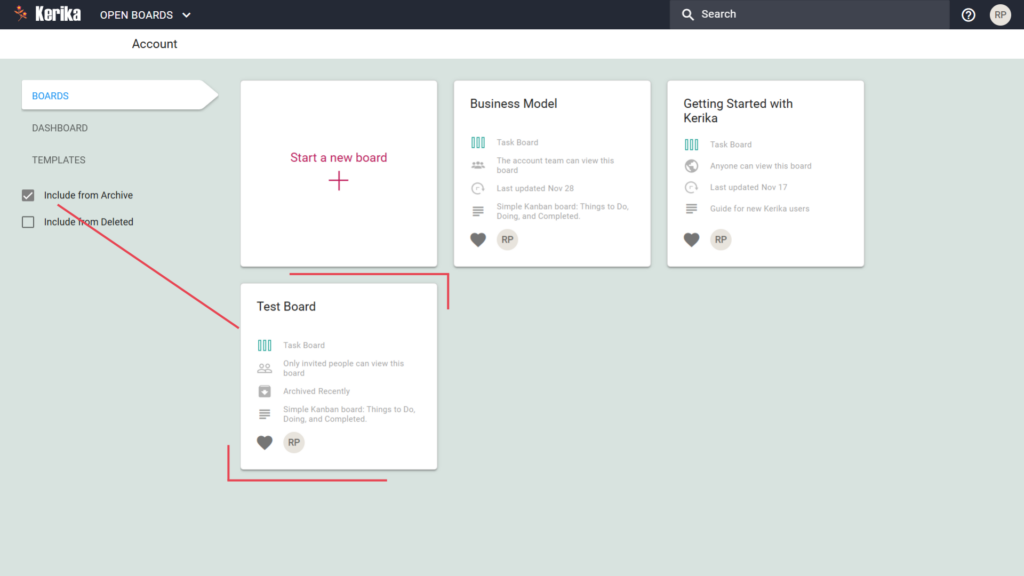
2. Access Archived Boards

Access Archived Boards

  • Use the Include from Archive checkbox in your Home view to display archived boards.
  • Retrieve archived boards anytime for reference or reuse.

When to Archive Boards:

  • Project Completion:
    Once a project is finished and doesn’t require active management, archive its board to clear your workspace.
  • Inactive Projects:
    Temporarily archive boards for projects that are on hold or waiting for approval.
  • Focus on Active Tasks:
    Archiving keeps your Home view streamlined, ensuring only current and relevant tasks are visible.

Why It Works:

  • Declutter Your Workspace: Focus only on active boards and tasks.
  • Quick Access to Past Projects: Safely store completed or paused boards for future reference.
  • Streamlined Workflow: Keep your Home view neat and organized for better productivity.

With Kerika, staying organized is easy. Archiving boards helps you focus on what matters while keeping everything else just a click away.

Ready to declutter your workspace? Start using Kerika today!

Highlighting Tasks: Focus on What Matters Most in Kerika

Managing a busy board can sometimes feel overwhelming, especially when you’re juggling multiple tasks with different priorities. That’s where Kerika’s Highlight Feature comes in – it helps you quickly focus on what’s most important by filtering and visually highlighting tasks that meet specific criteria.

Let’s explore how to use the highlight feature to keep your projects on track.

How to Use the Highlight Feature:

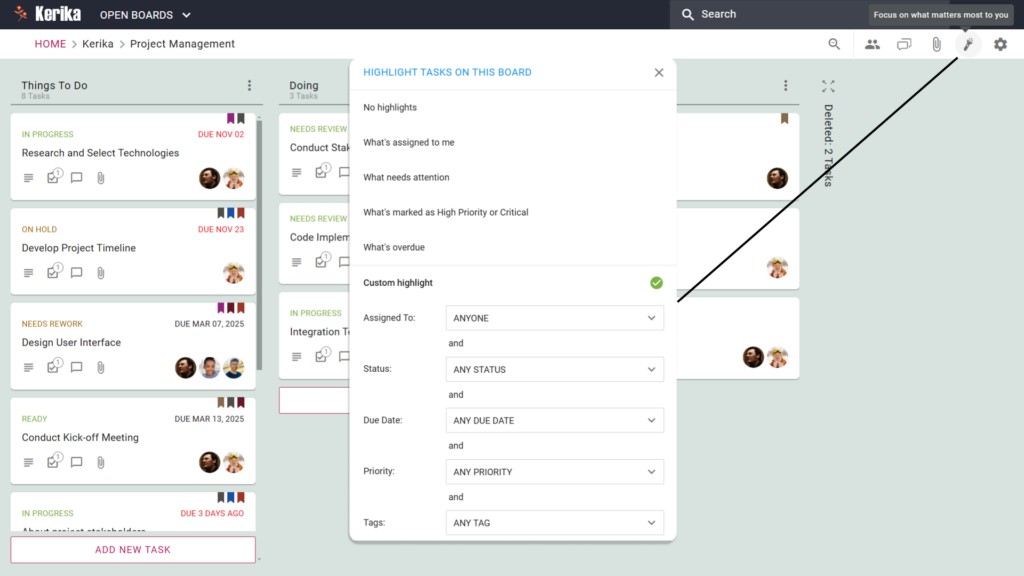
Highlight Feature Preview

1. Access the Highlight Option

Click the Highlight Icon on your board.

2. Choose What to Highlight

Select from predefined options or create custom filters:

  • What’s assigned to me: Instantly see all the tasks assigned to you, so you can stay on top of your responsibilities.
  • What needs attention: Highlights tasks that may require follow-up or have upcoming deadlines, ensuring nothing falls through the cracks.
  • What’s marked as High Priority or Critical: Focus on tasks that are essential to the project’s success.
  • What’s overdue: Clearly identifies tasks that are past their due dates, helping you address delays quickly.
  • Custom Highlight: Create tailored filters by combining parameters like assignees, task status, due dates, priorities, and tags. You can use one or multiple filters at a time to find out what matters to you most on the board.

Why It Works:

  • Stay Organized with “What’s Assigned to Me”By filtering for tasks assigned to you, this option ensures you can focus on your responsibilities without getting distracted by other tasks on the board. Perfect for managing your personal workload.
  • Act on “What Needs Attention”This filter highlights tasks that require immediate focus, whether it’s due to an approaching deadline or a stalled status. It’s a great way to identify bottlenecks and keep the project moving forward.
  • Prioritize with “What’s Marked as High Priority or Critical”High-stakes tasks deserve your full attention. This option ensures you never miss critical tasks that could impact the project’s success.
  • Address Delays with “What’s Overdue”Easily spot overdue tasks so you can allocate resources or follow up with the right team members to bring them back on track.
  • Tailor Your Workflow with Custom HighlightsThe Custom Highlight feature is where Kerika truly shines. Set multiple conditions – like showing tasks assigned to a specific person, with a “Needs Review” status, and due within a week – to create a personalized focus view that works for your unique needs.

With Kerika’s Highlight Feature, you can eliminate distractions and bring clarity to your workflow by focusing on the tasks that matter most.

Whether you’re managing your workload or the entire team’s, highlights keep you productive and on track. Try Kerika today and experience the difference!

Adding Teammates to Your Board With Kerika

Collaboration works best when everyone knows their role and has access to the right tools. With Kerika, inviting teammates to your board is simple and flexible.

Whether you’re working with a project manager, developers, designers, or external stakeholders, Kerika makes it possible to assign roles and ensure everyone has the level of access they need.

Here’s how you can add teammates and manage their roles effortlessly:

Adding Teammates to Your Board

Adding Teammates To The Board Preview
Click here to see how it works

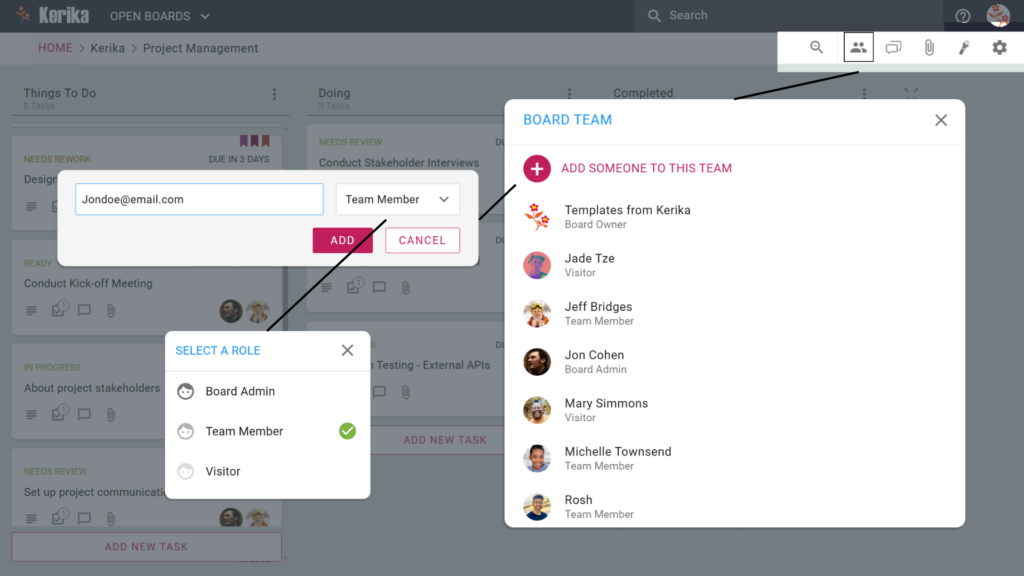
Step 1: Invite Teammates

  1. Open your board and click the Team Icon in the toolbar.
  2. Enter the email address of the person you want to invite.
  3. Select a role for them: Board Admin, Team Member, or Visitor.

Step 2: Assign Roles

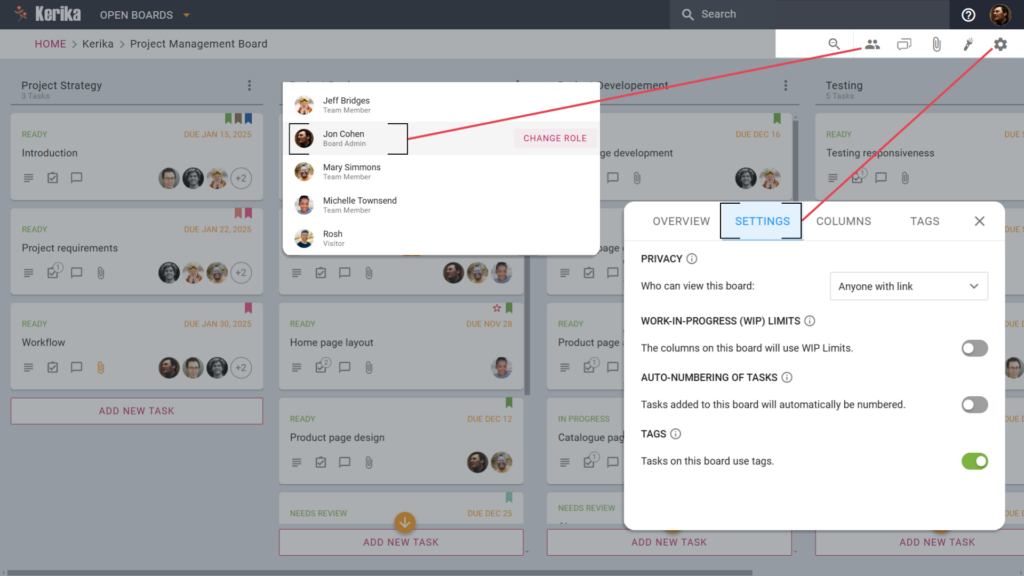
  • Board Admin: If you have created the board, then by default you’re a Board Admin. But you can give full control of the board to someone, which includes managing team members and settings.
  • Team Member: Can collaborate on tasks, upload files, and contribute to the board. Ideal for designers, developers, and other contributors.
  • Visitor: View-only access. Great for external stakeholders or clients who just need to monitor progress.

Step 3: Add Them to the Team

  • Click Add, and your teammate is instantly part of the board with the role you’ve assigned.

The Benefits of Kerika’s Role-Based Access:

1. Board Admin: Full Control for Team Leads

Preview of Board Admin Access

If you created the board, you’re the admin by default. But Kerika also lets you assign admin rights to others.

Key Benefits:

  • Manage team members, update board settings, and maintain control over the board’s structure.
  • Perfect for projects with multiple leads or project managers who need equal control.
  • Avoids bottlenecks that might occur if there’s only a single Board Admin who is unavailable for some reason, e.g. on vacation.

Admins ensure the board stays organized and functional while empowering leadership collaboration.

2. Team Member: Empower Your Contributors

Board Teammember View

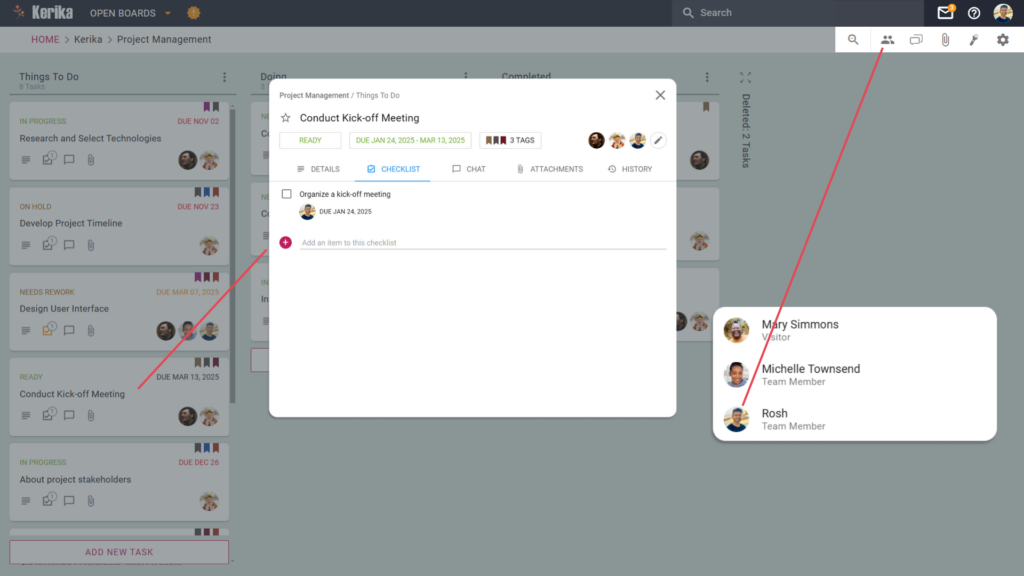
Team Members have all the tools they need to get the job done. They can collaborate on tasks, assign tasks to each other, upload files, and contribute to the board’s progress.

Key Benefits:

  • Ideal for designers, developers, and other active contributors.
  • Keeps the board dynamic by enabling hands-on collaboration while maintaining admin oversight.

Team Members drive the project forward, making them the backbone of productive teamwork.

3. Visitor: Keep Stakeholders in the Loop

Viewers View

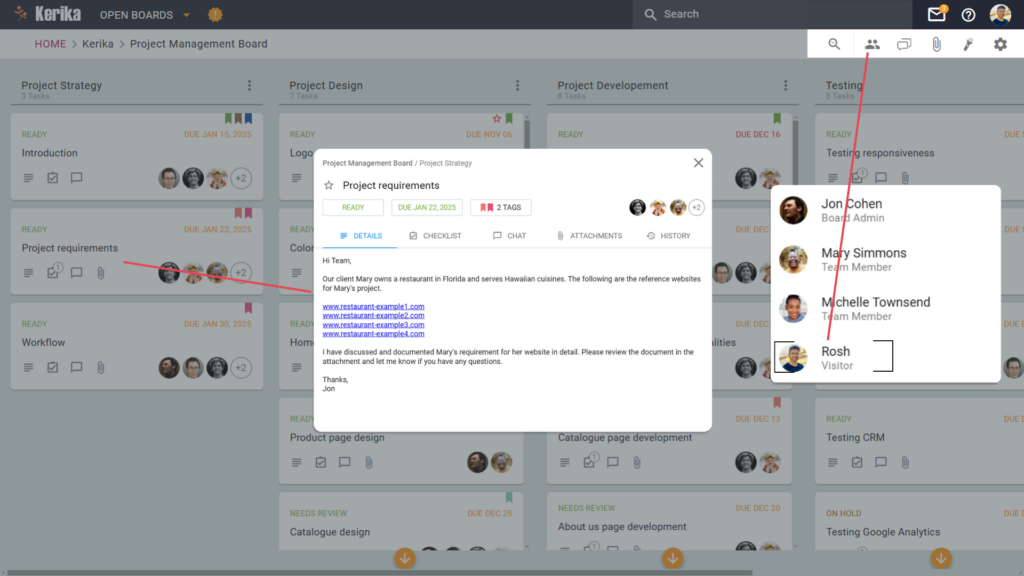
Visitors have view-only access, which means they can monitor the board’s progress without making changes.

Key Benefits:

  • Perfect for external stakeholders or clients who only need to see updates.
  • Ensures transparency without compromising the board’s structure or workflow.

Visitors are ideal for keeping everyone informed without adding complexity.

With Kerika, adding teammates isn’t just quick – it’s designed to support how your team works best. Whether you’re managing a tight-knit group or collaborating with external stakeholders, Kerika’s role-based system makes teamwork seamless and efficient.

Ready to streamline your team collaboration? Start inviting teammates and assign roles today with Kerika!

Personalize Your Experience: Customizing Preferences

Your workspace should work for you, not the other way around. Customization options allow you to tailor everything from background colors to notifications and whiteboard tools, helping you stay organized and productive.

To start personalizing your workspace, you’ll need to access the Preference Settings in your account. Here’s how:

  1. Click on your Profile Icon in the top-right corner of the screen.
  2. Select My Preferences from the dropdown menu.

These settings let you create an experience that fits your unique work style. Now that you know how to access the settings, let us guide you step by step how you can use each customization option.

How It Works: Adjusting Preferences

Preferences are typically grouped into three main categories: General, Notifications, and Whiteboard. Each section provides straightforward options designed to enhance your workflow and optimize your experience.

Here’s a closer look at how these settings work:

General Settings: Make Your Workspace Yours

  1. Background Color:● Choose a background color that’s easy on your eyes and suits your style
    ● Pick from a variety of options to make your workspace visually appealing.
  2. Use Tags for Task Boards● Enable this feature to automatically include tags on new task boards and templates you create.
    ● Helps you stay organized and categorize tasks effortlessly.

The Benefits:

Customizing the visual aspects of your workspace makes it feel more intuitive and less cluttered, helping you stay focused.

Notifications: Stay in the Loop Without Overloading

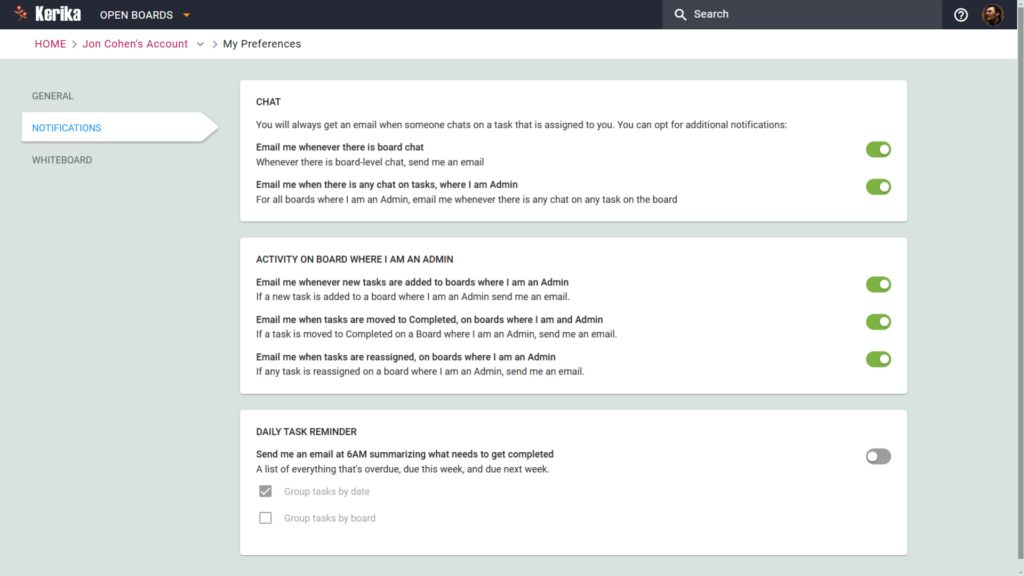
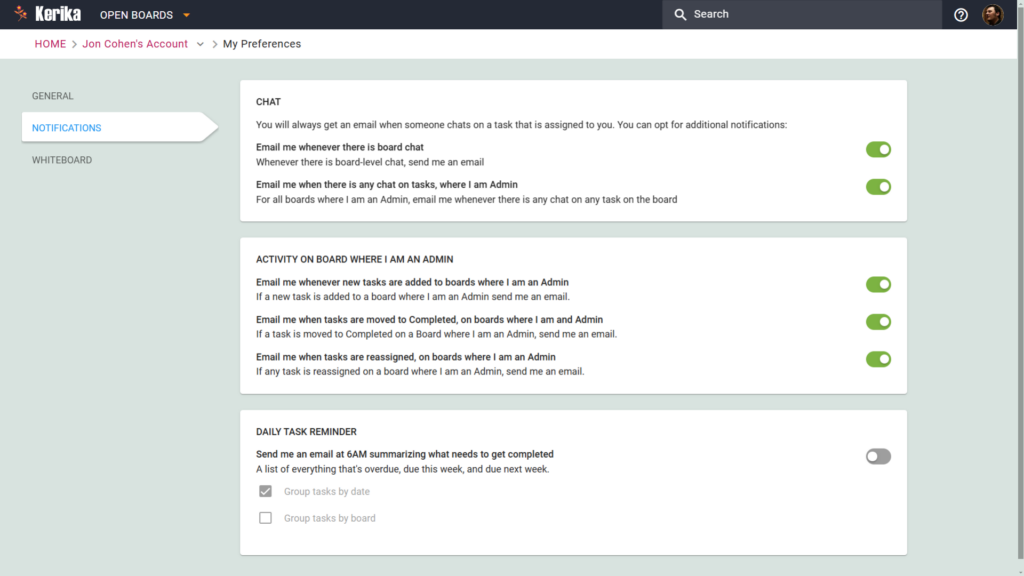
  1. Chat Notifications● Get emails when there’s board-level chat or when someone chats on a task you’re involved in.
  2. Activity Updates for Admins● Receive notifications when new tasks are added, completed, or reassigned on boards you administer.
  3. Daily Task Reminders● Opt for a daily email summary sent at 6 AM, showing overdue tasks and those due this week or next.
    ● Group tasks by date or board for easy tracking.

The Benefits:

With flexible notifications, you can stay informed about what matters most without getting bombarded by unnecessary updates.

Whiteboard Settings: Streamline Your Creative Process

  1. Lines and Shapes● Set default line styles, thickness, and colors to create clean, consistent visuals.
  2. Text on Canvases● Choose your preferred font style, size, and color for a polished look.
  3. Grid Options● Enable snapping to grid and set the grid size to keep your designs aligned and professional.

The Benefits:

These settings make whiteboards perfect for brainstorming, planning, or designing, ensuring your work looks great and stays organized.

Wrap Up

Whether it’s adjusting visual elements, tailoring notifications, or streamlining creative tools, these options are designed to enhance your productivity and keep your work environment organized. Taking a few moments to personalize your settings can lead to a more efficient and enjoyable experience every day.

Perubahan pada Harga Kami

Harga lama kami tidak berubah selama lebih dari 10 tahun, dan tidak lagi mencerminkan nilai produk kami, mahupun hakikat bahawa kini kami mempunyai lebih ramai pengguna di luar Amerika Syarikat berbanding di dalam.

Oleh itu, sudah tiba masanya untuk kami mengemas kini model harga kami secara menyeluruh! Dalam catatan blog ini, kami akan merangkum semua perubahan, dan dalam bahagian di bawah, anda akan menemui pautan ke catatan blog dan halaman laman web lain yang membincangkan setiap perkara dengan lebih terperinci:

Harga lebih rendah untuk kebanyakan negara

Selama 10 tahun yang lalu, kami hanya mempunyai satu harga: $7 bagi setiap Ahli Pasukan Akaun, dibayar setiap tahun. Walaupun harga ini agak rendah bagi pasaran Amerika Syarikat, ia menjadi cabaran bagi pengguna dari negara dengan ekonomi yang kurang berkembang dan kuasa beli yang lebih rendah.

Kami kini menjadikan Kerika lebih berpatutan bagi pengguna di luar Amerika Syarikat: harga baharu untuk Pelan Profesional bagi pelanggan di AS adalah $9 setiap pengguna sebulan, atau $90 setiap tahun, tetapi pelanggan dari hampir semua negara lain boleh melanggan pada kadar yang lebih rendah. Ini bermakna pelanggan dari negara dengan ekonomi yang lebih kecil boleh membeli langganan Kerika yang sama seperti pelanggan dari negara yang lebih kaya, tetapi dengan harga yang jauh lebih murah.

Perubahan ini akan dapat dilihat apabila anda mengunjungi halaman harga di laman web Kerika, serta dalam aplikasi Kerika. Harga yang dipaparkan akan merupakan jumlah selepas diskaun, dan ia akan dipaparkan dalam mata wang tempatan anda. Sebagai contoh, pengguna dari Malaysia akan melihat Pelan Profesional berharga RM 20 sebulan / RM 200 setahun.

(Pelan Perniagaan untuk pelanggan di Korea Selatan akan berharga RM 30 sebulan / RM 300 setahun.)

Bayar dalam mata wang anda sendiri

Selain harga yang lebih rendah di luar Amerika Syarikat, kami juga membolehkan pelanggan kami membayar dalam pelbagai mata wang — sebanyak 135 mata wang semuanya.

Ini akan memudahkan orang di negara yang berbeza, yang mungkin menghadapi kesukaran untuk membuat pembelian dalam Dolar AS, untuk membeli langganan Kerika.

Baca lebih lanjut mengenai mata wang.

Langganan Bulanan atau Tahunan

Pengguna yang baru dalam mana-mana perkhidmatan dalam talian mungkin ragu-ragu untuk membeli langganan tahunan sebelum mereka benar-benar biasa dengan perkhidmatan tersebut. Pilihan semula jadi bagi pelanggan baharu ialah membuat komitmen kewangan yang lebih kecil pada awalnya, dengan membeli langganan bulanan. Kami telah memudahkan perkara ini.

Kini, anda boleh membeli Langganan Bulanan atau Tahunan (tetapi tidak boleh mencampurkan kedua-duanya).

Langganan tahunan berharga 10 kali ganda kadar bulanan, jadi jika anda bercadang untuk menggunakan Kerika lebih daripada 10 bulan, adalah lebih jimat untuk mendapatkan langganan tahunan.

Namun, jika anda pelanggan baharu dan masih ragu-ragu untuk membuat komitmen kepada Kerika, kini anda mempunyai cara yang lebih mudah untuk terus menggunakan Kerika selepas Percubaan Percuma 30 hari anda tamat: hanya beli langganan bulanan untuk beberapa bulan, dan kemudian beralih kepada langganan tahunan untuk penjimatan kos setelah anda yakin dengan manfaat Kerika bagi produktiviti pasukan anda.

Jaminan Wang Dikembalikan 30 Hari

Dan untuk memudahkan lagi pelanggan baharu membeli Langganan Tahunan dengan yakin, kami kini menawarkan Jaminan Wang Dikembalikan 30 Hari yang sangat mudah!

Jika anda menukar fikiran dalam masa 30 hari selepas membeli Langganan Tahunan, atas sebarang sebab, anda boleh meminta bayaran balik penuh dalam bentuk tunai.

Kini anda tidak perlu risau sama ada anda membuat keputusan yang salah apabila mengklik butang Beli!

Baca lebih lanjut mengenai Jaminan Wang Dikembalikan 30 Hari kami.

Bayaran Balik Lain hanya dalam bentuk Kredit Kerika

Sistem lama kami untuk mengira dan menguruskan bayaran balik adalah sangat rumit: ia mencipta kesulitan dalam sistem bil kami, dan kesulitan itu seterusnya menyebabkan pelbagai masalah yang menjejaskan pelanggan dan kami sendiri.

Kami kini beralih kepada sistem yang lebih mudah: jika anda membatalkan langganan, anda akan menerima kredit pro rata dalam akaun Kerika anda, yang boleh digunakan untuk pembelian pada masa hadapan. Kredit ini tidak akan luput dan tidak boleh ditebus dalam bentuk tunai: ia hanya boleh digunakan untuk pembelian akan datang.

Baca lebih lanjut mengenai Dasar Bayaran Balik kami.

Diskaun Akademik & Badan Bukan Keuntungan

Pelan Akademik & Badan Bukan Keuntungan yang lama membenarkan Pasukan Akaun sehingga 10 orang menggunakan Kerika secara percuma. Walau bagaimanapun, ia sukar untuk dikendalikan, sering disalahgunakan, dan tidak dapat membantu semua sekolah, universiti, dan organisasi bukan keuntungan.

Pelan Akademik & Badan Bukan Keuntungan kini akan berfungsi sebagai diskaun mudah sebanyak 50%: jika anda layak, anda boleh membeli mana-mana pelan pada separuh harga, dan tidak akan ada lagi had bagi saiz Pasukan Akaun anda. Pelan baharu ini memudahkan organisasi yang lebih besar untuk menggunakan Kerika di seluruh organisasi mereka.

Baca lebih lanjut mengenai Diskaun Badan Bukan Keuntungan.

Kebanyakan Pembelian Perlu Dilakukan Secara Dalam Talian

Kami sebelum ini menawarkan pilihan untuk meminta invois yang boleh dibayar menggunakan cek bank atau pemindahan terus, tetapi malangnya, pilihan ini sering disalahgunakan oleh sebilangan pengguna yang meminta invois tetapi tidak membayarnya, serta mengabaikan e-mel peringatan kami!

Dengan sistem baharu kami, pilihan untuk membuat pembelian luar talian (iaitu, meminta invois) hanya tersedia kepada pelanggan tertentu. Beberapa pelanggan lama kami telah menggunakan kaedah luar talian selama bertahun-tahun kerana itu satu-satunya cara mereka boleh membuat pembelian — situasi biasa bagi mereka yang bekerja dalam sektor kerajaan atau syarikat besar yang memerlukan invois diproses melalui jabatan Akaun Belum Bayar mereka.

Bagi pelanggan lama ini, kaedah luar talian akan terus tersedia, tetapi akan dikuatkuasakan dengan lebih ketat: jika invois tidak dibayar tepat pada masanya, langganan yang berkaitan akan dibatalkan.

Jika anda pelanggan baharu yang memerlukan kaedah luar talian, sila hubungi kami!

Lebih Mudah Menggantikan Pengguna dalam Akaun

Dengan sistem harga baharu, pelanggan kami kini boleh menggantikan satu pengguna dengan pengguna lain tanpa dikenakan caj tambahan, selagi penyingkiran pengguna lama dan penambahan pengguna baharu dilakukan pada hari yang sama.

Jika seorang pengguna dikeluarkan daripada Pasukan Akaun dan pengguna lain ditambah pada hari yang sama, sistem tidak akan menjana sebarang transaksi bil.

Lebih Banyak Butiran dalam Sejarah Bil Anda

Skrin Sejarah Bil, yang boleh diakses dengan mengklik pilihan Urus Akaun dalam menu yang muncul apabila anda mengklik avatar anda di bahagian atas kanan aplikasi desktop, kini akan mengandungi lebih banyak maklumat mengenai perubahan yang dibuat, seperti menghidupkan/mematikan auto-pembaharuan, menambah pengguna, dan sebagainya.

Ini akan membantu pelanggan memahami dengan lebih baik bagaimana bil mereka berubah dari semasa ke semasa.

Peralihan yang Lancar

Jika anda sudah menjadi pelanggan Kerika, pelan anda akan diteruskan seperti biasa sehingga tamat tempohnya.

Sebarang Soalan atau Kebimbangan?

Kami faham bahawa perubahan harga boleh menyebabkan kebimbangan bagi sesetengah pengguna. Kami sedia membantu menjawab pertanyaan anda dan mendengar maklum balas anda. Hubungi kami!