In a world where customer satisfaction can make or break a business, the importance of a well-structured and results-driven customer success program is hard to overstate. It’s not just about solving problems when they arise. It’s about anticipating them, guiding customers through their journey, and ensuring they achieve meaningful outcomes. But here’s the challenge: without the right strategy, even the most dedicated teams can fall short.
Imagine a customer success team handling multiple tickets, feature requests, and bug reports while maintaining proactive communication with clients. This balancing act requires more than good intentions. It demands structure, clarity, and tools that bring everything together.
This guide will help you master that balance. Whether you are a growing startup or a seasoned enterprise, we will walk you through a step-by-step approach to elevate your customer success efforts. From managing incoming tickets to improving response times and keeping clients engaged, you will find practical advice to make an impact.
Let’s dive into what it takes to build a customer success program that not only solves issues but also drives lasting outcomes.

Click here to see how this team is utilising this board
Essential Steps To Build a Solid Customer Success Program
Building a robust customer success program involves a structured approach that can be scaled and adapted over time. Here are the essential steps you should follow, backed by industry best practices and studies.
1. Define Clear Objectives and Success Metrics
Start by outlining what you aim to achieve with your customer success program. Are you looking to improve customer retention, increase upsells, or enhance customer satisfaction scores? Setting clear objectives and associated success metrics gives your team precise targets to aim for.
According to a study by HubSpot, companies that define clear success metrics are more likely to achieve positive outcomes in customer retention. Clear objectives and success metrics provide teams with precise targets, improve communication, and enhance customer satisfaction and loyalty.
Watch out for: Setting vague or non-measurable objectives can lead to confusion and lack of direction. Ensure all objectives are SMART (Specific, Measurable, Achievable, Relevant, Time-bound).
2. Develop a Comprehensive Customer Journey Map
Understanding each stage of the customer’s journey is crucial. Map out the typical customer journey from onboarding to renewal, identifying key touchpoints where your team can add value. This mapping should include potential pain points and opportunities to enhance the customer experience. Research from the Customer Experience Professionals Association highlights that journey maps help align cross-functional teams and improve customer-centric decision-making.
Watch out for: Missing out on hidden pain points or failing to update the journey map as products and services evolve can cause misalignment with customer expectations.
3. Implement Proactive Communication Strategies
Proactive communication is key to preempting issues and building trust with customers. Develop communication protocols that ensure your team reaches out to customers at critical moments before issues arise. A survey by Gallup shows that fully engaged customers offer a higher premium in terms of share of wallet, profitability, and revenue compared to the average customer.
Watch out for: Over-communication can overwhelm customers, while too little can make them feel neglected. Find the right balance based on customer preferences and feedback.
4. Train Your Team Regularly
Continuous training and development are key to keeping your customer success team knowledgeable and effective. Regular training sessions on product updates, customer handling skills, and advanced communication techniques ensure that your team can provide exceptional service and handle complex issues with ease.
Watch out for: Training without practical application or feedback can be ineffective. Make sure training sessions are interactive, allow for role-playing scenarios, and provide feedback to ensure concepts are understood and can be applied.
5. Analyze Feedback and Adjust
Regularly gather and analyze feedback from customers to understand their needs, expectations, and satisfaction levels. This feedback can guide improvements in products and services and highlight areas where your customer success process could be enhanced.
Watch out for: Feedback should be actionable. It’s not enough to collect data; the insights gained must lead to actionable changes that drive improvements in customer satisfaction and business outcomes.
6. Celebrate Success and Recognize Challenges
Create a culture that celebrates milestones and acknowledges the challenges faced. Recognizing team efforts and learning from setbacks fosters a positive working environment and encourages continuous improvement.
Watch out for: Ensure that recognition is fair and inclusive. Focusing only on certain achievements or team members can lead to resentment and a decrease in team morale.
7. Leverage the Right Tools
Utilizing advanced task management tools is pivotal for orchestrating an effective customer success strategy. These tools support the customer success teams by organizing customer interactions, streamlining workflows, and ensuring timely resolutions. With capabilities for real-time updates and collaborative functionalities, these tools facilitate a proactive approach to customer management, enabling teams to adapt swiftly to customer needs and enhance the service experience.
Watch out for: It’s crucial to select tools that are intuitive and cost-effective, offering flexibility without overwhelming your team with complexity or excessive costs. The right tool should seamlessly integrate into your existing processes, enhancing efficiency without disrupting the workflow.
Let’s take a closer look at how the right tools can significantly streamline your customer success efforts. By integrating an effective task management system, you can enhance your team’s ability to manage workflows and respond to customer needs swiftly. This practical insight will help you understand the tangible benefits these tools bring to everyday customer success scenarios.
Using The Right Tools
Lets look into the practical application of task management tools, showcasing how a specific team utilizes such a system to enhance their customer success program.

Check How This Team Executes Their Customer Success Program
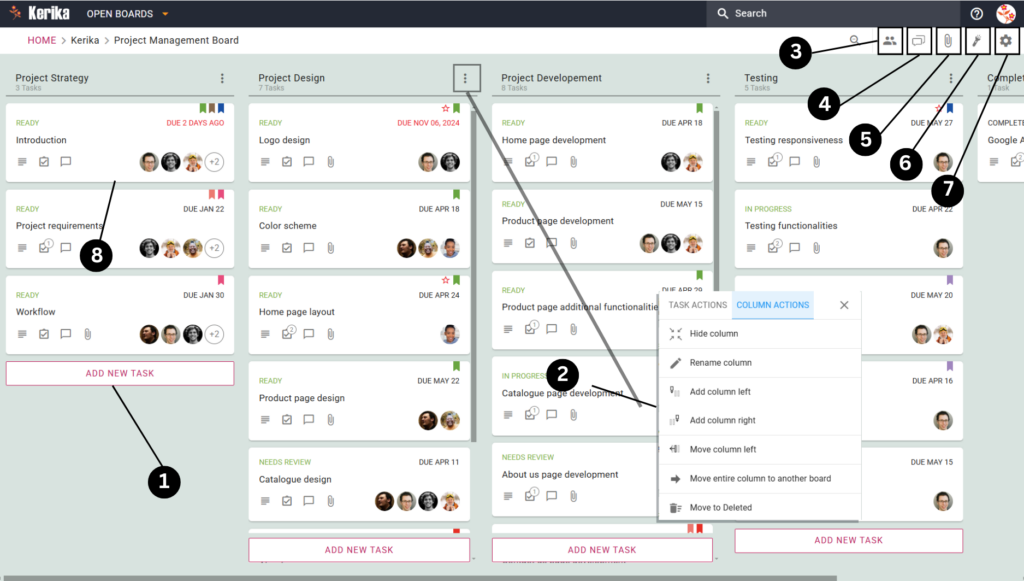
In this overview of a well-structured task management board, we see a system designed to optimize customer success outcomes. The board is segmented into various sections such as “New Tickets,” “Feature Requests,” and “Bugs,” each dedicated to tracking and managing specific types of customer interactions.
This structured approach ensures that every customer query or issue is captured and addressed promptly, enhancing response times and overall customer satisfaction.
The team uses the board to maintain a clear overview of ongoing tasks, allowing for efficient management of priorities and resources. For instance, new tickets are quickly assigned to ensure no request is overlooked, while feature requests are meticulously tracked to inform product updates that align with customer needs.
This system not only streamlines the workflow but also facilitates a proactive approach to customer service, laying the groundwork for a detailed exploration of how each element contributes to the team’s success in the subsequent section.
Take a Closer Look at This Customer Success Board

Check How This Team Executes Their Customer Success Program
1. Creating a Task Card for New Tickets

Efficiently managing new customer inquiries begins with the creation of task cards for each new ticket. For example, a card like “Team Discount?” is used to address specific requests, containing essential details such as the customer’s query and contact information.
This setup allows the team to track and prioritize these inquiries from receipt through to resolution, ensuring timely responses and maintaining high customer satisfaction.
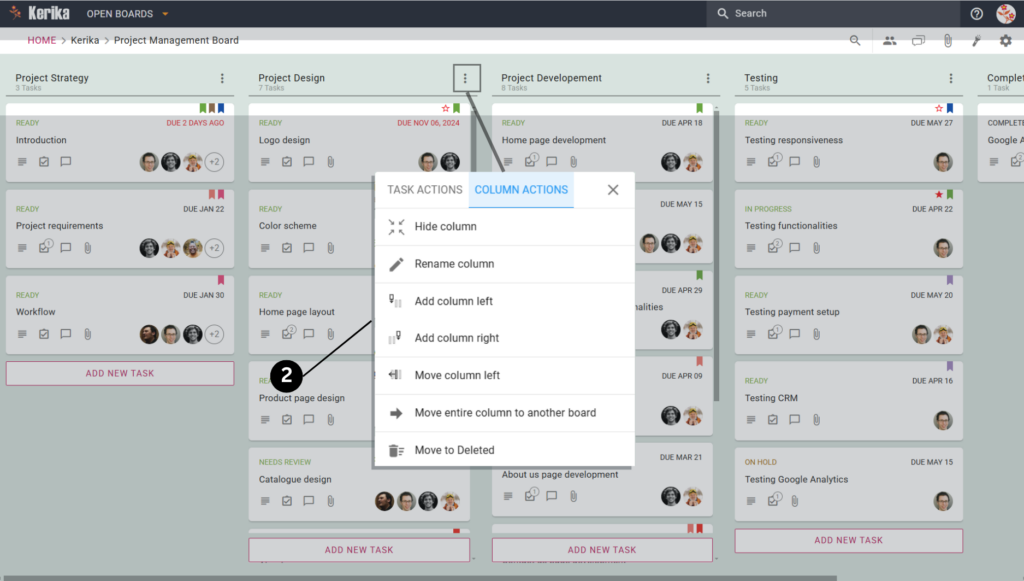
2. Customizing Workflow with Columns

Customizing columns in the workflow is crucial for managing customer interactions effectively. By setting up specific columns like “New Tickets” and “Open Tickets,” teams can streamline processes from initial inquiry to resolution.
This adaptability allows for adding, removing, or rearranging columns to keep the workflow organized and responsive to changing priorities, ensuring efficient handling of customer needs.
3. Zoom Out for Workflow Overview

By minimizing the task cards to display only their titles, team members can gain a high-level overview of the entire board without getting lost in the details.
This bird’s-eye view is particularly useful for identifying overall progress, detecting bottlenecks, and ensuring that no area of the board is overloaded with tasks. It allows for rapid assessment and reallocation of resources where necessary, ensuring that the workflow remains balanced and efficient.
4. Managing Team Members on the Board

Effective team management is crucial for any customer success board. The ability to add team members and assign specific roles such as Board Admin, Team Member, or Visitor ensures everyone understands their responsibilities and accesses only the information necessary for their tasks.
This feature facilitates streamlined collaboration by defining roles clearly and secures sensitive information by controlling access appropriately.
For example, team members might be assigned to handle day-to-day tasks while visitors could be restricted to view-only rights, which is ideal for external stakeholders or auditors who require insights without the capability to make changes.
5. Centralized Communication Using Board Chat

This allows these team members to quickly exchange information, offer assistance, or update each other on progress without leaving the platform. It helps in keeping all communications related general board activity within the same workspace, enhancing clarity and reducing the time spent searching for information across multiple channels.
This centralized approach streamlines interactions and keeps the team aligned on their tasks and objectives.
6. Centralized File Management for Seamless Access

The board’s file management system allows team members to upload, create, or link documents directly, supporting various document types like Google Docs and Spreadsheets. Files remain securely stored in your own drive, ensuring easy access and data security.
This setup eliminates the need for external storage solutions and keeps all necessary materials readily available and safe within the project’s ecosystem.
7. Highlight and Prioritize Critical Tasks

The ability to highlight and prioritize critical tasks within the board is crucial for maintaining operational efficiency. This ensures urgent tasks are easily visible, aiding in efficient management and timely completion.
For example, tasks can be filtered to show only those that are overdue, marked as high priority, or assigned to a particular team member, making it easier to manage workloads and ensure timely completion of critical activities.
8. Fine-Tuning Board Settings for Optimal Control

Adjusting the board settings is crucial for maintaining optimal control over the team’s workflow. By fine-tuning these elements, you can create a highly organized workspace and control who can view the board, implementing work-in-progress limits to manage the flow of tasks effectively, and enabling auto-numbering of tasks for better tracking.
Additionally, the ability to manage board tags and columns allows teams to customize the environment to match their specific processes and needs.
Break Down Customer Tickets Into Manageable Steps

Click here to view this task card
This Customer Success board excels at breaking down customer tickets into actionable and trackable steps, ensuring thorough handling of each customer interaction. Here’s how this structured approach enhances the customer success workflow:
- Details Tab for Ticket Descriptions: Each ticket on the board, such as “Team discount?”, includes a Details tab. This provides a comprehensive description of the customer’s issue or request, outlining the necessary actions and objectives. It ensures that all team members understand the scope of the customer’s needs clearly.
- Setting Ticket Status for Progress Tracking: The board allows each ticket to be marked with statuses like Ready, In Progress, or Needs Review. This system offers clear visibility on the progress of customer issues, enabling team members to efficiently track and address any delays or complications.
- Checklist Tab for Actionable Steps: Complex customer issues are divided into subtasks within the Checklist tab. This method helps in systematically addressing each component of the ticket, ensuring thorough resolution and customer satisfaction.
- Due Dates to Maintain Service Levels: Setting deadlines for each ticket ensures that responses and resolutions are timely. This helps the team prioritize their tasks effectively and meet the service level agreements set with customers.
- Tags for Easy Categorization: Tickets are tagged with relevant labels such as high priority or common issue, which helps in organizing and prioritizing the workflow. This feature makes it simple to filter and focus on tickets that require immediate attention or fall into specific categories.
- Chat Tab for Ticket-Specific Discussions: The Chat tab centralizes all discussions related to a specific ticket, allowing team members to collaborate directly within the context of the issue. This feature streamlines communication and speeds up problem resolution.
- Task Assignments for Clear Responsibility: Assigning tickets to specific team members clarifies who is responsible for handling each issue. This clear delineation of tasks prevents overlap and ensures accountability within the team.
- Attachments Tab for Relevant Documents: The Attachments tab enables team members to store all pertinent documentation directly with the ticket. This centralized storage of files ensures that all the necessary information is readily available and linked to the corresponding customer issue.
By utilizing these features, the board effectively organizes the handling of customer tickets, enhancing the team’s ability to manage their customer success workflow systematically and efficiently.
Conclusion
The capabilities demonstrated by the Customer Success board show that when technology aligns with strategic workflow management, teams can enhance their efficiency and effectiveness significantly. By breaking down tasks, managing communications, and utilizing advanced features like task prioritization and file management, teams are equipped to provide unparalleled customer service.
Implementing these strategies will not only streamline operations but also elevate the customer experience, fostering loyalty and driving success in today’s competitive environment.