Fundraising is the lifeline of countless initiatives, from non-profits tackling global challenges to startups on the brink of groundbreaking innovations. A successful campaign isn’t just about raising funds; it’s about forging meaningful connections, earning trust, and delivering value to both donors and beneficiaries.
Without a clear planning, handling donor relationships, managing timelines, and coordinating team efforts can quickly spiral into chaos. Missed follow-ups, misaligned goals, and scattered data are common hurdles that can turn even the most promising campaigns into overwhelming tasks.
In this guide, we’ll show you how to organize your campaign efficiently, address potential obstacles, and stay on track every step of the way. With practical tips and structured management techniques, you’ll have everything you need to drive a successful campaign from start to finish.
So let’s start with practical steps that will help you and your team stay focused, hit milestones, and keep campaigns on track.

Review this fund raising campaign board
Essential Steps For Executing a Successful Fundraising Campaign
Executing a successful fundraising campaign involves meticulous planning, strategic execution, and continuous evaluation. Below are essential steps to guide you through the process:
1. Define Clear Objectives
Start by establishing specific, measurable, achievable, relevant, and time-bound (SMART) goals for your campaign. Determine what you aim to achieve, whether it’s funding a particular project, expanding services, or covering operational costs. Clear objectives provide direction and a benchmark for success.
According to Smart Insights, applying the SMART framework to your marketing objectives ensures they are well-defined and achievable, leading to more effective campaigns.
- Watch Out For: Ambiguity in goals or shifting priorities that can make it difficult to track progress.
2. Assemble a Dedicated Team
Form a committee comprising staff, volunteers, and stakeholders who are passionate about your cause. Assign roles based on individual strengths, such as donor outreach, event planning, or marketing. A committed team ensures tasks are managed efficiently and fosters a sense of shared purpose.
- Watch Out For: Team members feeling overwhelmed or confused about their responsibilities, which can lead to delays or missed deadlines.
3. Conduct a Feasibility Study
Before launching, assess the viability of your campaign. According to CampaignCounsel.org, conducting a feasibility study is crucial for determining the potential success of a large-scale fundraising initiative. It helps organizations gauge donor interest, assess community support, and set achievable campaign goals
- Watch Out For: Gaps in research that can lead to overly ambitious targets or under-prepared teams.
4. Develop a Comprehensive Plan
Create a detailed roadmap outlining strategies, timelines, and resources needed. Incorporate various fundraising methods, such as events, online campaigns, and grant applications. A well-structured plan serves as a blueprint, guiding your team through each phase of the campaign.
- Watch Out For: Over-reliance on static plans that don’t account for unexpected changes.
5. Craft a Compelling Narrative
Tell a story that resonates with potential donors. Highlight the problem, your solution, and the impact of their contribution. Emotional and relatable narratives can significantly enhance donor engagement and motivation.
- Watch Out For: Inconsistent messaging across different platforms, which could weaken engagement.
6. Identify and Segment Your Audience
Analyze your donor base to identify key segments, such as individuals, corporations, or foundations. Tailor your messaging and approach to each group’s interests and capacity to give. Personalized communication increases the likelihood of successful solicitations. As BonterraTech highlights, donor segmentation allows organizations to deliver tailored messages that resonate with donors, increasing engagement and long-term support.
- Watch Out For: Relying on outdated donor data or failing to personalize outreach efforts.
7. Implement a Soft Launch
Begin with a soft launch targeting loyal supporters to build initial momentum. This phase allows you to gather feedback, address any issues, and create a sense of progress before the public launch. Early success can also leverage social proof to attract additional donors.
- Watch Out For: Overlooking the importance of gathering early feedback, which can lead to unresolved issues during the public phase.
8. Utilize Multichannel Marketing
Promote your campaign across various platforms, including social media, email newsletters, and traditional media. Consistent messaging across channels maximizes reach and reinforces your campaign’s presence.
- Watch Out For: Disconnected campaigns that fail to synchronize communications, potentially confusing or alienating donors.
9. Engage and Acknowledge Donors
Maintain open communication with donors throughout the campaign. Provide updates on progress, express gratitude, and demonstrate the impact of their contributions. Recognizing donors fosters loyalty and encourages future support.
- Watch Out For: Lack of timely communication or generic follow-ups that don’t feel personal.
10. Monitor Progress and Adapt
Regularly review your campaign’s performance against set milestones. Use data analytics to assess which strategies are effective and which need adjustment. Being flexible and responsive ensures the campaign remains on track and goals are met.
- Watch Out For: Teams sticking rigidly to initial plans, even when adjustments could yield better results.
Executing a successful fundraising campaign requires more than just following the right steps. Without proper coordination, tracking, and collaboration, even the most well-planned efforts can lose momentum. As your campaign progresses, donor outreach will grow, tasks will increase, deadlines may overlap, and maintaining clear communication with both donors and internal teams will be crucial.
This is why the right tools are essential. They help you manage donor relations, prioritize key activities, and monitor progress effectively. With these tools, you can streamline donor information, avoid missed opportunities, and make data-driven decisions that maximize your fundraising potential.
Using The Right Tools
With your campaign plan in place, the next step is ensuring that everything runs smoothly without the common issues we discussed. This is where a well-structured task management tool can make all the difference.
Take a look at this board. It’s an example of how teams can efficiently manage every stage of a fundraising campaign while staying organized and on track.

Review this fund raising campaign board
This board is an example of how teams can simplify complex fundraising campaigns. Tasks like event planning, donor follow-ups, and budget approvals are broken down into clear categories, making it easy to see what’s in progress, what needs immediate attention, and what’s completed.
When deadlines overlap or team members juggle multiple responsibilities, the board helps prioritize key fundraising activities, ensuring that no critical task is overlooked. The structure addresses common fundraising challenges by clearly assigning tasks related to donor outreach, proposal submissions, or campaign reviews.
Each team member knows exactly what they are responsible for, and collaboration becomes seamless. Instead of chasing updates or searching through emails for information, the entire team can view progress in real time and make necessary adjustments without confusion.
This doesn’t just help with meeting deadlines. It eliminates bottlenecks by making task statuses visible to everyone. let’s take a step further and explore how this board supports better decision-making and enables your team to adapt quickly to changes.
Take a Closer Look at This Fundraising Campaign Board
Let’s dive deeper into how this board helps teams manage every detail of a fundraising campaign while keeping tasks and goals in clear focus. The key to its effectiveness lies in its simplicity and ability to adapt as the campaign evolves. By visualizing progress, organizing tasks, and streamlining team collaboration, it helps teams stay on track and adjust quickly when needed.

Below, we’ll walk through each feature with examples to show how this board can make your fundraising campaign more efficient, productive, and stress-free.
1. Create Detailed Task Cards for Every Fundraising Activity

As shown in this task card, each activity is organized with essential details like objectives, team assignments, deadlines, and specific steps needed for completion. The card also integrates resources such as files, discussions, and updates, making it a central hub for everything related to the task.
These task cards improve fundraising efficiency by keeping all key information in one place, reducing confusion and the need for back-and-forth communication. Team members can work collaboratively, monitor progress, and stay on top of deadlines without wasting time searching for documents or updates across multiple platforms.
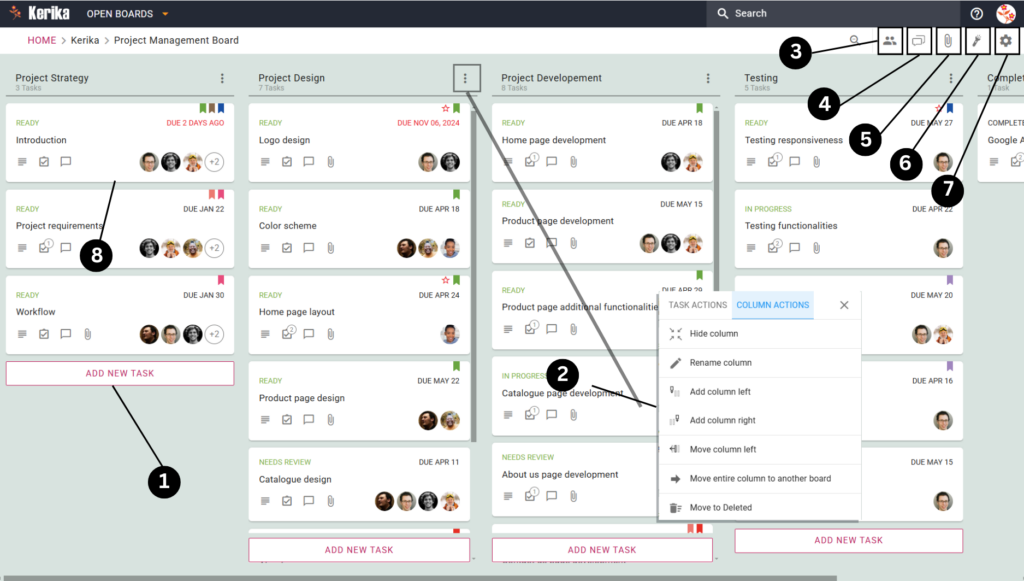
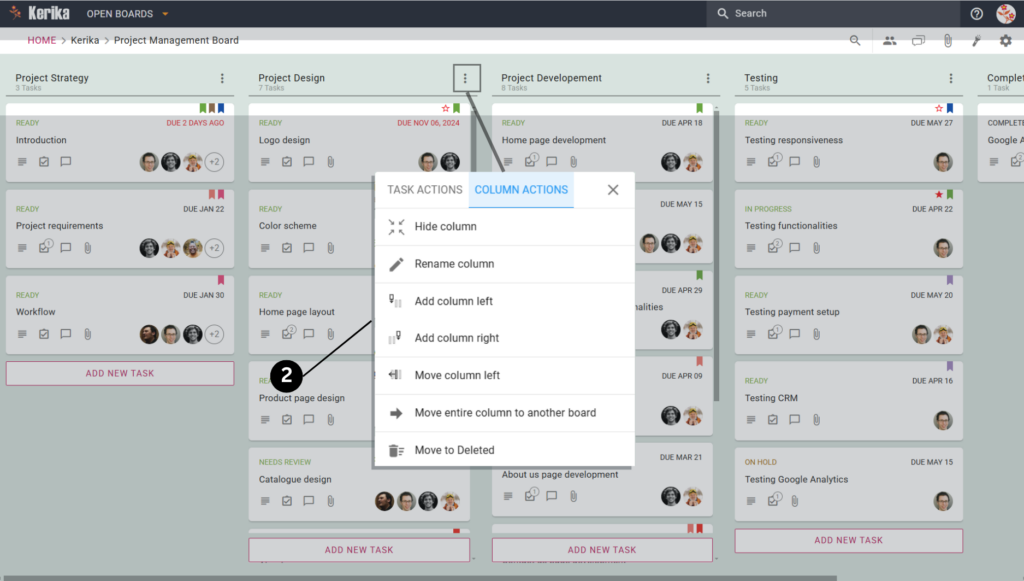
2. Customize Columns to Match Your Fundraising Workflow

In this board, you can see how each column is set up to represent different stages of the fundraising process, such as “Fundraising Ideas,” “Planning,” and “Active Campaigns.” With customizable settings, you can easily add, rename, or move columns, ensuring that the workflow adapts to your team’s unique needs.
These columns help streamline progress by clearly indicating where each task stands and what needs to happen next. Whether you’re brainstorming ideas or seeking approvals, organizing tasks by stages ensures that nothing gets stuck or forgotten.
This flexibility makes it easy to manage shifting priorities and maintain a smooth, efficient flow throughout the campaign.
3. Zoom Out to Scan and Find Tasks Quickly

The zoom-out option, shown in the image, hides task details and displays only the task names. This view is ideal for scanning the entire board at a glance and locating specific tasks without scrolling through extensive details. It’s particularly useful when you need a quick overview of what’s happening across multiple stages.
This helps you save time by making it easy to find tasks, check the progress, and identify any pending activities. Whether you’re tracking an approval or verifying the status of a campaign, this simplified view keeps everything accessible and easy to navigate.
4. Manage Team Members and Share Access

Here you can see the option to invite team members and assign roles such as Board Admin, Team Member, or Visitor. This feature ensures that everyone involved in the fundraising campaign has the right level of access based on their role, whether they are leading the campaign or providing occasional input.
By defining roles clearly, you avoid confusion and maintain control over sensitive information. Board Admins can manage tasks and team permissions, Team Members can collaborate and update progress, and Visitors can view progress without making changes. This structure ensures smooth collaboration and accountability while keeping your campaign secure and well-organized.
5. Use Board Chat for Team-Wide Discussions

The board chat feature is designed for general discussions that involve the entire team. Unlike task-specific chats, which focus on individual tasks, the board chat allows you to share updates, announcements, or feedback that everyone needs to see.
This feature helps keep general conversations separate from task-related details, reducing confusion and ensuring important updates are easy to find. Whether you’re sharing campaign milestones, addressing team-wide concerns, or brainstorming new ideas, board chat ensures the entire team stays in sync.
6. Share Files and Attachments Across the Whole Team

The board attachment option allows you to upload or link important documents, spreadsheets, presentations, or online resources that are useful for the entire team. This is useful for files are available to everyone and aren’t tied to specific tasks.
This feature ensures that essential documents, such as fundraising plans, donor lists, and campaign reports, are easily accessible to all team members in one place. It eliminates the need to search through different platforms, keeping the team informed and making collaboration smoother.
7. Highlight Tasks with Custom Filters

The highlight option allows you to quickly locate tasks using custom filters. You can filter by criteria such as assigned team member, task status, due date, priority, and tags. Whether you want to find overdue tasks or those marked as high priority, this feature helps you narrow down exactly what you’re looking for.
This option saves time by eliminating the need to manually search through tasks. Instead, you can instantly highlight items that need immediate attention, helping your team prioritize key tasks, address bottlenecks, and keep the fundraising campaign running smoothly.
8. Manage Board Settings for Full Control

The settings option provides a wide range of customization features that help you tailor the board to your specific fundraising needs. Here’s a closer look at what you can do:
- Overview: Get a summary of the board’s current status, including the number of completed tasks, overdue items, and upcoming deadlines. This quick snapshot helps you monitor overall progress.
- Privacy Settings: Control who can access the board by choosing between team-only access, account-wide access, or allowing access via a link.
- Work-In-Progress (WIP) Limits: Limit the number of tasks allowed in each column to prevent overloading team members and ensure a manageable workload.
- Tags Management: Create, edit, and organize tags to help categorize and prioritize tasks. Tags such as “Compliance” or “Finalization” allow for easy filtering.
- Column Settings: Add or adjust columns to match your workflow. This flexibility lets you adapt as the fundraising campaign evolves, ensuring the board always reflects your current needs.
- Auto-Numbering of Tasks: Enable this option to automatically assign task numbers, making it easier to reference specific tasks during discussions.
- Export and Archive: Export the board data in Excel format for external reporting or archive the board once the campaign is complete to preserve all progress and discussions.
With the board fully set up and organized, let’s take a closer look at how task cards help you break down complex activities into manageable steps, ensuring that every part of your fundraising campaign moves forward smoothly.
Break Down Tasks Into Manageable Steps
In any fundraising campaign, breaking tasks into smaller, actionable steps is crucial to ensuring smooth execution and preventing important details from slipping through the cracks.
This demo board showcases how each task is carefully segmented for better collaboration and progress tracking.

Here’s how the team uses task cards to break down their work effectively:
- Details Tab for Comprehensive Task Descriptions: The Details tab stores important information, such as the task’s objective, requirements, and background. This ensures team members have the context they need without repeatedly asking for clarifications.
- Task Status for Progress Updates: Each task can be assigned a status, like In Progress, Needs Review, or Ready, making it easy to track progress and identify tasks that require attention.
- Checklist Tab for Subtasks: Large tasks are split into smaller, manageable subtasks using the checklist feature. Each subtask can be checked off as completed, helping teams stay organized and track incremental progress.
- Due Dates to Meet Deadlines: Due dates ensure that tasks remain on schedule, and visibility into upcoming deadlines allows teams to prioritize tasks and avoid delays.
- Tags for Easy Categorization: Assigning tags like “Compliance” or “Donor Outreach” helps categorize tasks, making it simple to filter and find related tasks quickly.
- Chat Tab for Task-Specific Discussions: All task-related discussions are kept in the chat tab, avoiding scattered communication across different platforms and making it easy to reference past conversations.
- Task Assignments for Clear Ownership: By assigning tasks to specific team members, the board ensures accountability and clarity on who is responsible for each task, eliminating confusion.
- Attachments Tab for Storing Files: Task-specific documents, donor lists, or event planning files can be attached directly within the task card, saving time otherwise spent searching through shared drives or emails.
By breaking tasks into actionable steps and keeping everything centralized, the team can work efficiently, track progress with ease, and ensure that each phase of the fundraising campaign is executed successfully.
Conclusion: Set Your Fundraising Campaign Up for Success
A well-structured fundraising campaign is about more than just meeting goals; it’s about creating a streamlined process that keeps your team focused, tasks organized, and milestones on track. By implementing the right strategies and using an effective system, you can avoid common pitfalls and maintain momentum throughout the campaign.
Whether you’re managing donor outreach, approvals, or events, having a centralized board with task management features ensures your team can collaborate efficiently, adapt to changes, and achieve your fundraising goals with confidence. With the right approach, your campaign can build lasting connections, secure vital funding, and drive meaningful impact.