Cards on Kerika’s Task Boards and Scrum Boards can have a status flag; this is used to communicate the state of the card to other people working on the board — Team Members and Visitors.
(These flags should reflect the current stateof the card, not the importance or other attributes: that’s handled by the Tags and Priority fields, and will be covered in a separate blog post.)
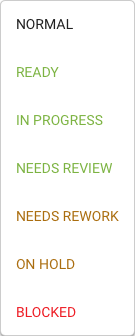
Normal
This is the default for all cards: it simply means that this card has no particular status. Cards are not expected to stay NORMAL for very long: as soon as they are complete they should progress to READY or NEEDS REVIEW.
Ready (To Pull)
The concept of READY TO PULL comes from Kanban, and reflects a “pull rather than push” approach to how work is taken up when people are freed up from their current assignment.
Pull vs. Push deserves its own blog post, but the difference can be summarized as follows:
In traditional project management, with a command-and-control model that places a single project manager in charge of everything, work gets “pushed” to people, usually without any regard to their availability.
This is commonplace across all sorts of teams: for example, a QA person is assigned a card when a developer is finished with it, because the natural next step is for the card to go through QA.
The problem with this approach is that it shows an unrealistic view of the status of the entire project, and often hides the real bottlenecks within a team. In our example,
If you’re using any other project management tool, chances are this has happened to you: you’re deep into a project, staring at a folder full of files labeled “final,” “final-2,” and “really-final-this-time,” trying to figure out which one is the latest version. Sound familiar?
But if you’re a Kerika user, updating files becomes refreshingly simple, seamless, and efficient. Unlike other tools, Kerika automatically tracks and replaces old file versions, so your team is always working with the most up-to-date version with no confusion and no hassle. Let’s dive into how it works:
How It Works: Updating Files in Kerika
In Kerika, files and attachments can be stored in two main areas: Task Cards and Board Attachments. Each area serves a unique purpose, giving you flexibility and control over your project files.
Let’s explore how you can seamlessly update files in both sections without creating a cluttered mess of versions.
Task Cards are where all the magic happens when it comes to organizing files related to specific tasks. Here’s how you update a file:
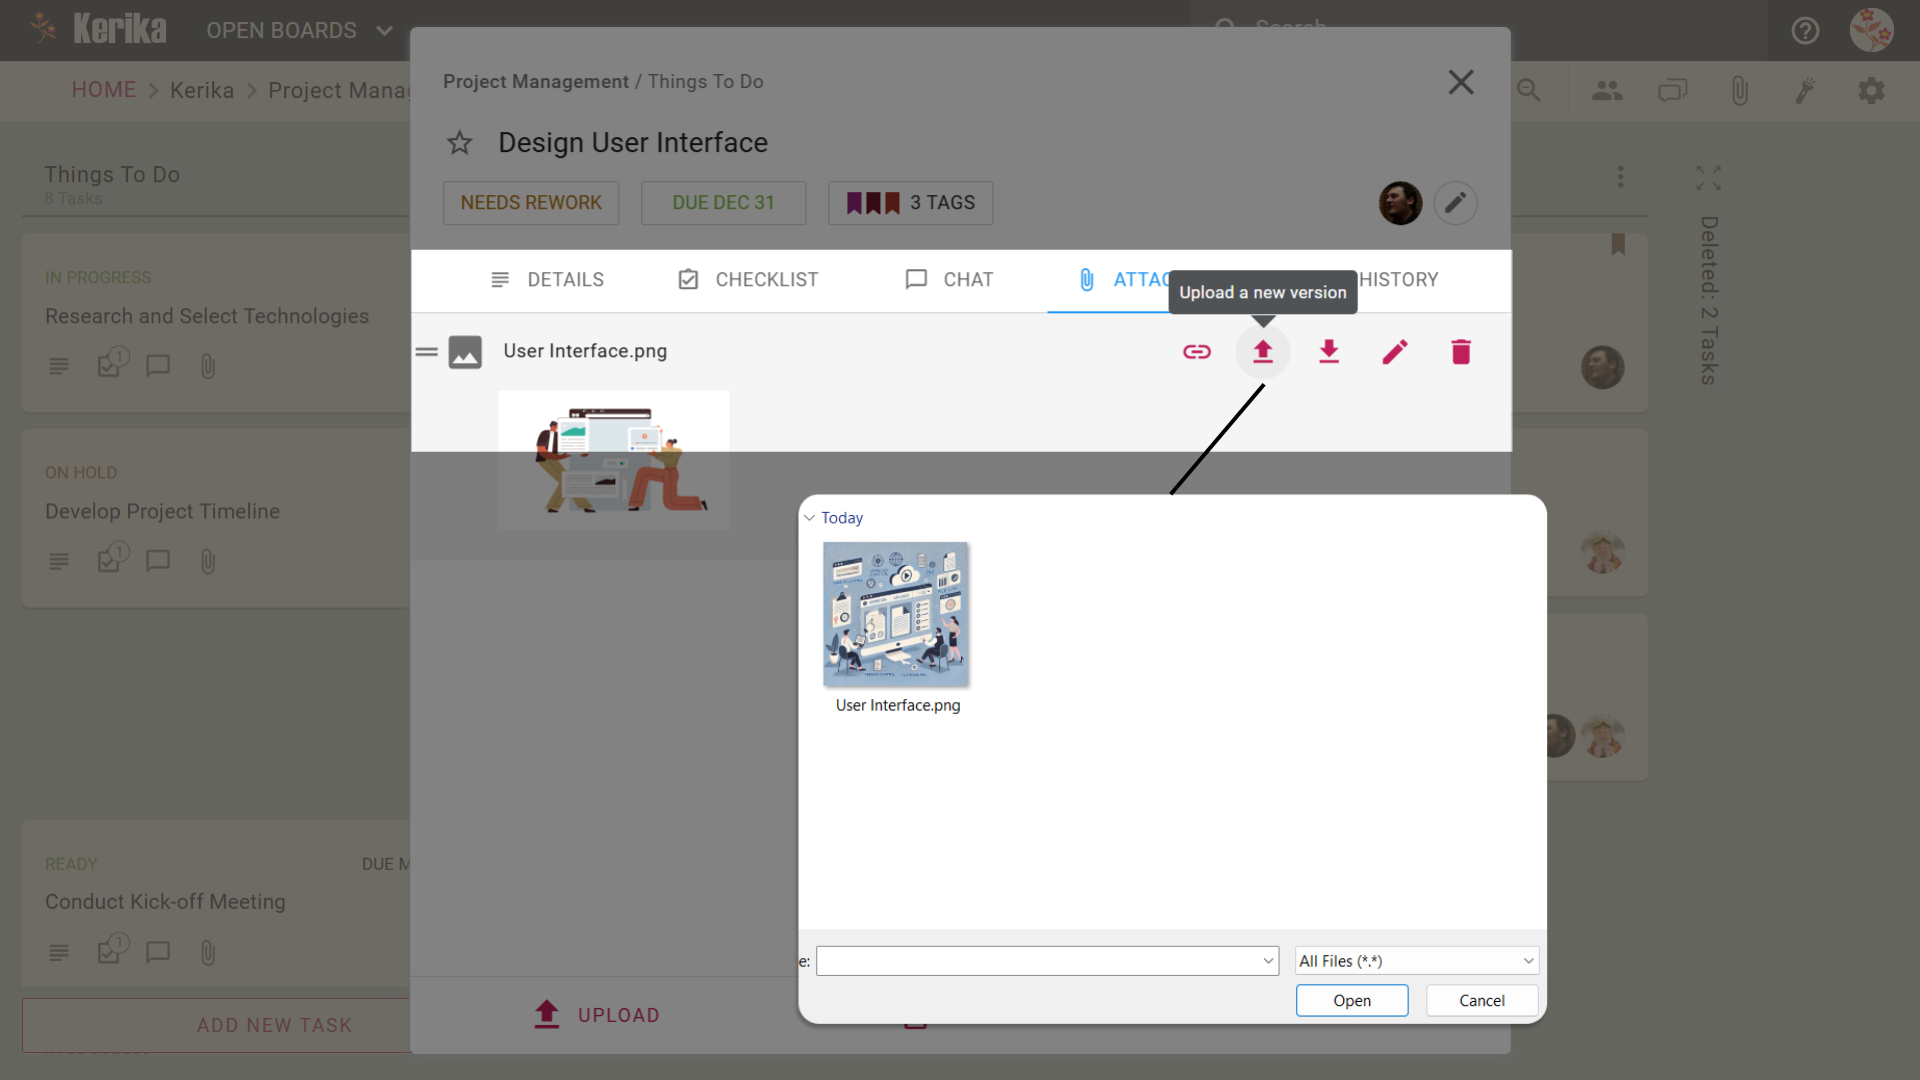
Locate Your File: Open the Task Card where the file is attached.
Upload a New Version: Click the Upload New Version icon next to the existing file. This automatically replaces the old version with the new one while keeping the history intact. No need to delete the old version or rename the file.
Benefits: The updated file is instantly tied to the task, so your team can continue collaborating without skipping a beat.
Task Cards ensure your file updates stay relevant to the task at hand, keeping everyone on the same page.
Board Attachments are ideal for files that impact the entire project such as project charters or shared templates. Updating files here is just as straightforward:
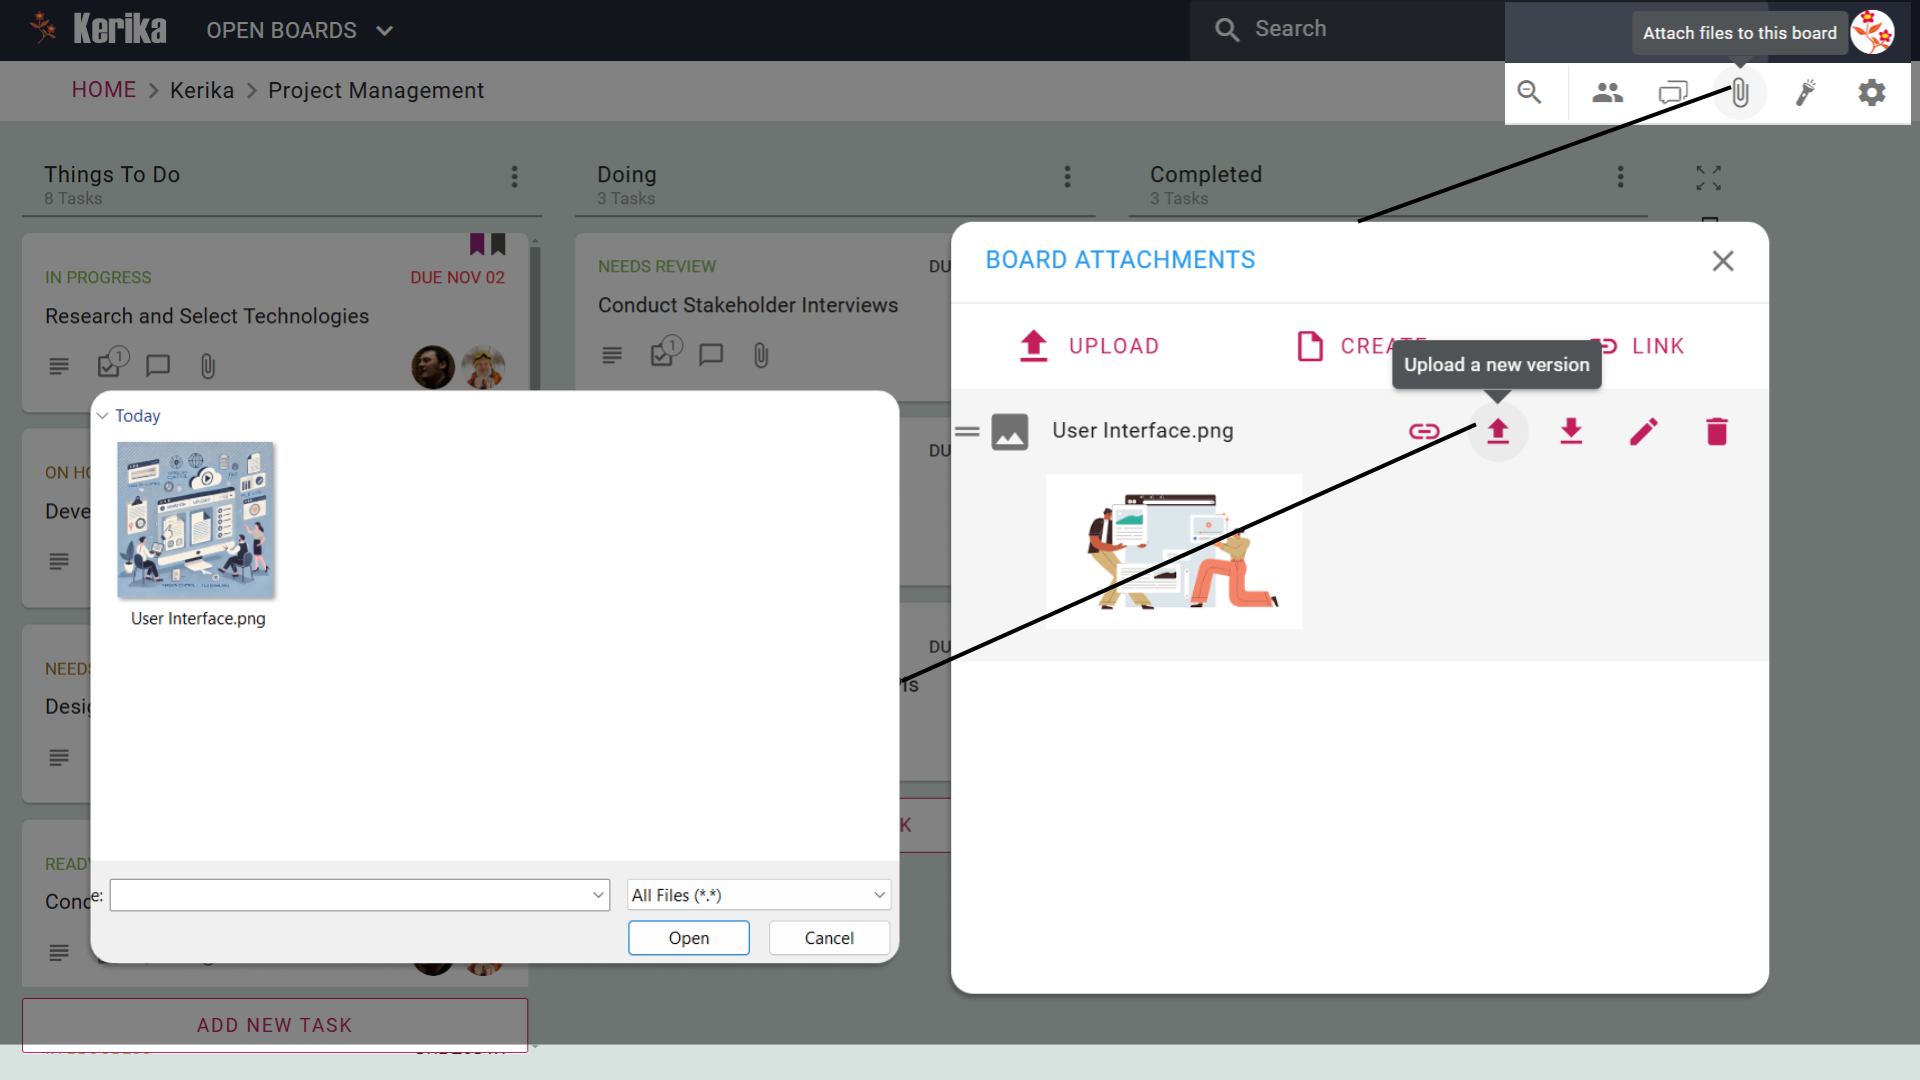
Navigate to Board Attachments: Click the Attachments icon on the board menu.
Update the File: Select the file you want to replace and click the Upload New Version button. The older version is replaced seamlessly, so there’s no confusion about which version is current.
Benefits: Your entire team gets instant access to the latest version, no matter where they’re working from.
Board Attachments ensure project-wide files stay organized and up-to-date without creating duplicates.
Kerika’s smart file management is here to simplify your project workflows. Say goodbye to the chaos of endless file versions and hello to effortless collaboration. If keeping your team organized and productive sounds like a win, give Kerika a try today!
When you’re working with a team – whether it’s designers, developers, marketers, or anyone else – sharing files can quickly become a hassle. From design mockups to campaign assets and technical documents, ensuring everyone has access to the right files at the right time can feel overwhelming.
But with Kerika, file sharing is effortless. Whether it’s sending a design file to your creative team or sharing a project roadmap with stakeholders, Kerika keeps everything organized and accessible, making collaboration seamless and stress-free.
Let’s explore how Kerika transforms file sharing for teams of all kinds:
How It Works: Sharing Files in Kerika
In Kerika, files can be shared in two main areas: Task Cards and Board Attachments. Each serves a specific purpose, ensuring your files are shared with the right people in the right context.
Task Cards are perfect for sharing files that are tied to a specific task. Here’s how file sharing works in Task Cards:
Attach Files Directly to the Task: Upload files or link resources directly to the task
card. Your teammates can access these files without searching through emails or separate folders.
Instant Access for Everyone Involved: Anyone inside the board has immediate access to the attached files, keeping collaboration smooth and efficient.
File Sharing Benefits: ● No confusion over which files are relevant to the task.
● All task-related materials stay together, so your team always knows where to look.
Task Cards make file sharing focused, relevant, and effortlessly organized.
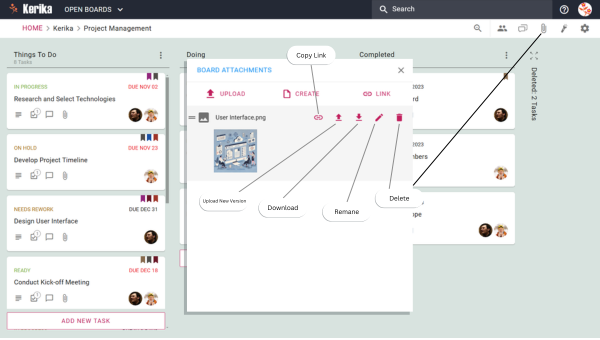
For files that affect the entire project, Board Attachments are the way to go. Here’s how file sharing works at the board level:
Upload or Link Files for the Whole Team: Add files or external links to the board that everyone can access, like project charters, shared templates, or reports.
Centralized File Sharing: All board members can access these files instantly, ensuring that key project resources are always within reach.
File Sharing Benefits: ● Perfect for team-wide updates or resources.
● Keeps your project running smoothly by ensuring everyone has access to the same information.
Board Attachments make it easy to share files that matter across your entire team.
With Kerika, file sharing is no longer a bottleneck in your projects. Whether you’re collaborating on specific tasks or managing project-wide resources, Kerika makes it easy to keep your files organized and accessible.
Ready to take the hassle out of file sharing? Try Kerika today and see how it simplifies teamwork for you and your team!
Managing multiple projects can quickly clutter your workspace, making it hard to focus on what’s important. With Kerika’s Archive Feature, you can keep your Home view clean by moving completed or inactive boards out of the way – without deleting them.
Let’s explore how archiving boards works in Kerika.
How to Archive Boards:
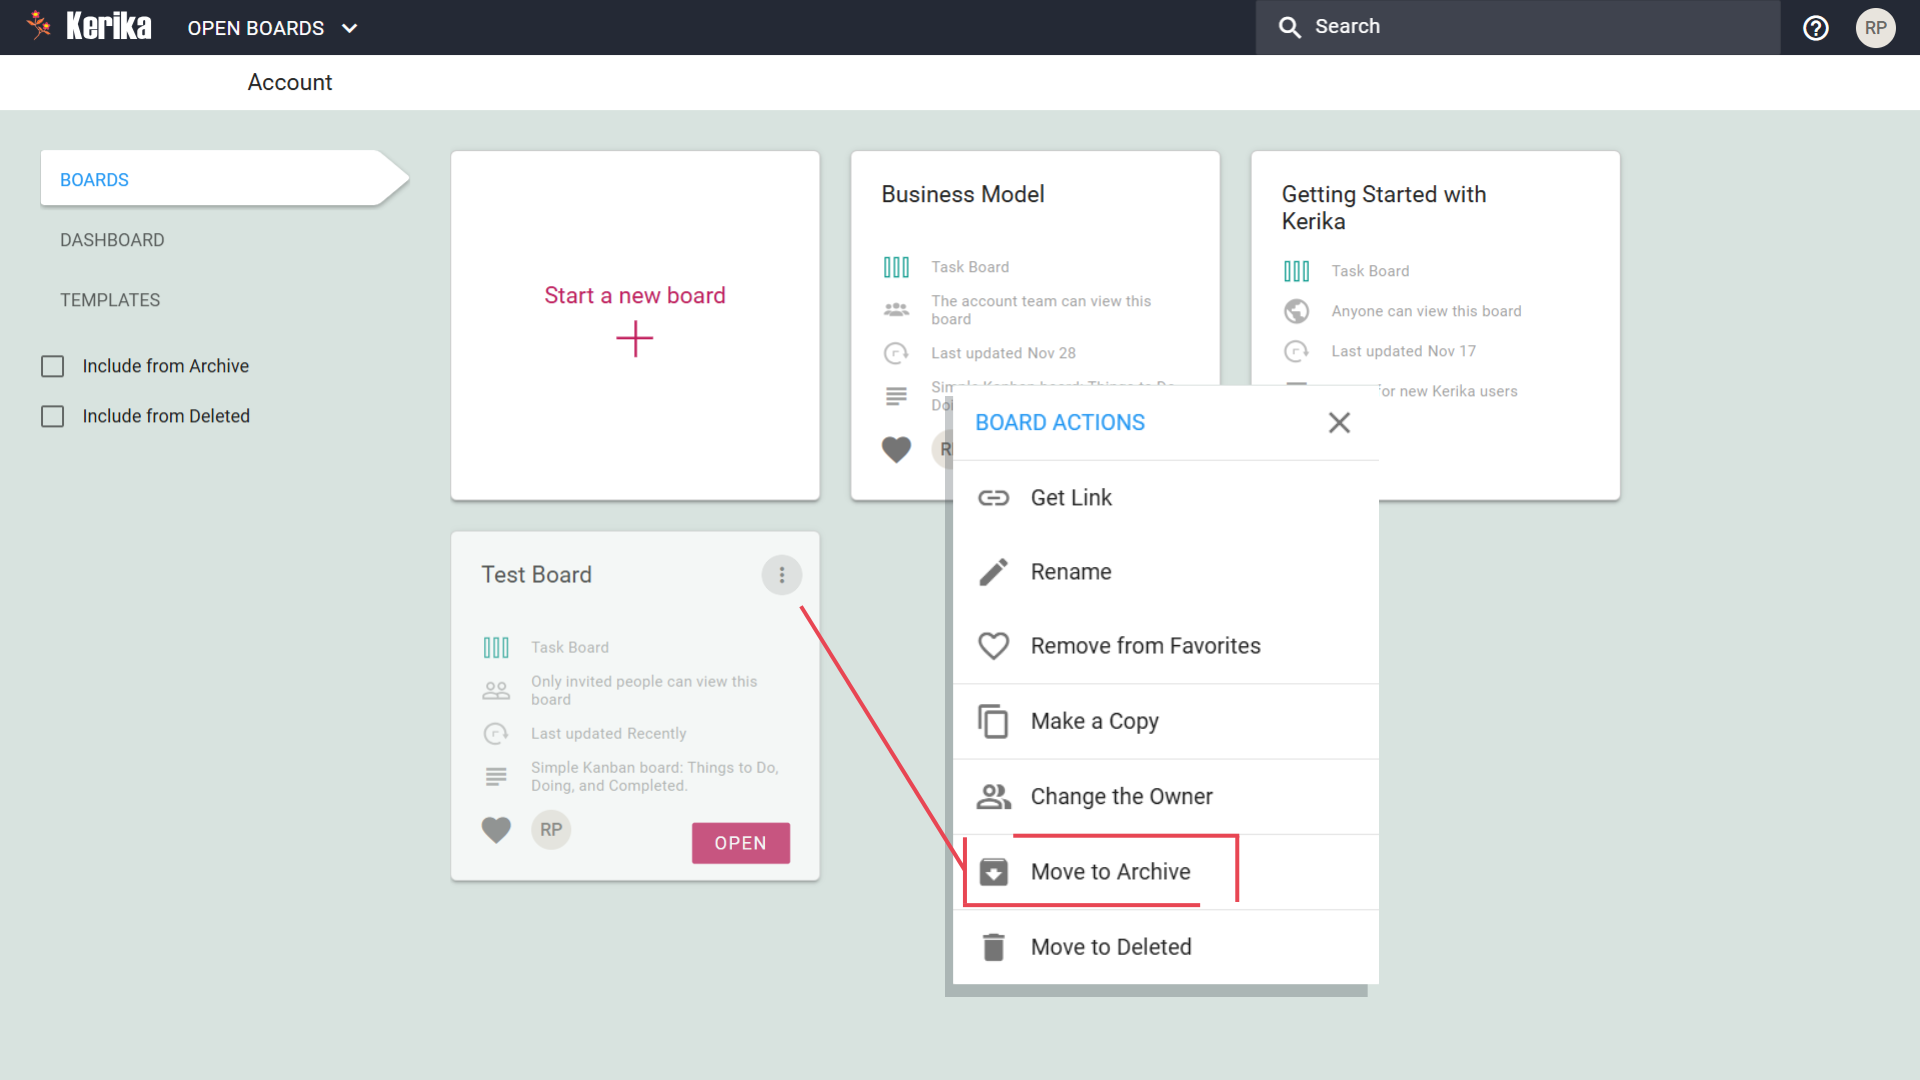
1. Move a Board to Archive
Click the three dots on the board you want to archive
Select Move to Archive from the dropdown menu
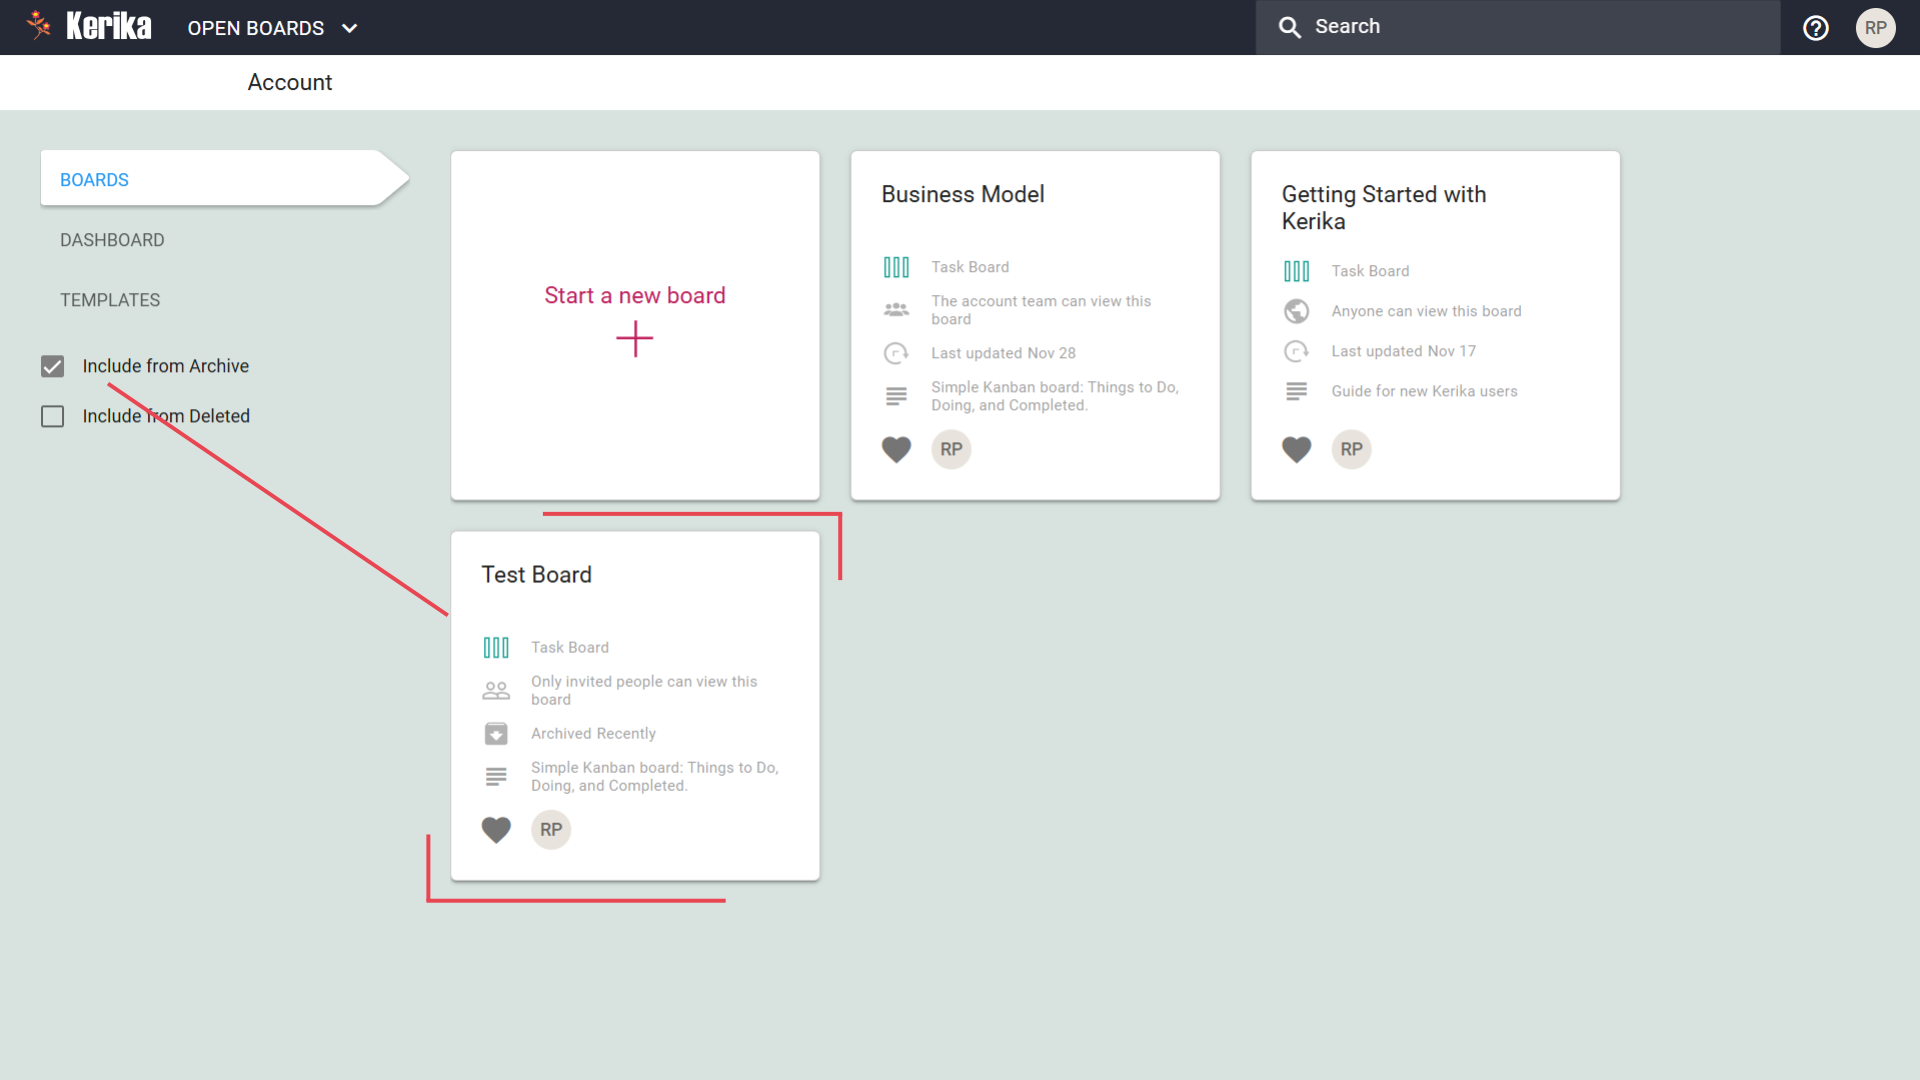
2. Access Archived Boards
Use the Include from Archive checkbox in your Home view to display archived boards.
Retrieve archived boards anytime for reference or reuse.
When to Archive Boards:
Project Completion:
Once a project is finished and doesn’t require active management, archive its board to clear your workspace.
Inactive Projects:
Temporarily archive boards for projects that are on hold or waiting for approval.
Focus on Active Tasks:
Archiving keeps your Home view streamlined, ensuring only current and relevant tasks are visible.
Why It Works:
Declutter Your Workspace: Focus only on active boards and tasks.
Quick Access to Past Projects: Safely store completed or paused boards for future reference.
Streamlined Workflow: Keep your Home view neat and organized for better productivity.
With Kerika, staying organized is easy. Archiving boards helps you focus on what matters while keeping everything else just a click away.
Ready to declutter your workspace? Start using Kerika today!
Managing a busy board can sometimes feel overwhelming, especially when you’re juggling multiple tasks with different priorities. That’s where Kerika’s Highlight Feature comes in – it helps you quickly focus on what’s most important by filtering and visually highlighting tasks that meet specific criteria.
Let’s explore how to use the highlight feature to keep your projects on track.
How to Use the Highlight Feature:
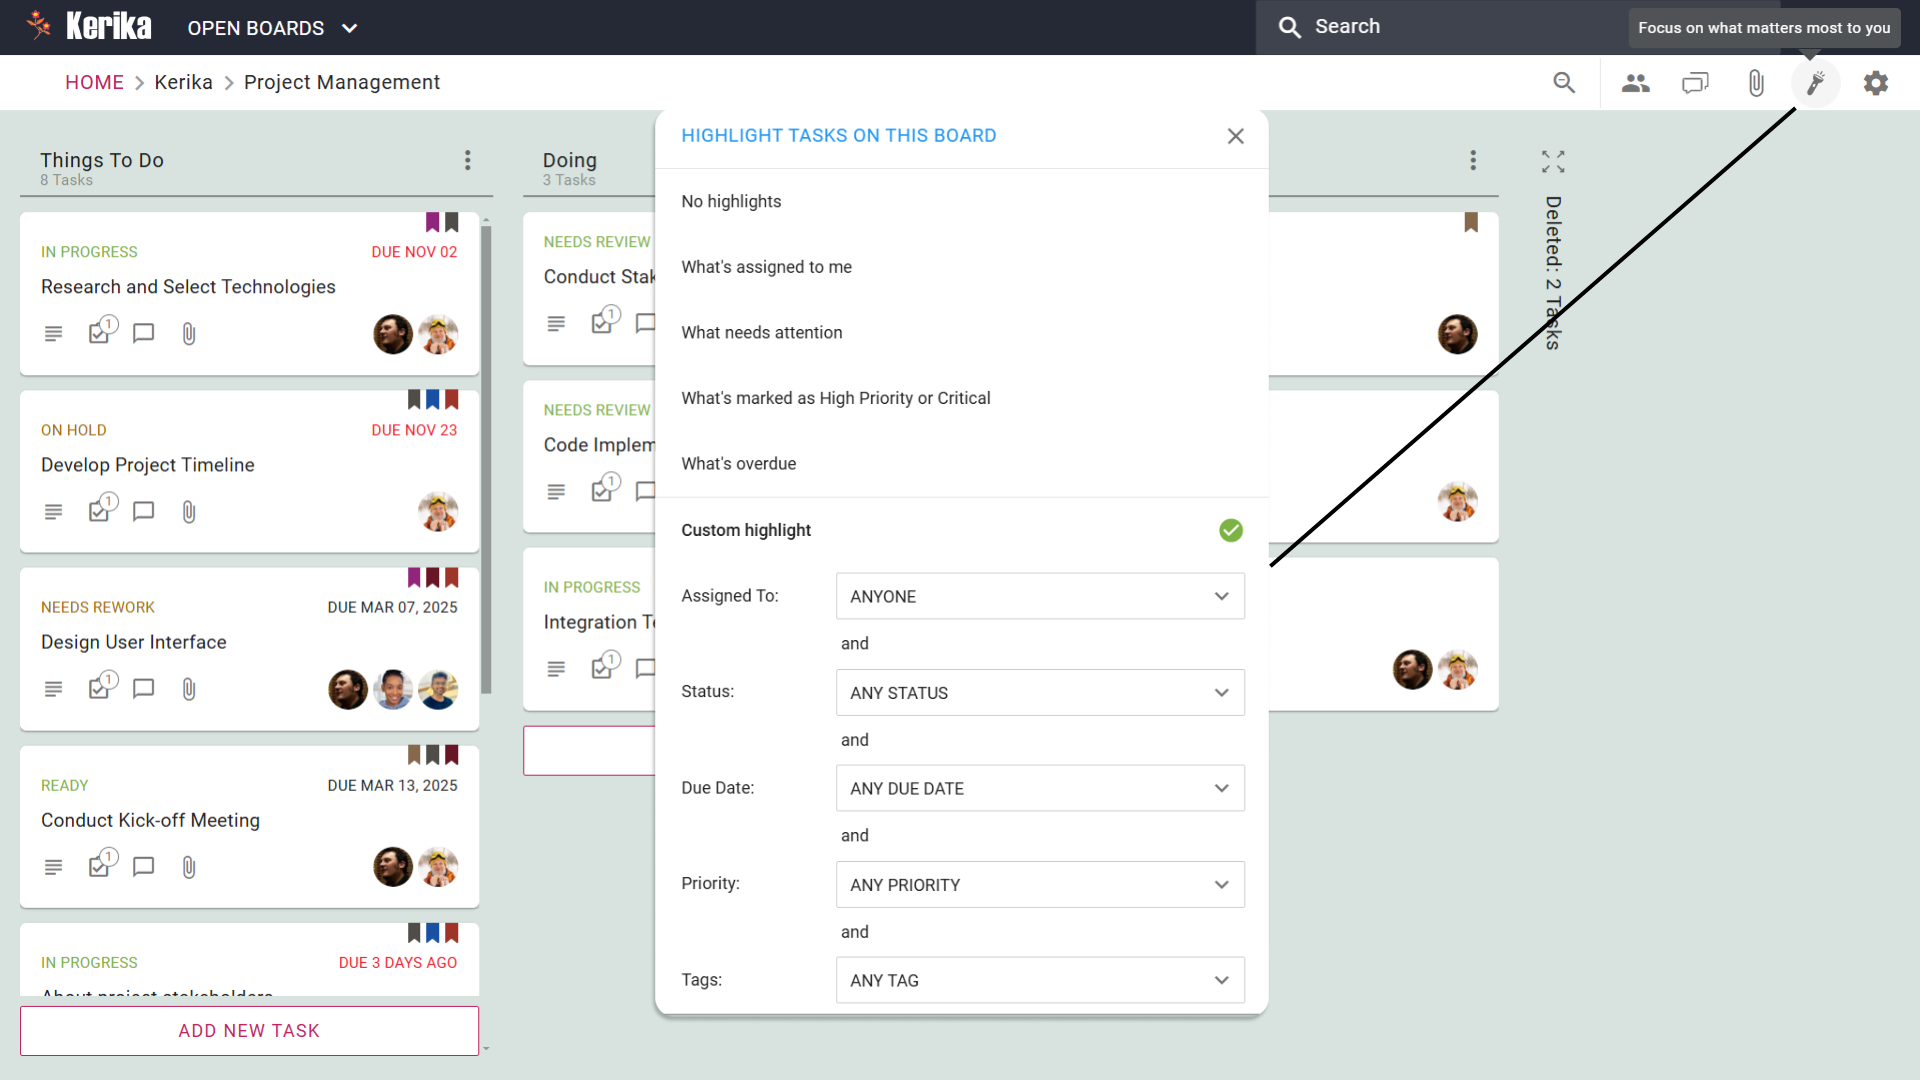
1. Access the Highlight Option
Click the Highlight Icon on your board.
2. Choose What to Highlight
Select from predefined options or create custom filters:
What’s assigned to me: Instantly see all the tasks assigned to you, so you can stay on top of your responsibilities.
What needs attention: Highlights tasks that may require follow-up or have upcoming deadlines, ensuring nothing falls through the cracks.
What’s marked as High Priority or Critical: Focus on tasks that are essential to the project’s success.
What’s overdue: Clearly identifies tasks that are past their due dates, helping you address delays quickly.
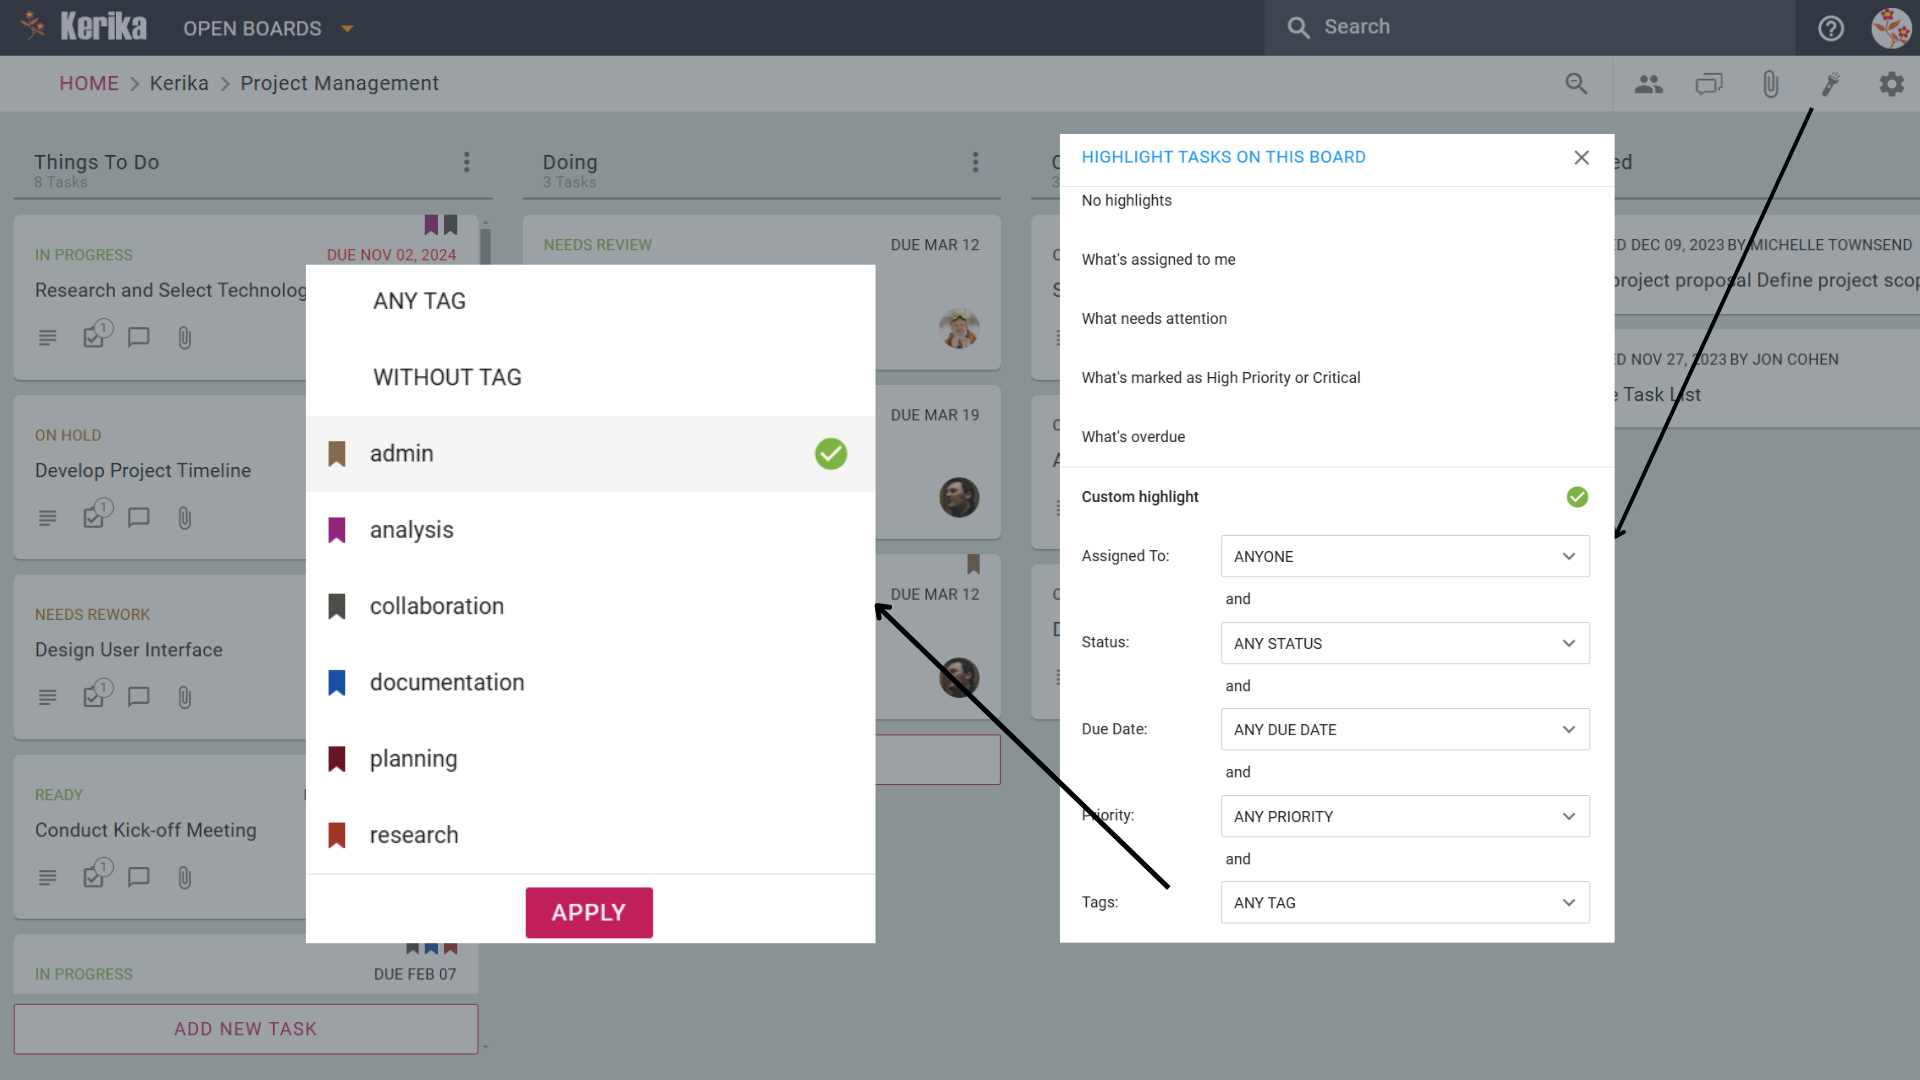
Custom Highlight: Create tailored filters by combining parameters like assignees, task status, due dates, priorities, and tags. You can use one or multiple filters at a time to find out what matters to you most on the board.
Why It Works:
Stay Organized with “What’s Assigned to Me”By filtering for tasks assigned to you, this option ensures you can focus on your responsibilities without getting distracted by other tasks on the board. Perfect for managing your personal workload.
Act on “What Needs Attention”This filter highlights tasks that require immediate focus, whether it’s due to an approaching deadline or a stalled status. It’s a great way to identify bottlenecks and keep the project moving forward.
Prioritize with “What’s Marked as High Priority or Critical”High-stakes tasks deserve your full attention. This option ensures you never miss critical tasks that could impact the project’s success.
Address Delays with “What’s Overdue”Easily spot overdue tasks so you can allocate resources or follow up with the right team members to bring them back on track.
Tailor Your Workflow with Custom HighlightsThe Custom Highlight feature is where Kerika truly shines. Set multiple conditions – like showing tasks assigned to a specific person, with a “Needs Review” status, and due within a week – to create a personalized focus view that works for your unique needs.
With Kerika’s Highlight Feature, you can eliminate distractions and bring clarity to your workflow by focusing on the tasks that matter most.
Whether you’re managing your workload or the entire team’s, highlights keep you productive and on track. Try Kerika today and experience the difference!
Collaboration works best when everyone knows their role and has access to the right tools. With Kerika, inviting teammates to your board is simple and flexible.
Whether you’re working with a project manager, developers, designers, or external stakeholders, Kerika makes it possible to assign roles and ensure everyone has the level of access they need.
Here’s how you can add teammates and manage their roles effortlessly:
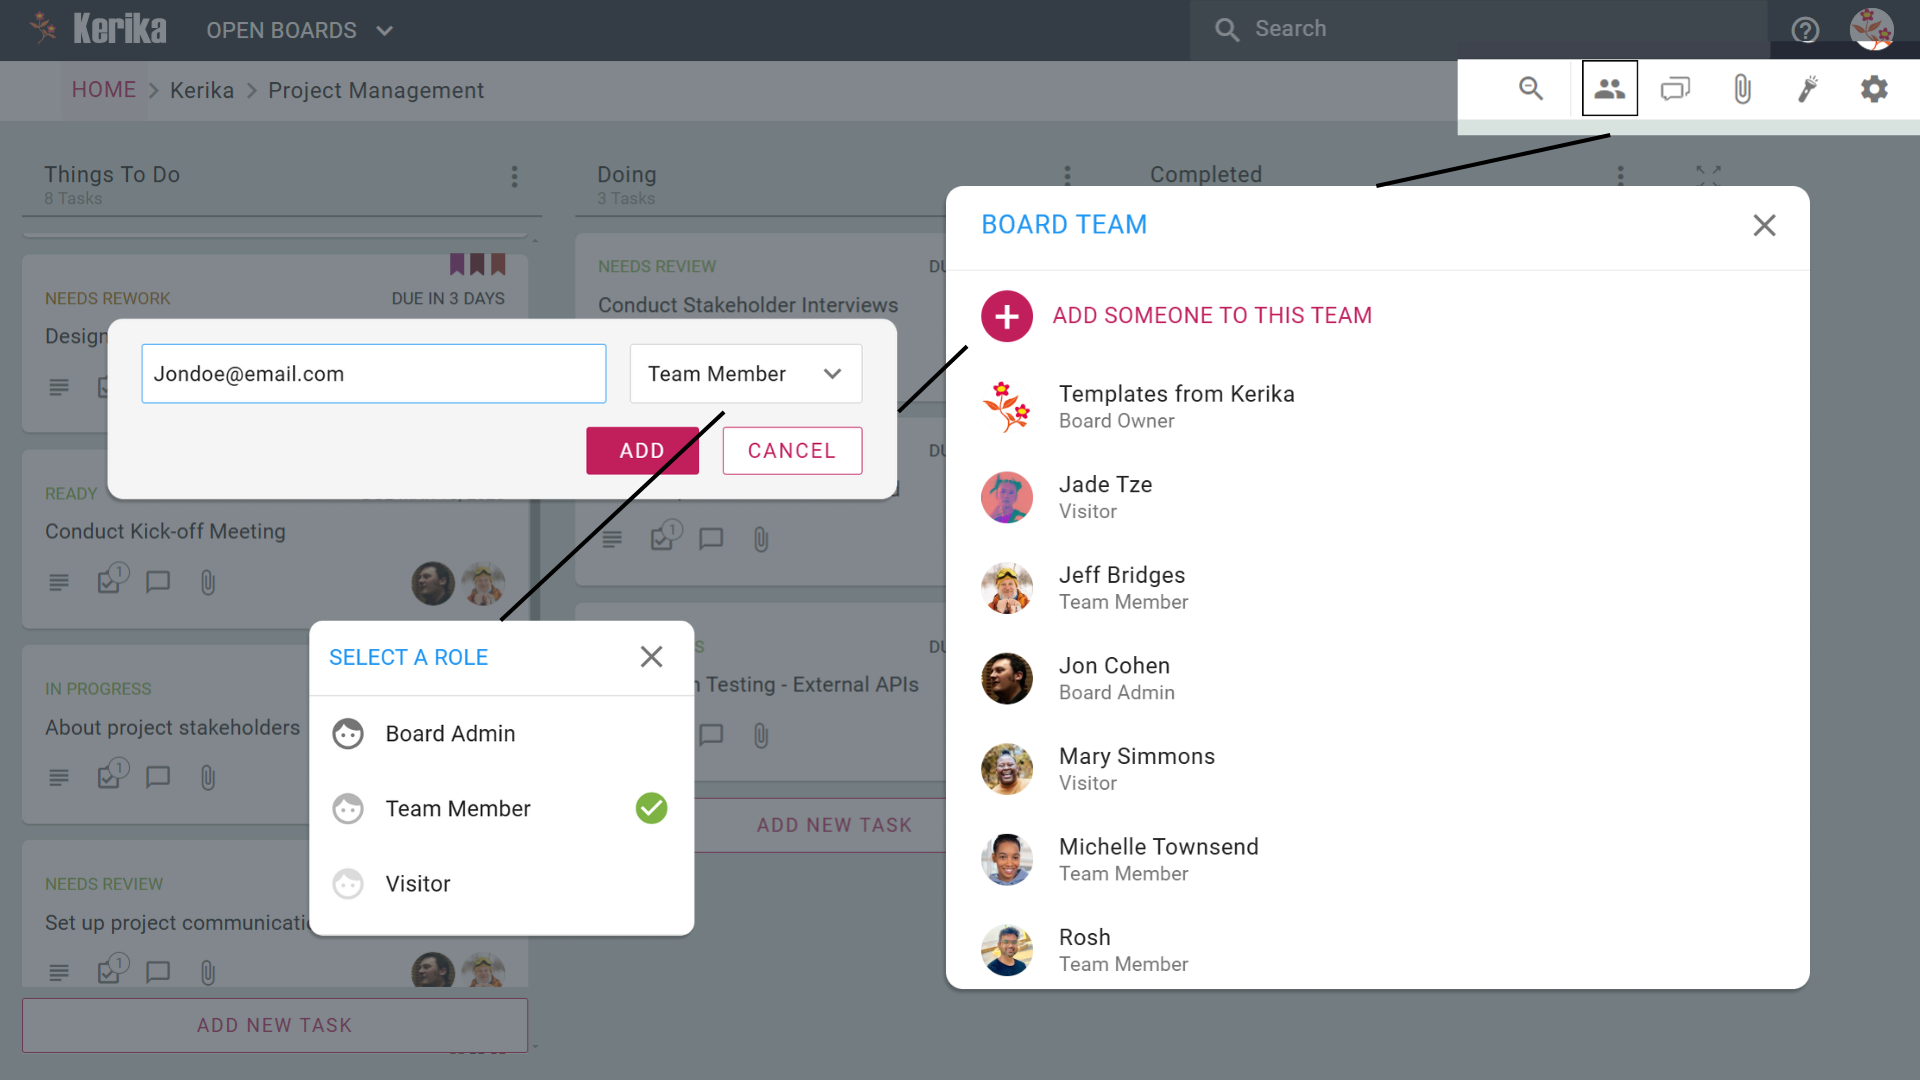
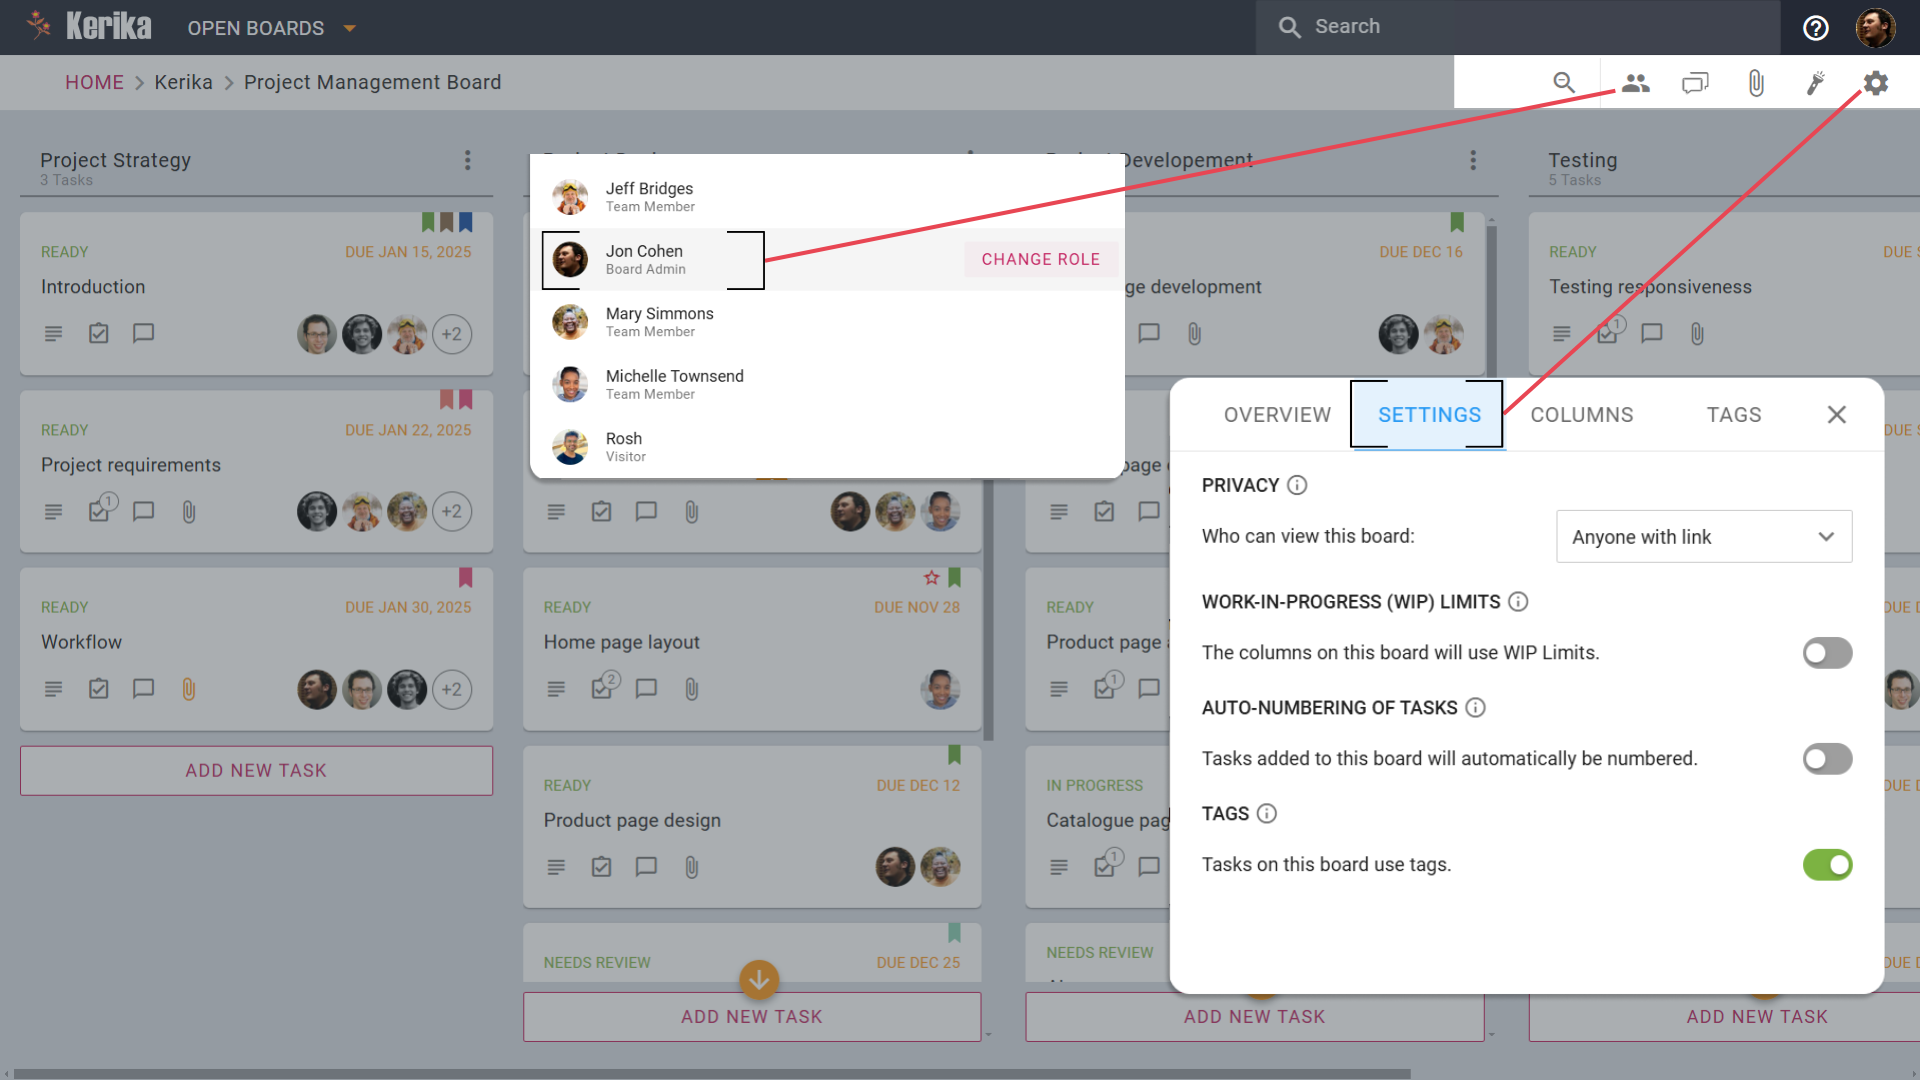
Open your board and click the Team Icon in the toolbar.
Enter the email address of the person you want to invite.
Select a role for them: Board Admin, Team Member, or Visitor.
Step 2: Assign Roles
Board Admin: If you have created the board, then by default you’re a Board Admin. But you can give full control of the board to someone, which includes managing team members and settings.
Team Member: Can collaborate on tasks, upload files, and contribute to the board. Ideal for designers, developers, and other contributors.
Visitor: View-only access. Great for external stakeholders or clients who just need to monitor progress.
Step 3: Add Them to the Team
Click Add, and your teammate is instantly part of the board with the role you’ve assigned.
The Benefits of Kerika’s Role-Based Access:
1. Board Admin: Full Control for Team Leads
If you created the board, you’re the admin by default. But Kerika also lets you assign admin rights to others.
Key Benefits:
Manage team members, update board settings, and maintain control over the board’s structure.
Perfect for projects with multiple leads or project managers who need equal control.
Avoids bottlenecks that might occur if there’s only a single Board Admin who is unavailable for some reason, e.g. on vacation.
Admins ensure the board stays organized and functional while empowering leadership collaboration.
2. Team Member: Empower Your Contributors
Team Members have all the tools they need to get the job done. They can collaborate on tasks, assign tasks to each other, upload files, and contribute to the board’s progress.
Key Benefits:
Ideal for designers, developers, and other active contributors.
Keeps the board dynamic by enabling hands-on collaboration while maintaining admin oversight.
Team Members drive the project forward, making them the backbone of productive teamwork.
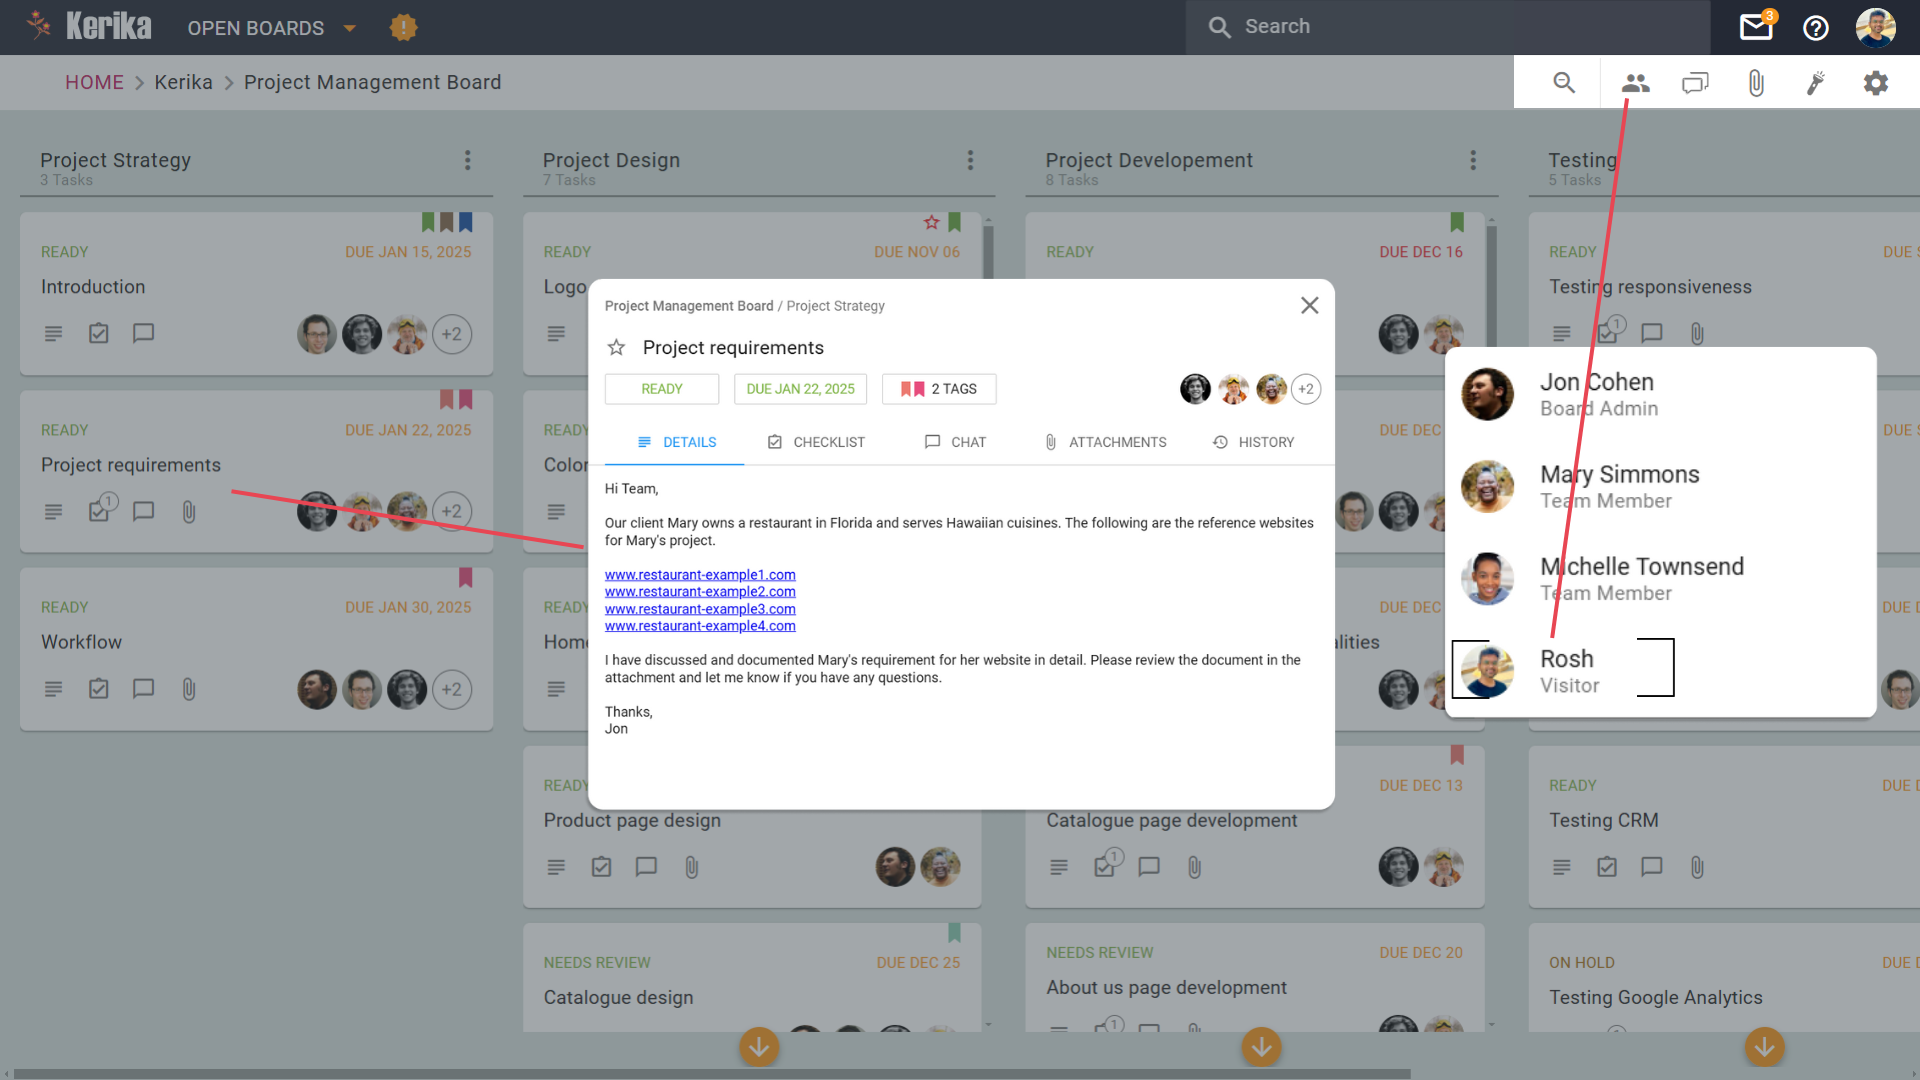
3. Visitor: Keep Stakeholders in the Loop
Visitors have view-only access, which means they can monitor the board’s progress without making changes.
Key Benefits:
Perfect for external stakeholders or clients who only need to see updates.
Ensures transparency without compromising the board’s structure or workflow.
Visitors are ideal for keeping everyone informed without adding complexity.
With Kerika, adding teammates isn’t just quick – it’s designed to support how your team works best. Whether you’re managing a tight-knit group or collaborating with external stakeholders, Kerika’s role-based system makes teamwork seamless and efficient.
Ready to streamline your team collaboration? Start inviting teammates and assign roles today with Kerika!
Collaboration works best when everyone knows their role and has access to the right tools. With Kerika, inviting teammates to your board is simple and flexible.
Whether you’re working with a project manager, developers, designers, or external stakeholders, Kerika makes it possible to assign roles and ensure everyone has the level of access they need.
Here’s how you can add teammates and manage their roles effortlessly:
Open your board and click the Team Icon in the toolbar.
Enter the email address of the person you want to invite.
Select a role for them: Board Admin, Team Member, or Visitor.
Step 2: Assign Roles
Board Admin: If you have created the board, then by default you’re a Board Admin. But you can give full control of the board to someone, which includes managing team members and settings.
Team Member: Can collaborate on tasks, upload files, and contribute to the board. Ideal for designers, developers, and other contributors.
Visitor: View-only access. Great for external stakeholders or clients who just need to monitor progress.
Step 3: Add Them to the Team
Click Add, and your teammate is instantly part of the board with the role you’ve assigned.
The Benefits of Kerika’s Role-Based Access:
1. Board Admin: Full Control for Team Leads
If you created the board, you’re the admin by default. But Kerika also lets you assign admin rights to others.
Key Benefits:
Manage team members, update board settings, and maintain control over the board’s structure.
Perfect for projects with multiple leads or project managers who need equal control.
Avoids bottlenecks that might occur if there’s only a single Board Admin who is unavailable for some reason, e.g. on vacation.
Admins ensure the board stays organized and functional while empowering leadership collaboration.
2. Team Member: Empower Your Contributors
Team Members have all the tools they need to get the job done. They can collaborate on tasks, assign tasks to each other, upload files, and contribute to the board’s progress.
Key Benefits:
Ideal for designers, developers, and other active contributors.
Keeps the board dynamic by enabling hands-on collaboration while maintaining admin oversight.
Team Members drive the project forward, making them the backbone of productive teamwork.
3. Visitor: Keep Stakeholders in the Loop
Visitors have view-only access, which means they can monitor the board’s progress without making changes.
Key Benefits:
Perfect for external stakeholders or clients who only need to see updates.
Ensures transparency without compromising the board’s structure or workflow.
Visitors are ideal for keeping everyone informed without adding complexity.
With Kerika, adding teammates isn’t just quick – it’s designed to support how your team works best. Whether you’re managing a tight-knit group or collaborating with external stakeholders, Kerika’s role-based system makes teamwork seamless and efficient.
Ready to streamline your team collaboration? Start inviting teammates and assign roles today with Kerika!
Your workspace should work for you, not the other way around. Customization options allow you to tailor everything from background colors to notifications and whiteboard tools, helping you stay organized and productive.
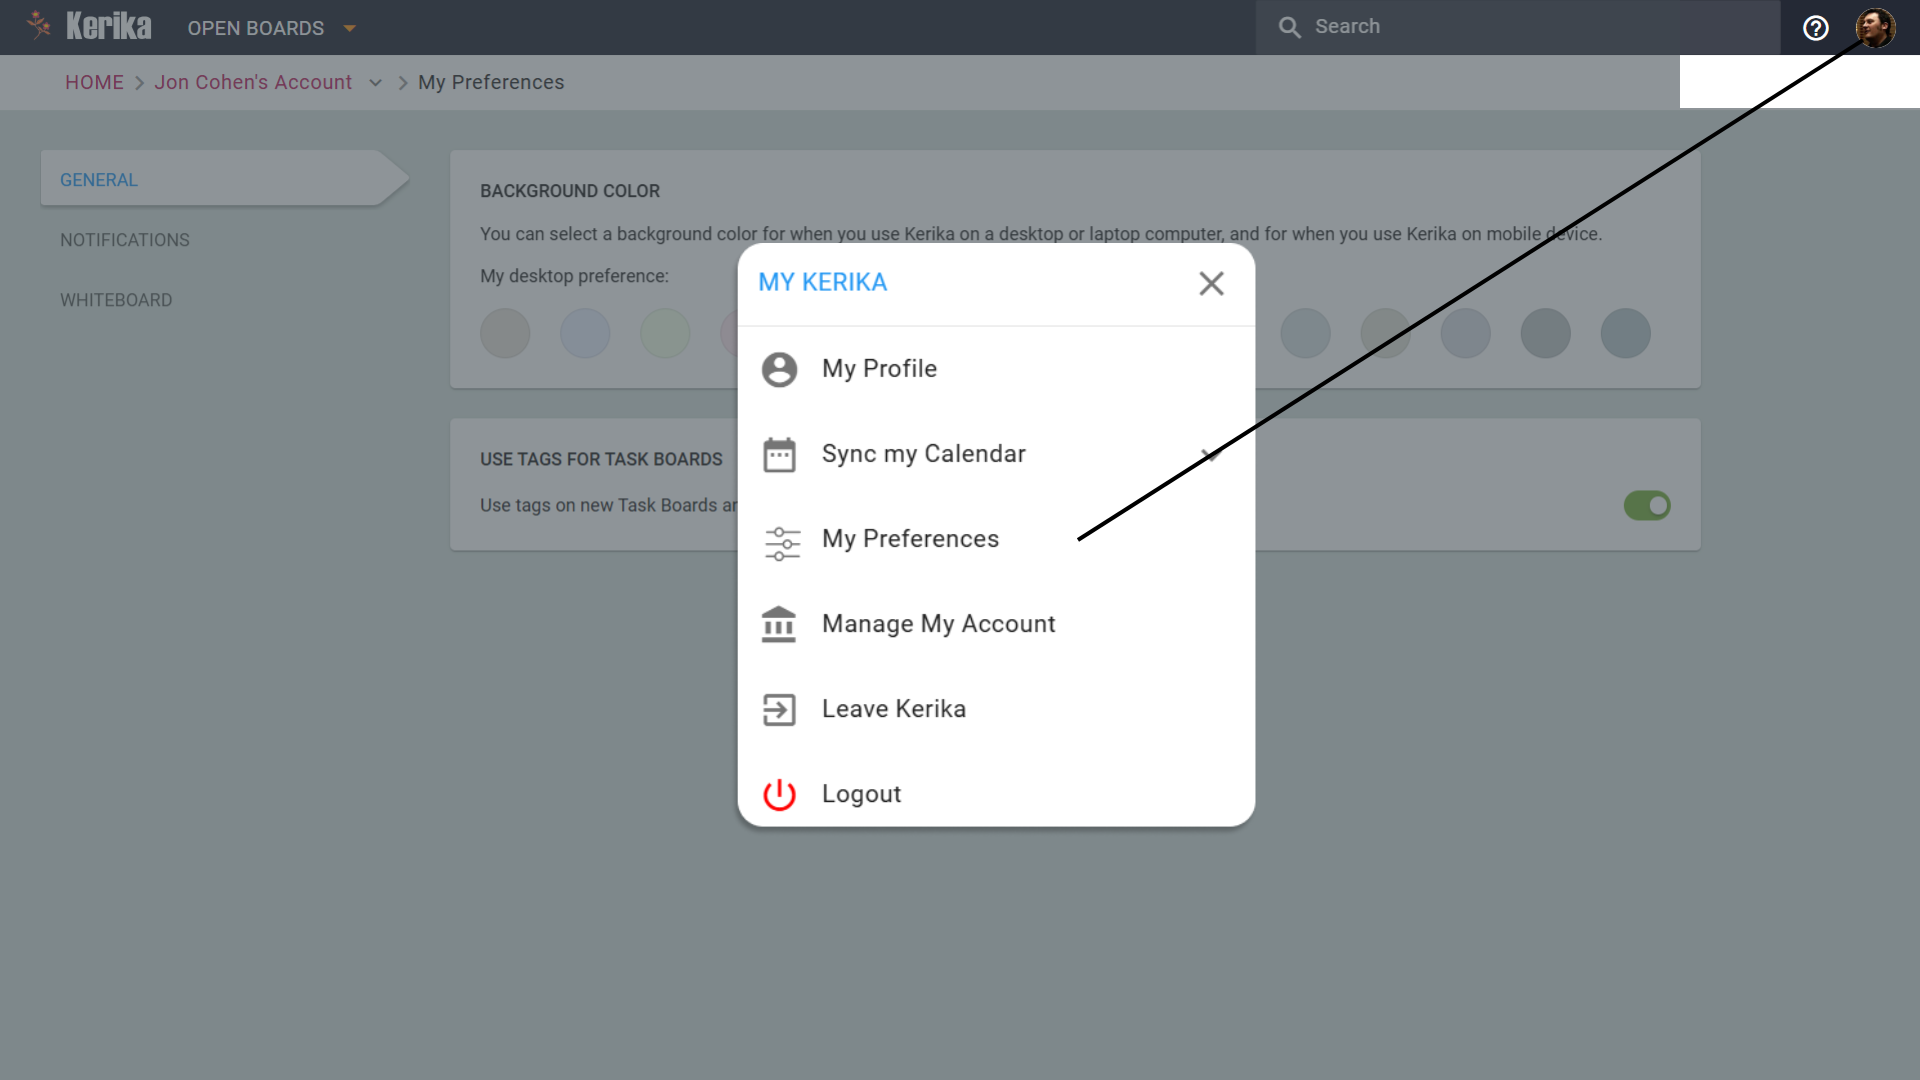
To start personalizing your workspace, you’ll need to access the Preference Settings in your account. Here’s how:
Click on your Profile Icon in the top-right corner of the screen.
Select My Preferences from the dropdown menu.
These settings let you create an experience that fits your unique work style. Now that you know how to access the settings, let us guide you step by step how you can use each customization option.
How It Works: Adjusting Preferences
Preferences are typically grouped into three main categories: General, Notifications, and Whiteboard. Each section provides straightforward options designed to enhance your workflow and optimize your experience.
Here’s a closer look at how these settings work:
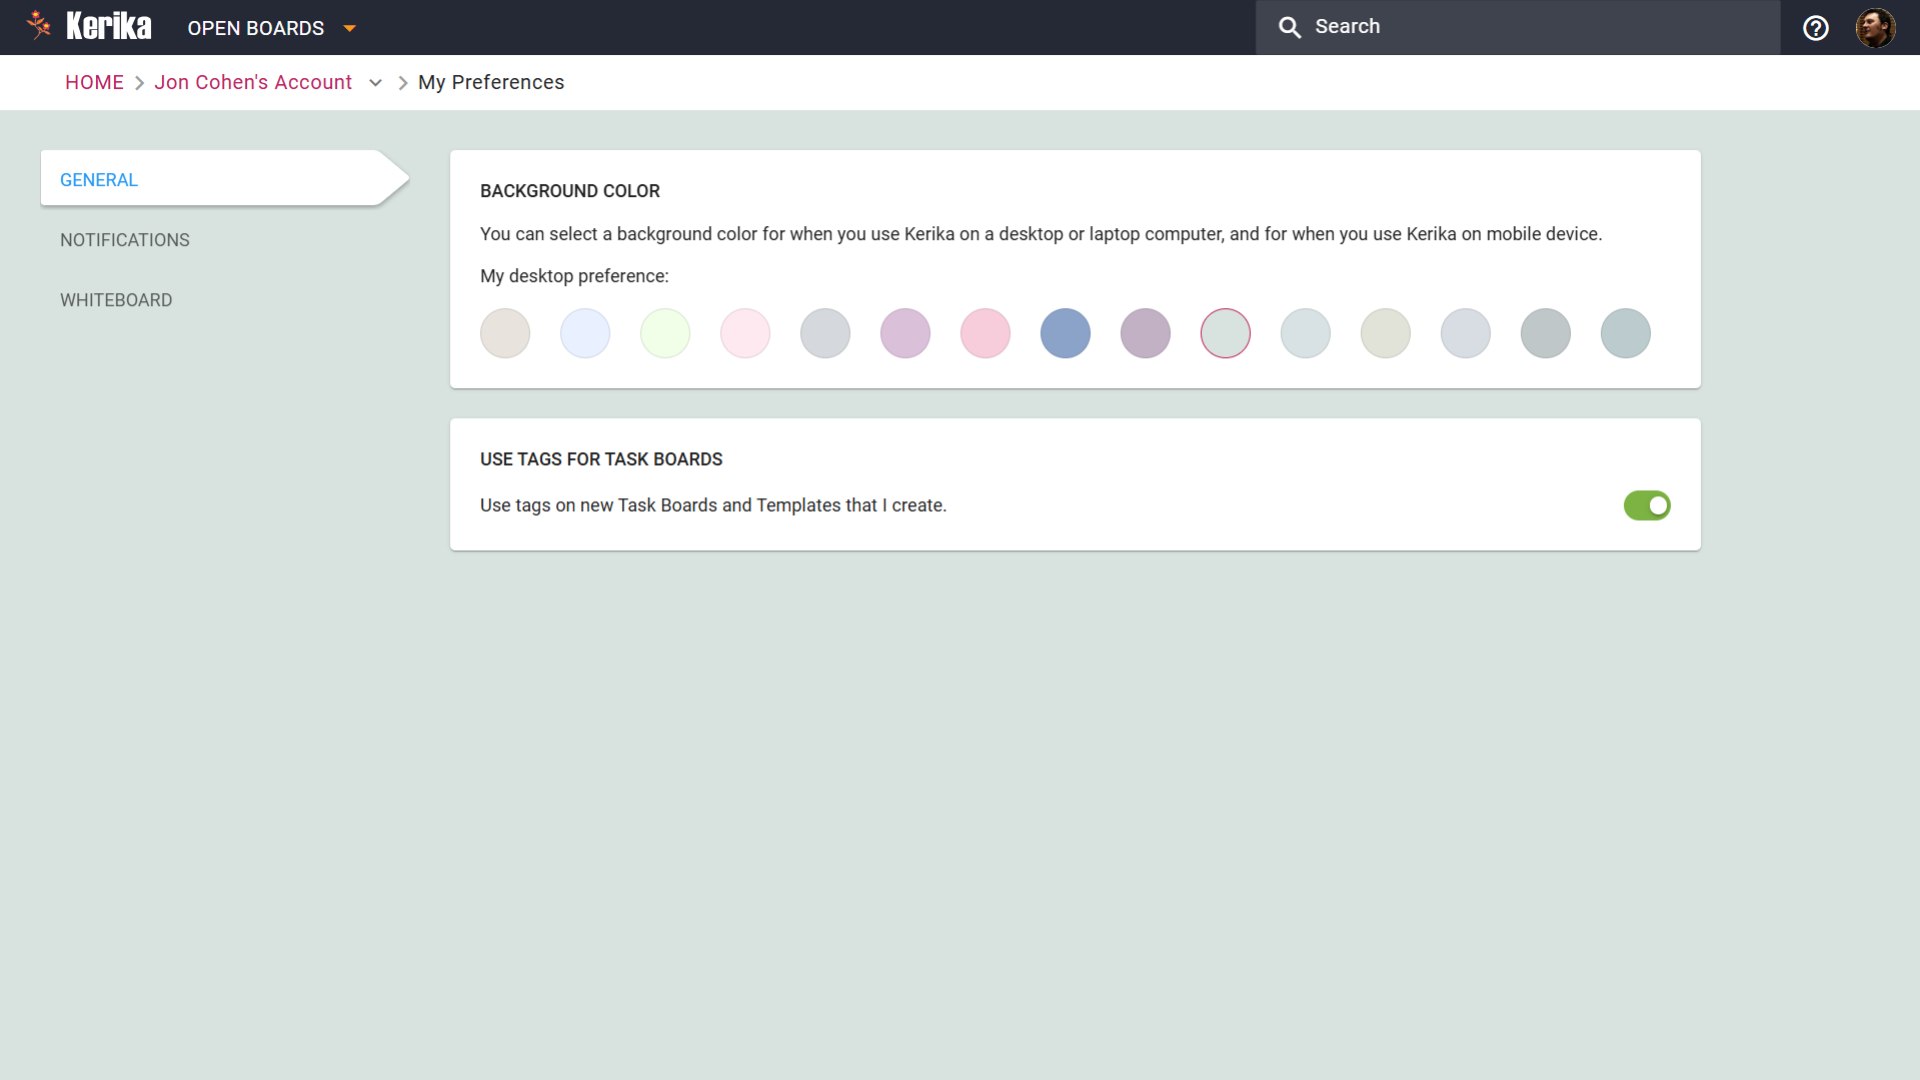
General Settings: Make Your Workspace Yours
Background Color:● Choose a background color that’s easy on your eyes and suits your style
● Pick from a variety of options to make your workspace visually appealing.
Use Tags for Task Boards● Enable this feature to automatically include tags on new task boards and templates you create.
● Helps you stay organized and categorize tasks effortlessly.
The Benefits:
Customizing the visual aspects of your workspace makes it feel more intuitive and less cluttered, helping you stay focused.
Notifications: Stay in the Loop Without Overloading
Chat Notifications● Get emails when there’s board-level chat or when someone chats on a task you’re involved in.
Activity Updates for Admins● Receive notifications when new tasks are added, completed, or reassigned on boards you administer.
Daily Task Reminders● Opt for a daily email summary sent at 6 AM, showing overdue tasks and those due this week or next.
● Group tasks by date or board for easy tracking.
The Benefits:
With flexible notifications, you can stay informed about what matters most without getting bombarded by unnecessary updates.
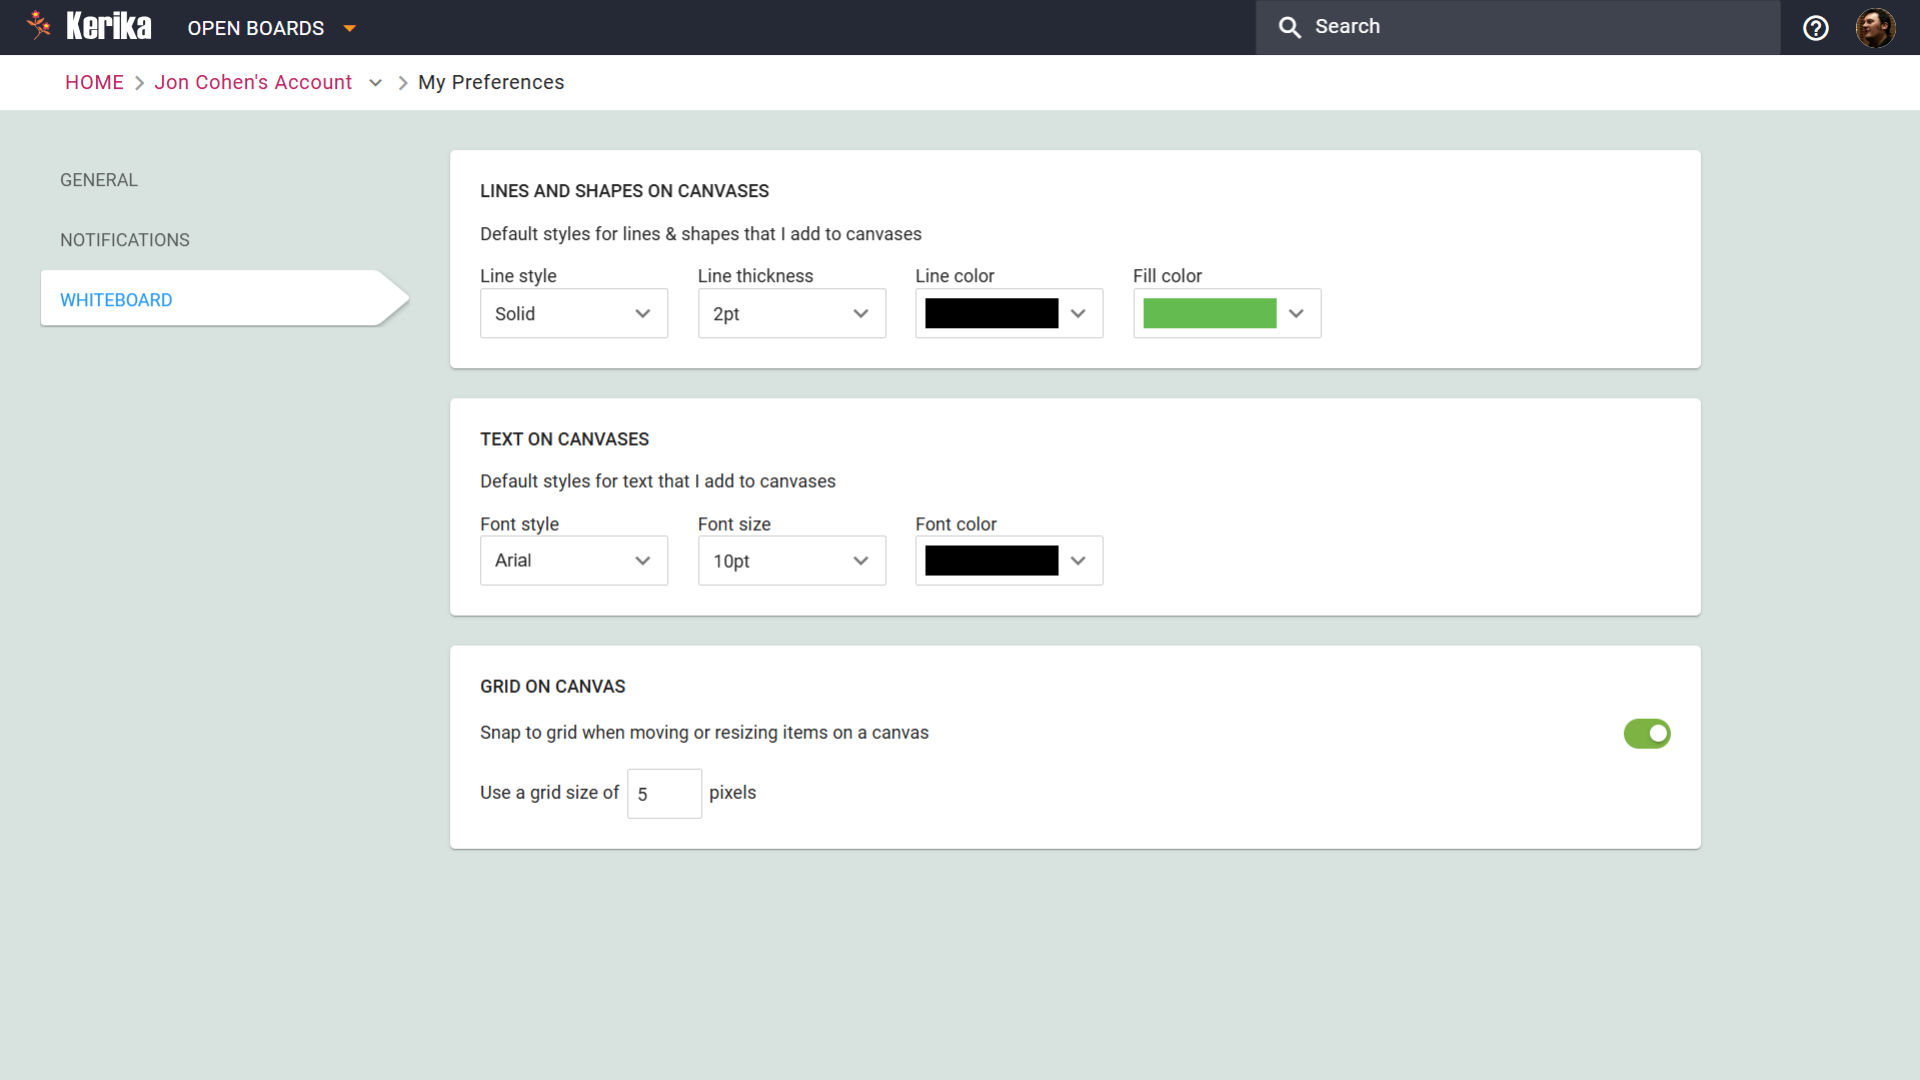
Whiteboard Settings: Streamline Your Creative Process
Lines and Shapes● Set default line styles, thickness, and colors to create clean, consistent visuals.
Text on Canvases● Choose your preferred font style, size, and color for a polished look.
Grid Options● Enable snapping to grid and set the grid size to keep your designs aligned and professional.
The Benefits:
These settings make whiteboards perfect for brainstorming, planning, or designing, ensuring your work looks great and stays organized.
Wrap Up
Whether it’s adjusting visual elements, tailoring notifications, or streamlining creative tools, these options are designed to enhance your productivity and keep your work environment organized. Taking a few moments to personalize your settings can lead to a more efficient and enjoyable experience every day.
Working across multiple tasks and projects can make it challenging to focus on specific types of work, like design or research tasks, without scanning through the entire project board. This process can be time-consuming and may even lead to missed deadlines.
Tags provide a simple solution. By marking tasks with clear, customizable labels, you can quickly filter and highlight exactly what you need to focus on. With just a few clicks, tags help bring order to even the busiest boards.
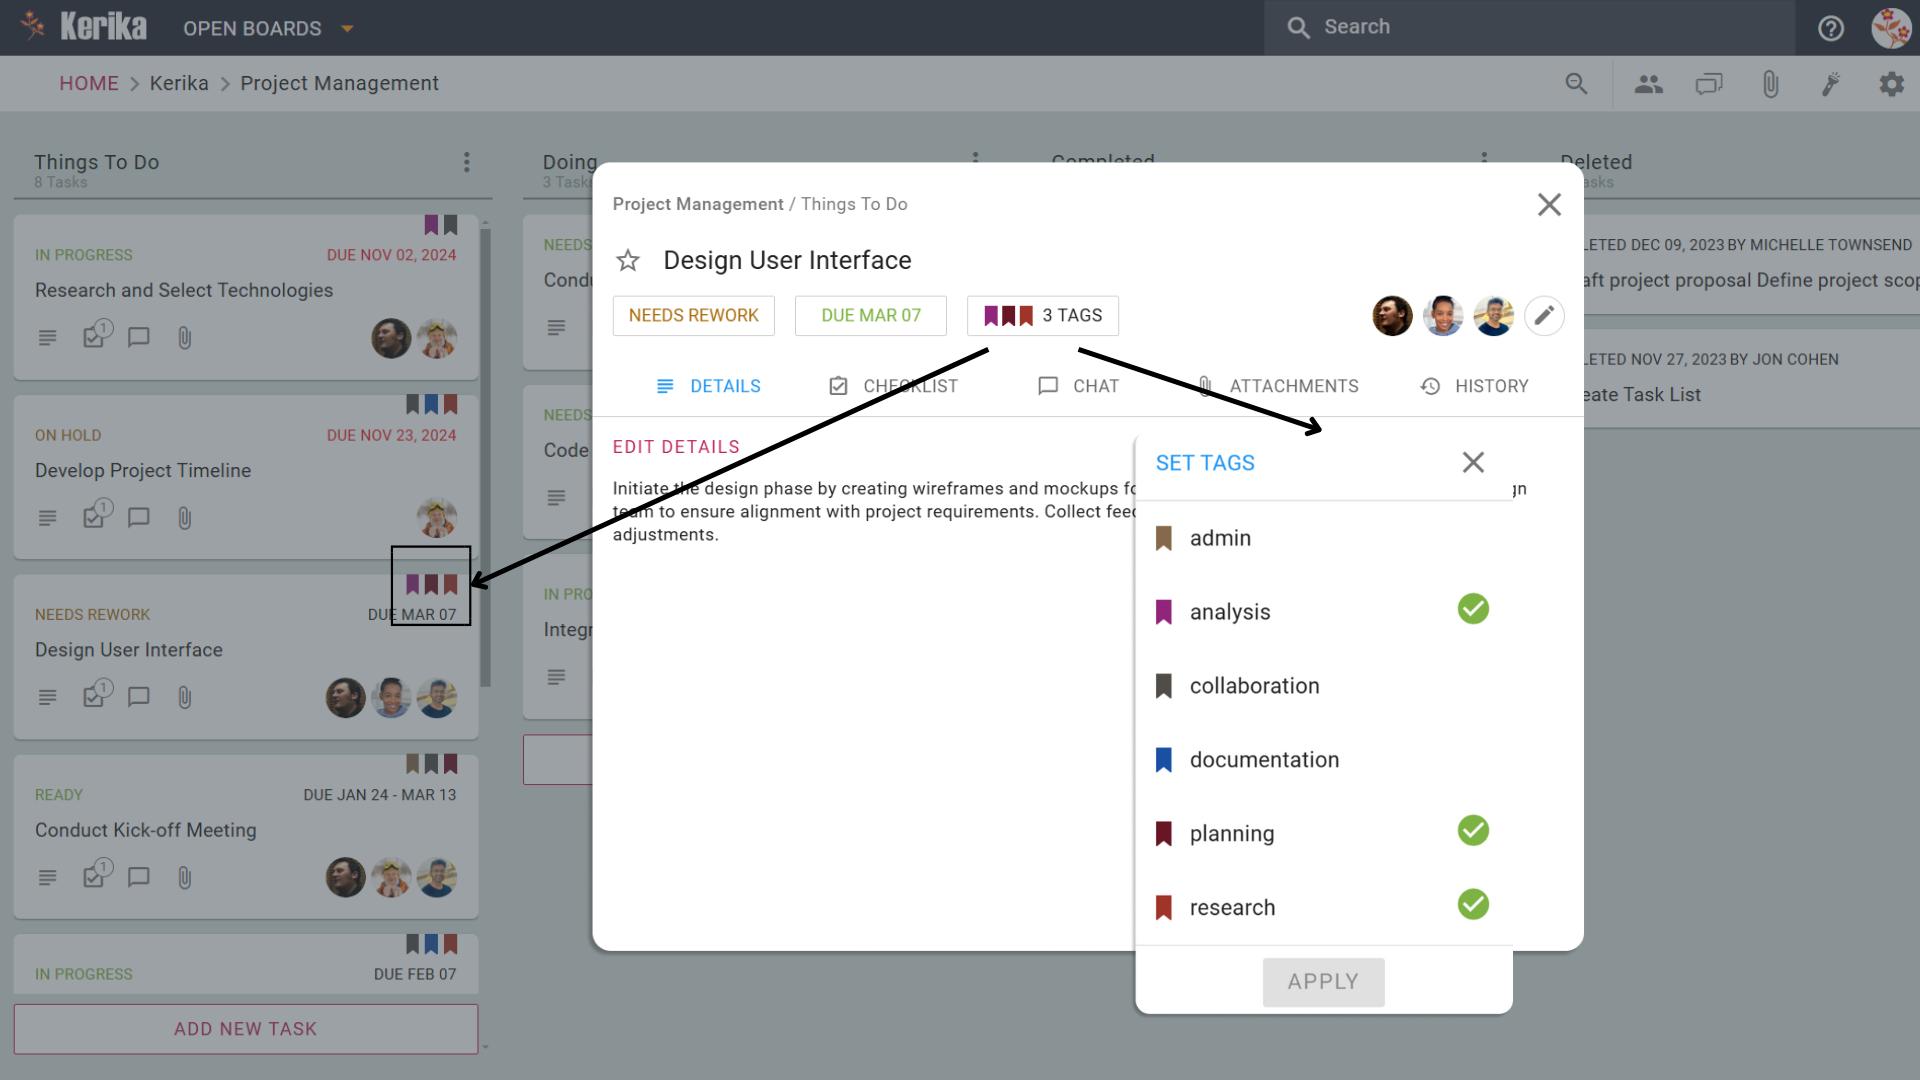
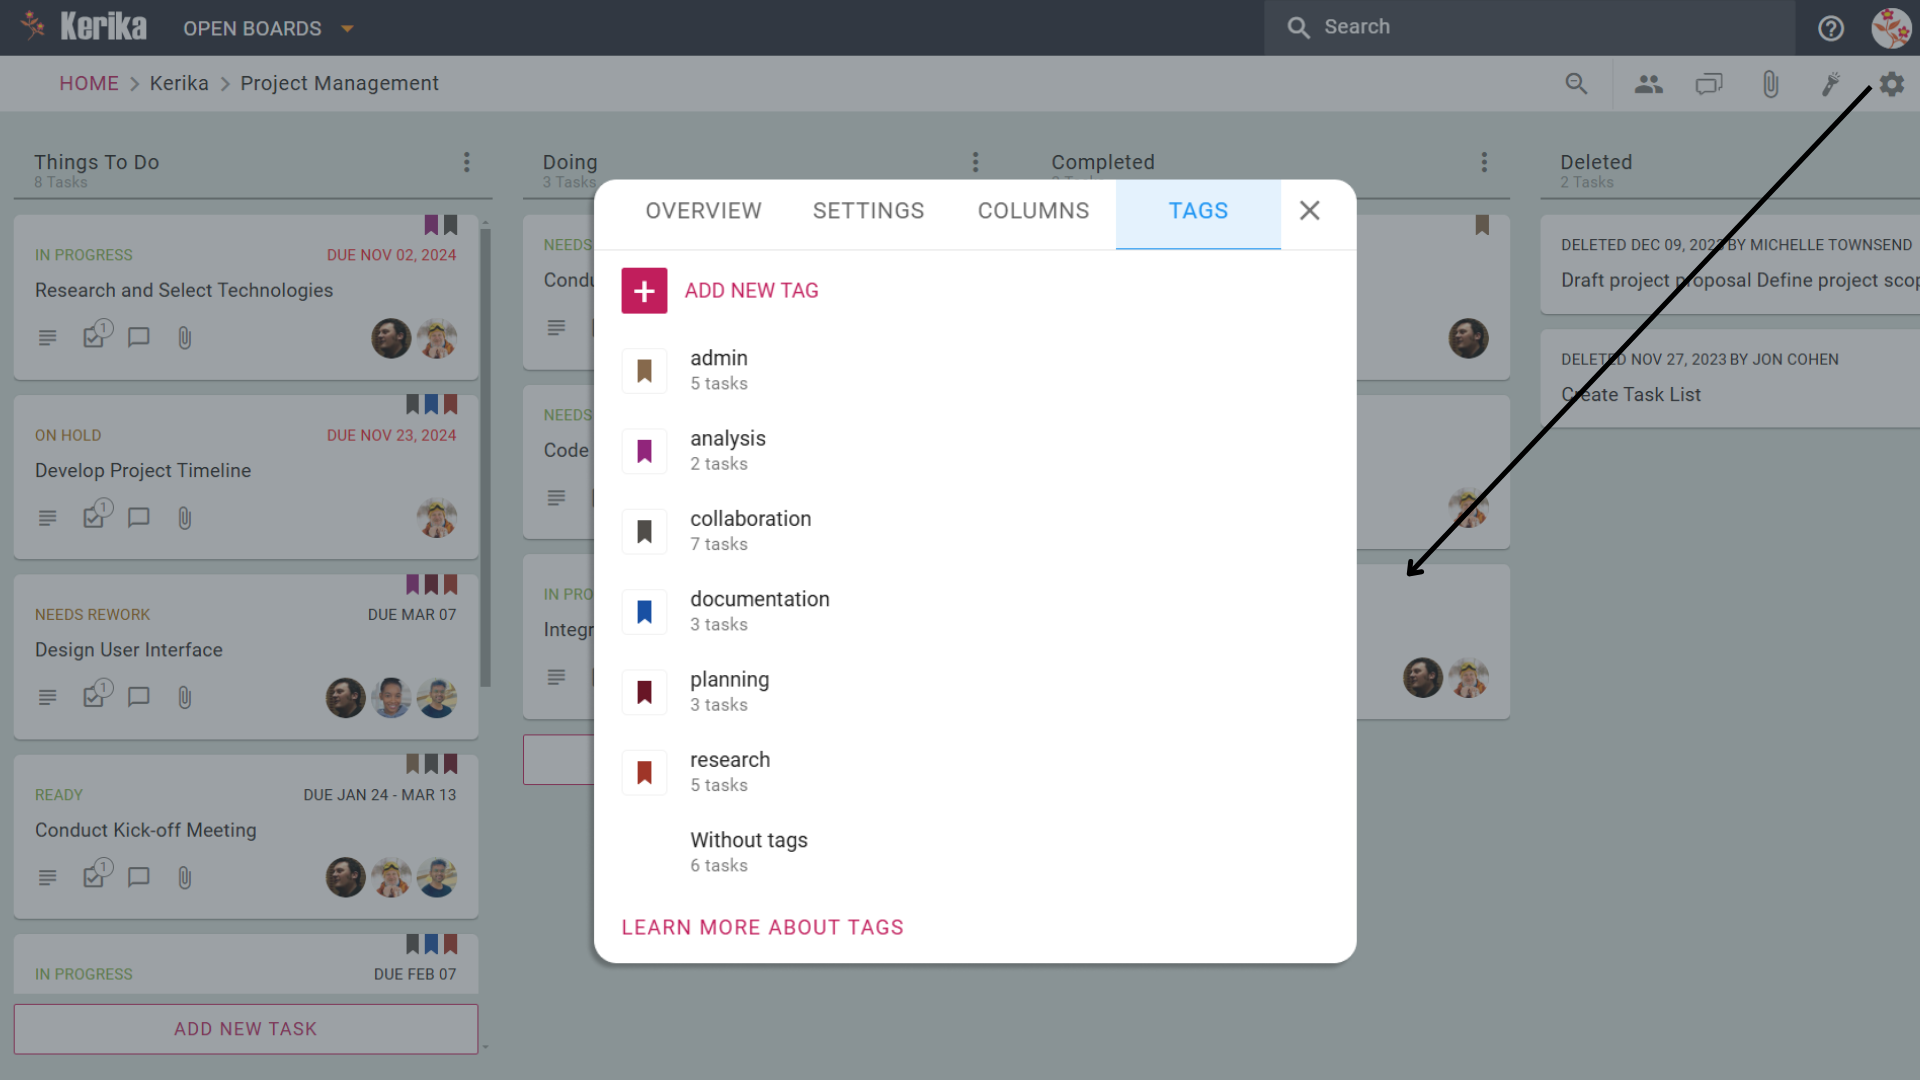
Tags act as visual markers that can be added to tasks. They let you categorize work based on topics, teams, priorities, or anything that suits your workflow. And the best part? They’re completely customizable.
Tags are not just for looks – they’re your secret weapon for filtering tasks:
Use the Highlight Option: In the board menu, click on “Highlight Tasks on This Board.”
Select a Tag: Choose the tag you want to focus on. Instantly, only the tasks with that tag are highlighted, cutting through the noise.
Combine with Other Filters: Add due dates, priorities, or statuses to refine your search even further.
Why You’ll Love Using Tags
Streamlined Focus: Whether it’s a tag for “Urgent,” “Research,” or “Collaboration,” tags make it easy to zoom in on specific tasks.
Customizable Organization: No two projects are alike, so why should your tags be? Tailor them to suit your workflow.
Time-Saving Navigation: With tags and highlights, you’ll never waste time hunting for a task again.
Wrap-Up
Tags are more than just labels: They’re a practical tool for boosting productivity and maintaining clarity. By creating, applying, and filtering tasks with tags, you can streamline your workflow and stay organized, no matter the complexity of your project.
Big projects can often feel overwhelming, with multiple moving parts and team members juggling different responsibilities. That’s where checklists come in, offering a simple yet powerful way to break down complex tasks into manageable steps.
Why Use Checklists?
Clarity Through Simplicity: Checklists turn daunting tasks into actionable steps, helping your team understand what needs to be done.
Improved Collaboration: Assigning individual checklist items to teammates ensures clarity in roles and responsibilities.
Tracking Progress: Checklists make it easy to monitor the completion of subtasks, keeping the larger project on track.
Checklists are seamlessly integrated into task management workflows, providing flexibility and structure. Here’s how you can use them effectively:
1. Create a Checklist Within a Task Card
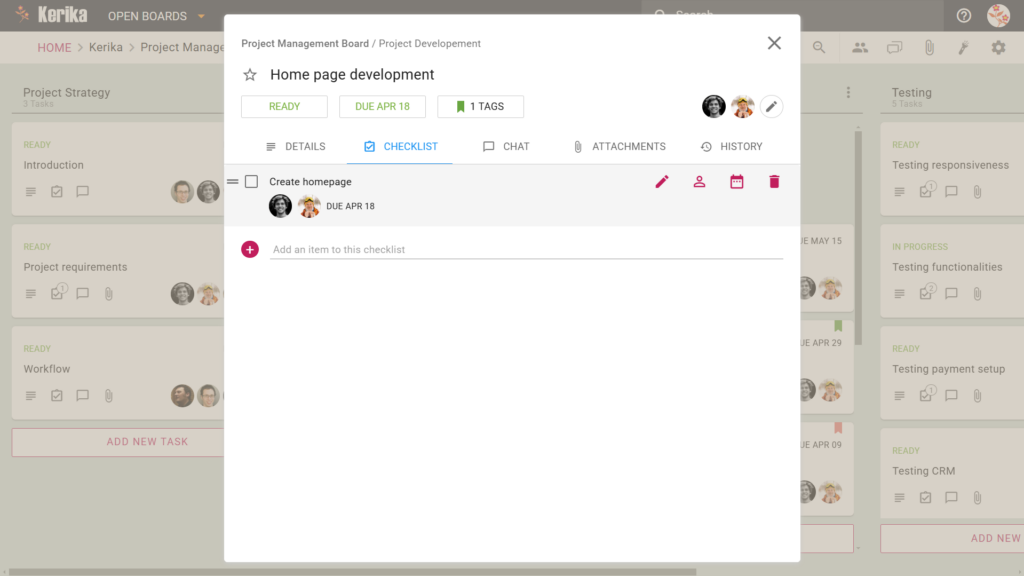
Open a task card and go to the “Checklist” tab.
Add items that represent the smaller steps needed to complete the main task.
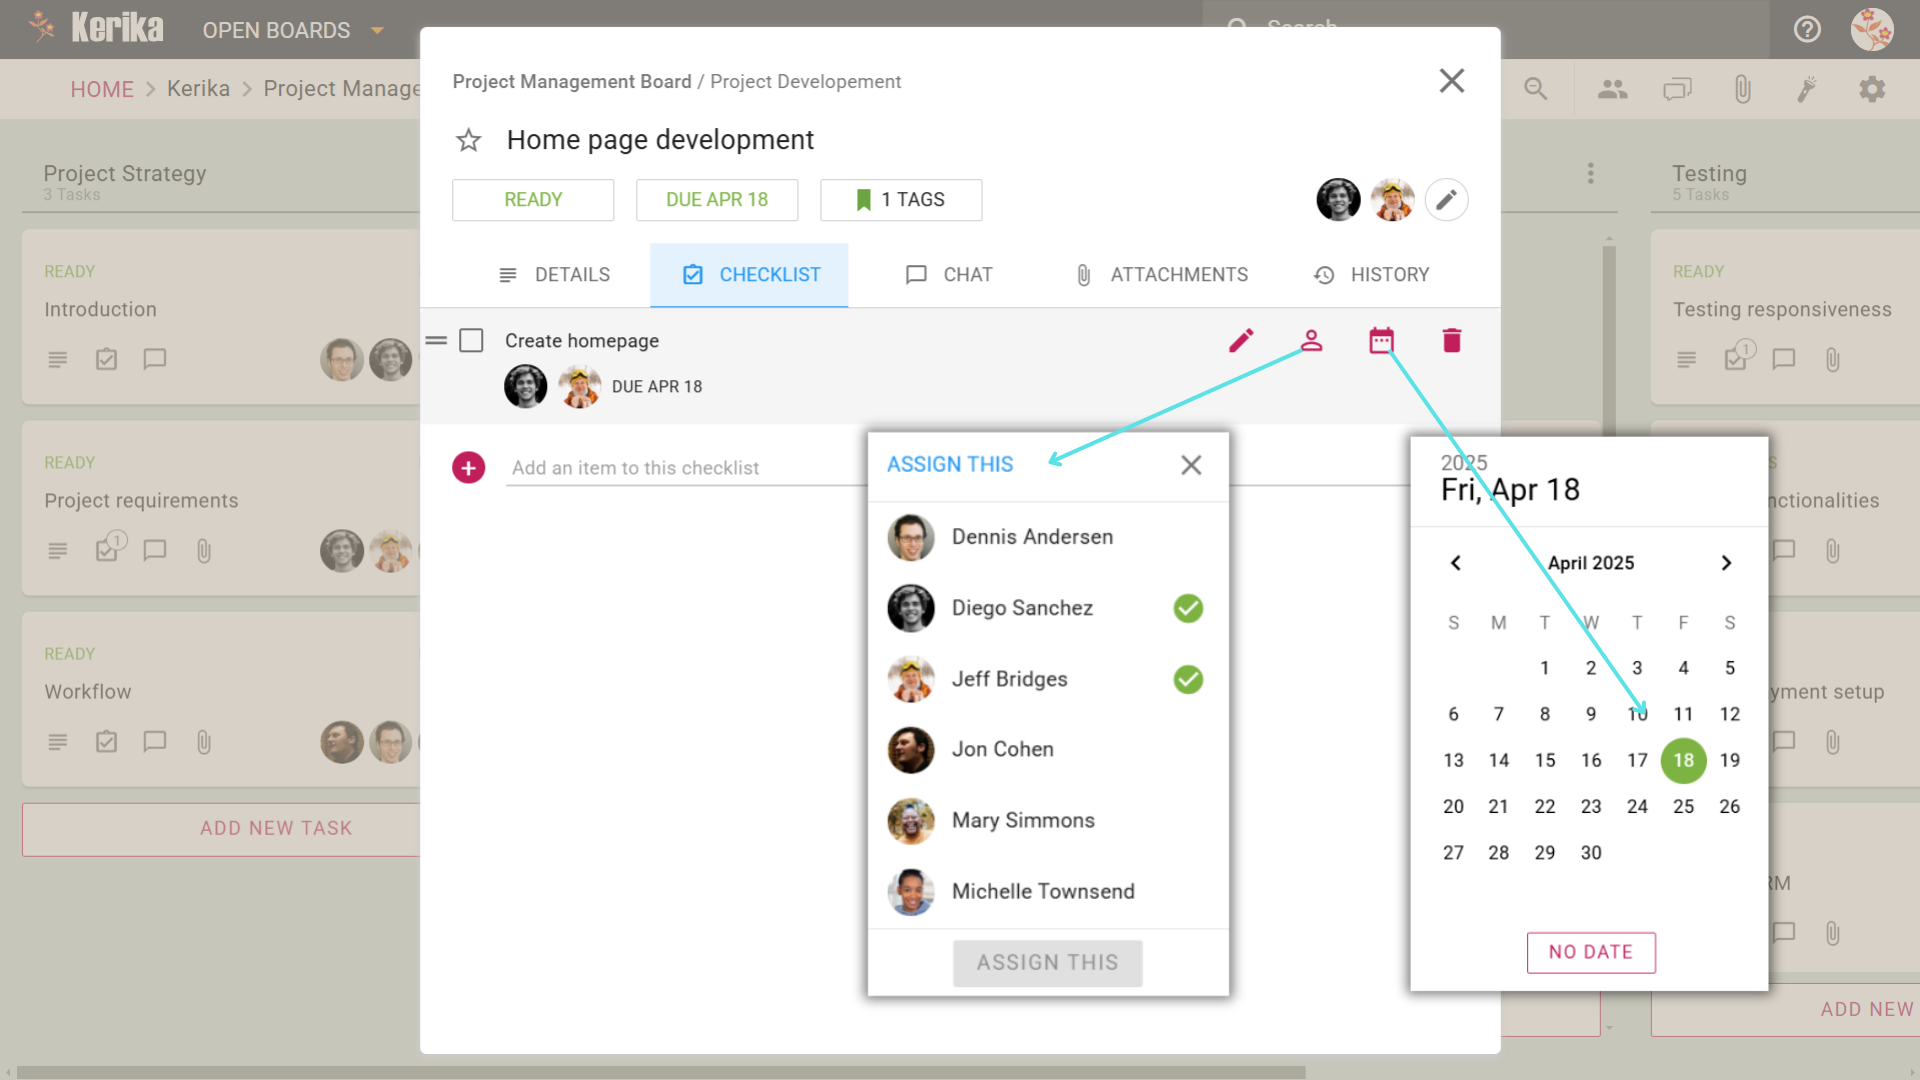
2. Set Due Dates for Checklist Items
For each checklist item, assign specific due dates. This ensures every subtask is completed on time without losing sight of the overall deadline.
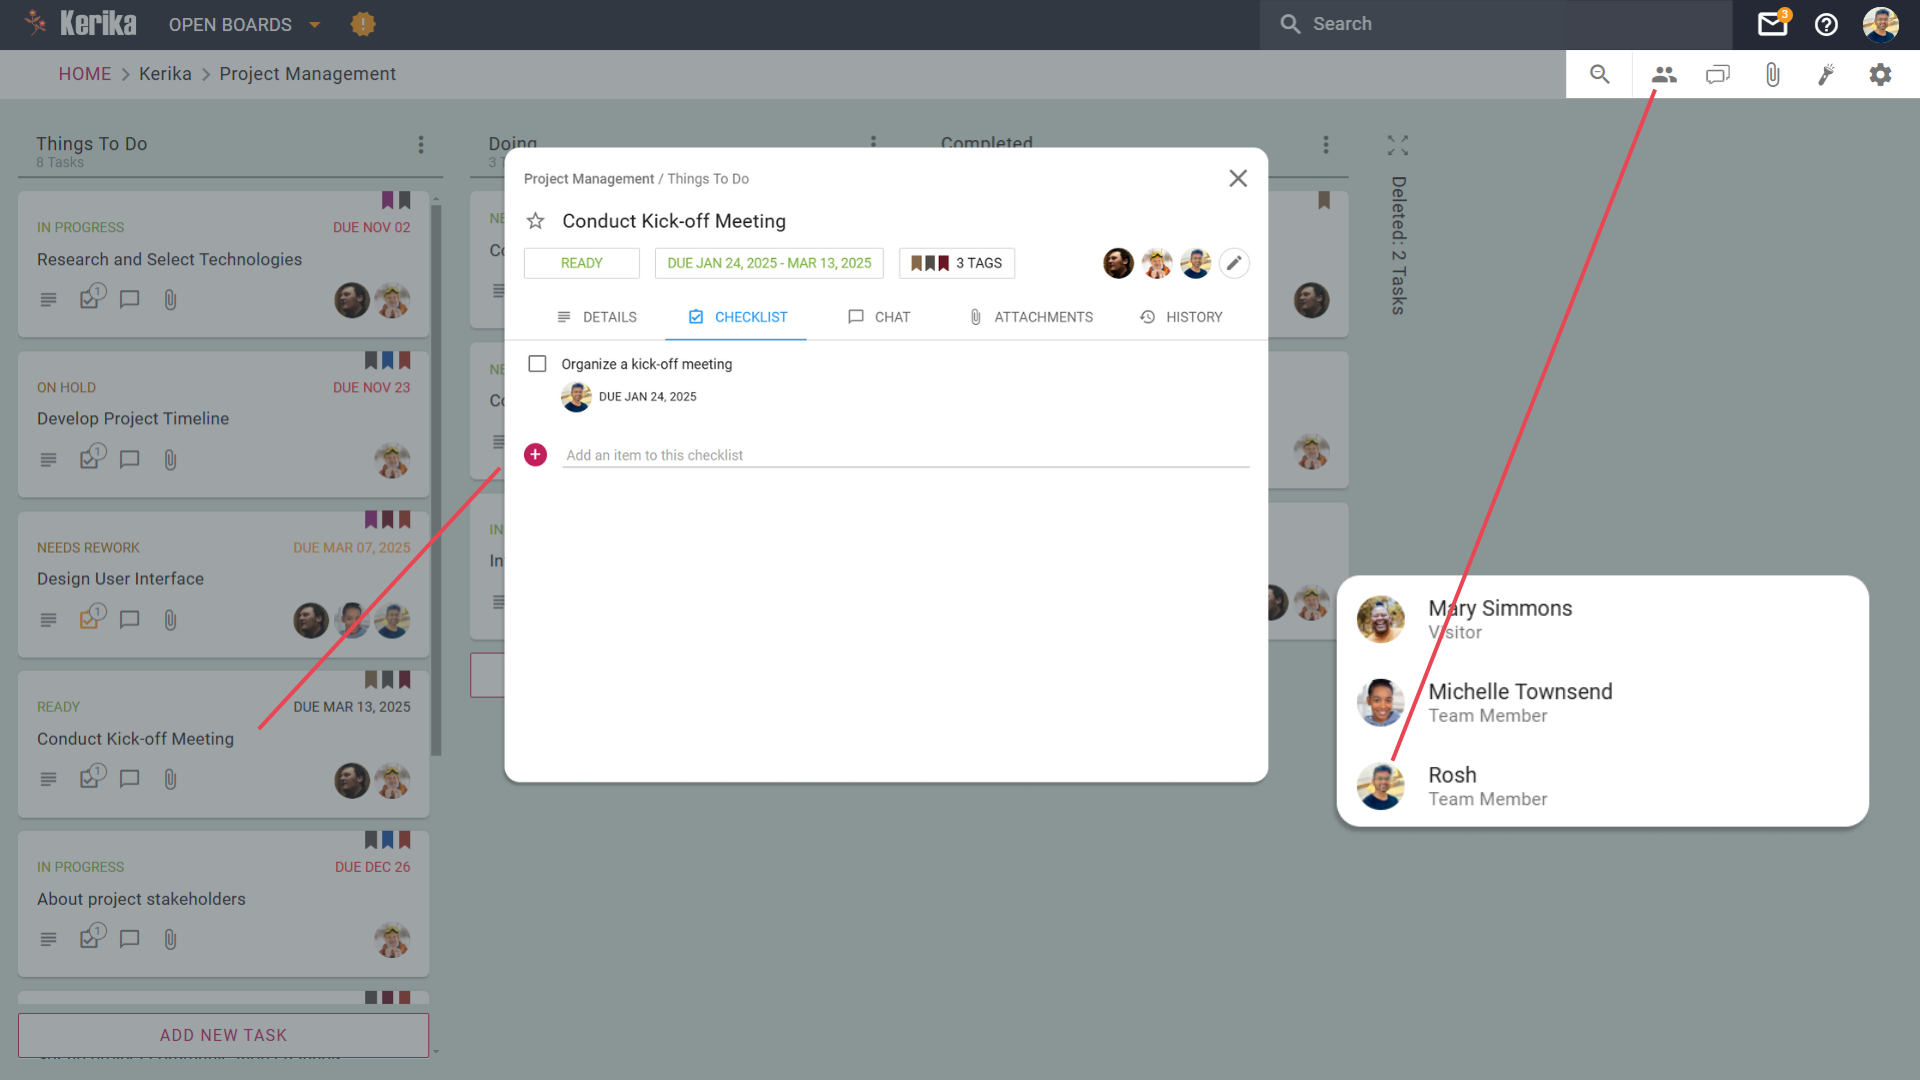
3. Assign Items to Teammates
Easily assign individual checklist items to team members, making it clear who is responsible for what. This feature eliminates ambiguity and keeps everyone aligned.
4. Use Cases for Checklists
Breaking Down Deliverables: Divide a big deliverable, like a website redesign, into smaller tasks such as wireframes, content creation, and testing.
Tracking Dependencies: Ensure subtasks are completed in the correct order by setting due dates and assigning them to the right team members.
Collaborating on Shared Goals: For team projects, assign specific checklist items to leverage individual strengths and keep everyone accountable.
5. Benefits of Using Checklists
Better Organization: Simplifies complex tasks by presenting them in a structured format.
Improved Efficiency: Ensures that smaller steps don’t fall through the cracks, speeding up the overall process.
Enhanced Communication: Provides clarity by assigning tasks to specific people and tracking their progress.
In Action
The ability to set due dates and assign team members directly from the checklist keeps everything streamlined. For example, in the “Home Page Development” task (illustrated above), individual checklist items like “Create Homepage” are assigned with specific due dates, ensuring everyone knows their role and timeline.
Wraping-Up
Checklists are more than just a to-do list, they’re a tool for breaking down complexity, fostering collaboration, and ensuring that every detail is accounted for. Whether you’re managing a small project or a large team, checklists empower you to stay organized, efficient, and focused.