Managing complex assignments can often feel like a juggling act. Limited customization, rigid layouts, and repetitive shuffling of tasks can make the process more tedious than it needs to be.
A well-designed Actions Menu can give you the flexibility to tailor your task board to your unique workflow. From rearranging and renaming columns to moving tasks and sorting them by priority, due dates, or assignments, these features can simplify even the most complex projects.
Ready to take full control of your workflow? Let’s explore how the Actions Menu can help you streamline your tasks and boards with ease.
What is the Column Actions Menu?
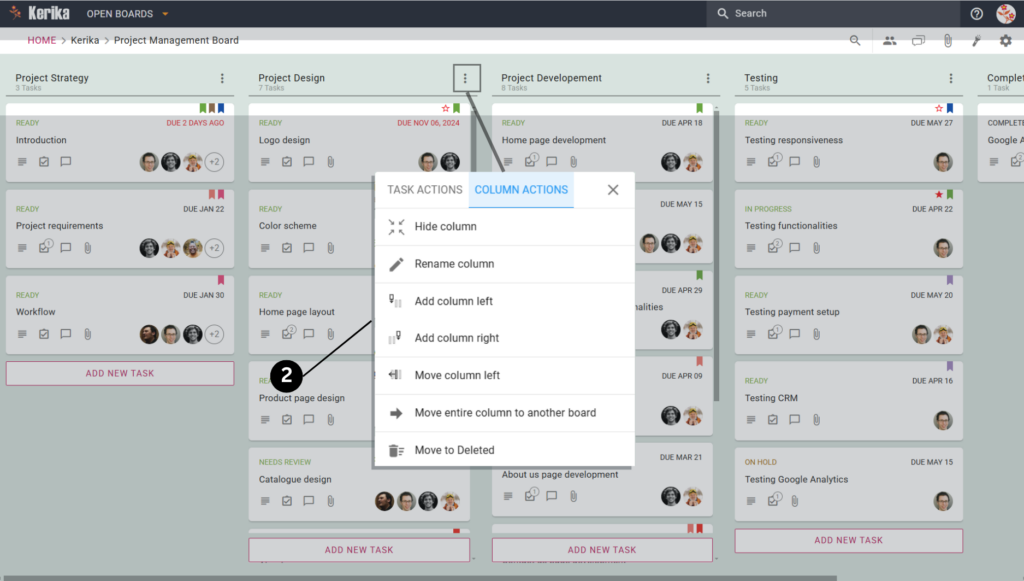
The Column Actions menu is a gateway for organizing and customizing your task boards. Accessible through the three-dot menu at the top of each column, it provides a range of options to modify and manage your board layout.
Key Features:
Add Columns: Insert new columns to refine your workflow.
Move Columns: Rearrange columns to match your project’s priorities.
Rename or Hide Columns: Keep your board visually tidy by renaming or temporarily hiding sections.
Transfer Columns Across Boards: Seamlessly migrate an entire column to a new board without losing any tasks.
The Task Actions Menu: Sorting Made Simple
Alongside the Column Actions menu, the Task Actions menu helps you manage tasks efficiently within a column.
Sorting Tasks:
The Sort All Tasks option allows you to organize tasks effortlessly based on the following:
Sort by Due Date: Prioritize tasks with approaching deadlines.
Sort by Status: Group tasks by progress stages (e.g., In Progress, Completed).
Sort by Priority: Highlight high-priority tasks so nothing critical gets missed.
Sort by Assigned Person: Organize tasks by assignees for better clarity on responsibilities.
Sort by Title: Alphabetically sort tasks for quick referencing.
Select All Tasks:
Need to take action on multiple tasks at once? Use the Select All Tasks feature to apply bulk changes efficiently.
Why You’ll Love These Features
Improved Organization: Customize your task board to fit your exact project requirements, whether you’re managing a marketing campaign or a software development sprint.
Enhanced Flexibility: As projects evolve, so can your board. Adjust columns and tasks dynamically without disrupting your workflow.
Streamlined Task Management: Combine column actions with task sorting and bulk selection for a perfectly organized board.
Sort Within Columns: Use Task Actions to align tasks by priority or deadlines for better clarity.
Experiment with Layouts: Don’t let your board stagnate – keep updating column arrangements as your team’s needs change.
Wrap-Up
The Column Actions and Task Actions features give you the tools to adapt and optimize your workflow effortlessly. Whether you’re adding a column, sorting tasks, or moving a column to another board, these options let you tailor your board to suit your needs.
Fundraising is the lifeline of countless initiatives, from non-profits tackling global challenges to startups on the brink of groundbreaking innovations. A successful campaign isn’t just about raising funds; it’s about forging meaningful connections, earning trust, and delivering value to both donors and beneficiaries.
Without a clear planning, handling donor relationships, managing timelines, and coordinating team efforts can quickly spiral into chaos. Missed follow-ups, misaligned goals, and scattered data are common hurdles that can turn even the most promising campaigns into overwhelming tasks.
In this guide, we’ll show you how to organize your campaign efficiently, address potential obstacles, and stay on track every step of the way. With practical tips and structured management techniques, you’ll have everything you need to drive a successful campaign from start to finish.
So let’s start with practical steps that will help you and your team stay focused, hit milestones, and keep campaigns on track.
Essential Steps For Executing a Successful Fundraising Campaign
Executing a successful fundraising campaign involves meticulous planning, strategic execution, and continuous evaluation. Below are essential steps to guide you through the process:
1. Define Clear Objectives
Start by establishing specific, measurable, achievable, relevant, and time-bound (SMART) goals for your campaign. Determine what you aim to achieve, whether it’s funding a particular project, expanding services, or covering operational costs. Clear objectives provide direction and a benchmark for success.
According to Smart Insights, applying the SMART framework to your marketing objectives ensures they are well-defined and achievable, leading to more effective campaigns.
Watch Out For: Ambiguity in goals or shifting priorities that can make it difficult to track progress.
2. Assemble a Dedicated Team
Form a committee comprising staff, volunteers, and stakeholders who are passionate about your cause. Assign roles based on individual strengths, such as donor outreach, event planning, or marketing. A committed team ensures tasks are managed efficiently and fosters a sense of shared purpose.
Watch Out For: Team members feeling overwhelmed or confused about their responsibilities, which can lead to delays or missed deadlines.
3. Conduct a Feasibility Study
Before launching, assess the viability of your campaign. According to CampaignCounsel.org, conducting a feasibility study is crucial for determining the potential success of a large-scale fundraising initiative. It helps organizations gauge donor interest, assess community support, and set achievable campaign goals
Watch Out For: Gaps in research that can lead to overly ambitious targets or under-prepared teams.
4. Develop a Comprehensive Plan
Create a detailed roadmap outlining strategies, timelines, and resources needed. Incorporate various fundraising methods, such as events, online campaigns, and grant applications. A well-structured plan serves as a blueprint, guiding your team through each phase of the campaign.
Watch Out For: Over-reliance on static plans that don’t account for unexpected changes.
5. Craft a Compelling Narrative
Tell a story that resonates with potential donors. Highlight the problem, your solution, and the impact of their contribution. Emotional and relatable narratives can significantly enhance donor engagement and motivation.
Watch Out For: Inconsistent messaging across different platforms, which could weaken engagement.
6. Identify and Segment Your Audience
Analyze your donor base to identify key segments, such as individuals, corporations, or foundations. Tailor your messaging and approach to each group’s interests and capacity to give. Personalized communication increases the likelihood of successful solicitations. As BonterraTech highlights, donor segmentation allows organizations to deliver tailored messages that resonate with donors, increasing engagement and long-term support.
Watch Out For: Relying on outdated donor data or failing to personalize outreach efforts.
7. Implement a Soft Launch
Begin with a soft launch targeting loyal supporters to build initial momentum. This phase allows you to gather feedback, address any issues, and create a sense of progress before the public launch. Early success can also leverage social proof to attract additional donors.
Watch Out For: Overlooking the importance of gathering early feedback, which can lead to unresolved issues during the public phase.
8. Utilize Multichannel Marketing
Promote your campaign across various platforms, including social media, email newsletters, and traditional media. Consistent messaging across channels maximizes reach and reinforces your campaign’s presence.
Watch Out For: Disconnected campaigns that fail to synchronize communications, potentially confusing or alienating donors.
9. Engage and Acknowledge Donors
Maintain open communication with donors throughout the campaign. Provide updates on progress, express gratitude, and demonstrate the impact of their contributions. Recognizing donors fosters loyalty and encourages future support.
Watch Out For: Lack of timely communication or generic follow-ups that don’t feel personal.
10. Monitor Progress and Adapt
Regularly review your campaign’s performance against set milestones. Use data analytics to assess which strategies are effective and which need adjustment. Being flexible and responsive ensures the campaign remains on track and goals are met.
Watch Out For: Teams sticking rigidly to initial plans, even when adjustments could yield better results.
Executing a successful fundraising campaign requires more than just following the right steps. Without proper coordination, tracking, and collaboration, even the most well-planned efforts can lose momentum. As your campaign progresses, donor outreach will grow, tasks will increase, deadlines may overlap, and maintaining clear communication with both donors and internal teams will be crucial.
This is why the right tools are essential. They help you manage donor relations, prioritize key activities, and monitor progress effectively. With these tools, you can streamline donor information, avoid missed opportunities, and make data-driven decisions that maximize your fundraising potential.
Using The Right Tools
With your campaign plan in place, the next step is ensuring that everything runs smoothly without the common issues we discussed. This is where a well-structured task management tool can make all the difference.
Take a look at this board. It’s an example of how teams can efficiently manage every stage of a fundraising campaign while staying organized and on track.
This board is an example of how teams can simplify complex fundraising campaigns. Tasks like event planning, donor follow-ups, and budget approvals are broken down into clear categories, making it easy to see what’s in progress, what needs immediate attention, and what’s completed.
When deadlines overlap or team members juggle multiple responsibilities, the board helps prioritize key fundraising activities, ensuring that no critical task is overlooked. The structure addresses common fundraising challenges by clearly assigning tasks related to donor outreach, proposal submissions, or campaign reviews.
Each team member knows exactly what they are responsible for, and collaboration becomes seamless. Instead of chasing updates or searching through emails for information, the entire team can view progress in real time and make necessary adjustments without confusion.
This doesn’t just help with meeting deadlines. It eliminates bottlenecks by making task statuses visible to everyone. let’s take a step further and explore how this board supports better decision-making and enables your team to adapt quickly to changes.
Take a Closer Look at This Fundraising Campaign Board
Let’s dive deeper into how this board helps teams manage every detail of a fundraising campaign while keeping tasks and goals in clear focus. The key to its effectiveness lies in its simplicity and ability to adapt as the campaign evolves. By visualizing progress, organizing tasks, and streamlining team collaboration, it helps teams stay on track and adjust quickly when needed.
Below, we’ll walk through each feature with examples to show how this board can make your fundraising campaign more efficient, productive, and stress-free.
1. Create Detailed Task Cards for Every Fundraising Activity
As shown in this task card, each activity is organized with essential details like objectives, team assignments, deadlines, and specific steps needed for completion. The card also integrates resources such as files, discussions, and updates, making it a central hub for everything related to the task.
These task cards improve fundraising efficiency by keeping all key information in one place, reducing confusion and the need for back-and-forth communication. Team members can work collaboratively, monitor progress, and stay on top of deadlines without wasting time searching for documents or updates across multiple platforms.
2. Customize Columns to Match Your Fundraising Workflow
In this board, you can see how each column is set up to represent different stages of the fundraising process, such as “Fundraising Ideas,” “Planning,” and “Active Campaigns.” With customizable settings, you can easily add, rename, or move columns, ensuring that the workflow adapts to your team’s unique needs.
These columns help streamline progress by clearly indicating where each task stands and what needs to happen next. Whether you’re brainstorming ideas or seeking approvals, organizing tasks by stages ensures that nothing gets stuck or forgotten.
This flexibility makes it easy to manage shifting priorities and maintain a smooth, efficient flow throughout the campaign.
3. Zoom Out to Scan and Find Tasks Quickly
The zoom-out option, shown in the image, hides task details and displays only the task names. This view is ideal for scanning the entire board at a glance and locating specific tasks without scrolling through extensive details. It’s particularly useful when you need a quick overview of what’s happening across multiple stages.
This helps you save time by making it easy to find tasks, check the progress, and identify any pending activities. Whether you’re tracking an approval or verifying the status of a campaign, this simplified view keeps everything accessible and easy to navigate.
4. Manage Team Members and Share Access
Here you can see the option to invite team members and assign roles such as Board Admin, Team Member, or Visitor. This feature ensures that everyone involved in the fundraising campaign has the right level of access based on their role, whether they are leading the campaign or providing occasional input.
By defining roles clearly, you avoid confusion and maintain control over sensitive information. Board Admins can manage tasks and team permissions, Team Members can collaborate and update progress, and Visitors can view progress without making changes. This structure ensures smooth collaboration and accountability while keeping your campaign secure and well-organized.
5. Use Board Chat for Team-Wide Discussions
The board chat feature is designed for general discussions that involve the entire team. Unlike task-specific chats, which focus on individual tasks, the board chat allows you to share updates, announcements, or feedback that everyone needs to see.
This feature helps keep general conversations separate from task-related details, reducing confusion and ensuring important updates are easy to find. Whether you’re sharing campaign milestones, addressing team-wide concerns, or brainstorming new ideas, board chat ensures the entire team stays in sync.
6. Share Files and Attachments Across the Whole Team
The board attachment option allows you to upload or link important documents, spreadsheets, presentations, or online resources that are useful for the entire team. This is useful for files are available to everyone and aren’t tied to specific tasks.
This feature ensures that essential documents, such as fundraising plans, donor lists, and campaign reports, are easily accessible to all team members in one place. It eliminates the need to search through different platforms, keeping the team informed and making collaboration smoother.
7. Highlight Tasks with Custom Filters
The highlight option allows you to quickly locate tasks using custom filters. You can filter by criteria such as assigned team member, task status, due date, priority, and tags. Whether you want to find overdue tasks or those marked as high priority, this feature helps you narrow down exactly what you’re looking for.
This option saves time by eliminating the need to manually search through tasks. Instead, you can instantly highlight items that need immediate attention, helping your team prioritize key tasks, address bottlenecks, and keep the fundraising campaign running smoothly.
8. Manage Board Settings for Full Control
The settings option provides a wide range of customization features that help you tailor the board to your specific fundraising needs. Here’s a closer look at what you can do:
Overview: Get a summary of the board’s current status, including the number of completed tasks, overdue items, and upcoming deadlines. This quick snapshot helps you monitor overall progress.
Privacy Settings: Control who can access the board by choosing between team-only access, account-wide access, or allowing access via a link.
Work-In-Progress (WIP) Limits: Limit the number of tasks allowed in each column to prevent overloading team members and ensure a manageable workload.
Tags Management: Create, edit, and organize tags to help categorize and prioritize tasks. Tags such as “Compliance” or “Finalization” allow for easy filtering.
Column Settings: Add or adjust columns to match your workflow. This flexibility lets you adapt as the fundraising campaign evolves, ensuring the board always reflects your current needs.
Auto-Numbering of Tasks: Enable this option to automatically assign task numbers, making it easier to reference specific tasks during discussions.
Export and Archive: Export the board data in Excel format for external reporting or archive the board once the campaign is complete to preserve all progress and discussions.
With the board fully set up and organized, let’s take a closer look at how task cards help you break down complex activities into manageable steps, ensuring that every part of your fundraising campaign moves forward smoothly.
Break Down Tasks Into Manageable Steps
In any fundraising campaign, breaking tasks into smaller, actionable steps is crucial to ensuring smooth execution and preventing important details from slipping through the cracks.
This demo board showcases how each task is carefully segmented for better collaboration and progress tracking.
Here’s how the team uses task cards to break down their work effectively:
Details Tab for Comprehensive Task Descriptions: The Details tab stores important information, such as the task’s objective, requirements, and background. This ensures team members have the context they need without repeatedly asking for clarifications.
Task Status for Progress Updates: Each task can be assigned a status, like In Progress, Needs Review, or Ready, making it easy to track progress and identify tasks that require attention.
Checklist Tab for Subtasks: Large tasks are split into smaller, manageable subtasks using the checklist feature. Each subtask can be checked off as completed, helping teams stay organized and track incremental progress.
Due Dates to Meet Deadlines: Due dates ensure that tasks remain on schedule, and visibility into upcoming deadlines allows teams to prioritize tasks and avoid delays.
Tags for Easy Categorization: Assigning tags like “Compliance” or “Donor Outreach” helps categorize tasks, making it simple to filter and find related tasks quickly.
Chat Tab for Task-Specific Discussions: All task-related discussions are kept in the chat tab, avoiding scattered communication across different platforms and making it easy to reference past conversations.
Task Assignments for Clear Ownership: By assigning tasks to specific team members, the board ensures accountability and clarity on who is responsible for each task, eliminating confusion.
Attachments Tab for Storing Files: Task-specific documents, donor lists, or event planning files can be attached directly within the task card, saving time otherwise spent searching through shared drives or emails.
By breaking tasks into actionable steps and keeping everything centralized, the team can work efficiently, track progress with ease, and ensure that each phase of the fundraising campaign is executed successfully.
Conclusion: Set Your Fundraising Campaign Up for Success
A well-structured fundraising campaign is about more than just meeting goals; it’s about creating a streamlined process that keeps your team focused, tasks organized, and milestones on track. By implementing the right strategies and using an effective system, you can avoid common pitfalls and maintain momentum throughout the campaign.
Whether you’re managing donor outreach, approvals, or events, having a centralized board with task management features ensures your team can collaborate efficiently, adapt to changes, and achieve your fundraising goals with confidence. With the right approach, your campaign can build lasting connections, secure vital funding, and drive meaningful impact.
Switching between projects in some tools can feel like a chore. Clicking through endless menus, searching for the right board, and trying to track what’s due can quickly become overwhelming. It’s a process that wastes time and drains your focus.
A better approach simplifies everything. Imagine seamlessly moving between projects, checking what’s due, catching up on updates, or focusing on your assigned tasks – all with just a click. No distractions, no hassle, just a smoother way to stay organized.
Want to see how this can transform your workflow? Let’s break it down step by step.
Seamless Project Switching:
Quick Steps to Get Started
Click the Open Boards button in the top menu.
Browse through your boards, neatly grouped by account or sorted into special views.
Pick the board you need, and you’re there – no extra steps, no confusion.
How The Options Work:
What’s Assigned to Me: Perfect for zeroing in on your to-dos.
What’s Due: Keep track of deadlines and tackle high-priority tasks first.
What’s New & Updated: Catch up on recent updates without digging through every board.
See Shared Boards at a Glance: Shared boards are grouped by accounts, making it easy to navigate projects shared with you by teammates, clients, or collaborators.
Why You’ll Love It
It Saves You Time: No more hunting around to find the right board. Jump straight into what matters.
It Keeps You Focused: With shortcuts like What’s Due, you can prioritize your day without feeling scattered.
It Simplifies Your Workflow: Switching between projects is so smooth, it feels effortless and natural.
How It Helps in Real-Life Scenarios
Juggling Multiple Teams: If you’re managing different teams, you can easily check their progress by hopping between their boards.
Starting Your Day Right: Use What’s Assigned to Me to kick off your day with a clear game plan.
Keeping Up with Changes: Need to catch up? Check What’s New & Updated and see all the latest changes at a glance.
Effortless Collaboration: Quickly access shared boards for seamless updates and collaboration with clients or other teams.
Wrap-Up
Seamless navigation tools make managing multiple projects and shared boards simple and efficient. Whether you’re tracking deadlines, catching up on updates, or diving into a shared workspace, everything you need stays organized and easily accessible.
In a world where customer satisfaction can make or break a business, the importance of a well-structured and results-driven customer success program is hard to overstate. It’s not just about solving problems when they arise. It’s about anticipating them, guiding customers through their journey, and ensuring they achieve meaningful outcomes. But here’s the challenge: without the right strategy, even the most dedicated teams can fall short.
Imagine a customer success team handling multiple tickets, feature requests, and bug reports while maintaining proactive communication with clients. This balancing act requires more than good intentions. It demands structure, clarity, and tools that bring everything together.
This guide will help you master that balance. Whether you are a growing startup or a seasoned enterprise, we will walk you through a step-by-step approach to elevate your customer success efforts. From managing incoming tickets to improving response times and keeping clients engaged, you will find practical advice to make an impact.
Let’s dive into what it takes to build a customer success program that not only solves issues but also drives lasting outcomes.
Essential Steps To Build a Solid Customer Success Program
Building a robust customer success program involves a structured approach that can be scaled and adapted over time. Here are the essential steps you should follow, backed by industry best practices and studies.
1. Define Clear Objectives and Success Metrics
Start by outlining what you aim to achieve with your customer success program. Are you looking to improve customer retention, increase upsells, or enhance customer satisfaction scores? Setting clear objectives and associated success metrics gives your team precise targets to aim for.
According to a study by HubSpot, companies that define clear success metrics are more likely to achieve positive outcomes in customer retention. Clear objectives and success metrics provide teams with precise targets, improve communication, and enhance customer satisfaction and loyalty.
Watch out for: Setting vague or non-measurable objectives can lead to confusion and lack of direction. Ensure all objectives are SMART (Specific, Measurable, Achievable, Relevant, Time-bound).
2. Develop a Comprehensive Customer Journey Map
Understanding each stage of the customer’s journey is crucial. Map out the typical customer journey from onboarding to renewal, identifying key touchpoints where your team can add value. This mapping should include potential pain points and opportunities to enhance the customer experience. Research from the Customer Experience Professionals Association highlights that journey maps help align cross-functional teams and improve customer-centric decision-making.
Watch out for: Missing out on hidden pain points or failing to update the journey map as products and services evolve can cause misalignment with customer expectations.
3. Implement Proactive Communication Strategies
Proactive communication is key to preempting issues and building trust with customers. Develop communication protocols that ensure your team reaches out to customers at critical moments before issues arise. A survey by Gallup shows that fully engaged customers offer a higher premium in terms of share of wallet, profitability, and revenue compared to the average customer.
Watch out for: Over-communication can overwhelm customers, while too little can make them feel neglected. Find the right balance based on customer preferences and feedback.
4. Train Your Team Regularly
Continuous training and development are key to keeping your customer success team knowledgeable and effective. Regular training sessions on product updates, customer handling skills, and advanced communication techniques ensure that your team can provide exceptional service and handle complex issues with ease.
Watch out for: Training without practical application or feedback can be ineffective. Make sure training sessions are interactive, allow for role-playing scenarios, and provide feedback to ensure concepts are understood and can be applied.
5. Analyze Feedback and Adjust
Regularly gather and analyze feedback from customers to understand their needs, expectations, and satisfaction levels. This feedback can guide improvements in products and services and highlight areas where your customer success process could be enhanced.
Watch out for: Feedback should be actionable. It’s not enough to collect data; the insights gained must lead to actionable changes that drive improvements in customer satisfaction and business outcomes.
6. Celebrate Success and Recognize Challenges
Create a culture that celebrates milestones and acknowledges the challenges faced. Recognizing team efforts and learning from setbacks fosters a positive working environment and encourages continuous improvement.
Watch out for: Ensure that recognition is fair and inclusive. Focusing only on certain achievements or team members can lead to resentment and a decrease in team morale.
7. Leverage the Right Tools
Utilizing advanced task management tools is pivotal for orchestrating an effective customer success strategy. These tools support the customer success teams by organizing customer interactions, streamlining workflows, and ensuring timely resolutions. With capabilities for real-time updates and collaborative functionalities, these tools facilitate a proactive approach to customer management, enabling teams to adapt swiftly to customer needs and enhance the service experience.
Watch out for: It’s crucial to select tools that are intuitive and cost-effective, offering flexibility without overwhelming your team with complexity or excessive costs. The right tool should seamlessly integrate into your existing processes, enhancing efficiency without disrupting the workflow.
Let’s take a closer look at how the right tools can significantly streamline your customer success efforts. By integrating an effective task management system, you can enhance your team’s ability to manage workflows and respond to customer needs swiftly. This practical insight will help you understand the tangible benefits these tools bring to everyday customer success scenarios.
Using The Right Tools
Lets look into the practical application of task management tools, showcasing how a specific team utilizes such a system to enhance their customer success program.
In this overview of a well-structured task management board, we see a system designed to optimize customer success outcomes. The board is segmented into various sections such as “New Tickets,” “Feature Requests,” and “Bugs,” each dedicated to tracking and managing specific types of customer interactions.
This structured approach ensures that every customer query or issue is captured and addressed promptly, enhancing response times and overall customer satisfaction.
The team uses the board to maintain a clear overview of ongoing tasks, allowing for efficient management of priorities and resources. For instance, new tickets are quickly assigned to ensure no request is overlooked, while feature requests are meticulously tracked to inform product updates that align with customer needs.
This system not only streamlines the workflow but also facilitates a proactive approach to customer service, laying the groundwork for a detailed exploration of how each element contributes to the team’s success in the subsequent section.
Efficiently managing new customer inquiries begins with the creation of task cards for each new ticket. For example, a card like “Team Discount?” is used to address specific requests, containing essential details such as the customer’s query and contact information.
This setup allows the team to track and prioritize these inquiries from receipt through to resolution, ensuring timely responses and maintaining high customer satisfaction.
2. Customizing Workflow with Columns
Customizing columns in the workflow is crucial for managing customer interactions effectively. By setting up specific columns like “New Tickets” and “Open Tickets,” teams can streamline processes from initial inquiry to resolution.
This adaptability allows for adding, removing, or rearranging columns to keep the workflow organized and responsive to changing priorities, ensuring efficient handling of customer needs.
3. Zoom Out for Workflow Overview
By minimizing the task cards to display only their titles, team members can gain a high-level overview of the entire board without getting lost in the details.
This bird’s-eye view is particularly useful for identifying overall progress, detecting bottlenecks, and ensuring that no area of the board is overloaded with tasks. It allows for rapid assessment and reallocation of resources where necessary, ensuring that the workflow remains balanced and efficient.
4. Managing Team Members on the Board
Effective team management is crucial for any customer success board. The ability to add team members and assign specific roles such as Board Admin, Team Member, or Visitor ensures everyone understands their responsibilities and accesses only the information necessary for their tasks.
This feature facilitates streamlined collaboration by defining roles clearly and secures sensitive information by controlling access appropriately.
For example, team members might be assigned to handle day-to-day tasks while visitors could be restricted to view-only rights, which is ideal for external stakeholders or auditors who require insights without the capability to make changes.
5. Centralized Communication Using Board Chat
This allows these team members to quickly exchange information, offer assistance, or update each other on progress without leaving the platform. It helps in keeping all communications related general board activity within the same workspace, enhancing clarity and reducing the time spent searching for information across multiple channels.
This centralized approach streamlines interactions and keeps the team aligned on their tasks and objectives.
6. Centralized File Management for Seamless Access
The board’s file management system allows team members to upload, create, or link documents directly, supporting various document types like Google Docs and Spreadsheets. Files remain securely stored in your own drive, ensuring easy access and data security.
This setup eliminates the need for external storage solutions and keeps all necessary materials readily available and safe within the project’s ecosystem.
7.Highlight and Prioritize Critical Tasks
The ability to highlight and prioritize critical tasks within the board is crucial for maintaining operational efficiency. This ensures urgent tasks are easily visible, aiding in efficient management and timely completion.
For example, tasks can be filtered to show only those that are overdue, marked as high priority, or assigned to a particular team member, making it easier to manage workloads and ensure timely completion of critical activities.
8. Fine-Tuning Board Settings for Optimal Control
Adjusting the board settings is crucial for maintaining optimal control over the team’s workflow. By fine-tuning these elements, you can create a highly organized workspace and control who can view the board, implementing work-in-progress limits to manage the flow of tasks effectively, and enabling auto-numbering of tasks for better tracking.
Additionally, the ability to manage board tags and columns allows teams to customize the environment to match their specific processes and needs.
This Customer Success board excels at breaking down customer tickets into actionable and trackable steps, ensuring thorough handling of each customer interaction. Here’s how this structured approach enhances the customer success workflow:
Details Tab for Ticket Descriptions: Each ticket on the board, such as “Team discount?”, includes a Details tab. This provides a comprehensive description of the customer’s issue or request, outlining the necessary actions and objectives. It ensures that all team members understand the scope of the customer’s needs clearly.
Setting Ticket Status for Progress Tracking: The board allows each ticket to be marked with statuses like Ready, In Progress, or Needs Review. This system offers clear visibility on the progress of customer issues, enabling team members to efficiently track and address any delays or complications.
Checklist Tab for Actionable Steps: Complex customer issues are divided into subtasks within the Checklist tab. This method helps in systematically addressing each component of the ticket, ensuring thorough resolution and customer satisfaction.
Due Dates to Maintain Service Levels: Setting deadlines for each ticket ensures that responses and resolutions are timely. This helps the team prioritize their tasks effectively and meet the service level agreements set with customers.
Tags for Easy Categorization: Tickets are tagged with relevant labels such as high priority or common issue, which helps in organizing and prioritizing the workflow. This feature makes it simple to filter and focus on tickets that require immediate attention or fall into specific categories.
Chat Tab for Ticket-Specific Discussions: The Chat tab centralizes all discussions related to a specific ticket, allowing team members to collaborate directly within the context of the issue. This feature streamlines communication and speeds up problem resolution.
Task Assignments for Clear Responsibility: Assigning tickets to specific team members clarifies who is responsible for handling each issue. This clear delineation of tasks prevents overlap and ensures accountability within the team.
Attachments Tab for Relevant Documents: The Attachments tab enables team members to store all pertinent documentation directly with the ticket. This centralized storage of files ensures that all the necessary information is readily available and linked to the corresponding customer issue.
By utilizing these features, the board effectively organizes the handling of customer tickets, enhancing the team’s ability to manage their customer success workflow systematically and efficiently.
Conclusion
The capabilities demonstrated by the Customer Success board show that when technology aligns with strategic workflow management, teams can enhance their efficiency and effectiveness significantly. By breaking down tasks, managing communications, and utilizing advanced features like task prioritization and file management, teams are equipped to provide unparalleled customer service.
Implementing these strategies will not only streamline operations but also elevate the customer experience, fostering loyalty and driving success in today’s competitive environment.
Mistakes happen – tasks can sometimes be deleted by accident. That’s why having a safeguard in place is essential to ensure nothing important is lost forever.
When tasks are deleted, they don’t disappear permanently; instead, they’re moved to a Deleted Column of your board. This provides a safety net, allowing tasks to be reviewed or restored if needed. However, the ability to permanently delete tasks is restricted to Board Admins.
This setup ensures accountability while maintaining flexibility. Team members can delete tasks knowing they can be recovered if needed, but permanent removal requires an Admin’s oversight, keeping task management secure and deliberate.
When a task is deleted, it’s not gone forever. Instead, it’s moved to the Deleted Column, where it stays until further action is taken.
Recover Tasks Anytime: Anyone on the board can restore deleted tasks from this column if they realize a mistake has been made.
No Pressure: You don’t need to worry about accidental clicks or hasty decisions – everything remains recoverable.
2. Only Board Admins Can Permanently Delete
When it’s time to clean up the Deleted Column for good, only the Board Admins can step in to permanently remove tasks.
Added Protection: By restricting this authority to admins, you can make sure that no task is permanently deleted without careful consideration.
Clear Accountability: This feature adds a layer of control, ensuring that critical tasks are not lost due to unintentional actions.
Why This Matters
Avoid Losing Important Work The Deleted Column acts as a safety net, allowing team members to delete tasks without the fear of losing them permanently. Tasks remain recoverable until a Board Admin decides otherwise, offering both flexibility and security.
Maintain Control Board Admins have the authority to oversee permanent deletions, ensuring that only unnecessary or duplicate tasks are removed. This structure helps maintain clarity and keeps projects well-organized.
Promote Accountability Restricting permanent deletion rights encourages teams to manage tasks carefully, reducing errors and promoting a reliable, transparent system. This approach fosters trust and responsibility across the board.
Conclusion
Deleted tasks are recoverable until a Board Admin takes action, ensuring safety, accountability, and control. This approach prevents accidental losses and keeps your workflow secure and organized.
Vaš radni prostor trebao bi raditi za vas, a ne obrnuto. Opcije prilagodbe omogućuju vam da prilagodite sve, od boja pozadine do obavijesti i alata za bijelu ploču, što vam pomaže da ostanete organizirani i produktivni.
Da biste započeli personalizirati svoj radni prostor, morat ćete pristupiti postavkama postavki na svom računu. Evo kako:
Kliknite ikonu svog profila u gornjem desnom kutu zaslona.
Odaberite Moje postavke iz padajućeg izbornika.
Ove postavke omogućuju vam stvaranje iskustva koje odgovara vašem jedinstvenom stilu rada. Sada kada znate kako pristupiti postavkama, dopustite nam da vas vodimo korak po korak kako možete koristiti svaku opciju prilagodbe.
Kako radi: Podešavanje postavki
Postavke se obično grupiraju u tri glavne kategorije: General, Obavijesti, i Bijela ploča. Svaki odjeljak pruža jednostavne opcije dizajnirane za poboljšanje vašeg tijeka rada i optimiziranje vašeg iskustva.
Evo detaljnijeg pregleda kako te postavke funkcioniraju:
Opće postavke: učinite svoj radni prostor svojim
Boja pozadine: ● Odaberite boju pozadine koja je ugodna vašim očima i koja odgovara vašem stilu
● Birajte između raznih opcija kako biste svoj radni prostor učinili vizualno privlačnim.
Koristite oznake za ploče sa zadacima ● Omogućite ovu značajku za automatsko uključivanje oznaka na nove ploče zadataka i predloške koje izradite.
● Pomaže vam da ostanete organizirani i bez napora kategorizirate zadatke.
Prednosti: Prilagođavanje vizualnih aspekata vašeg radnog prostora čini ga intuitivnijim i manje pretrpanim, što vam pomaže da ostanete usredotočeni.
Obavijesti: Ostanite u tijeku bez preopterećenja
Obavijesti o chatu ● Primajte e-poruke kada postoji chat na razini odbora ili kada netko razgovara o zadatku u koji ste uključeni.
Ažuriranja aktivnosti za administratore ● Primajte obavijesti kada se dodaju, dovrše ili ponovno dodijele novi zadaci na pločama kojima upravljate.
Podsjetnici za dnevne zadatke ● Odlučite se za dnevni sažetak putem e-pošte koji se šalje u 6 ujutro, a prikazuje zakašnjele zadatke i one koji su dospjeli ovaj ili sljedeći tjedan.
● Grupirajte zadatke po datumu ili ploči za jednostavno praćenje.
Prednosti: S fleksibilnim obavijestima možete biti informirani o onome što je najvažnije, a da vas ne bombardiraju nepotrebnim ažuriranjima.
Postavke bijele ploče: Pojednostavite svoj kreativni proces
Linije i oblici ● Postavite zadane stilove linija, debljinu i boje za stvaranje čistih, dosljednih vizualnih prikaza.
Tekst na platnu ● Odaberite željeni stil fonta, veličinu i boju za dotjeran izgled.
Mogućnosti mreže ● Omogućite spajanje na rešetku i postavite veličinu rešetke kako bi vaši dizajni bili usklađeni i profesionalni.
Prednosti:
Ove postavke čine bijele ploče savršenima za razmišljanje, planiranje ili dizajn, osiguravajući da vaš rad izgleda sjajno i da ostane organiziran.
Završiti
Bilo da se radi o prilagodbi vizualnih elemenata, prilagođavanju obavijesti ili pojednostavljenju kreativnih alata, ove su opcije osmišljene kako bi poboljšale vašu produktivnost i održale vaše radno okruženje organiziranim. Odvajanje nekoliko trenutaka za personalizaciju vaših postavki može dovesti do učinkovitijeg i ugodnijeg iskustva svaki dan.
Efficient project management is the backbone of delivering successful outcomes. Whether you’re designing a website, launching a product, or coordinating a complex development effort, a structured approach ensures that all tasks are aligned, timelines are met, and stakeholders remain informed.
This guide walks you through the essential steps to mastering project management, providing actionable strategies to streamline workflows, foster collaboration, and track progress.
Once you’ve grasped the fundamentals, you’ll see how a visual tool can bring these principles to life, helping your team stay focused and productive.
Essential Steps to Build an Effective Project Management Workflow
A strong project management workflow ensures that tasks are completed efficiently, deadlines are met, and team collaboration runs smoothly.
Here are the key steps to build a reliable project management process:
1. Define Clear Objectives and Goals
Every successful project begins with clear, well-defined objectives. Understanding what you aim to achieve keeps the team focused and aligned throughout the project lifecycle.
Key Actions:
Conduct stakeholder meetings to align on project goals.
Break down objectives into measurable deliverables using the SMART framework (Specific, Measurable, Achievable, Relevant, Time-bound).
Document these objectives in a centralized location to ensure team visibility.
2. Develop a Detailed Project Plan
A comprehensive project plan serves as a roadmap, outlining tasks, timelines, and dependencies. It ensures that every team member understands their role and responsibilities.
Key Actions:
Use Gantt charts to map out timelines and task dependencies.
Identify milestones and deadlines to track progress effectively.
Allocate resources based on task complexity and team expertise.
3. Assign Roles and Responsibilities
Defining roles ensures accountability and eliminates confusion about who is responsible for each task. A RACI matrix (Responsible, Accountable, Consulted, Informed) can be helpful.
Key Actions:
Assign roles based on individual skills and project needs.
Communicate responsibilities clearly during team meetings or kickoff sessions.
Encourage feedback to ensure responsibilities are distributed fairly.
4. Prioritize and Break Down Tasks
Breaking down the project into smaller, manageable tasks ensures that no aspect of the work is overlooked. Prioritization helps focus the team’s efforts on what matters most.
Key Actions:
Categorize tasks by urgency and importance using prioritization techniques like the Eisenhower Matrix.
Divide complex tasks into smaller subtasks with clear deadlines.
Use tools to track task progress and keep everyone updated.
5. Foster Collaboration and Communication
Open and transparent communication is critical for effective project management. It helps teams stay aligned, resolve conflicts, and ensure progress is on track.
Key Actions:
Set up regular meetings (e.g., daily stand-ups or weekly check-ins) to review progress and address roadblocks.
Encourage team members to share updates and feedback in real-time.
Use collaborative tools to centralize communication and document decisions.
6. Monitor Progress and Adjust Plans
Tracking project progress helps identify potential risks and bottlenecks before they escalate. Regular monitoring allows for adjustments to keep the project on course.
Key Actions:
Use KPIs (Key Performance Indicators) such as project completion percentage, budget adherence, and resource utilization.
Conduct periodic reviews to reassess goals and timelines.
Create contingency plans to address unforeseen challenges.
7. Evaluate and Document Learnings
After completing the project, evaluate its success by measuring outcomes against initial goals. Documenting lessons learned helps improve future workflows.
Key Actions:
Hold a post-project review to discuss what went well and what could be improved.
Collect feedback from all stakeholders to identify strengths and weaknesses.
Update standard operating procedures (SOPs) based on findings.
Using the Right Tools to Build a Project Management Workflow
While mastering the essential steps of project management is key, implementing those steps effectively requires the right tools. A reliable task management system can bridge the gap between theory and execution, ensuring that projects are not only well-organized but also actionable.
The right tool streamlines task delegation, prioritization, and collaboration, enabling your team to stay focused and deliver results on time.
The demo board below exemplifies an efficient project management workflow in action. This board visually represents tasks progressing through stages such as “Project Strategy,” “Project Design,” “Development,” and “Testing,” ensuring nothing falls through the cracks.
By centralizing information, tracking progress at a glance, and identifying bottlenecks, this workspace provides a clear and actionable overview of your project.
Now let’s dive deeper into this demo board and understand how each section works together to create a robust project management system designed for success.
You can see in the image above how this team organizes their workflow using a board that simplifies project management. It’s designed to handle every stage of the process.
Let’s take a closer look at this team’s board to understand how each feature contributes to an effective project management system.Here’s how it all comes together.
1. Adding New Tasks to the Board
Every project starts with a list of tasks, and this board makes it incredibly simple to add them. By clicking on the “Add New Task” button (highlighted in the bottom left corner of the board), you can create a new card. Each card represents a specific task, such as “Homepage Design” or “Product Page Development.” This ensures your workflow stays clear and nothing gets left behind.
2. Customizing Columns for Your Workflow
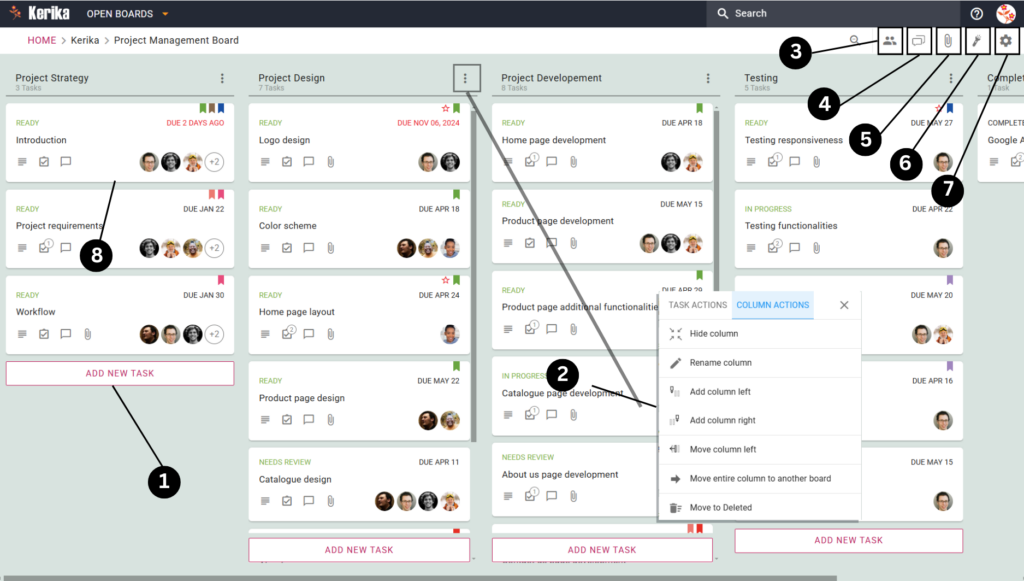
Need to adjust how your board is set up? You can easily rename columns, add new ones, or move existing columns to match your workflow. Simply click on the column menu (three dots) at the top of any column to access these options. For example, if a new phase of your project emerges, you can add a column like “Testing” without disrupting your existing tasks.
3. Managing Team Members and Roles
Effective collaboration starts with the right roles. Use the Team Members menu to add or remove members from the board. Each person can be assigned as an Admin, Member, or Visitor based on their responsibilities. For instance, assign Admin rights to project leads while giving clients Visitor access to view progress.
4. Centralizing Team Communication
Keep all discussions relevant to the board using the Board Chat feature. This allows your team to share updates, ask questions, or address challenges in one central location. For instance, a designer might share feedback on the “Logo Design” task directly in the chat to keep everyone on the same page.
5. Attaching and Sharing Files
Every project involves a fair amount of documentation, and this board handles it beautifully. With the Attachments section, you can upload files, link Google Docs, or even create new documents directly from the board. For instance, attach style guides or client briefs to ensure all necessary materials are accessible to the team.
6. Highlighting Important Tasks
Prioritize what matters with the Highlight feature. This lets you filter tasks based on due dates, priority levels, tags or specific assignments. You can combine these filters to find tasks as well.
For example, You can highlight tasks assigned to a particular teammate, tagged as ‘mockups’, along with their status as ‘Ready’. This saves you a lot of manual work to find what you are looking for.
7. Adjusting Privacy Settings
The Settings Menu is where this team fine-tunes their board for maximum efficiency. Clicking the gear icon in the top-right corner reveals four tabs: Overview, Settings, Columns, and Tags. Each tab plays a specific role in optimizing the workflow. Let’s break them down:
Overview Tab:
Provides a snapshot of the board’s progress, a description of its purpose, options for exporting tasks in Excel format, and the ability to archive completed boards for future reference.
Settings Tab:
Controls board privacy and access permissions, letting you choose between team-only access, organizational access, or public sharing via a link. It also manages edit permissions to maintain workflow integrity.
Columns Tab:
Allows customization of the board structure by adding, renaming, or reordering columns. This helps align the workflow with the team’s specific project requirements.
Tags Tab:
Facilitates task categorization by creating, managing, and applying tags. Tags make it easier to filter tasks by priority, type, or other custom labels, improving task organization and retrieval.
Now, let’s dive into how the team uses these task cards to break down the entire project management process into manageable steps. We will show you how you can use this feature to break down each tasks into an actionable item.
Break Down Tasks Into Manageable Steps
Task cards serve as the central hub where you and your team can capture and organize all the necessary details for completing a task. Here’s how to use them effectively:
Add Key Details:
Start by clearly defining the task’s objectives and any steps required for completion. For example, for a homepage design task, outline the layout and content requirements.
Track Progress:
Update the task’s progress by marking it as “In Progress,” “Needs Review,” or “Completed” so everyone can stay informed about its status.
Set Deadlines:
Assign a specific due date to each task to ensure that deadlines are met and nothing gets delayed.
Break Tasks Into Actionable Steps:
Decompose complex tasks into smaller, manageable steps. For example, “Create homepage content” might include subtasks like writing copy, selecting images, and designing the layout.
Use Tags For Clarity:
Use Tags to categorize tasks. You can prioritize by urgency or group tasks by themes like “Design,” “Development,” or “Testing.”
Attach Files:
Keep all project resources organized by attaching files directly to the task card. Upload design mockups, reports, or PDFs, create new Google Docs or Kerika Canvases, or link external resources – all in one place. This ensures your team can quickly access everything they need without wasting time searching through emails or folders.
Maintain Focused Communication:
Use the Chat tab to keep all discussions tied to specific tasks, ensuring that communication is clear and easy to track.
Assign Team Members:
Assign each task to specific team members, so it’s clear who is responsible for what. This enhances accountability and ensures tasks move forward efficiently.
Set Task Priority for Clear Focus:
Prioritizing tasks is key to keeping your project on track, and the Set Priority feature makes this effortless. You can assign one of three levels to each task:
Normal: For routine tasks that can proceed without urgency.
High Priority: For tasks requiring quick action or increased focus from the team.
Critical: For time-sensitive or high-impact tasks that demand immediate attention.
By leveraging these features, task cards help your team stay organized, collaborate seamlessly, and ensure no important detail is overlooked. With these steps in place, managing your project becomes easier and more effective.
Set Up Your Kerika Account
Getting started with Kerika is quick, simple, and sets the stage for organizing your project workflow seamlessly. Here’s how you can set up your account and get started on the right foot:
If you use Google Workspace, select the SIGN UP WITH GOOGLE option.
If you’re an Office 365 user, opt for SIGN UP WITH MICROSOFT.
You can also choose SIGN UP WITH BOX for file storage integration.
Follow the prompts, and you’ll be ready to go in moments—no credit card required, and you’ll receive a free 30-day trial for your team.
A Global Workspace for Everyone
Kerika supports 38 languages, so you and your team can work in the language you’re most comfortable with, creating a truly inclusive experience.
Create Your First Board
Once you’ve signed up, it’s time to create your first board and bring your project management workflow to life. Here’s how:
Click “Create New Board”: From the Kerika dashboard, select the option to create a new board.
Choose the Board Type: For project management, select the Task Board template. This comes preloaded with columns like “To Do,” “Doing,” and “Completed.”
Name Your Board: Give your board a name that reflects your project, such as “Website Redesign” or “Marketing Plan.”
Customize Your Workspace: Add or rename columns to suit your workflow, and start adding tasks to keep your team aligned.
You now have a fully functional, visual workspace ready to help you track progress, manage tasks, and foster collaboration within your team.
Wrapping Up: Your Blueprint for Project Success
Mastering project management isn’t just about completing tasks; it’s about creating a system that keeps your team on the same page, fosters collaboration, and ensures every milestone is met. With a detailed workflow and the right tools, you can stay organized, productive, and focused on achieving your goals.
This board demonstrates how every aspect of your project can be broken into actionable steps. By prioritizing tasks, tracking progress, and using features like task cards to manage details, you’ll ensure nothing gets overlooked.Kerika isn’t just a tool; it’s a framework to streamline teamwork, maintain accountability, and bring your project vision to life. Ready to take the next step? Start building your board, organize your tasks, and watch your projects succeed with Kerika!
A busy board can sometimes feel like a maze, especially when you’re juggling tasks with varying priorities. The Highlight Feature makes it easy to cut through the noise, letting you filter and visually emphasize tasks that meet specific criteria.
Here’s how to use this feature to stay on top of your projects:
How to Use the Highlight Feature
1. Access the Highlight Option
Click the Highlight Icon on your board.
2. Choose What to Highlight
Select from predefined options or create custom filters:
What’s assigned to me: Instantly see all the tasks assigned to you, so you can stay on top of your responsibilities.
What needs attention: Highlights tasks that may require follow-up or have upcoming deadlines, ensuring nothing falls through the cracks.
What’s marked as High Priority or Critical: Focus on tasks that are essential to the project’s success.
What’s overdue: Clearly identifies tasks that are past their due dates, helping you address delays quickly.
Custom Highlight: Create tailored filters by combining parameters like assignees, task status, due dates, priorities, and tags. You can use one or multiple filters at a time to find out what matters to you most on the board.
Why It Works
Focus on Your Tasks with “What’s Assigned to Me”Filter tasks assigned to you to concentrate on your responsibilities without getting sidetracked by other items on the board. It’s an efficient way to stay on top of your personal workload.
Identify Urgent Work with “What Needs Attention”Highlight tasks that require immediate focus, whether due to an upcoming deadline or stalled progress. This filter helps you spot bottlenecks and maintain project momentum.
Stay on Top of Critical Work with “What’s Marked as High Priority or Critical”High-priority tasks demand attention. This option ensures that crucial work gets the focus it deserves, helping you drive the project toward success.
Address Overdue Items with “What’s Overdue”Quickly identify overdue tasks and take action by reallocating resources or following up with team members to bring them back on track.
Customize Your Workflow with Custom HighlightsThe Custom Highlight feature allows you to set multiple conditions, such as showing tasks assigned to a specific person, marked as “Needs Review,” and due within a week. Tailor these settings to create a personalized focus view that suits your specific workflow.
Conclusion
With the Highlight Feature, you can cut through distractions and focus on what matters, ensuring a clear and efficient workflow. Whether managing your workload or overseeing the entire team, highlights help you stay productive and focused.
Papan yang sibuk kadangkala boleh berasa seperti labirin, terutamanya apabila anda menyulap tugas dengan pelbagai keutamaan. The Ciri Serlahkan menjadikannya mudah untuk mengurangkan bunyi bising, membolehkan anda menapis dan secara visual menekankan tugasan yang memenuhi kriteria tertentu.
Begini cara menggunakan ciri ini untuk mengikuti perkembangan projek anda:
Cara Menggunakan Ciri Serlahkan
1. Akses Pilihan Sorotan
Klik pada Ikon Serlahkan pada papan anda.
2. Pilih Perkara untuk Diserlahkan
Pilih daripada pilihan yang dipratentukan atau buat penapis tersuai:
Apa yang ditugaskan kepada saya: Lihat dengan serta-merta semua tugasan yang diberikan kepada anda, supaya anda boleh terus melaksanakan tanggungjawab anda.
Apa yang perlu diberi perhatian: Serlahkan tugas yang mungkin memerlukan susulan atau mempunyai tarikh akhir yang akan datang, memastikan tiada apa-apa yang gagal.
Perkara yang ditandakan sebagai Keutamaan Tinggi atau Kritikal: Fokus pada tugasan yang penting untuk kejayaan projek.
Apa yang tertunggak: Mengenal pasti tugasan yang melepasi tarikh akhir dengan jelas, membantu anda menangani kelewatan dengan cepat.
Sorotan Tersuai: Buat penapis yang disesuaikan dengan menggabungkan parameter seperti penerima tugasan, status tugas, tarikh akhir, keutamaan dan teg. Anda boleh menggunakan satu atau berbilang penapis pada satu masa untuk mengetahui perkara yang paling penting kepada anda di papan tulis.
Mengapa Ia Berfungsi
Fokus pada Tugasan Anda dengan “Apa yang Ditugaskan kepada Saya” Tapis tugas yang diberikan kepada anda untuk menumpukan perhatian pada tanggungjawab anda tanpa diketepikan oleh item lain di papan tulis. Ini adalah cara yang cekap untuk sentiasa mengatasi beban kerja peribadi anda.
Kenal pasti Kerja Segera dengan “Apa yang Perlu Diperhatikan” Serlahkan tugas yang memerlukan tumpuan segera, sama ada disebabkan tarikh akhir yang akan datang atau kemajuan yang terhenti. Penapis ini membantu anda mengesan kesesakan dan mengekalkan momentum projek.
Kekal dalam Kerja Kritikal dengan “Apa yang Ditandakan sebagai Keutamaan Tinggi atau Kritikal” Tugas keutamaan tinggi menuntut perhatian. Pilihan ini memastikan kerja penting mendapat tumpuan yang sepatutnya, membantu anda memacu projek ke arah kejayaan.
Alamat Item Tertunggak dengan “What’s Overdue” Kenal pasti tugas tertunggak dengan cepat dan ambil tindakan dengan mengagihkan semula sumber atau membuat susulan dengan ahli pasukan untuk membawa mereka kembali ke landasan yang betul.
Sesuaikan Aliran Kerja Anda dengan Sorotan Tersuai Ciri Sorotan Tersuai membolehkan anda menetapkan berbilang syarat, seperti menunjukkan tugasan yang diberikan kepada orang tertentu, ditandakan sebagai “Memerlukan Semakan” dan perlu dibuat dalam masa seminggu. Sesuaikan tetapan ini untuk membuat paparan fokus diperibadikan yang sesuai dengan aliran kerja khusus anda.
Kesimpulan
Dengan Ciri Serlahkan, anda boleh mengurangkan gangguan dan menumpukan pada perkara yang penting, memastikan aliran kerja yang jelas dan cekap.Sama ada mengurus beban kerja anda atau mengawasi keseluruhan pasukan, sorotan membantu anda kekal produktif dan fokus.