Ever found yourself wondering how a task ended up in a different column or why its details suddenly changed? Tracking changes on a task board can sometimes feel like piecing together a puzzle. That’s where the Card History feature comes in, offering a clear and detailed log of every action taken on a task card.
With just a click, you can see who made updates, what was changed, and when it happened—ensuring transparency and eliminating confusion. Whether you’re collaborating with designers, developers, or project managers, this feature keeps everyone aligned and informed.
Let’s dive into how Card History works and how it can simplify team collaboration
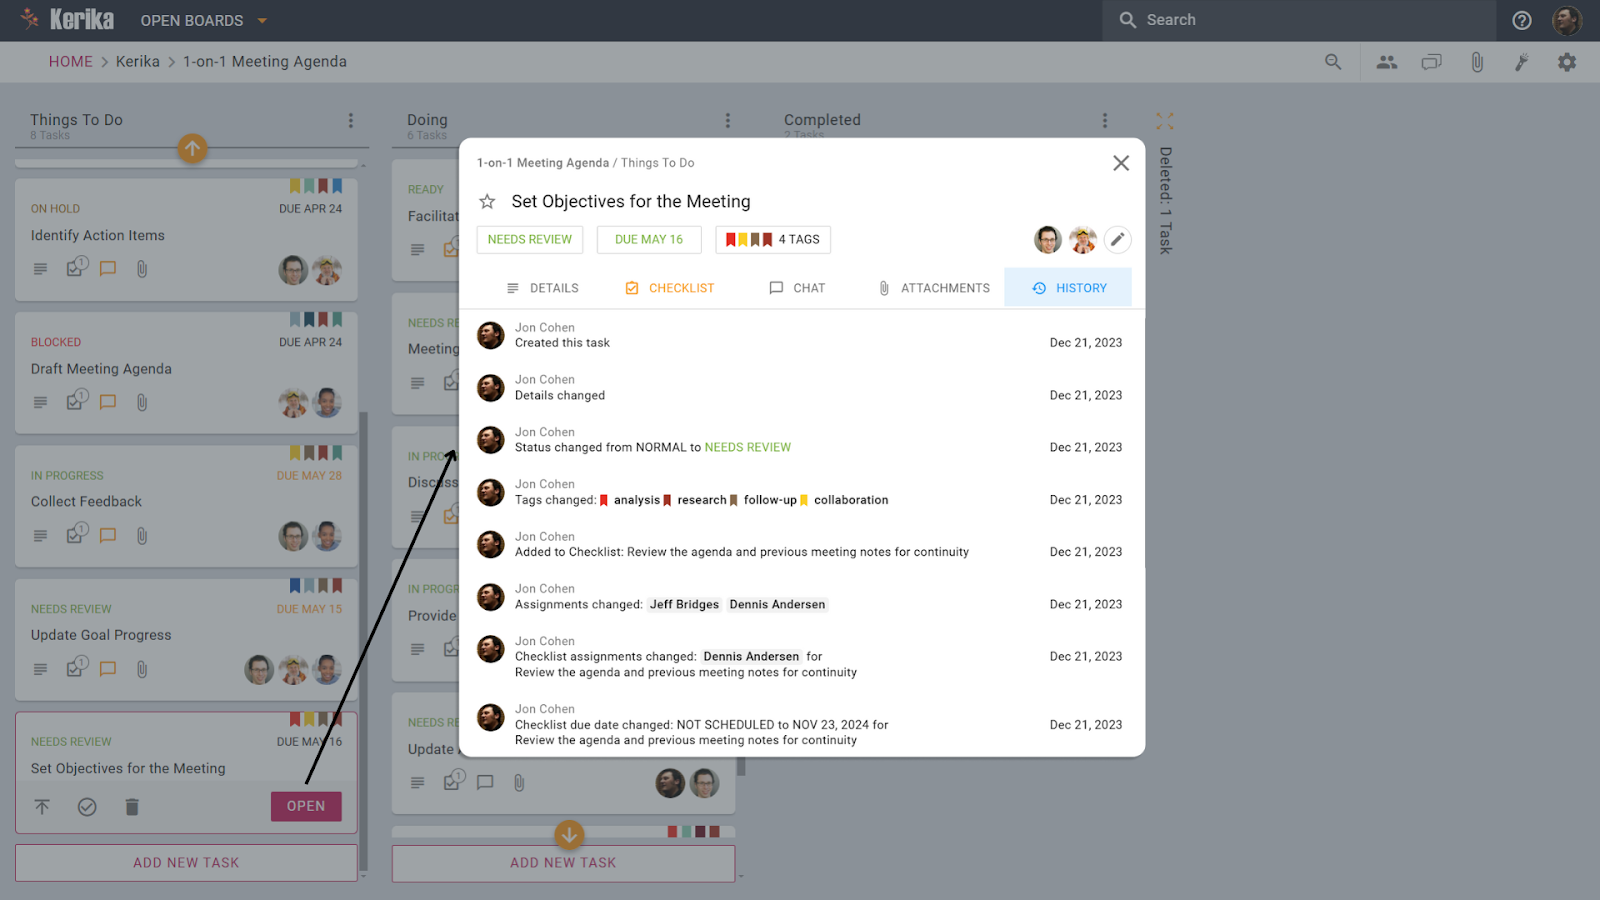
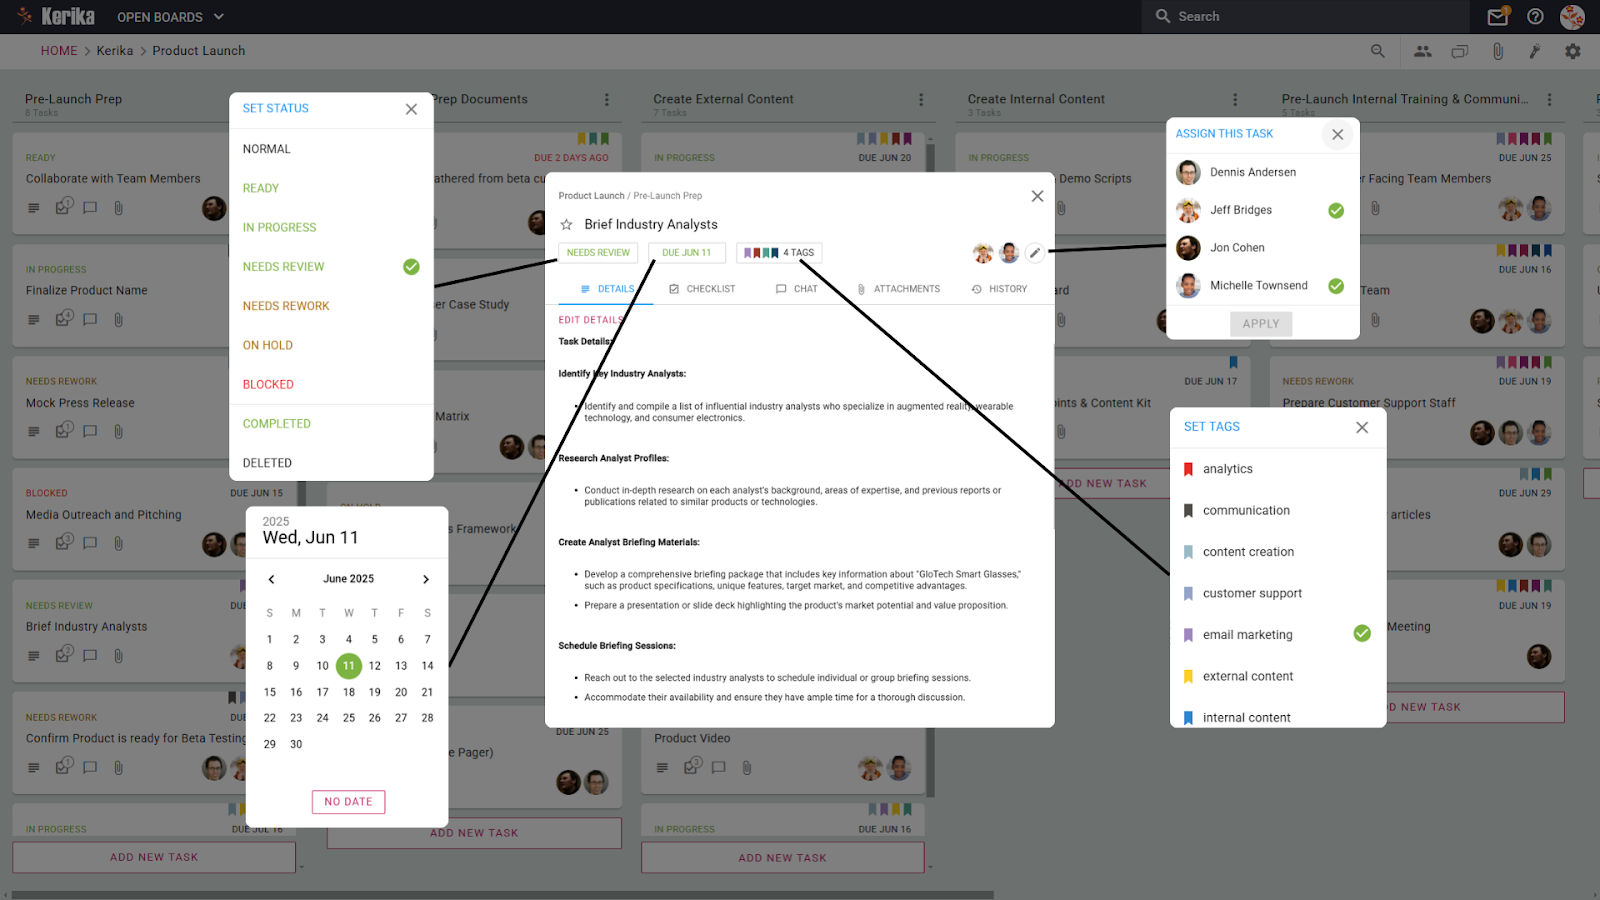
Open a Task Card: Click on the task card you want to review.
Navigate to the “History” Tab: At the top of the card, you’ll find a tab labeled “History.”
View Detailed Logs: Once you open the tab, you’ll see a chronological list of all actions taken on the card. This includes updates to details, status changes, new assignments, and more.
Every action is timestamped and shows who made the update, giving you a clear and reliable record at a glance.
When to Use Card History
Resolving Confusion: Sometimes tasks seem to take on a life of their own. If you’re wondering why a card moved to another column or its details changed, Card History is your answer. It gives you the full picture of the card’s journey, helping you avoid misunderstandings.
Accountability and Transparency: Want to know who made a decision and when? Card History provides a reliable record for performance reviews, audits, or simply keeping everyone on the same page.
Understanding Dependencies: For interconnected tasks, Card History helps you track changes and see how they align with the bigger picture. It’s especially useful for projects with complex workflows.
Why It Matters
Improved Communication: No need for endless back-and-forth questions; everyone stays aligned.
Efficiency: Save time by accessing a clear, consolidated record of changes.
Trust and Accountability: Build a transparent work environment where actions are traceable.
Conclusion:
The Card History isn’t just a feature – it’s your team’s memory bank. It empowers you to collaborate more effectively, ensuring that every update is accounted for and understood.
Launching a new product can be thrilling, but without proper planning, it can quickly spiral into chaos. From missed deadlines to poor market fit, many product launches stumble right out of the gate. As highlighted by the Harvard Business Review, most product launches fail due to common mistakes like poor timing, inadequate market research, and unclear marketing strategies. These issues can lead to disappointing sales and a tarnished brand reputation.
Without a clear roadmap, even the best ideas risk being lost in the shuffle. But don’t worry, this guide is here to help you avoid those pitfalls. We’ll break down the product launch process into practical, step-by-step strategies to help you get things done smoothly, ensuring your product gets the strong debut it deserves. Ready to launch with confidence? Let’s get started!
Essential Steps to Launch a Successful Product
A successful product launch doesn’t just happen, it’s built on a foundation of careful preparation, well-timed execution, and ongoing collaboration. Let’s break down the key steps you’ll need to follow to achieve launch success, along with practical tips and challenges to watch out for.
McKinsey emphasizes that product launches involving early stakeholder alignment and comprehensive planning are significantly more likely to stay on schedule and meet goals. With that in mind, the first step in any successful launch is getting everyone on the same page. Collaborate with cross-functional teams to define roles and responsibilities, ensuring that nothing slips through the cracks.
Take the time to conduct market research and refine your product positioning, don’t assume you already know everything about your audience. Creating a clear timeline with key milestones helps prevent last-minute scrambles. But remember, plans are only as good as the flexibility they allow. Build buffer time into your schedule to accommodate delays and surprises.
Without proper alignment, small miscommunications can snowball into costly delays. Regular check-ins can help you address issues before they become major problems, ensuring smoother execution from start to finish.
2. Develop Internal Materials That Drive Clarity
Imagine launching a product with incomplete internal documentation. Your marketing team misinterprets the product’s key features, and your support team fumbles with customer questions. This isn’t just a hypothetical, it’s what happens when internal materials like product demos, buyer personas, and training scripts aren’t prioritized.
Gather customer insights from beta tests or early feedback, and refine internal documents accordingly. Ensure your customer-facing teams have a solid grasp of key messaging, FAQs, and troubleshooting guides. Regularly review and update these materials, especially if you encounter last-minute product tweaks.
Internal clarity lays the foundation for external success. When teams have a deep understanding of the product, they can communicate its value consistently and effectively. According to Harvard Business Review, employees who receive adequate information to do their jobs well are 2.8 times more likely to be engaged, and companies with engaged workers report a 23% increase in profits..
3. Craft Targeted External Content
It’s easy to fall into the trap of creating generic promotional content that tries to appeal to everyone and ends up appealing to no one. The Content Marketing Institute has shown that brands that focus on personalized messaging see significantly higher engagement and conversion rates. Instead of vague messages about how “innovative” your product is, highlight the specific problems it solves and why customers should care.
For example, create blog posts, videos, and in-app messages that highlight key benefits while keeping customer pain points front and center. Include visuals like product screenshots or GIFs that demonstrate features in action. Align your messaging across channels so your audience receives the same clear message, whether they’re reading a blog or watching a demo video.
Without proper coordination, inconsistent brand tone and content gaps can confuse potential customers. A centralized content review process helps ensure that your marketing efforts are cohesive.
4. Train Internal Teams to Be Product Champions
Training isn’t just another item to check off your list, it’s a core part of launch success. A well-trained team is more confident and effective during launches.
Host role-specific training sessions for sales, support, and marketing teams to ensure they understand the product’s key benefits and can confidently address customer questions or objections. Develop internal FAQs and troubleshooting guides to minimize confusion during the launch. Assign experienced trainers and provide hands-on practice to boost team readiness.
However, skipping key training areas or rushing through sessions can leave teams unprepared, leading to inconsistent customer experiences. Create a training checklist to ensure that no topic is left out. The more prepared your team is, the smoother the customer interactions will be.
5. Review and Test Everything Before Launch Day
Imagine rushing to launch only to discover that a key feature is broken or a press release contains major errors. This kind of scenario is more common than you’d think when pre-launch reviews are treated as optional. Conduct a full review of marketing materials, distribution channels, and product functionality before the official launch.
A mock launch can help you spot weak points. Have stakeholders test various aspects, from customer support workflows to product demos, and gather feedback on anything that needs improvement. Pay attention to small details, as they often have the biggest impact during the launch.
Companies with robust pre-launch testing and risk assessments are better equipped to handle last-minute challenges. Don’t skip this step, it could save you from dealing with major issues on launch day.
6. Launch and Monitor Performance in Real Time
Imagine rushing to launch only to discover that a key feature is broken or a press release contains major errors. This kind of scenario is more common than you’d think when pre-launch reviews are treated as optional. Conduct a full review of marketing materials, distribution channels, and product functionality before the official launch.
A mock launch can help you spot weak points. Have stakeholders test various aspects, from customer support workflows to product demos, and gather feedback on anything that needs improvement. Pay attention to small details, as they often have the biggest impact during the launch.
Bain & Company emphasizes the need to track performance metrics during and after a launch. Smart data use helps measure progress and identify issues. Don’t just monitor, adapt quickly if feedback shows problems or underperforming campaigns to keep momentum.
Even the most detailed plan can run into roadblocks without the right tools to manage it. Whether you’re dealing with overlapping deadlines, shifting priorities, or coordinating multiple teams, a well-organized task management system is essential.
The right task management tool can help you stay on top of each stage of the launch, from pre-launch preparations to post-launch evaluations, ensuring that no task slips through the cracks. So let’s explore how this task management tool can help streamline this process, keeping your team organized and on track.
Using the Right Tools for a Seamless Product Launch
Managing a product launch can feel like juggling dozens of moving parts, preparing content, training teams, coordinating outreach, and more. What makes this board so helpful is its simplicity and the way it keeps everything visible and organized. You’re not left scrambling through scattered emails or vague to-do lists. Instead, you can see exactly what’s in progress, what needs attention, and what’s completed.
Let’s say you’re preparing a press release and waiting for approval from another team. Instead of guessing or constantly checking in, you can easily spot the task status and know who’s working on what. No guesswork, no confusion. It works because it reflects what we’ve talked about: clarity, accountability, and smooth collaboration. Teams can avoid missed deadlines by identifying delays early and fixing them before they escalate.
The board also helps balance long-term goals and short-term tasks. Teams working on product demos, sales materials, or customer FAQs can move forward without waiting for others to finish. By keeping tasks categorized, you can focus on one thing at a time without feeling overwhelmed by everything else happening around you.
What really makes it effective is how it adapts as you go. If a task needs rework or a new priority comes up, you can adjust without derailing the entire plan. It’s flexible and keeps the team aligned, making sure no task slips through the cracks. This kind of structure doesn’t just help during the launch, it sets you up for long-term success. With the right system, you’ll always know where things stand and what to tackle next.
A well-structured task management system keeps teams aligned, tasks organized, and progress visible, making even complex product launches manageable. Now, let’s take a closer look at how this board is designed to handle each stage of the product launch with precision and flexibility.
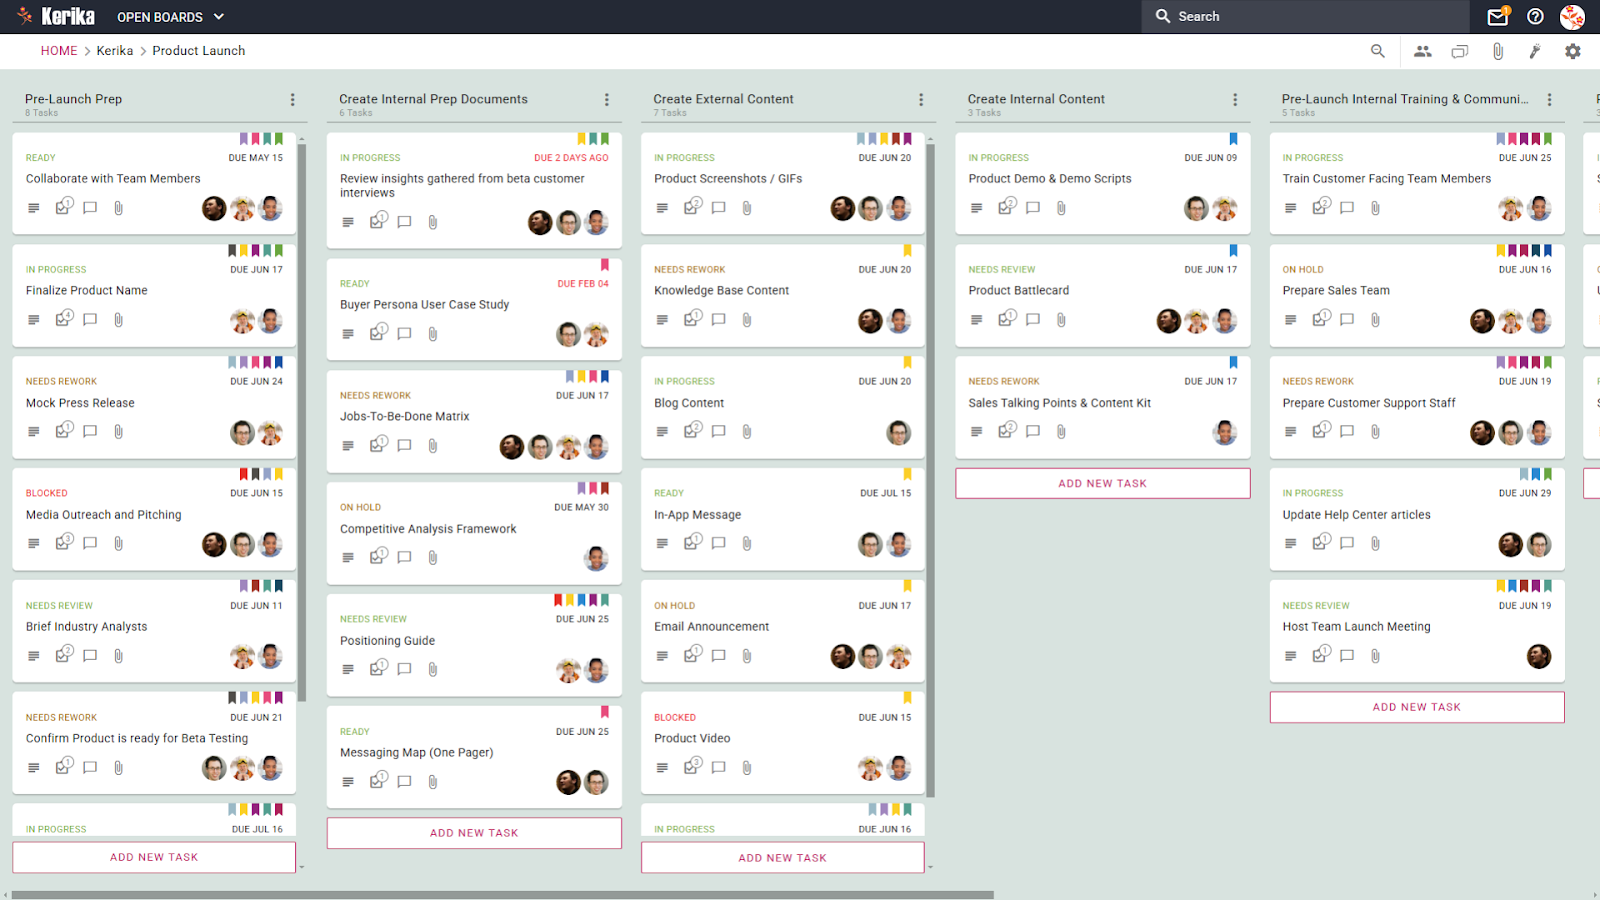
Taking a Closer Look at This Product Launch Board
A great tool isn’t just about organization, but it’s about clarity and flow. This product launch board visually breaks down tasks into stages, allowing teams to track progress, prioritize what needs attention, and collaborate without confusion. Let’s explore how each key feature on this board helps the team stay on track and ensures the entire launch process runs smoothly.
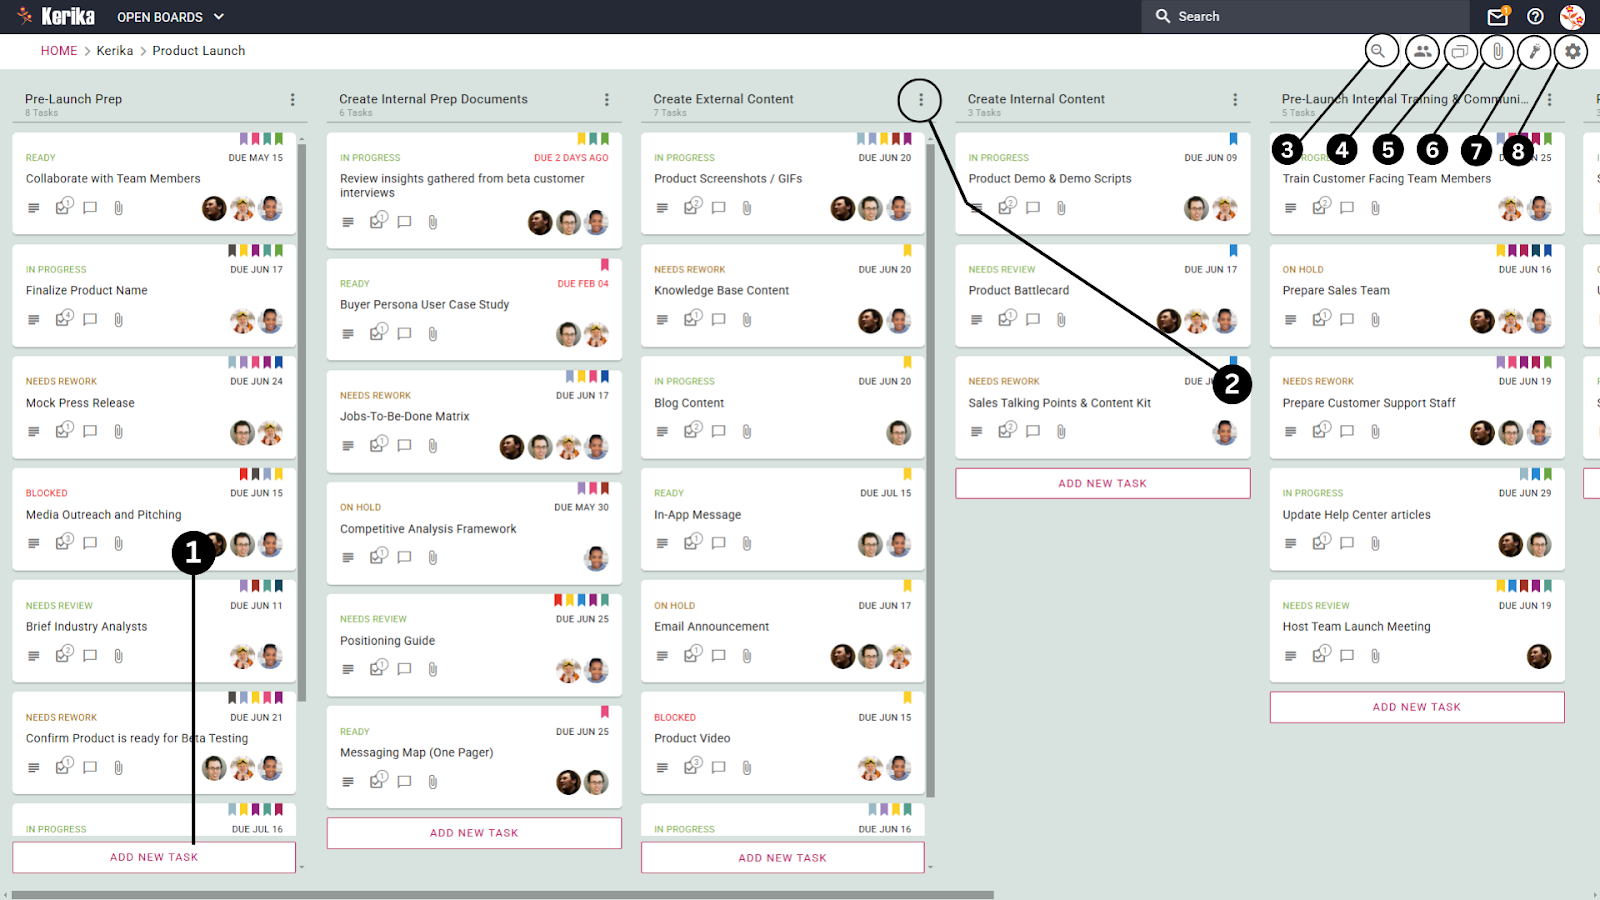
Every product launch starts with ideas and action items, and this board makes it easy to capture them without missing a beat. Whether it’s conducting market research or preparing content, new tasks can be added seamlessly as they arise.
This feature keeps the team agile and ensures that important action items don’t get overlooked or delayed. By allowing tasks to be added on the fly, teams can react to new priorities, adjust to feedback, and maintain forward momentum, all while keeping everything organized in one place.
2. Creating and Managing Columns: Organize Tasks by Stages
Columns define the key stages of your workflow, making it easy to track tasks as they move from one phase to the next. Whether it’s initial planning, content creation, or training, each column represents a step in the product launch process.
What makes this feature valuable is its flexibility. You can rename, rearrange, or even add columns as the project evolves. If priorities shift or a new step is needed, the workflow can be updated without causing confusion. This keeps everyone on the same page and ensures that no task is left hanging between phases. It’s like giving your team a clear roadmap with the freedom to adjust as they go.
3. Zooming Out for a Quick Overview: Find What You Need Fast
When you’re managing multiple tasks, it’s easy to get lost in the details. That’s where the zoom-out feature comes in handy. By hiding extra details and only showing task names, it gives you a clean, simplified view of the entire board, making it easier to spot tasks, deadlines, or bottlenecks at a glance.
This feature is especially useful when you’re short on time and need a quick overview of what’s pending or when you’re searching for a specific task. It’s all about helping you scan the board efficiently and focus on what matters without distractions.
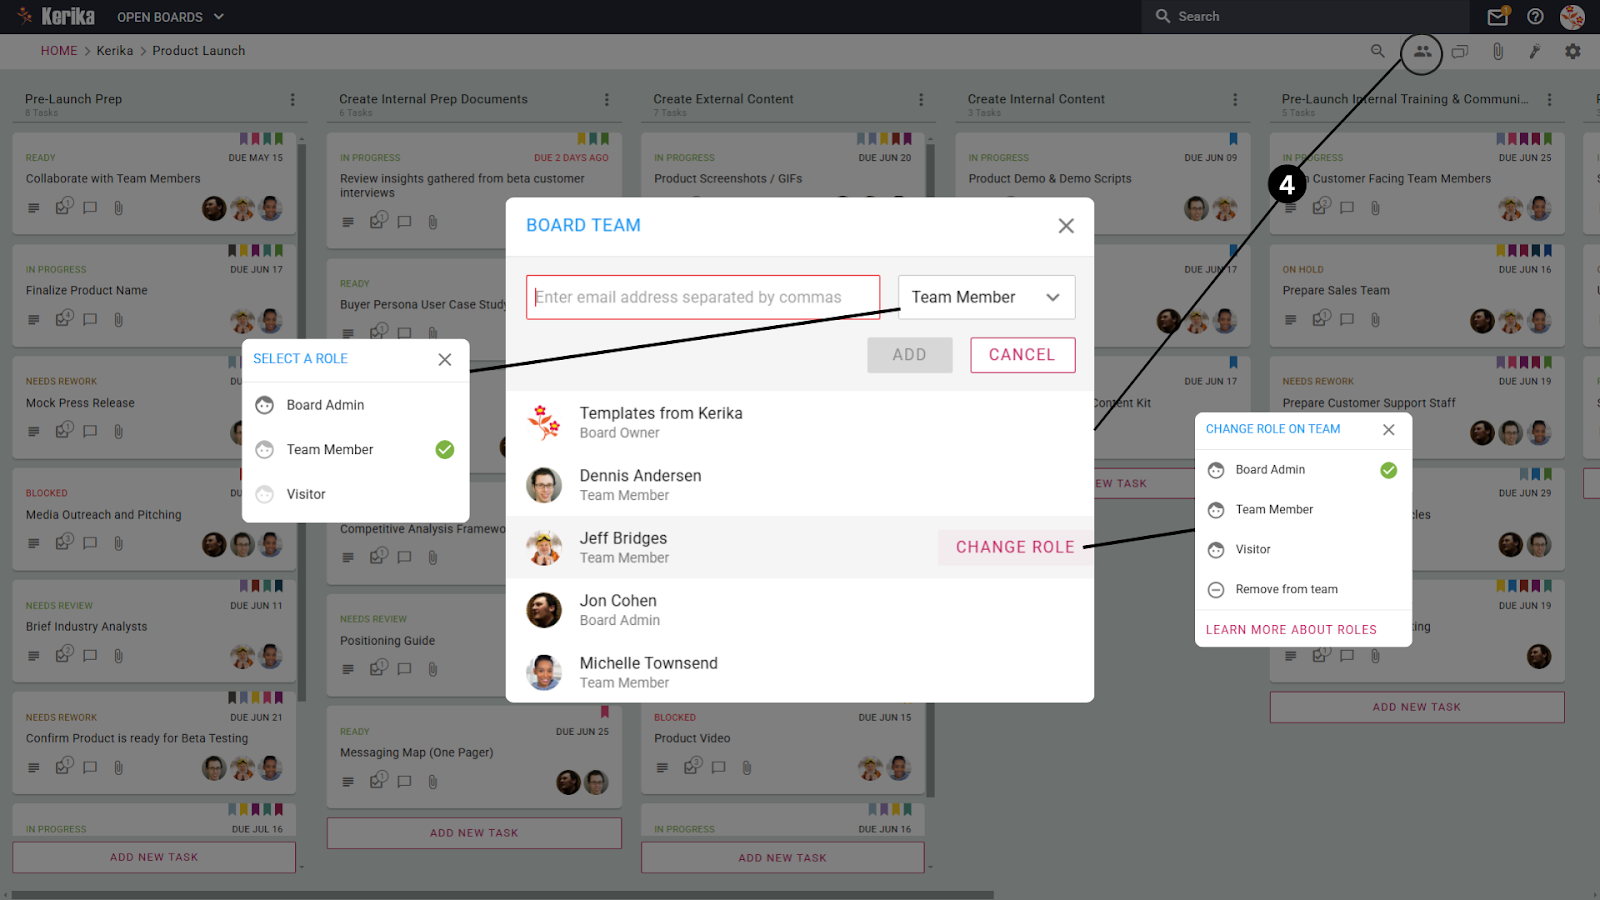
4. Managing Teammates and Their Roles: Assign Responsibility and Control Access
In any successful project, knowing who’s responsible for what is key. This feature allows you to add teammates, assign them roles, and adjust access levels as needed. Whether someone is a project leader, contributor, or simply a viewer, you can easily manage their permissions based on their involvement.
This helps prevent confusion and keeps sensitive tasks or information secure. Team members know exactly what’s expected of them, and leaders can maintain control without micromanaging. With everyone in the right role, the team operates more efficiently, and tasks move smoothly from one stage to the next.
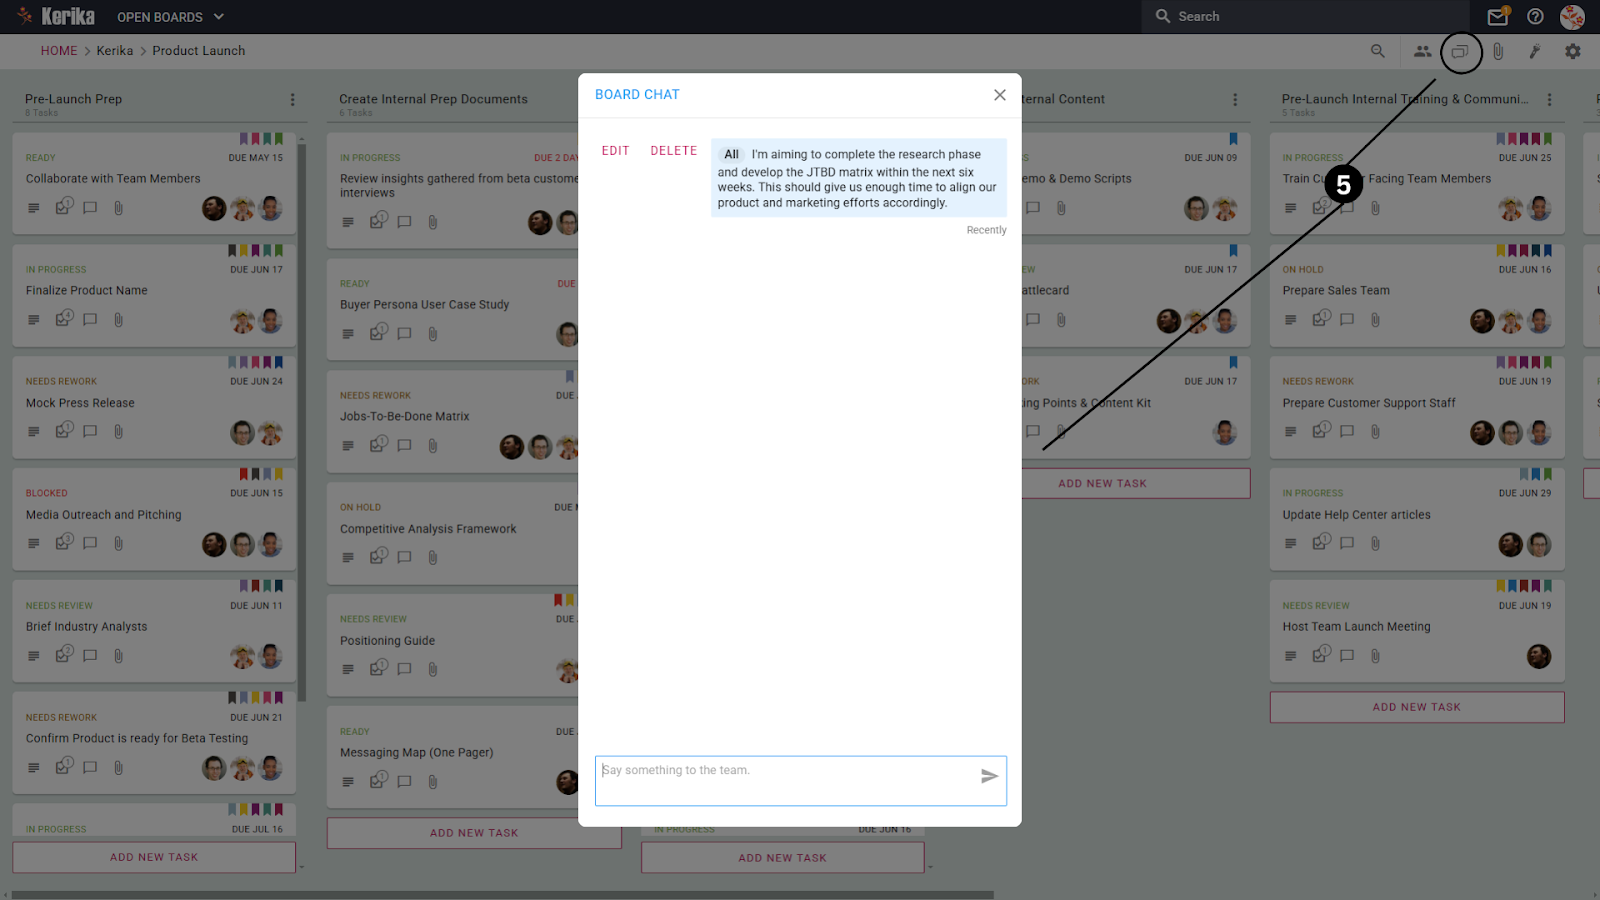
5. Board Chat: Keep General Discussions in One Place
While individual task cards have their own chat options, the board chat is where you can communicate with the entire team at once. It’s ideal for general updates, announcements, or discussions that don’t belong to any specific task.
This feature helps reduce confusion by keeping team-wide conversations separate from task-specific ones. Instead of important updates getting buried in individual chats, they stay accessible and visible to everyone, ensuring that no one misses out on key information.
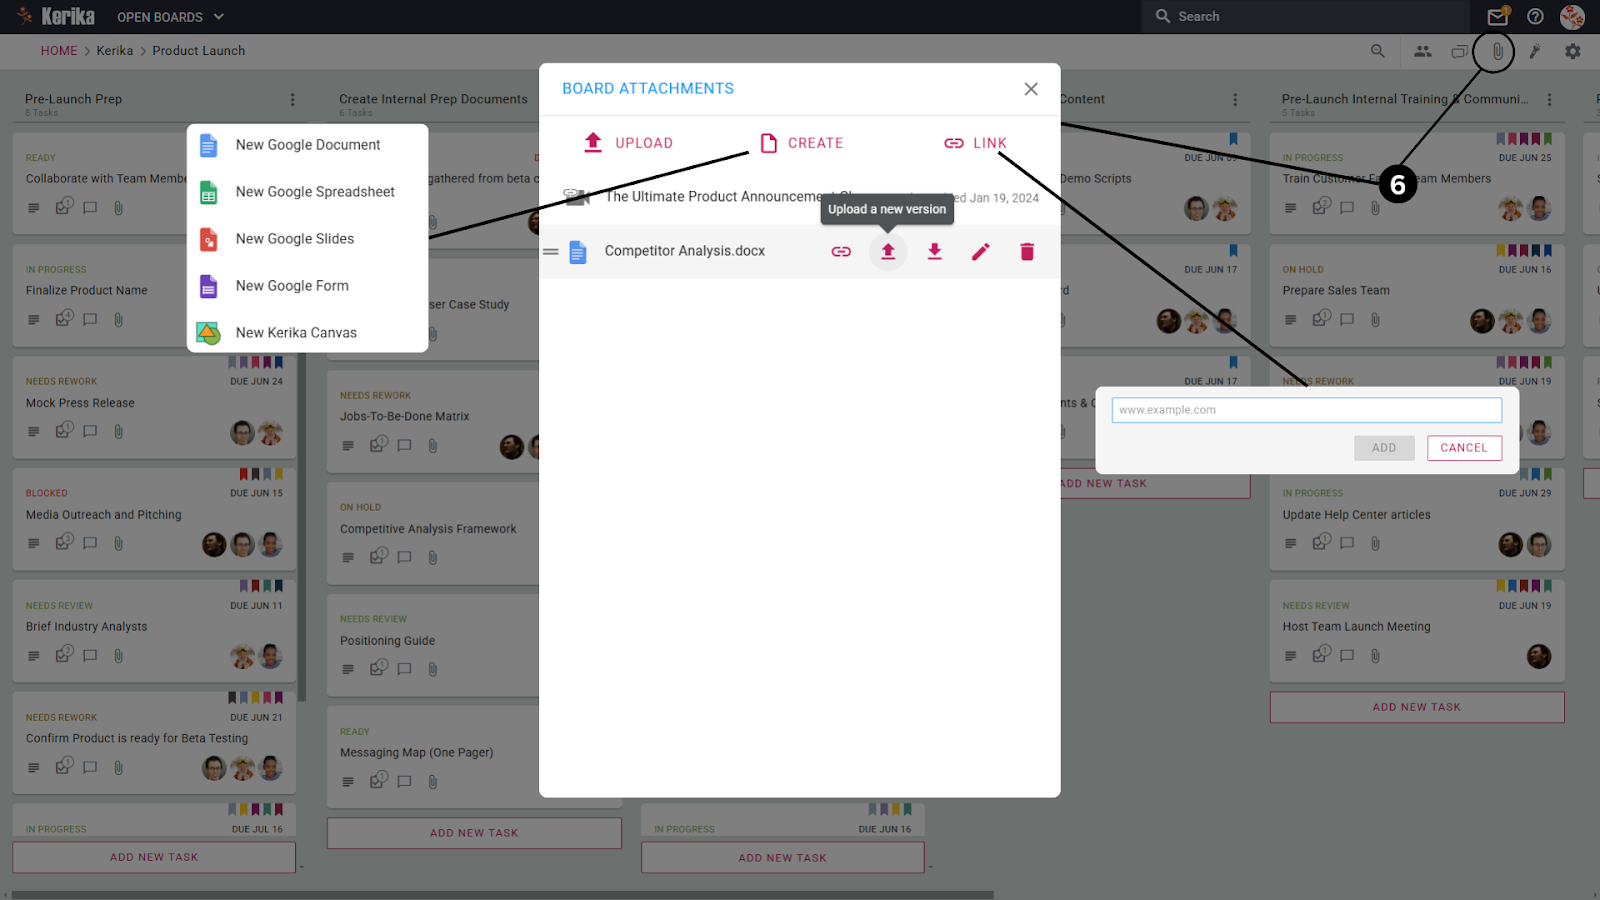
6. Sharing Files and Attachments: Keep Resources Accessible
This feature allows the team to upload, create, or link files directly on the board, making sure that important documents like product guides, analysis reports, or media kits are easily accessible. Instead of hunting through emails or external storage, team members can find what they need right where the work happens.
By attaching files directly to the task or board, it keeps resources organized and relevant. Team members always have access to the latest versions, which helps avoid confusion and ensures that everyone is working with up-to-date information. This streamlined file-sharing keeps projects moving efficiently and eliminates time wasted on searching for critical documents.
With multiple tasks spread across different stages, the highlight option helps you filter and focus on exactly what you’re looking for. Whether you want to find tasks assigned to specific team members, those marked as high priority, or tasks due soon, this tool makes it easy to apply any combination of filters.
This feature is especially useful when deadlines are approaching or when certain tasks need immediate attention. Instead of scanning the entire board, you can quickly highlight relevant tasks and stay on top of what matters most, saving time and improving efficiency.
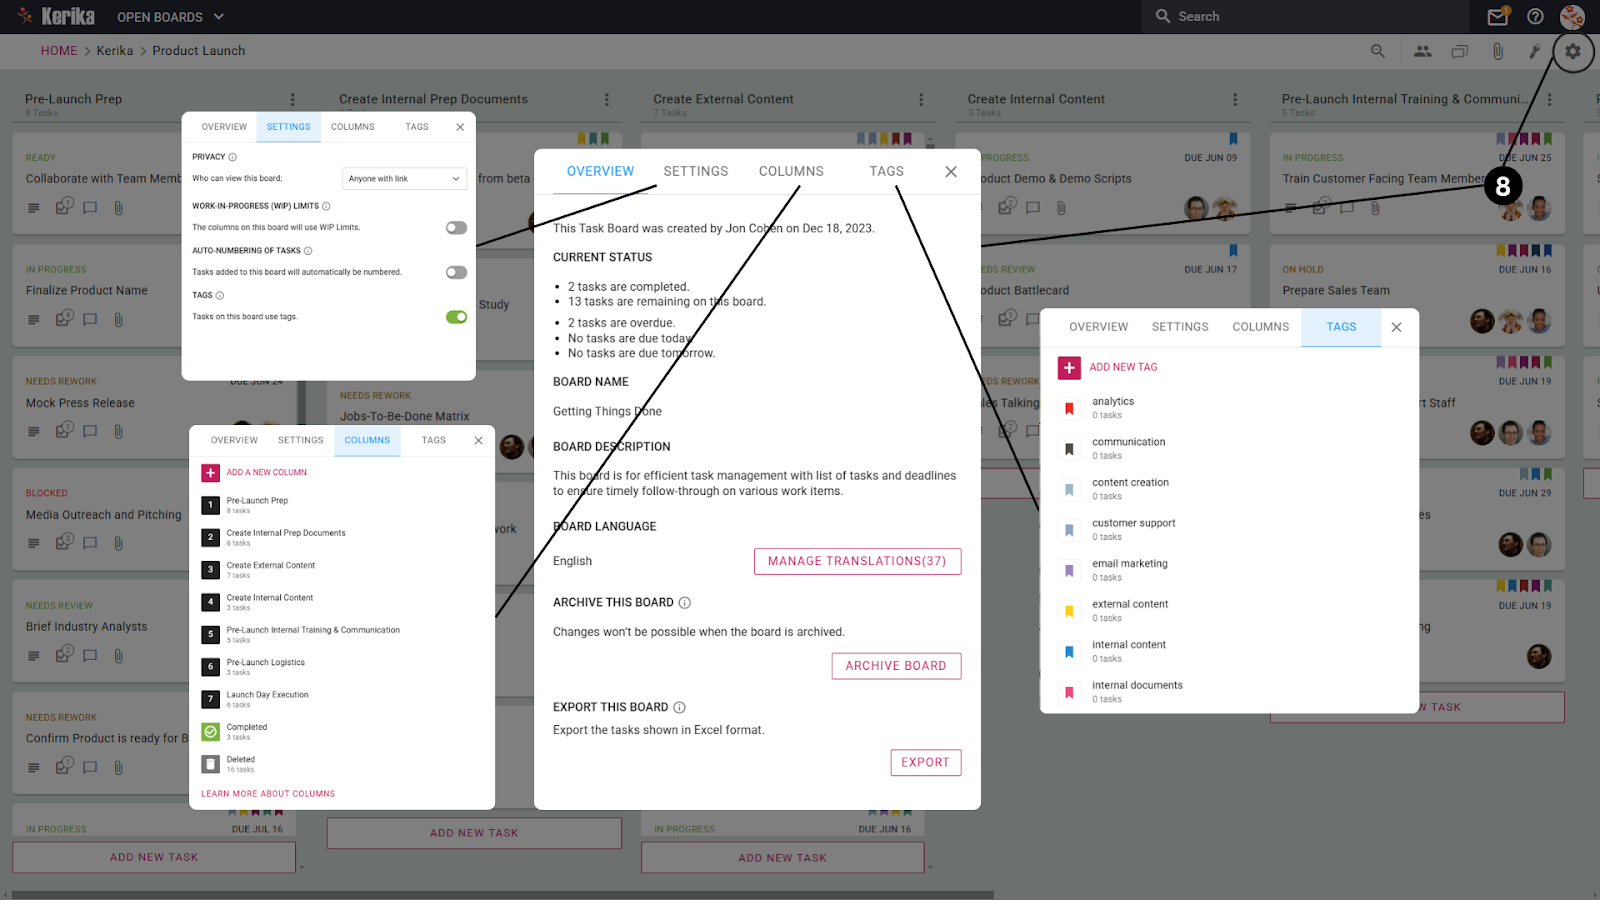
8. Board Settings: Fine-Tune Your Product Launch Board
The board settings give you complete control over how tasks and progress are managed during the product launch, ensuring every stage runs smoothly. Here’s how they help:
Privacy Settings: Manage who can access or contribute to the board, keeping sensitive product details secure while allowing the right people to collaborate.
Work-In-Progress Limits: Prevent your team from taking on too many tasks at once, reducing burnout and ensuring high-priority tasks get the attention they deserve.
Auto-Numbering of Tasks: Keep tasks easily identifiable so your team can track them without confusion as they progress through the product launch phases.
Overview of Progress: Get a real-time snapshot of completed tasks, overdue items, and upcoming deadlines, helping you address bottlenecks before they become issues.
Column Management: Adjust stages like “Pre-Launch Prep” or “External Content Creation” to fit the needs of your evolving launch plan.
Tag Management: Label tasks with tags like “marketing,” “customer training,” or “media outreach,” so you can filter and locate tasks quickly.
Archive or Export Options: Archive the board post-launch or export key data to review what worked and plan for future launches.
With the right setup, your product launch board serves as a powerful roadmap, keeping tasks organized, teams aligned, and progress visible at every stage. Now, let’s break down how individual task cards work and see how they help you manage each step of the launch with precision and ease.
Break Down Product Launch Tasks Into Manageable Steps
Launching a product involves dozens of moving parts, but success comes from breaking them down into smaller, actionable tasks that teams can easily tackle. That’s where task cards play a key role. Each task card is more than just a reminder, it’s a central hub where teams can access all the details they need to get the job done.
From the first glance, a task card tells you everything important: what needs to be done (task details), who is responsible (assign task), the task’s current status, when it’s due, and what category it falls under (tags). This setup makes it easy for teams to prioritize work, stay accountable, and ensure no steps are missed along the way. Let’s take a closer look at how each of these features helps break down even the most complex product launches into manageable, achievable tasks.
Big tasks can feel overwhelming, but the checklist tab makes them manageable by breaking them down into smaller, actionable steps. Once you open the tab, you can create a list of subtasks, each with its own due date and assignee. This allows you to assign specific pieces of a larger task to different team members while maintaining clear deadlines for completion.
For example, when preparing an industry analysis, you can create subtasks for gathering analyst profiles, creating briefing materials, and scheduling sessions, all within the same task card. This structure keeps large tasks organized and ensures that each step is tracked and completed on time, making the entire process much smoother.
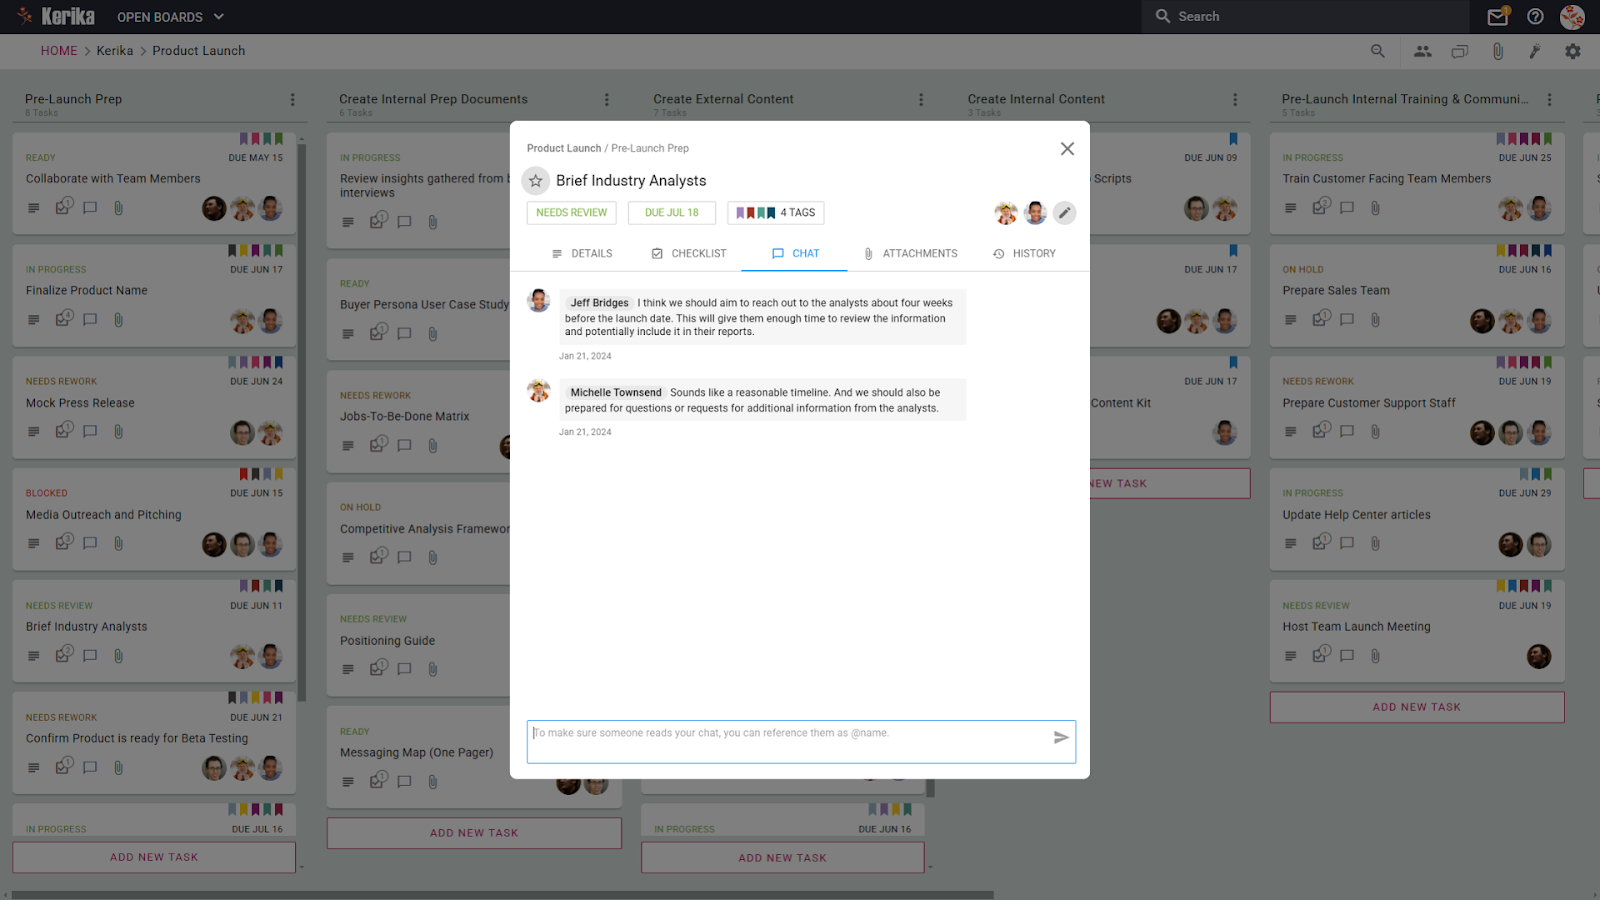
The chat tab is designed to make collaboration simple and focused by keeping task-specific conversations within the task card itself. Instead of using external communication tools or long email chains, team members can discuss the task directly, ensuring that all relevant comments, feedback, and updates stay in one place.
This feature is especially useful for tracking decisions or clarifying details without disrupting the workflow. For example, when discussing outreach timelines or deliverables, team members can quickly reference past messages without switching between tools. It streamlines communication, keeps everyone on the same page, and saves time by eliminating the need to search for important updates elsewhere.
The attachments tab is a game-changer when it comes to keeping all product launch materials, like press releases, product demos, or marketing assets, organized and accessible. Each task card can store its own relevant files, so your team always knows where to find what they need, whether it’s a competitive analysis document or a product announcement draft.
One of the most important features is the ability to update file versions directly within the card. Instead of confusing your team with multiple file versions like “press_release_v1” or “final_v3,” you can upload updated versions under the same attachment. This ensures that everyone is working with the most current files, preventing mix-ups and making collaboration more efficient during critical launch phases.
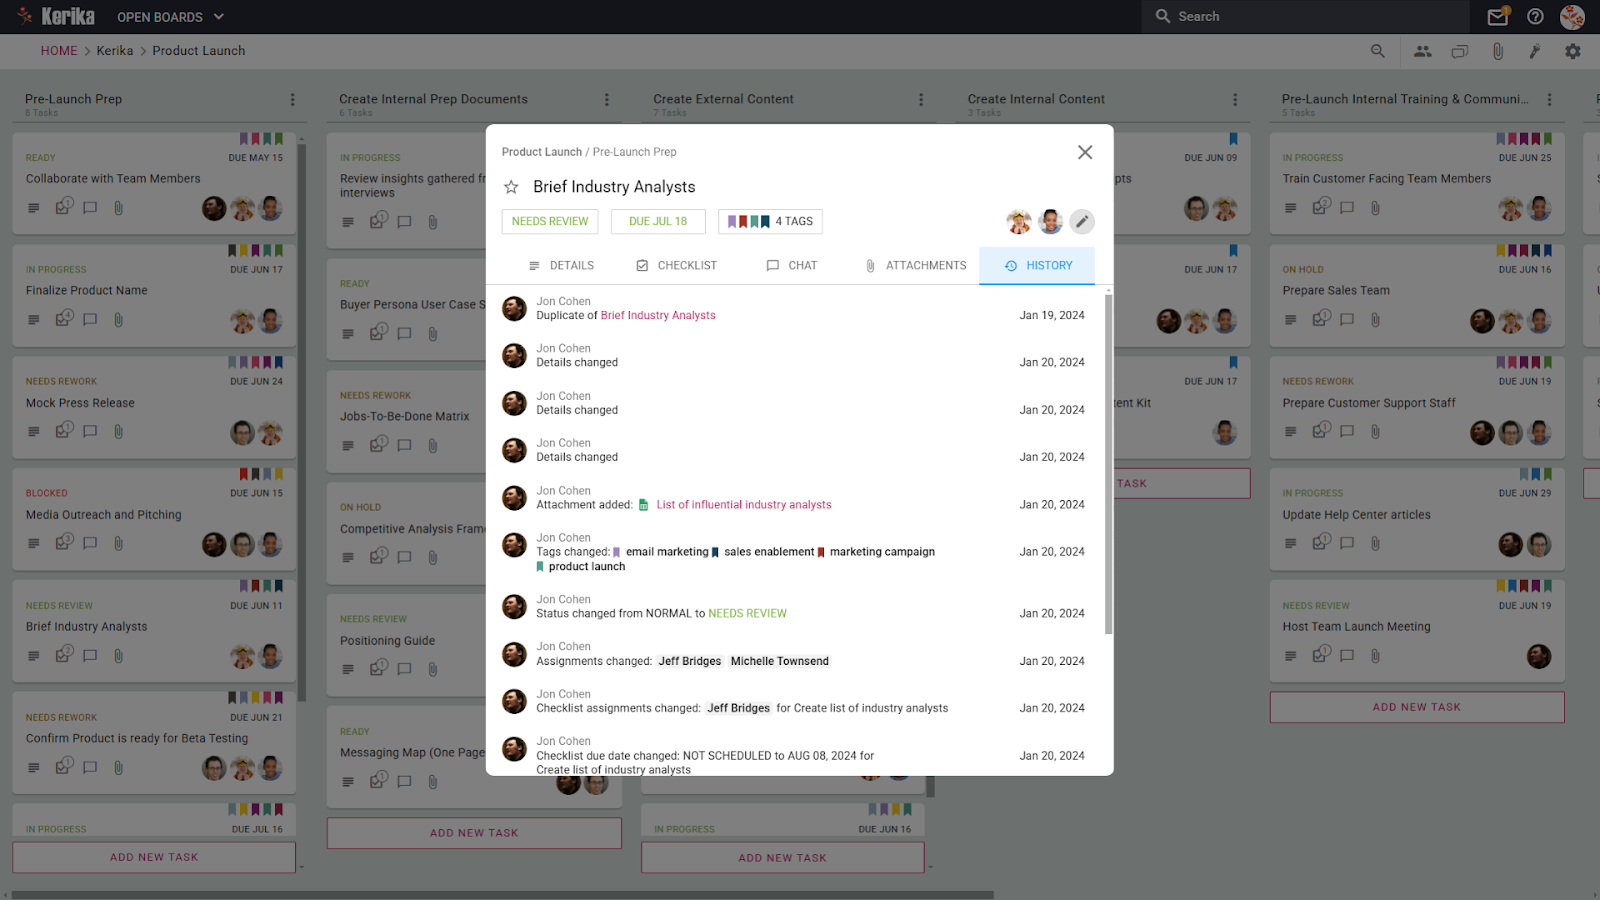
The history tab provides a detailed log of every change made to a task, ensuring that the entire team stays informed and accountable. Whether it’s a status update, file attachment, tag change, or assignment shift, everything is recorded in chronological order.
This feature is particularly valuable during a product launch when tasks and responsibilities evolve quickly. If a deadline changes or a new team member is assigned, anyone can easily trace back what happened and when. It eliminates confusion over who did what and helps teams resolve issues efficiently by reviewing past decisions and updates in one place. With this level of visibility, you can prevent miscommunication and keep the launch on track.
Conclusion: Set Your Product Launch Up for Success
A successful product launch is built on a foundation of careful planning, effective collaboration, and organized task management. Breaking down complex tasks, assigning responsibilities, and tracking progress ensures that nothing slips through the cracks. By using structured steps, from pre-launch prep to post-launch reviews, your team can work with clarity and confidence.
With the right tools and processes in place, you reduce the risk of delays, missed opportunities, and last-minute chaos. Instead, you create a streamlined path that aligns everyone toward a common goal, giving your product the best chance to make a strong and lasting impact.
Managing communication while working on projects can be a challenge. Inbox clutter, endless notifications, and the need to switch platforms just to reply can slow down your workflow. It’s a frustrating and time-consuming process.
The “Reply By Email to Chat” feature makes it possible to respond directly to chat notifications from your email. Just hit “Reply” in your email client, and your message syncs seamlessly with the corresponding chat – effortlessly keeping the conversation flowing and organized.
Here’s how this feature works for both task card chats and board-level chats, and why it can make collaboration smoother and more efficient.
When a conversation happens within a task card, email notifications include the chat history and task details. You can hit “Reply” in your email client, and your response will instantly appear in the chat section of the task card.
Board-level communication is equally seamless. Chat messages from the board chat are delivered to your email, and when you respond, your reply syncs back into the board chat for everyone to see. No logins required!
The Magic Behind “Reply By Email to Chat”
Stay in Context: Email notifications include the full conversation thread, linked directly to the relevant task or board. You can hit “Reply” in your email, and your message is automatically synced as a chat update, keeping everything connected and clear.
No Clutter, Just Clarity: Unnecessary email signatures, logos, and attachments are automatically removed, ensuring discussions remain clean, focused, and easy to follow.
Keep Everyone Aligned: Your email reply isn’t just logged—it’s instantly visible to all teammates with access to the task or board, ensuring that everyone stays updated and on the same page.
How Does it Help You
Save Time and Energy: Replying directly from your inbox means you skip the hassle of switching tabs or logging in, letting you focus on your work.
Keep Things Professional: Chats are clean and distraction-free, making it easier for your team to follow discussions and make decisions faster.
Perfect for Remote and Busy Teams: This feature ensures remote teams stay connected, and no update gets delayed, regardless of time zones.
How It Helps in Real Life
Tight Deadlines: Quickly provide updates or answer questions without pausing your workflow.
Collaborating Across Time Zones: Ensure remote teammates stay informed without requiring you to log into Kerika.
Simplifying Task Reviews: Add notes or feedback directly from your inbox, with everything tied to the correct task.
Why You’ll Love It
The “Reply By Email to Chat” feature keeps communication streamlined, organized, and accessible. It’s not just a time-saver, it simplifies collaboration, ensuring everyone stays connected and aligned without unnecessary effort or steps.
Conclusion
The “Reply By Email to Chat” feature transforms how teams communicate by making collaboration seamless and efficient. With the ability to reply directly from your inbox, every update stays organized, accessible, and tied to the right task or board. This approach not only saves time but also ensures clarity and alignment across your team, even when working remotely or under tight deadlines.
As part of our continued push to make Kerika easy to use and purchase from anywhere in the world, our new pricing system will allow customers to pay in any of these currencies:
USD – United States Dollar
AED – United Arab Emirates Dirham
AFN – Afghan Afghani
ALL – Albanian Lek
AMD – Armenian Dram
ANG – Netherlands Antillean Guilder
AOA – Angolan Kwanza
ARS – Argentine Peso
AUD – Australian Dollar
AWG – Aruban Florin
AZN – Azerbaijani Manat
BAM – Bosnia and Herzegovina Convertible Mark
BBD – Barbadian Dollar
BDT – Bangladeshi Taka
BGN – Bulgarian Lev
BIF – Burundian Franc
BMD – Bermudian Dollar
BND – Brunei Dollar
BOB – Bolivian Boliviano
BRL – Brazilian Real
BSD – Bahamian Dollar
BWP – Botswana Pula
BYN – Belarusian Ruble
BZD – Belize Dollar
CAD – Canadian Dollar
CDF – Congolese Franc
CHF – Swiss Franc
CLP – Chilean Peso
CNY – Chinese Yuan Renminbi
COP – Colombian Peso
CRC – Costa Rican Colón
CVE – Cape Verdean Escudo
CZK – Czech Koruna
DJF – Djiboutian Franc
DKK – Danish Krone
DOP – Dominican Peso
DZD – Algerian Dinar
EGP – Egyptian Pound
ETB – Ethiopian Birr
EUR – Euro
FJD – Fijian Dollar
FKP – Falkland Islands Pound
GBP – British Pound Sterling
GEL – Georgian Lari
GIP – Gibraltar Pound
GMD – Gambian Dalasi
GNF – Guinean Franc
GTQ – Guatemalan Quetzal
GYD – Guyanese Dollar
HKD – Hong Kong Dollar
HNL – Honduran Lempira
HTG – Haitian Gourde
HUF – Hungarian Forint
IDR – Indonesian Rupiah
ILS – Israeli New Shekel
INR – Indian Rupee
ISK – Icelandic Króna
JMD – Jamaican Dollar
JPY – Japanese Yen
KES – Kenyan Shilling
KGS – Kyrgyzstani Som
KHR – Cambodian Riel
KMF – Comorian Franc
KRW – South Korean Won
KYD – Cayman Islands Dollar
KZT – Kazakhstani Tenge
LAK – Lao Kip
LBP – Lebanese Pound
LKR – Sri Lankan Rupee
LRD – Liberian Dollar
LSL – Lesotho Loti
MAD – Moroccan Dirham
MDL – Moldovan Leu
MGA – Malagasy Ariary
MKD – Macedonian Denar
MMK – Myanmar Kyat
MNT – Mongolian Tögrög
MOP – Macanese Pataca
MUR – Mauritian Rupee
MVR – Maldivian Rufiyaa
MWK – Malawian Kwacha
MXN – Mexican Peso
MYR – Malaysian Ringgit
MZN – Mozambican Metical
NAD – Namibian Dollar
NGN – Nigerian Naira
NIO – Nicaraguan Córdoba
NOK – Norwegian Krone
NPR – Nepalese Rupee
NZD – New Zealand Dollar
PAB – Panamanian Balboa
PEN – Peruvian Sol
PGK – Papua New Guinean Kina
PHP – Philippine Peso
PKR – Pakistani Rupee
PLN – Polish Złoty
PYG – Paraguayan Guaraní
QAR – Qatari Riyal
RON – Romanian Leu
RSD – Serbian Dinar
RUB – Russian Ruble
RWF – Rwandan Franc
SAR – Saudi Riyal
SBD – Solomon Islands Dollar
SCR – Seychellois Rupee
SEK – Swedish Krona
SGD – Singapore Dollar
SHP – Saint Helena Pound
SLE – Sierra Leonean Leone
SOS – Somali Shilling
SRD – Surinamese Dollar
STD – São Tomé and Príncipe Dobra (pre-2018, replaced by STN)
SZL – Eswatini Lilangeni
THB – Thai Baht
TJS – Tajikistani Somoni
TOP – Tongan Paʻanga
TRY – Turkish Lira
TTD – Trinidad and Tobago Dollar
TWD – New Taiwan Dollar
TZS – Tanzanian Shilling
UAH – Ukrainian Hryvnia
UGX – Ugandan Shilling
UYU – Uruguayan Peso
UZS – Uzbekistani Soʻm
VND – Vietnamese Đồng
VUV – Vanuatu Vatu
WST – Samoan Tala
XAF – Central African CFA Franc
XCD – East Caribbean Dollar
XCG – (Not a standard currency code; may need clarification)
XOF – West African CFA Franc
XPF – CFP Franc (used in French Pacific territories)
YER – Yemeni Rial
ZAR – South African Rand
ZMW – Zambian Kwacha
This will make it easy for folks in many countries who would otherwise have no reason to make dollar-based purchases (or may not even have a credit card that allows them to make purchases in any currency other than their native currency!)
If you are from a country that’s not listed above, the default way to pay will be in USD – United States Dollars.
Our old pricing hadn’t changed in over 10 years, and no longer reflected the value of our product, nor the fact that we now have more users outside the United States than within.
It was time, therefore, for us to update our pricing model in every respect! In this blog post we summarize all the changes, and in the sections below you will find links to other blog posts and website pages that discuss each item in more detail:
Lower prices for most countries
We had just one price for the last 10 years: $7 per Account Team Member, paid annually. While this was actually low for the United States market, it posed challenges for folks from countries with less developed economies and lower purchasing power.
We are making Kerika more affordable for users from outside the United States: while the new pricing for the Professional Plan for US-based customers is $9 per user monthly, or $90 annually, customers from nearly every other country can purchase subscriptions at a lower rate. This means customers from countries with smaller economies can purchase the same Kerika subscriptions as customers from richer economies, at a significantly discounted price.
This will be reflected when you visit the Kerika website’s pricing page, and when you look at the the available plans from inside the Kerika app. The pricing shown will be the discounted amount, and it will be in your local currency. Users from India, for example, will see the Professional Plan priced at ₹ 200 monthly / ₹ 2,000 annually.
The Business Plan for US-based customers will be $13 per user monthly, or $130 annually.
Pay in your own currency
Along with lower prices outside the United States we are also enabling our customers to pay in a variety of currencies — 135 currencies in all.
This will make it easier for people in different countries, who may find it difficult to make purchases in US Dollars, to buy Kerika subscriptions.
Users who are new to any online service may hesitate to buy annual subscriptions before they are fully familiar with that service. The natural preference for new customers would be to make a smaller cash commitment at first, by buying monthly subscriptions. We are making that easy.
You can now buy either Monthly or Annual Subscriptions (not a mix of both).
Annual subscriptions are priced at 10x the monthly rate, so if you are planning to use Kerika for more than 10 months it will be cheaper for you to get annual subscriptions.
But if you are a new customer and feeling hesitant about making that commitment to Kerika, you now have a very easy way to continue using Kerika after your 30-day Free Trial is over: just buy monthly subscriptions for a few months, and then switch over to annual subscriptions for the cost savings after you are convinced of Kerika’s benefits for your team’s productivity.
30-day Money Back Guarantee
And to make it even easier for new customers to confidently buy Annual Subscriptions, we are now offering a very simple 30-day Money Back Guarantee!
If you change your mind within 30 days of buying Annual Subscriptions, for any reason at all, you can ask for a full, cash refund of your purchase.
Now you don’t have to worry about whether you are making a mistake when you click on the Buy button!
Our old system of calculating and managing refunds was a real pain for us: it created complexity in our billing system, and that complexity, in turn, created a bunch of bugs that hurt our customers and us alike.
We are now moving to a simpler system: if you decide to cancel subscriptions you will get pro rata credit in your Kerika account which you can use for future purchases. The credits won’t expire and can’t be cashed out: they can be used only for future purchases.
The old Academic & Nonprofit Plan allowed for Account Teams of up to 10 people to use Kerika free. This was always cumbersome to administer, led itself to abuse (unfortunately), and didn’t help all schools, universities, and nonprofits.
The Academic & Nonprofit Plan will now work as a simple discount of 50%: if you qualify, you will be able to buy any plan at half-price, and there will not longer be a limit on how large your Account Team can be. This new Plan makes it easier for larger organizations to adopt the use of Kerika across the entire organization.
We used to offer the option of requesting an invoice that could be paid by bank cheque or direct deposit, but this option was unfortunately abused by a surprising number of users who would request invoices, ignore paying them, and ignore our emails reminding them about the outstanding invoices!
With our new system the option to make offline purchases (i.e. request an invoice) will be available to select customers only. Some of our older customers have been using the offline method for years because that’s the only way that they could make purchases — a common situation for folks working in government or very large companies that insist on invoices being submitted and processed through their Accounts Payable departments.
For these older customers, the offline method will continue to be available, but it will be strictly enforced: if invoices aren’t paid on time, the associated subscriptions will be cancelled.
If you are a new customer that needs the offline method, please contact us!
Easier to replace users within an Account
With the new pricing system it will be easier for our customers to replace one user with another without having to deal with additional charges, providing the removal of the old user and the addition of the new user takes place within the same day.
If a user is removed from an Account Team and another added within the same day, the system will not generate any billing transactions.
More Details in your Billing History Screen
The Billing History screen, which you can access by clicking on the Manage Account option in the menu that appears when you click on your avatar at the top-right of the desktop app, will contain more information about changes made, such as turning auto-renewal ON/OFF, adding people etc.
This should help our customers understand better how their billing has changed over time.
A Smooth Transition
This is perhaps the most important part of all: if you are already a Kerika customer, for any Plan, your Plan will continue as before until the end of it’s term.
If you had previously purchased at $ 84 / user, and the price for your region is now $ 90, you don’t have to make any additional payment right now: instead, when your Plan’s term if over, the new rates will go into effect.
Similarly, if you had the old Academic & Nonprofit Plan, that will continue until the end of the current term. When that term expires you will need to purchase either the Professional or Business Plan, but you will automatically be eligible for the Nonprofit Discount.
Any Questions or Concerns?
We realize pricing changes can always be a little unsettling for some users, no matter how much care is taken in designing the new model, and we would be happy to help you with your questions and to listen to your concerns. Contact us!
In an age of constant connectivity, where digital notifications and information streams are endless, productivity is harder to maintain than ever. This Pew Research Center study highlights how information overload affects our ability to prioritize tasks and make decisions effectively, leading to increased stress and diminished productivity. Many of us face the same challenges: forgotten deadlines, half-finished projects, and that paralyzing sense of overwhelm when juggling too many priorities.
The Getting Things Done (GTD) method has emerged as a game-changer for those seeking clarity and control over their tasks. But implementing it successfully isn’t always straightforward. This guide will walk you through practical steps to fully embrace the GTD method, avoid common pitfalls, and give you proper tools to execute your workflow. Let’s dive in and get things moving efficiently!
Essential Steps to Mastering Productivity and Getting Things Done
Achieving productivity doesn’t happen by chance, it’s the result of a deliberate, well-structured approach. Let’s explore the essential steps to help you organize your tasks, prioritize effectively, and turn intentions into tangible outcomes.
Step 1: Capture Everything in a Trusted System
The GTD method begins with capturing every idea, task, or commitment in a reliable system outside of your brain. The goal is to free your mind from the burden of remembering everything while ensuring nothing important slips through the cracks. This is crucial because mental overload significantly impairs productivity (Mayer & Moreno, 2003)
Create an inbox or central location where you can immediately jot down tasks as they arise. Whether it’s a digital tool, a notebook, or both, the key is consistency in capturing every to-do.
Watch Out For: Relying on memory instead of documenting tasks. Studies show that mental overload impairs productivity, so make capturing a habit you don’t skip.
Step 2: Clarify and Categorize Tasks
Once you’ve captured tasks, clarify what each item means and what actions are required. Not every task needs immediate attention, some may require delegation, scheduling, or simply discarding.
Ask yourself, “Is this actionable now?” If yes, define the next step. If not, categorize it under “Someday/Maybe,” “Reference,” or “Waiting For.” This process prevents clutter and keeps your list actionable.
Watch Out For: Vague or unclear tasks, like “Prepare report.” Be specific about next actions, “Draft outline of report” provides clarity and momentum.
Step 3: Organize Tasks Based on Context and Priority
Organizing tasks by priority and context ensures you can access the right tasks at the right time. Tasks can be grouped by project, deadline, or environment (e.g., tasks for meetings or errands).
Use categories such as “Urgent,” “Important,” and “Delegated” to make decision-making easier. Consider the Eisenhower Matrix to distinguish between urgent and important tasks.
Watch Out For: Overloading high-priority categories. If everything is labeled urgent, you risk decision fatigue and feeling overwhelmed.
Step 4: Schedule Time for Review and Planning
Regularly reviewing your task list ensures you stay on top of commitments and can adjust plans as needed. The weekly review, a core element of GTD, lets you reflect on what’s completed, pending, or no longer relevant.
Dedicate time each week to review upcoming deadlines, unfinished tasks, and long-term projects. Use this session to clean up your system and refocus on what matters.
Watch Out For: Skipping reviews due to a busy schedule. Without regular reviews, your task list may become outdated or overwhelming.
Step 5: Break Down Complex Tasks Into Manageable Steps
Large tasks or projects can be intimidating, leading to procrastination. Breaking them down into smaller, achievable steps provides clarity and keeps you moving forward.
For any project, identify the first actionable step, such as “Schedule kickoff meeting” or “Gather research materials.” As you complete smaller tasks, you’ll build momentum toward completing the larger goal.
Watch Out For: Underestimating the time required for sub-tasks. When planning, allocate buffer time to account for unexpected delays.
Step 6: Minimize Distractions and Batch Similar Tasks
Distractions can derail productivity, while context-switching between tasks decreases efficiency. Minimizing interruptions and batching tasks that require similar focus is crucial.
Schedule deep work sessions for high-concentration tasks and group similar activities, like answering emails or making phone calls, into designated time blocks.
Watch Out For: Overloading your day with tasks requiring intense focus without breaks. Fatigue can lead to burnout, so schedule downtime.
Step 7: Reflect and Refine Your System
Productivity is an evolving process. What works today may not work tomorrow, so regular reflection is essential. Identifying what’s effective and where improvements are needed will ensure your system remains flexible and relevant.
At the end of each week or month, assess what’s working. Adjust categories, modify task priorities, or experiment with new techniques if needed.
Watch Out For: Sticking rigidly to a system that no longer fits your workflow. Adaptability is key to long-term productivity.
Mastering productivity with the GTD method begins with capturing tasks, clarifying priorities, and regularly reviewing progress. With these steps in place, let’s explore how the right tools can streamline your workflow, enhance collaboration, and keep you on track.
Using The Right Tools
To successfully get things done, having a clear system is key. This kanban board is a perfect example of how to stay on top of tasks without feeling overwhelmed. Everything is neatly organized into different stages, making it easy to know what’s coming up, what’s in progress, and what’s done. No guesswork, no forgotten tasks.
Why does this setup work so well? First, it’s simple. Tasks aren’t just scattered across notebooks or apps. They are placed where they belong, ready to be tackled with clear priorities and due dates. It reflects what we covered earlier: capturing tasks, clarifying them, and knowing exactly what needs to happen next. You can see tasks that need review, upcoming deadlines, and the progress made so far. That’s exactly how you avoid the mental clutter we discussed earlier.
Second, the layout helps you focus on what really matters. By visually seeing tasks at different stages, you can quickly spot what needs immediate attention. Missed deadlines? Easily identified and corrected. Overdue tasks? Right there, waiting to be rescheduled or updated.
Finally, collaboration becomes smoother. Team members know what they’re working on without needing long email threads or constant status updates. Everything is available, from feedback to files, keeping progress steady and eliminating confusion.
In short, this board works because it simplifies the complex. It puts everything you need in one place, making sure no task falls through the cracks, and lets you focus on moving things forward. Ready to dive deeper into how you can make this work for you? Let’s break it down step by step.
Take a Closer Look at This Task Board
This task board is designed to simplify that chaos by giving teams a clear visual overview of what needs to be done, what’s in progress, and what’s already completed. It acts as a central hub where tasks, deadlines, files, and updates are all in one place, making sure nothing falls through the cracks.
The purpose of this board is to help teams stay organized, prioritize tasks effectively, and collaborate seamlessly without constantly searching for updates or juggling scattered to-do lists. In this section, we’ll break down key features of the board, showing you how they can boost productivity and help you successfully get things done.
Without a proper system, it’s easy to forget important tasks or feel overwhelmed by the scope of a project. Task cards solve this by making sure every action is clearly defined and tracked. As shown in the image, the card for “Review and organize notes from yesterday’s meeting” includes detailed instructions, action points, and categories.
This level of detail reduces confusion and eliminates the back-and-forth of clarifying instructions, letting teams dive into the work confidently. By keeping everything in one place, it ensures smoother handoffs, quicker updates, and better results.
Without a clear workflow, tasks can get stuck, deadlines may be missed, and teams may lose track of progress. Managing columns solves this by creating a step-by-step visual process where tasks move fluidly through different stages.
As seen in the image, you can rename columns, sort tasks, or even move entire columns if priorities shift. This flexibility ensures that you can adapt the board as the project evolves, making sure no task is left behind or forgotten. The result is a smoother, more visible workflow that keeps everyone on the same page.
When managing multiple tasks, it’s easy to get bogged down by too many details or struggle to locate specific tasks quickly. The zoom-out feature solves this by stripping away the extra information and providing a clean, uncluttered view of all tasks across the board.
You can easily spot tasks by name, check progress across different stages, and identify what needs attention without scrolling or getting distracted by additional details. This helps you stay efficient and maintain focus when you’re short on time or need a quick update.
When teams lack clarity about their roles or responsibilities, it can lead to missed deadlines, confusion, or duplicated efforts. This feature solves that by clearly defining roles such as Board Admin, Team Member, or Visitor. As shown in the image, admins can manage tasks and permissions, team members can collaborate and update progress, and visitors can view updates without making changes.
This structure ensures smoother collaboration and keeps sensitive information secure while holding team members accountable for their respective tasks.
Without a dedicated space for team-wide discussions, general updates can get buried in email threads or scattered across various platforms. This feature solves that by centralizing conversations that are relevant to everyone, such as project milestones, feedback, or announcements.
Unlike task-specific chats, board chat lets you address the entire team all at once, ensuring everyone stays informed without the need to check multiple places. It keeps general discussions organized and prevents important updates from being missed.
When important files are scattered across emails or different storage platforms, teams can waste valuable time searching for what they need. This feature eliminates that issue by providing a central location where everyone can access shared files, whether it’s reports, spreadsheets, presentations, or links to online resources.
Unlike attachments in individual task cards, these files are available for the entire team to reference whenever needed. It promotes smoother collaboration by ensuring that key documents, such as project guidelines or meeting notes, are always within reach, saving time and avoiding confusion.
When managing multiple tasks, finding the right one can be time-consuming, especially when deadlines, priorities, and responsibilities overlap. This feature solves that by letting you filter tasks based on criteria such as due date, priority, assigned team member, or status. For example, you can instantly highlight overdue tasks or those marked as high priority.
As shown in the image, you have complete flexibility to customize the filters and zero in on tasks needing immediate action. This keeps the team efficient, helps prevent bottlenecks, and ensures nothing important is overlooked.
The board settings give you the flexibility to customize the board according to your project’s needs, helping you manage everything from privacy to task organization.
Here’s a closer look at the key options available:
Overview: Provides a snapshot of the current status, showing completed tasks, overdue items, and tasks due soon. This summary keeps you updated on progress without needing to open individual task cards.
Privacy Settings: Control who can access the board by restricting access to team members or sharing it via a link. This ensures sensitive projects stay secure.
Work-in-Progress (WIP) Limits: Set limits on the number of tasks allowed in each column to prevent overload and maintain an efficient workflow.
Auto-Numbering of Tasks: Automatically assigns numbers to tasks, making it easy to reference them during discussions or progress reviews.
Tags Management: Create and manage tags to categorize tasks. Tags help filter and prioritize items, allowing you to quickly locate tasks related to specific themes or requirements.
Column Management: Add, edit, or rearrange columns to reflect changes in the project workflow. This feature ensures flexibility when adjusting to new tasks or phases.
Export and Archive Options: Export the entire board into an Excel file for external reporting, or archive completed boards to preserve project history.
These settings give you the tools to tailor the board to your team’s specific requirements while keeping everything organized, secure, and adaptable to change.
With the board fully set up and organized, it’s time to focus on the core of any successful project: the tasks themselves. Let’s explore how breaking down tasks into manageable steps using task cards can help you maintain clarity, boost collaboration, and ensure steady progress.
Break Down Tasks Into Manageable Steps
Task cards serve as the backbone of any project by transforming large, overwhelming goals into smaller, actionable steps.
Let’s explore the key features within task cards and how they help teams maintain focus and organization.
When you open a task card, the first thing you’ll notice is its clean, structured layout that presents essential details without overwhelming you.
Here’s why it matters:
Task Details: The core description of the task, including what needs to be done and any important context. This section ensures that team members understand the task from the start and know exactly what’s expected.
Assign Task: Quickly identify who is responsible for the task or add team members to collaborate. Assigning tasks upfront ensures accountability and avoids confusion about ownership.
Task Status: The current status, such as “Needs Review” or “In Progress,” keeps everyone updated on where the task stands. This feature helps maintain smooth workflows and prevents tasks from stalling.
Due Date: The set deadline is clearly displayed, ensuring that tasks are prioritized correctly and progress is aligned with project timelines. This feature reduces the risk of overdue or forgotten tasks.
Tags: Tags allow for easy categorization, helping you organize tasks by themes like “action items,” “documentation,” or “follow-up.” This makes it easier to filter tasks later and focus on specific priorities.
2. Checklist Tab: Breaking Down Tasks into Actionable Steps
The Checklist tab is designed to help you break down large tasks into smaller, more manageable actions. Instead of treating complex tasks as a single item, this feature allows you to divide them into subtasks that can be tracked individually, ensuring steady progress and reducing the risk of oversight.
Key Benefits:
Breaking Down Big Tasks: For tasks that involve multiple steps, the checklist ensures that no step is overlooked. For example, in the image, the item “Summarize Decisions” is part of a larger review task but is treated as a separate action to ensure completion.
Setting Deadlines: You can assign specific due dates for each checklist item, ensuring that subtasks are completed on time and do not delay the overall project. In this example, a due date of February 13 has been set to keep the process on schedule.
Assigning Subtasks: The checklist also allows you to assign individual subtasks to specific team members. This feature promotes accountability by making sure that everyone knows their role and prevents confusion about who is responsible for each step.
3. Attachments Tab: Centralized Access to Task-Specific Resources
The Attachments tab allows you to attach important documents directly to the task card, providing a centralized place for task-specific files, links, or newly created documents. This feature ensures that team members have all the resources they need without switching between multiple apps or platforms.
Key Benefits:
Quick Access to Relevant Files: Instead of searching through emails or cloud drives, team members can find everything related to the task in one place. This saves time and boosts productivity.
Create Documents Directly: The feature also allows you to create Google Docs, Sheets, Slides, Forms, or even project-specific documents without leaving the task card. This makes it easy to document progress or collaborate on updates.
Support for Multiple File Types: Whether it’s meeting notes, reports, or design mockups, the Attachments tab accommodates different file types and links, making sure no information is left out.
Easily Update Files Without Confusion: You can upload new versions of a file without deleting the old one. Just hit the upload button, and the updated version will be added seamlessly. This saves you from the confusion of managing versions like v1, v2, or v3.
4. Task History: Track Every Change with Precision
The History tab keeps a detailed log of every action taken on the task, providing a full record of changes, updates, and progress. From status changes to file attachments and assigned members, everything is recorded to maintain transparency.
Key Benefits:
Transparency: Everyone on the team can see who made changes, what was updated, and when it happened, ensuring that no action goes unnoticed.
Accountability: If questions arise about task progress or decisions, the history offers a reliable reference point.
Version Tracking: Whether it’s changes to deadlines, updated task assignments, or added documents, the log ensures that previous actions can be reviewed at any time.
Conclusion: The Key to Getting Things Done
Effective task management is more than just completing checklists, it’s about creating a well-structured process where planning, collaboration, and accountability work hand in hand. Breaking down tasks, assigning responsibilities, setting deadlines, and tracking progress through a visual system ensures that nothing is missed and everyone stays on the same page.
With the right approach and tools, you can overcome information overload, streamline your workflow, and achieve your goals without stress. By combining structured planning and collaboration, you give your team the clarity and direction they need to turn even the most complex projects into success stories.
Managing complex assignments can often feel like a juggling act. Limited customization, rigid layouts, and repetitive shuffling of tasks can make the process more tedious than it needs to be.
A well-designed Actions Menu can give you the flexibility to tailor your task board to your unique workflow. From rearranging and renaming columns to moving tasks and sorting them by priority, due dates, or assignments, these features can simplify even the most complex projects.
Ready to take full control of your workflow? Let’s explore how the Actions Menu can help you streamline your tasks and boards with ease.
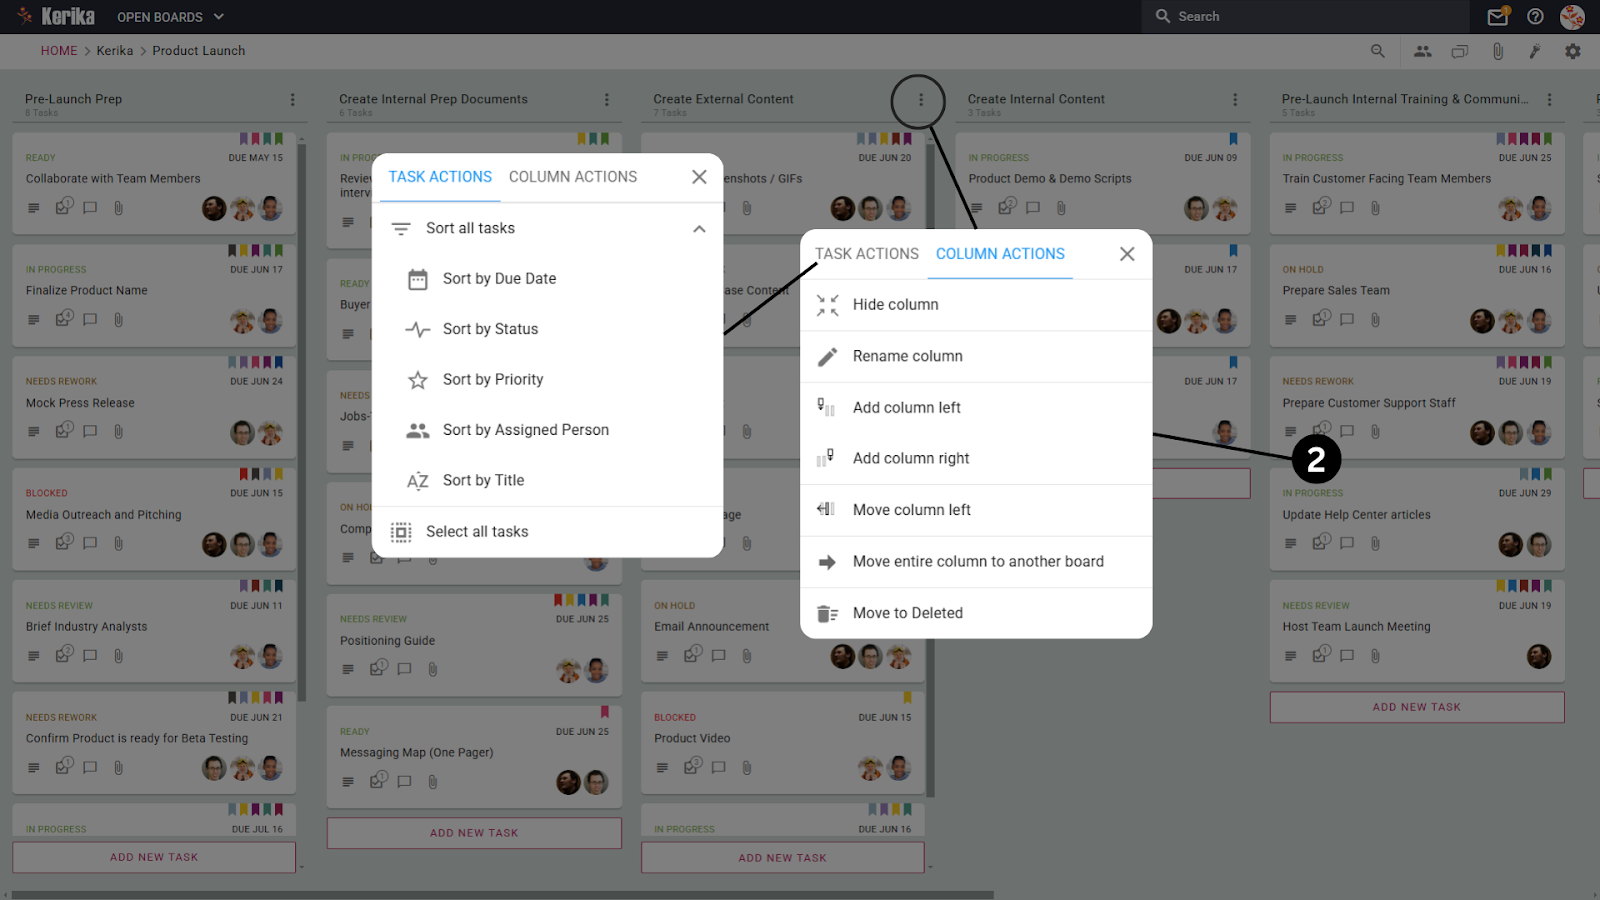
What is the Column Actions Menu?
The Column Actions menu is a gateway for organizing and customizing your task boards. Accessible through the three-dot menu at the top of each column, it provides a range of options to modify and manage your board layout.
Key Features:
Add Columns: Insert new columns to refine your workflow.
Move Columns: Rearrange columns to match your project’s priorities.
Rename or Hide Columns: Keep your board visually tidy by renaming or temporarily hiding sections.
Transfer Columns Across Boards: Seamlessly migrate an entire column to a new board without losing any tasks.
The Task Actions Menu: Sorting Made Simple
Alongside the Column Actions menu, the Task Actions menu helps you manage tasks efficiently within a column.
Sorting Tasks:
The Sort All Tasks option allows you to organize tasks effortlessly based on the following:
Sort by Due Date: Prioritize tasks with approaching deadlines.
Sort by Status: Group tasks by progress stages (e.g., In Progress, Completed).
Sort by Priority: Highlight high-priority tasks so nothing critical gets missed.
Sort by Assigned Person: Organize tasks by assignees for better clarity on responsibilities.
Sort by Title: Alphabetically sort tasks for quick referencing.
Select All Tasks:
Need to take action on multiple tasks at once? Use the Select All Tasks feature to apply bulk changes efficiently.
Why You’ll Love These Features
Improved Organization: Customize your task board to fit your exact project requirements, whether you’re managing a marketing campaign or a software development sprint.
Enhanced Flexibility: As projects evolve, so can your board. Adjust columns and tasks dynamically without disrupting your workflow.
Streamlined Task Management: Combine column actions with task sorting and bulk selection for a perfectly organized board.
Sort Within Columns: Use Task Actions to align tasks by priority or deadlines for better clarity.
Experiment with Layouts: Don’t let your board stagnate – keep updating column arrangements as your team’s needs change.
Wrap-Up
The Column Actions and Task Actions features give you the tools to adapt and optimize your workflow effortlessly. Whether you’re adding a column, sorting tasks, or moving a column to another board, these options let you tailor your board to suit your needs.
Fundraising is the lifeline of countless initiatives, from non-profits tackling global challenges to startups on the brink of groundbreaking innovations. A successful campaign isn’t just about raising funds; it’s about forging meaningful connections, earning trust, and delivering value to both donors and beneficiaries.
Without a clear planning, handling donor relationships, managing timelines, and coordinating team efforts can quickly spiral into chaos. Missed follow-ups, misaligned goals, and scattered data are common hurdles that can turn even the most promising campaigns into overwhelming tasks.
In this guide, we’ll show you how to organize your campaign efficiently, address potential obstacles, and stay on track every step of the way. With practical tips and structured management techniques, you’ll have everything you need to drive a successful campaign from start to finish.
So let’s start with practical steps that will help you and your team stay focused, hit milestones, and keep campaigns on track.
Essential Steps For Executing a Successful Fundraising Campaign
Executing a successful fundraising campaign involves meticulous planning, strategic execution, and continuous evaluation. Below are essential steps to guide you through the process:
1. Define Clear Objectives
Start by establishing specific, measurable, achievable, relevant, and time-bound (SMART) goals for your campaign. Determine what you aim to achieve, whether it’s funding a particular project, expanding services, or covering operational costs. Clear objectives provide direction and a benchmark for success.
According to Smart Insights, applying the SMART framework to your marketing objectives ensures they are well-defined and achievable, leading to more effective campaigns.
Watch Out For: Ambiguity in goals or shifting priorities that can make it difficult to track progress.
2. Assemble a Dedicated Team
Form a committee comprising staff, volunteers, and stakeholders who are passionate about your cause. Assign roles based on individual strengths, such as donor outreach, event planning, or marketing. A committed team ensures tasks are managed efficiently and fosters a sense of shared purpose.
Watch Out For: Team members feeling overwhelmed or confused about their responsibilities, which can lead to delays or missed deadlines.
3. Conduct a Feasibility Study
Before launching, assess the viability of your campaign. According to CampaignCounsel.org, conducting a feasibility study is crucial for determining the potential success of a large-scale fundraising initiative. It helps organizations gauge donor interest, assess community support, and set achievable campaign goals
Watch Out For: Gaps in research that can lead to overly ambitious targets or under-prepared teams.
4. Develop a Comprehensive Plan
Create a detailed roadmap outlining strategies, timelines, and resources needed. Incorporate various fundraising methods, such as events, online campaigns, and grant applications. A well-structured plan serves as a blueprint, guiding your team through each phase of the campaign.
Watch Out For: Over-reliance on static plans that don’t account for unexpected changes.
5. Craft a Compelling Narrative
Tell a story that resonates with potential donors. Highlight the problem, your solution, and the impact of their contribution. Emotional and relatable narratives can significantly enhance donor engagement and motivation.
Watch Out For: Inconsistent messaging across different platforms, which could weaken engagement.
6. Identify and Segment Your Audience
Analyze your donor base to identify key segments, such as individuals, corporations, or foundations. Tailor your messaging and approach to each group’s interests and capacity to give. Personalized communication increases the likelihood of successful solicitations. As BonterraTech highlights, donor segmentation allows organizations to deliver tailored messages that resonate with donors, increasing engagement and long-term support.
Watch Out For: Relying on outdated donor data or failing to personalize outreach efforts.
7. Implement a Soft Launch
Begin with a soft launch targeting loyal supporters to build initial momentum. This phase allows you to gather feedback, address any issues, and create a sense of progress before the public launch. Early success can also leverage social proof to attract additional donors.
Watch Out For: Overlooking the importance of gathering early feedback, which can lead to unresolved issues during the public phase.
8. Utilize Multichannel Marketing
Promote your campaign across various platforms, including social media, email newsletters, and traditional media. Consistent messaging across channels maximizes reach and reinforces your campaign’s presence.
Watch Out For: Disconnected campaigns that fail to synchronize communications, potentially confusing or alienating donors.
9. Engage and Acknowledge Donors
Maintain open communication with donors throughout the campaign. Provide updates on progress, express gratitude, and demonstrate the impact of their contributions. Recognizing donors fosters loyalty and encourages future support.
Watch Out For: Lack of timely communication or generic follow-ups that don’t feel personal.
10. Monitor Progress and Adapt
Regularly review your campaign’s performance against set milestones. Use data analytics to assess which strategies are effective and which need adjustment. Being flexible and responsive ensures the campaign remains on track and goals are met.
Watch Out For: Teams sticking rigidly to initial plans, even when adjustments could yield better results.
Executing a successful fundraising campaign requires more than just following the right steps. Without proper coordination, tracking, and collaboration, even the most well-planned efforts can lose momentum. As your campaign progresses, donor outreach will grow, tasks will increase, deadlines may overlap, and maintaining clear communication with both donors and internal teams will be crucial.
This is why the right tools are essential. They help you manage donor relations, prioritize key activities, and monitor progress effectively. With these tools, you can streamline donor information, avoid missed opportunities, and make data-driven decisions that maximize your fundraising potential.
Using The Right Tools
With your campaign plan in place, the next step is ensuring that everything runs smoothly without the common issues we discussed. This is where a well-structured task management tool can make all the difference.
Take a look at this board. It’s an example of how teams can efficiently manage every stage of a fundraising campaign while staying organized and on track.
This board is an example of how teams can simplify complex fundraising campaigns. Tasks like event planning, donor follow-ups, and budget approvals are broken down into clear categories, making it easy to see what’s in progress, what needs immediate attention, and what’s completed.
When deadlines overlap or team members juggle multiple responsibilities, the board helps prioritize key fundraising activities, ensuring that no critical task is overlooked. The structure addresses common fundraising challenges by clearly assigning tasks related to donor outreach, proposal submissions, or campaign reviews.
Each team member knows exactly what they are responsible for, and collaboration becomes seamless. Instead of chasing updates or searching through emails for information, the entire team can view progress in real time and make necessary adjustments without confusion.
This doesn’t just help with meeting deadlines. It eliminates bottlenecks by making task statuses visible to everyone. let’s take a step further and explore how this board supports better decision-making and enables your team to adapt quickly to changes.
Take a Closer Look at This Fundraising Campaign Board
Let’s dive deeper into how this board helps teams manage every detail of a fundraising campaign while keeping tasks and goals in clear focus. The key to its effectiveness lies in its simplicity and ability to adapt as the campaign evolves. By visualizing progress, organizing tasks, and streamlining team collaboration, it helps teams stay on track and adjust quickly when needed.
Below, we’ll walk through each feature with examples to show how this board can make your fundraising campaign more efficient, productive, and stress-free.
1. Create Detailed Task Cards for Every Fundraising Activity
As shown in this task card, each activity is organized with essential details like objectives, team assignments, deadlines, and specific steps needed for completion. The card also integrates resources such as files, discussions, and updates, making it a central hub for everything related to the task.
These task cards improve fundraising efficiency by keeping all key information in one place, reducing confusion and the need for back-and-forth communication. Team members can work collaboratively, monitor progress, and stay on top of deadlines without wasting time searching for documents or updates across multiple platforms.
2. Customize Columns to Match Your Fundraising Workflow
In this board, you can see how each column is set up to represent different stages of the fundraising process, such as “Fundraising Ideas,” “Planning,” and “Active Campaigns.” With customizable settings, you can easily add, rename, or move columns, ensuring that the workflow adapts to your team’s unique needs.
These columns help streamline progress by clearly indicating where each task stands and what needs to happen next. Whether you’re brainstorming ideas or seeking approvals, organizing tasks by stages ensures that nothing gets stuck or forgotten.
This flexibility makes it easy to manage shifting priorities and maintain a smooth, efficient flow throughout the campaign.
3. Zoom Out to Scan and Find Tasks Quickly
The zoom-out option, shown in the image, hides task details and displays only the task names. This view is ideal for scanning the entire board at a glance and locating specific tasks without scrolling through extensive details. It’s particularly useful when you need a quick overview of what’s happening across multiple stages.
This helps you save time by making it easy to find tasks, check the progress, and identify any pending activities. Whether you’re tracking an approval or verifying the status of a campaign, this simplified view keeps everything accessible and easy to navigate.
4. Manage Team Members and Share Access
Here you can see the option to invite team members and assign roles such as Board Admin, Team Member, or Visitor. This feature ensures that everyone involved in the fundraising campaign has the right level of access based on their role, whether they are leading the campaign or providing occasional input.
By defining roles clearly, you avoid confusion and maintain control over sensitive information. Board Admins can manage tasks and team permissions, Team Members can collaborate and update progress, and Visitors can view progress without making changes. This structure ensures smooth collaboration and accountability while keeping your campaign secure and well-organized.
5. Use Board Chat for Team-Wide Discussions
The board chat feature is designed for general discussions that involve the entire team. Unlike task-specific chats, which focus on individual tasks, the board chat allows you to share updates, announcements, or feedback that everyone needs to see.
This feature helps keep general conversations separate from task-related details, reducing confusion and ensuring important updates are easy to find. Whether you’re sharing campaign milestones, addressing team-wide concerns, or brainstorming new ideas, board chat ensures the entire team stays in sync.
6. Share Files and Attachments Across the Whole Team
The board attachment option allows you to upload or link important documents, spreadsheets, presentations, or online resources that are useful for the entire team. This is useful for files are available to everyone and aren’t tied to specific tasks.
This feature ensures that essential documents, such as fundraising plans, donor lists, and campaign reports, are easily accessible to all team members in one place. It eliminates the need to search through different platforms, keeping the team informed and making collaboration smoother.
7. Highlight Tasks with Custom Filters
The highlight option allows you to quickly locate tasks using custom filters. You can filter by criteria such as assigned team member, task status, due date, priority, and tags. Whether you want to find overdue tasks or those marked as high priority, this feature helps you narrow down exactly what you’re looking for.
This option saves time by eliminating the need to manually search through tasks. Instead, you can instantly highlight items that need immediate attention, helping your team prioritize key tasks, address bottlenecks, and keep the fundraising campaign running smoothly.
8. Manage Board Settings for Full Control
The settings option provides a wide range of customization features that help you tailor the board to your specific fundraising needs. Here’s a closer look at what you can do:
Overview: Get a summary of the board’s current status, including the number of completed tasks, overdue items, and upcoming deadlines. This quick snapshot helps you monitor overall progress.
Privacy Settings: Control who can access the board by choosing between team-only access, account-wide access, or allowing access via a link.
Work-In-Progress (WIP) Limits: Limit the number of tasks allowed in each column to prevent overloading team members and ensure a manageable workload.
Tags Management: Create, edit, and organize tags to help categorize and prioritize tasks. Tags such as “Compliance” or “Finalization” allow for easy filtering.
Column Settings: Add or adjust columns to match your workflow. This flexibility lets you adapt as the fundraising campaign evolves, ensuring the board always reflects your current needs.
Auto-Numbering of Tasks: Enable this option to automatically assign task numbers, making it easier to reference specific tasks during discussions.
Export and Archive: Export the board data in Excel format for external reporting or archive the board once the campaign is complete to preserve all progress and discussions.
With the board fully set up and organized, let’s take a closer look at how task cards help you break down complex activities into manageable steps, ensuring that every part of your fundraising campaign moves forward smoothly.
Break Down Tasks Into Manageable Steps
In any fundraising campaign, breaking tasks into smaller, actionable steps is crucial to ensuring smooth execution and preventing important details from slipping through the cracks.
This demo board showcases how each task is carefully segmented for better collaboration and progress tracking.
Here’s how the team uses task cards to break down their work effectively:
Details Tab for Comprehensive Task Descriptions: The Details tab stores important information, such as the task’s objective, requirements, and background. This ensures team members have the context they need without repeatedly asking for clarifications.
Task Status for Progress Updates: Each task can be assigned a status, like In Progress, Needs Review, or Ready, making it easy to track progress and identify tasks that require attention.
Checklist Tab for Subtasks: Large tasks are split into smaller, manageable subtasks using the checklist feature. Each subtask can be checked off as completed, helping teams stay organized and track incremental progress.
Due Dates to Meet Deadlines: Due dates ensure that tasks remain on schedule, and visibility into upcoming deadlines allows teams to prioritize tasks and avoid delays.
Tags for Easy Categorization: Assigning tags like “Compliance” or “Donor Outreach” helps categorize tasks, making it simple to filter and find related tasks quickly.
Chat Tab for Task-Specific Discussions: All task-related discussions are kept in the chat tab, avoiding scattered communication across different platforms and making it easy to reference past conversations.
Task Assignments for Clear Ownership: By assigning tasks to specific team members, the board ensures accountability and clarity on who is responsible for each task, eliminating confusion.
Attachments Tab for Storing Files: Task-specific documents, donor lists, or event planning files can be attached directly within the task card, saving time otherwise spent searching through shared drives or emails.
By breaking tasks into actionable steps and keeping everything centralized, the team can work efficiently, track progress with ease, and ensure that each phase of the fundraising campaign is executed successfully.
Conclusion: Set Your Fundraising Campaign Up for Success
A well-structured fundraising campaign is about more than just meeting goals; it’s about creating a streamlined process that keeps your team focused, tasks organized, and milestones on track. By implementing the right strategies and using an effective system, you can avoid common pitfalls and maintain momentum throughout the campaign.
Whether you’re managing donor outreach, approvals, or events, having a centralized board with task management features ensures your team can collaborate efficiently, adapt to changes, and achieve your fundraising goals with confidence. With the right approach, your campaign can build lasting connections, secure vital funding, and drive meaningful impact.
Switching between projects in some tools can feel like a chore. Clicking through endless menus, searching for the right board, and trying to track what’s due can quickly become overwhelming. It’s a process that wastes time and drains your focus.
A better approach simplifies everything. Imagine seamlessly moving between projects, checking what’s due, catching up on updates, or focusing on your assigned tasks – all with just a click. No distractions, no hassle, just a smoother way to stay organized.
Want to see how this can transform your workflow? Let’s break it down step by step.
Seamless Project Switching:
Quick Steps to Get Started
Click the Open Boards button in the top menu.
Browse through your boards, neatly grouped by account or sorted into special views.
Pick the board you need, and you’re there – no extra steps, no confusion.
How The Options Work:
What’s Assigned to Me: Perfect for zeroing in on your to-dos.
What’s Due: Keep track of deadlines and tackle high-priority tasks first.
What’s New & Updated: Catch up on recent updates without digging through every board.
See Shared Boards at a Glance: Shared boards are grouped by accounts, making it easy to navigate projects shared with you by teammates, clients, or collaborators.
Why You’ll Love It
It Saves You Time: No more hunting around to find the right board. Jump straight into what matters.
It Keeps You Focused: With shortcuts like What’s Due, you can prioritize your day without feeling scattered.
It Simplifies Your Workflow: Switching between projects is so smooth, it feels effortless and natural.
How It Helps in Real-Life Scenarios
Juggling Multiple Teams: If you’re managing different teams, you can easily check their progress by hopping between their boards.
Starting Your Day Right: Use What’s Assigned to Me to kick off your day with a clear game plan.
Keeping Up with Changes: Need to catch up? Check What’s New & Updated and see all the latest changes at a glance.
Effortless Collaboration: Quickly access shared boards for seamless updates and collaboration with clients or other teams.
Wrap-Up
Seamless navigation tools make managing multiple projects and shared boards simple and efficient. Whether you’re tracking deadlines, catching up on updates, or diving into a shared workspace, everything you need stays organized and easily accessible.