At the request of a user, we have added the ability for you to include emoji in your chat:
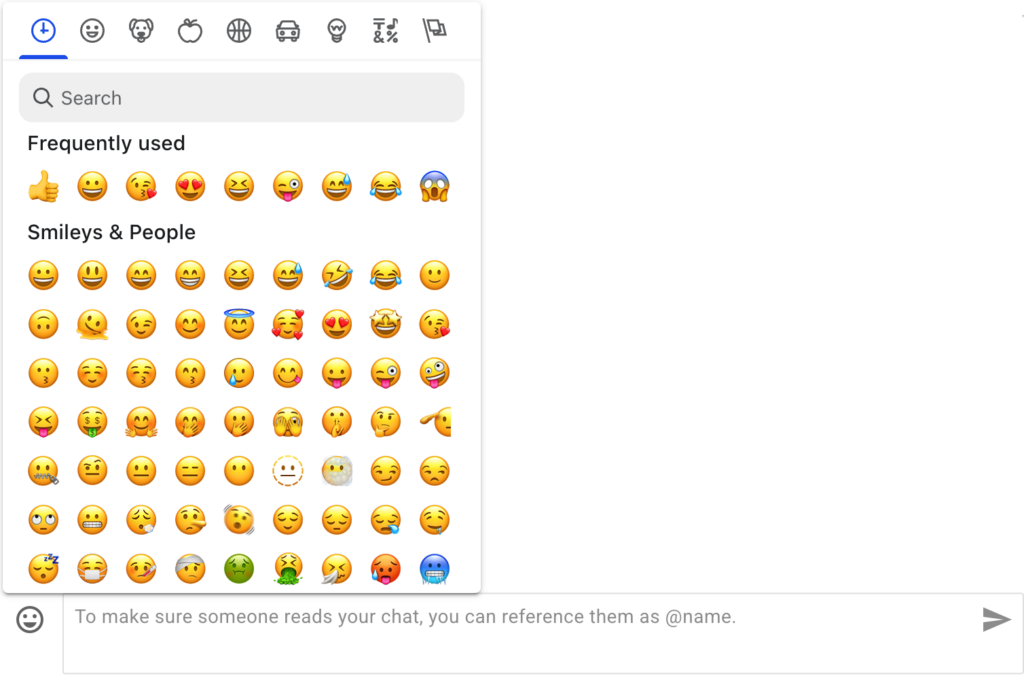
At the request of a user, we have added the ability for you to include emoji in your chat:
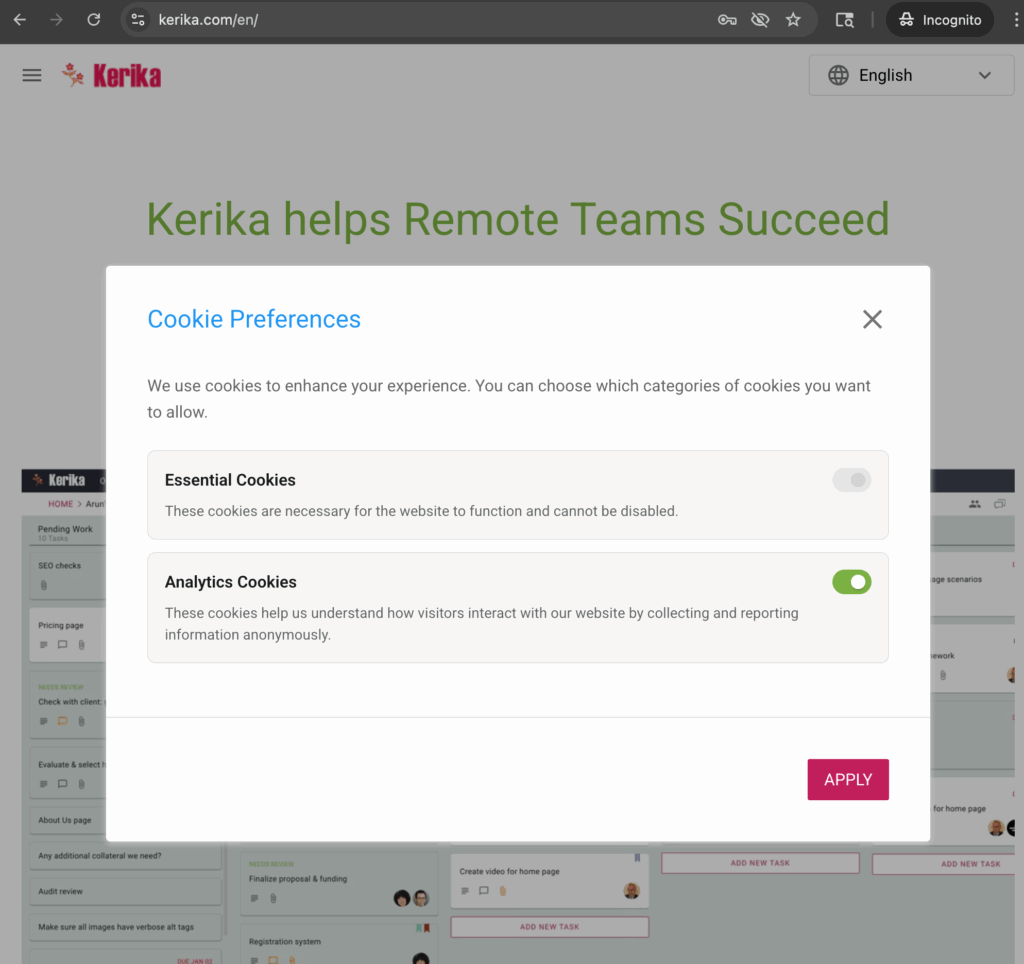
We have implemented a “cookie consent” pop-up dialog that appears to folks when they visit the kerika.com website:

There’s an option to manage which cookies you accept:
Harga lama kami tidak berubah selama lebih dari 10 tahun, dan tidak lagi mencerminkan nilai produk kami, mahupun hakikat bahawa kini kami mempunyai lebih ramai pengguna di luar Amerika Syarikat berbanding di dalam.
Oleh itu, sudah tiba masanya untuk kami mengemas kini model harga kami secara menyeluruh! Dalam catatan blog ini, kami akan merangkum semua perubahan, dan dalam bahagian di bawah, anda akan menemui pautan ke catatan blog dan halaman laman web lain yang membincangkan setiap perkara dengan lebih terperinci:
Selama 10 tahun yang lalu, kami hanya mempunyai satu harga: $7 bagi setiap Ahli Pasukan Akaun, dibayar setiap tahun. Walaupun harga ini agak rendah bagi pasaran Amerika Syarikat, ia menjadi cabaran bagi pengguna dari negara dengan ekonomi yang kurang berkembang dan kuasa beli yang lebih rendah.
Kami kini menjadikan Kerika lebih berpatutan bagi pengguna di luar Amerika Syarikat: harga baharu untuk Pelan Profesional bagi pelanggan di AS adalah $9 setiap pengguna sebulan, atau $90 setiap tahun, tetapi pelanggan dari hampir semua negara lain boleh melanggan pada kadar yang lebih rendah. Ini bermakna pelanggan dari negara dengan ekonomi yang lebih kecil boleh membeli langganan Kerika yang sama seperti pelanggan dari negara yang lebih kaya, tetapi dengan harga yang jauh lebih murah.
Perubahan ini akan dapat dilihat apabila anda mengunjungi halaman harga di laman web Kerika, serta dalam aplikasi Kerika. Harga yang dipaparkan akan merupakan jumlah selepas diskaun, dan ia akan dipaparkan dalam mata wang tempatan anda. Sebagai contoh, pengguna dari Malaysia akan melihat Pelan Profesional berharga RM 20 sebulan / RM 200 setahun.
(Pelan Perniagaan untuk pelanggan di Korea Selatan akan berharga RM 30 sebulan / RM 300 setahun.)
Selain harga yang lebih rendah di luar Amerika Syarikat, kami juga membolehkan pelanggan kami membayar dalam pelbagai mata wang — sebanyak 135 mata wang semuanya.
Ini akan memudahkan orang di negara yang berbeza, yang mungkin menghadapi kesukaran untuk membuat pembelian dalam Dolar AS, untuk membeli langganan Kerika.
Baca lebih lanjut mengenai mata wang.
Pengguna yang baru dalam mana-mana perkhidmatan dalam talian mungkin ragu-ragu untuk membeli langganan tahunan sebelum mereka benar-benar biasa dengan perkhidmatan tersebut. Pilihan semula jadi bagi pelanggan baharu ialah membuat komitmen kewangan yang lebih kecil pada awalnya, dengan membeli langganan bulanan. Kami telah memudahkan perkara ini.
Kini, anda boleh membeli Langganan Bulanan atau Tahunan (tetapi tidak boleh mencampurkan kedua-duanya).
Langganan tahunan berharga 10 kali ganda kadar bulanan, jadi jika anda bercadang untuk menggunakan Kerika lebih daripada 10 bulan, adalah lebih jimat untuk mendapatkan langganan tahunan.
Namun, jika anda pelanggan baharu dan masih ragu-ragu untuk membuat komitmen kepada Kerika, kini anda mempunyai cara yang lebih mudah untuk terus menggunakan Kerika selepas Percubaan Percuma 30 hari anda tamat: hanya beli langganan bulanan untuk beberapa bulan, dan kemudian beralih kepada langganan tahunan untuk penjimatan kos setelah anda yakin dengan manfaat Kerika bagi produktiviti pasukan anda.
Dan untuk memudahkan lagi pelanggan baharu membeli Langganan Tahunan dengan yakin, kami kini menawarkan Jaminan Wang Dikembalikan 30 Hari yang sangat mudah!
Jika anda menukar fikiran dalam masa 30 hari selepas membeli Langganan Tahunan, atas sebarang sebab, anda boleh meminta bayaran balik penuh dalam bentuk tunai.
Kini anda tidak perlu risau sama ada anda membuat keputusan yang salah apabila mengklik butang Beli!
Baca lebih lanjut mengenai Jaminan Wang Dikembalikan 30 Hari kami.
Sistem lama kami untuk mengira dan menguruskan bayaran balik adalah sangat rumit: ia mencipta kesulitan dalam sistem bil kami, dan kesulitan itu seterusnya menyebabkan pelbagai masalah yang menjejaskan pelanggan dan kami sendiri.
Kami kini beralih kepada sistem yang lebih mudah: jika anda membatalkan langganan, anda akan menerima kredit pro rata dalam akaun Kerika anda, yang boleh digunakan untuk pembelian pada masa hadapan. Kredit ini tidak akan luput dan tidak boleh ditebus dalam bentuk tunai: ia hanya boleh digunakan untuk pembelian akan datang.
Baca lebih lanjut mengenai Dasar Bayaran Balik kami.
Pelan Akademik & Badan Bukan Keuntungan yang lama membenarkan Pasukan Akaun sehingga 10 orang menggunakan Kerika secara percuma. Walau bagaimanapun, ia sukar untuk dikendalikan, sering disalahgunakan, dan tidak dapat membantu semua sekolah, universiti, dan organisasi bukan keuntungan.
Pelan Akademik & Badan Bukan Keuntungan kini akan berfungsi sebagai diskaun mudah sebanyak 50%: jika anda layak, anda boleh membeli mana-mana pelan pada separuh harga, dan tidak akan ada lagi had bagi saiz Pasukan Akaun anda. Pelan baharu ini memudahkan organisasi yang lebih besar untuk menggunakan Kerika di seluruh organisasi mereka.
Baca lebih lanjut mengenai Diskaun Badan Bukan Keuntungan.
Kami sebelum ini menawarkan pilihan untuk meminta invois yang boleh dibayar menggunakan cek bank atau pemindahan terus, tetapi malangnya, pilihan ini sering disalahgunakan oleh sebilangan pengguna yang meminta invois tetapi tidak membayarnya, serta mengabaikan e-mel peringatan kami!
Dengan sistem baharu kami, pilihan untuk membuat pembelian luar talian (iaitu, meminta invois) hanya tersedia kepada pelanggan tertentu. Beberapa pelanggan lama kami telah menggunakan kaedah luar talian selama bertahun-tahun kerana itu satu-satunya cara mereka boleh membuat pembelian — situasi biasa bagi mereka yang bekerja dalam sektor kerajaan atau syarikat besar yang memerlukan invois diproses melalui jabatan Akaun Belum Bayar mereka.
Bagi pelanggan lama ini, kaedah luar talian akan terus tersedia, tetapi akan dikuatkuasakan dengan lebih ketat: jika invois tidak dibayar tepat pada masanya, langganan yang berkaitan akan dibatalkan.
Jika anda pelanggan baharu yang memerlukan kaedah luar talian, sila hubungi kami!
Dengan sistem harga baharu, pelanggan kami kini boleh menggantikan satu pengguna dengan pengguna lain tanpa dikenakan caj tambahan, selagi penyingkiran pengguna lama dan penambahan pengguna baharu dilakukan pada hari yang sama.
Jika seorang pengguna dikeluarkan daripada Pasukan Akaun dan pengguna lain ditambah pada hari yang sama, sistem tidak akan menjana sebarang transaksi bil.
Skrin Sejarah Bil, yang boleh diakses dengan mengklik pilihan Urus Akaun dalam menu yang muncul apabila anda mengklik avatar anda di bahagian atas kanan aplikasi desktop, kini akan mengandungi lebih banyak maklumat mengenai perubahan yang dibuat, seperti menghidupkan/mematikan auto-pembaharuan, menambah pengguna, dan sebagainya.
Ini akan membantu pelanggan memahami dengan lebih baik bagaimana bil mereka berubah dari semasa ke semasa.
Peralihan yang Lancar
Jika anda sudah menjadi pelanggan Kerika, pelan anda akan diteruskan seperti biasa sehingga tamat tempohnya.
Kami faham bahawa perubahan harga boleh menyebabkan kebimbangan bagi sesetengah pengguna. Kami sedia membantu menjawab pertanyaan anda dan mendengar maklum balas anda. Hubungi kami!
Ang lumang sistema ng pagpepresyo namin ay hindi nagbago sa loob ng mahigit 10 taon, at hindi na ito sumasalamin sa tunay na halaga ng aming produkto — lalo na ngayon na mas marami na kaming mga gumagamit mula sa labas ng Estados Unidos kaysa sa loob nito.
Kaya’t panahon na upang i-update namin ang aming modelo ng pagpepresyo sa lahat ng aspeto! Sa blog post na ito, buod ang lahat ng mga pagbabago, at sa mga seksyon sa ibaba ay makikita mo ang mga link patungo sa iba pang blog posts at mga pahina ng aming website na tatalakay ng bawat detalye:
Sa loob ng nakaraang 10 taon, iisa lang ang presyo: $7 bawat miyembro ng Account Team, binabayaran taun-taon. Bagama’t mababa ito para sa merkado ng US, naging hadlang ito para sa mga bansa na may hindi gaanong maunlad na ekonomiya at mababang purchasing power.
Ginagawa naming mas abot-kaya ang Kerika para sa mga gumagamit sa labas ng Estados Unidos: habang ang bagong presyo ng Professional Plan para sa US-based na customers ay $9 kada buwan o $90 taun-taon, makakabili ang mga customer mula sa halos lahat ng ibang bansa ng subscription sa mas mababang halaga.
Makikita ito kapag binisita mo ang Pricing Page ng Kerika o tiningnan mo ang mga available na plano sa loob ng app. Ipapakita ang presyo sa lokal mong pera. Halimbawa, para sa mga gumagamit sa Pilipinas, makikita nila ang Professional Plan sa halagang ₱200 / buwan o ₱2,000 taun-taon.
(Para naman sa Business Plan, ang presyo ay ₱300 / buwan o ₱3,000 taun-taon.)
Kasabay ng mas murang presyo sa labas ng US, pinapagana na rin namin ang pagbabayad gamit ang 135 na iba’t ibang uri ng pera.
Mas madali na ngayon para sa mga nasa ibang bansa na hindi makabili gamit ang US Dollars ang mag-subscribe sa Kerika.
👉 Basahin pa tungkol sa mga sinusuportahang currency.
Maaaring magdalawang-isip ang mga bagong user na agad bumili ng taunang subscription kung hindi pa sila pamilyar sa serbisyo. Mas natural na magsimula muna sa mas maliit na commitment gamit ang buwanang subscription — at pinapadali na namin ito ngayon!
Pwede ka nang pumili sa pagitan ng buwanan o taunan (hindi pinaghalong dalawa).
Ang taunang subscription ay 10x ng buwanang presyo, kaya kung balak mong gamitin ang Kerika nang higit sa 10 buwan, mas makakatipid ka kung taunang plano ang pipiliin.
Pero kung bago ka pa lang sa Kerika at hindi pa sigurado, madali ka nang makakapagpatuloy pagkatapos ng 30-araw na Libreng Pagsubok: magsimula sa buwanang subscription, tapos lumipat sa taunang plano kapag kumbinsido ka na sa mga benepisyo ng Kerika para sa produktibidad ng iyong team.
Para mas mapagaan ang loob ng mga bagong user, nag-aalok na kami ngayon ng napakasimpleng 30-araw na Money Back Guarantee!
Kung magbago ang isip mo sa loob ng 30 araw matapos bumili ng taunang subscription, kahit anong dahilan, pwede kang humiling ng buong refund.
Wala nang alalahanin kung tama ba ang pagbili mo — subukan mo lang!
👉 Basahin pa ang tungkol sa aming 30-araw na Money Back Guarantee.
Ang dati naming refund system ay napakakumplikado: naging sanhi ito ng bugs at problema sa billing.
Ngayon, mas simple na: kapag nag-cancel ka ng subscription, makakakuha ka ng pro-rata na credit sa iyong Kerika account para sa mga susunod na pagbili. Ang credits ay hindi mawawala at hindi maaaring i-convert sa cash — para lang ito sa future purchases.
👉 Basahin pa ang tungkol sa aming Refund Policy.
Dati, pinapayagan namin ang Account Teams ng hanggang 10 katao na gumamit ng Kerika nang libre, pero mahirap itong i-manage at madalas ay naaabuso.
Ngayon, ang bagong plano ay isang diretsong 50% na diskwento: kung kwalipikado ka, maaari mong bilhin ang anumang plano sa kalahating presyo, kahit gaano kalaki ang iyong team. Mas madali na para sa buong paaralan o organisasyon na gumamit ng Kerika.
👉 Basahin pa ang tungkol sa Nonprofit Discount.
Dati, pwede kang humiling ng invoice at magbayad sa pamamagitan ng bank cheque o direct deposit. Ngunit maraming user ang nagsamantala sa opsyong ito — humihiling ng invoice pero hindi nagbabayad.
Ngayon, ang offline na pagbili (i.e. invoice request) ay para na lang sa piling customer, lalo na yung mga matagal nang gumagamit ng offline method (hal. gobyerno o malalaking kumpanya).
Para sa kanila, mananatili ito pero ipapatupad nang mahigpit: kapag hindi bayad ang invoice sa takdang panahon, ika-cancel ang subscription.
Kung bago ka at kailangan mong gumamit ng offline method, 👉 makipag-ugnayan sa amin.
Sa bagong pricing system, madali mo nang mapalitan ang isang user ng isa pa nang walang dagdag na bayad, basta sa parehong araw ito ginawa.
Kung ang isang user ay inalis at pinalitan sa parehong araw, walang mabubuong bagong singil.
Sa Billing History screen (makikita sa Manage Account mula sa menu sa kanang itaas), makikita mo na ngayon ang mas detalyadong impormasyon tulad ng pagbabago sa auto-renewal, pagdagdag ng user, atbp.
Mas malinaw mo nang mauunawaan kung paano nagbabago ang billing mo sa paglipas ng panahon.
Ito ang pinakamahalaga: kung kasalukuyan kang customer ng Kerika, mananatili ang iyong kasalukuyang plano hanggang sa matapos ang term nito.
Kung binili mo noon sa $84/user at ang bagong presyo sa iyong rehiyon ay ₱2,400, hindi ka kailangang magbayad muli ngayon — sa susunod mong renewal pa ito magiging epektibo.
Ganoon din para sa lumang Academic & Nonprofit Plan — itutuloy ito hanggang matapos ang term, at pagkatapos ay pwede kang lumipat sa bagong Professional o Business Plan na may automatic Nonprofit Discount.
Alam naming ang mga pagbabago sa presyo ay maaaring makaapekto sa ilan, kahit gaano pa ito pinag-isipan. Masaya kaming sagutin ang iyong mga tanong at pakinggan ang iyong mga saloobin.
Giá cũ của chúng tôi đã không thay đổi trong hơn 10 năm và không còn phản ánh đúng giá trị của sản phẩm, cũng như thực tế rằng hiện tại chúng tôi có nhiều người dùng ngoài Hoa Kỳ hơn là trong nước.
Vì vậy, đã đến lúc chúng tôi cập nhật mô hình định giá của mình một cách toàn diện! Trong bài viết này, chúng tôi sẽ tóm tắt tất cả các thay đổi, và ở các phần bên dưới bạn sẽ tìm thấy liên kết đến các bài blog khác và các trang trên website trình bày chi tiết hơn từng nội dung:
Trong 10 năm qua, chúng tôi chỉ có một mức giá: $7 cho mỗi thành viên trong nhóm tài khoản, thanh toán hàng năm. Mức giá này tương đối thấp so với thị trường Hoa Kỳ, nhưng lại gây khó khăn cho người dùng ở các quốc gia có nền kinh tế kém phát triển và sức mua thấp hơn.
Chúng tôi đang làm cho Kerika trở nên phải chăng hơn cho người dùng ngoài Hoa Kỳ: trong khi mức giá mới cho Gói Chuyên Nghiệp cho khách hàng ở Hoa Kỳ là $9 mỗi người mỗi tháng, hoặc $90 mỗi năm, thì khách hàng từ gần như mọi quốc gia khác đều có thể mua với mức giá thấp hơn. Điều này có nghĩa là người dùng ở các nền kinh tế nhỏ có thể đăng ký Kerika với mức giá ưu đãi hơn rất nhiều so với các nước giàu.
Bạn sẽ thấy điều này khi truy cập trang định giá của website Kerika hoặc khi xem các gói trong ứng dụng Kerika. Mức giá hiển thị sẽ là mức giá đã giảm, và sẽ hiển thị bằng đơn vị tiền tệ địa phương của bạn. Ví dụ, người dùng tại Việt Nam sẽ thấy Gói Chuyên Nghiệp có giá ₫13.400 mỗi tháng / ₫134.000 mỗi năm.
(Gói Doanh Nghiệp dành cho khách hàng Việt Nam sẽ có giá ₫194.200 mỗi tháng / ₫1.942.000 mỗi năm.)
Bên cạnh mức giá thấp hơn, chúng tôi còn cho phép khách hàng thanh toán bằng nhiều loại tiền tệ khác nhau — tổng cộng là 135 loại tiền.
Điều này giúp người dùng ở nhiều quốc gia dễ dàng hơn trong việc thanh toán, đặc biệt nếu họ gặp khó khăn khi thanh toán bằng Đô la Mỹ.
Tìm hiểu thêm về các loại tiền tệ được hỗ trợ.
Người dùng mới thường do dự khi đăng ký gói theo năm trước khi hiểu rõ dịch vụ. Họ có xu hướng chọn các gói thanh toán theo tháng để giảm rủi ro về tài chính. Chúng tôi giúp bạn dễ dàng làm điều này.
Giờ đây bạn có thể chọn mua gói theo tháng hoặc theo năm (không thể kết hợp cả hai).
Gói theo năm sẽ có giá bằng 10 lần gói theo tháng. Vì vậy, nếu bạn có kế hoạch sử dụng Kerika hơn 10 tháng thì mua gói năm sẽ tiết kiệm hơn.
Nhưng nếu bạn là người dùng mới và còn phân vân, bạn hoàn toàn có thể tiếp tục dùng Kerika sau khi hết thời gian Dùng Thử Miễn Phí 30 ngày bằng cách đăng ký thuê bao theo tháng trong vài tháng đầu, sau đó chuyển sang gói năm để tiết kiệm chi phí.
Để giúp người dùng mới yên tâm hơn khi mua gói năm, chúng tôi hiện đang cung cấp Chính sách Hoàn Tiền 30 Ngày rất đơn giản!
Nếu bạn đổi ý trong vòng 30 ngày kể từ ngày mua gói thuê bao năm, vì bất kỳ lý do gì, bạn có thể yêu cầu hoàn lại toàn bộ số tiền đã thanh toán.
Bạn không còn phải lo lắng mình có mắc sai lầm khi bấm nút Mua hay không nữa!
Tìm hiểu thêm về Chính sách Hoàn Tiền 30 Ngày của chúng tôi.
Hệ thống hoàn tiền cũ của chúng tôi thực sự là một nỗi đau: nó khiến hệ thống thanh toán trở nên phức tạp và gây ra nhiều lỗi ảnh hưởng đến cả khách hàng và chúng tôi.
Giờ đây, chúng tôi áp dụng hệ thống đơn giản hơn: nếu bạn hủy gói thuê bao, bạn sẽ được cấp tín dụng theo tỷ lệ trong tài khoản Kerika của mình để dùng cho các giao dịch sau này. Tín dụng này không có thời hạn sử dụng và không thể đổi thành tiền mặt — chỉ có thể dùng để mua hàng trong tương lai.
Xem thêm về Chính sách Hoàn Tiền của chúng tôi.
Trước đây, gói dành cho học thuật & tổ chức phi lợi nhuận cho phép các nhóm lên đến 10 người sử dụng Kerika miễn phí. Tuy nhiên, điều này khó quản lý, dễ bị lạm dụng và không giúp ích cho mọi trường học hay tổ chức.
Giờ đây, chương trình này sẽ được chuyển thành giảm giá 50% đơn giản: nếu bạn đủ điều kiện, bạn có thể mua bất kỳ gói nào với giá chỉ bằng một nửa. Không còn giới hạn số lượng thành viên trong nhóm tài khoản.
Tìm hiểu thêm về Giảm giá cho tổ chức phi lợi nhuận.
Trước đây chúng tôi cho phép yêu cầu hóa đơn để thanh toán bằng séc ngân hàng hoặc chuyển khoản, nhưng phương thức này đã bị nhiều người dùng lợi dụng — họ yêu cầu hóa đơn nhưng không thanh toán và cũng phớt lờ các email nhắc nhở!
Với hệ thống mới, phương thức thanh toán ngoại tuyến (tức là yêu cầu hóa đơn) chỉ áp dụng cho một số khách hàng đặc biệt. Một số khách hàng lâu năm đã dùng phương thức này trong nhiều năm do yêu cầu từ tổ chức (ví dụ như cơ quan chính phủ hoặc tập đoàn lớn yêu cầu xử lý qua phòng Kế Toán).
Đối với những khách hàng này, phương thức ngoại tuyến vẫn được duy trì, nhưng sẽ bị giám sát chặt chẽ: nếu hóa đơn không được thanh toán đúng hạn, thuê bao sẽ bị hủy.
Nếu bạn là khách hàng mới cần dùng phương thức ngoại tuyến, hãy liên hệ với chúng tôi!
Với hệ thống giá mới, khách hàng có thể thay thế một người dùng bằng người khác trong cùng một ngày mà không phát sinh thêm chi phí, miễn là việc thay thế diễn ra trong cùng ngày.
Nếu một người dùng bị xóa khỏi nhóm và một người khác được thêm vào trong cùng một ngày, hệ thống sẽ không tạo ra giao dịch thanh toán nào.
Màn hình Lịch Sử Thanh Toán (Billing History), có thể truy cập bằng cách nhấp vào Quản lý Tài Khoản trong menu khi bạn bấm vào ảnh đại diện ở góc phải trên cùng của ứng dụng máy tính để bàn, giờ đây sẽ hiển thị nhiều thông tin hơn về các thay đổi như bật/tắt tự động gia hạn, thêm người dùng, v.v.
Điều này sẽ giúp bạn hiểu rõ hơn về quá trình thanh toán của mình theo thời gian.
Đây có lẽ là phần quan trọng nhất: nếu bạn đã là khách hàng của Kerika với bất kỳ gói nào, gói hiện tại sẽ tiếp tục có hiệu lực cho đến khi hết thời hạn.
Nếu bạn đã mua với giá $84/người mỗi năm, và giá hiện tại cho khu vực của bạn là ₫134.000 mỗi năm, bạn không cần thanh toán thêm gì ngay bây giờ. Khi hết hạn, mức giá mới sẽ được áp dụng.
Tương tự, nếu bạn đang sử dụng gói học thuật & phi lợi nhuận cũ, gói này sẽ tiếp tục cho đến khi hết thời hạn. Khi đó bạn sẽ cần mua Gói Chuyên Nghiệp hoặc Gói Doanh Nghiệp, nhưng bạn sẽ tự động đủ điều kiện nhận Giảm Giá Phi Lợi Nhuận.
Chúng tôi hiểu rằng việc thay đổi giá cả có thể khiến một số người dùng lo lắng, dù chúng tôi đã nỗ lực thiết kế mô hình mới một cách cẩn thận. Chúng tôi rất sẵn lòng giải đáp mọi thắc mắc và lắng nghe ý kiến của bạn.
Liên hệ với chúng tôi!
Sebagai sebahagian daripada usaha berterusan kami untuk memastikan Kerika mudah digunakan dan dibeli dari mana-mana sahaja di dunia, sistem harga baru kami membolehkan pelanggan untuk membayar dalam mana-mana mata wang berikut:
USD – Dolar Amerika Syarikat
AED – Dirham Emiriah Arab Bersatu
AFN – Afghani Afghanistan
ALL – Lek Albania
AMD – Dram Armenia
ANG – Gulden Antillen Belanda
AOA – Kwanza Angola
ARS – Peso Argentina
AUD – Dolar Australia
AWG – Florin Aruba
AZN – Manat Azerbaijan
BAM – Mark Konvertibel Bosnia dan Herzegovina
BBD – Dolar Barbados
BDT – Taka Bangladesh
BGN – Lev Bulgaria
BIF – Franc Burundi
BMD – Dolar Bermuda
BND – Dolar Brunei
BOB – Boliviano Bolivia
BRL – Real Brazil
BSD – Dolar Bahamas
BWP – Pula Botswana
BYN – Rubel Belarus
BZD – Dolar Belize
CAD – Dolar Kanada
CDF – Franc Congo
CHF – Franc Switzerland
CLP – Peso Chile
CNY – Yuan China
COP – Peso Colombia
CRC – Colón Costa Rica
CVE – Escudo Cape Verde
CZK – Koruna Czech
DJF – Franc Djibouti
DKK – Krone Denmark
DOP – Peso Dominican
DZD – Dinar Algeria
EGP – Pound Mesir
ETB – Birr Ethiopia
EUR – Euro
FJD – Dolar Fiji
FKP – Pound Kepulauan Falkland
GBP – Pound Sterling British
GEL – Lari Georgia
GIP – Pound Gibraltar
GMD – Dalasi Gambia
GNF – Franc Guinea
GTQ – Quetzal Guatemala
GYD – Dolar Guyana
HKD – Dolar Hong Kong
HNL – Lempira Honduras
HTG – Gourde Haiti
HUF – Forint Hungary
IDR – Rupiah Indonesia
ILS – Shekel Baru Israel
INR – Rupee India
ISK – Króna Iceland
JMD – Dolar Jamaica
JPY – Yen Jepun
KES – Shilling Kenya
KGS – Som Kyrgyzstan
KHR – Riel Kemboja
KMF – Franc Komoro
KRW – Won Korea Selatan
KYD – Dolar Kepulauan Cayman
KZT – Tenge Kazakhstan
LAK – Kip Laos
LBP – Pound Lubnan
LKR – Rupee Sri Lanka
LRD – Dolar Liberia
LSL – Loti Lesotho
MAD – Dirham Maghribi
MDL – Leu Moldova
MGA – Ariary Madagascar
MKD – Denar Macedonia
MMK – Kyat Myanmar
MNT – Tögrög Mongolia
MOP – Pataca Macau
MUR – Rupee Mauritius
MVR – Rufiyaa Maldives
MWK – Kwacha Malawi
MXN – Peso Mexico
MYR – Ringgit Malaysia
MZN – Metical Mozambique
NAD – Dolar Namibia
NGN – Naira Nigeria
NIO – Córdoba Nicaragua
NOK – Krone Norway
NPR – Rupee Nepal
NZD – Dolar New Zealand
PAB – Balboa Panama
PEN – Sol Peru
PGK – Kina Papua New Guinea
PHP – Peso Filipina
PKR – Rupee Pakistan
PLN – Złoty Poland
PYG – Guaraní Paraguay
QAR – Riyal Qatar
RON – Leu Romania
RSD – Dinar Serbia
RUB – Rubel Rusia
RWF – Franc Rwanda
SAR – Riyal Arab Saudi
SBD – Dolar Kepulauan Solomon
SCR – Rupee Seychelles
SEK – Krona Sweden
SGD – Dolar Singapura
SHP – Pound Saint Helena
SLE – Leone Sierra Leone
SOS – Shilling Somalia
SRD – Dolar Surinam
STD – Dobra São Tomé dan Príncipe (sebelum 2018, digantikan dengan STN)
SZL – Lilangeni Eswatini
THB – Baht Thailand
TJS – Somoni Tajikistan
TOP – Paʻanga Tonga
TRY – Lira Turki
TTD – Dolar Trinidad dan Tobago
TWD – Dolar Taiwan Baru
TZS – Shilling Tanzania
UAH – Hryvnia Ukraine
UGX – Shilling Uganda
UYU – Peso Uruguay
UZS – Soʻm Uzbekistan
VND – Đồng Vietnam
VUV – Vatu Vanuatu
WST – Tala Samoa
XAF – Franc CFA Afrika Tengah
XCD – Dolar Caribbean Timur
XOF – Franc CFA Afrika Barat
XPF – Franc CFP (digunakan di wilayah Pasifik Perancis)
YER – Rial Yemen
ZAR – Rand Afrika Selatan
ZMW – Kwacha Zambia
Jika negara anda tidak disenaraikan di atas, kaedah pembayaran lalai adalah dalam USD – Dolar Amerika Syarikat.
At Kerika we have been experimenting with using AI for software development for some time now: Microsoft’s Copilot has been used by our developers to help with their coding, and it has definitely proven helpful. We are now adding AI to some of parts of our user interface.
When you want to start a new Kerika Task Board, you will see that there’s a new option for GET HELP FROM AI:
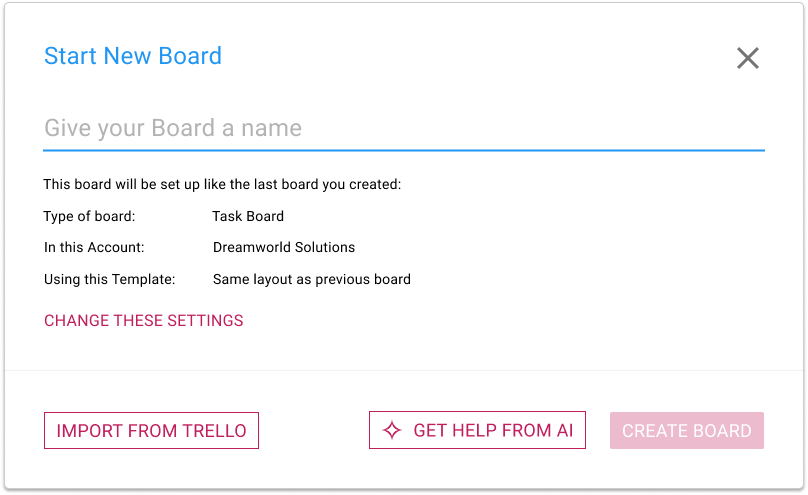
Clicking on this button brings up a dialog where you can tell our AI what you want your new board to do:
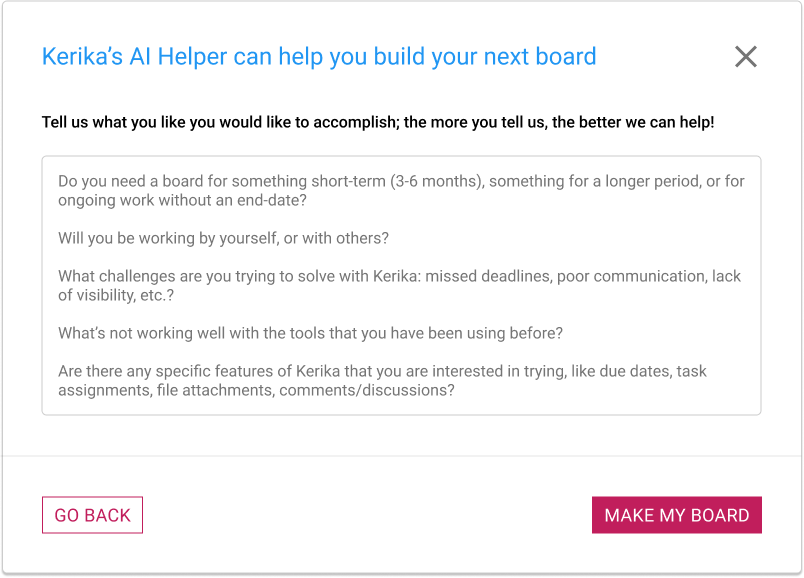
It’s very important to provide as much detail as possible! The more you tell about Kerika’s AI about what you want your board to do, the better it can help. Some suggestions for what you should tell the AI:
Do you need a board for something short-term (3-6 months), something for a longer period, or for ongoing work without an end-date?
Will you be working by yourself, or with others?
What challenges are you trying to solve with Kerika: missed deadlines, poor communication, lack of visibility, etc.?
What’s not working well with the tools that you have been using before?
Are there any specific features of Kerika that you are interested in trying, like due dates, task assignments, file attachments, comments/discussions?
Using AI takes some time, typically 1-2 minutes to build your board. You can do other things with Kerika in the meantime; you will be notified when your board is ready. You can also cancel your request if you change your mind.
Similarly, you now have the option of getting help from Kerika’s AI in making new templates:
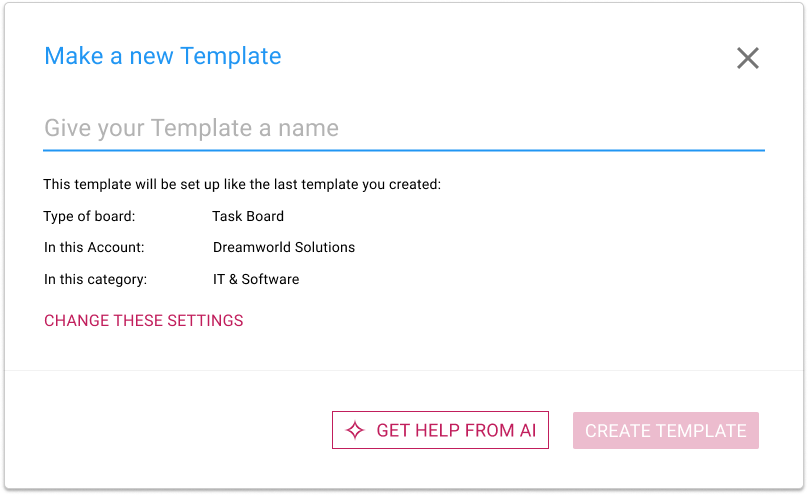
If you choose to get help from AI, you are asked to provide details about what your new template should do, and how it will be used:
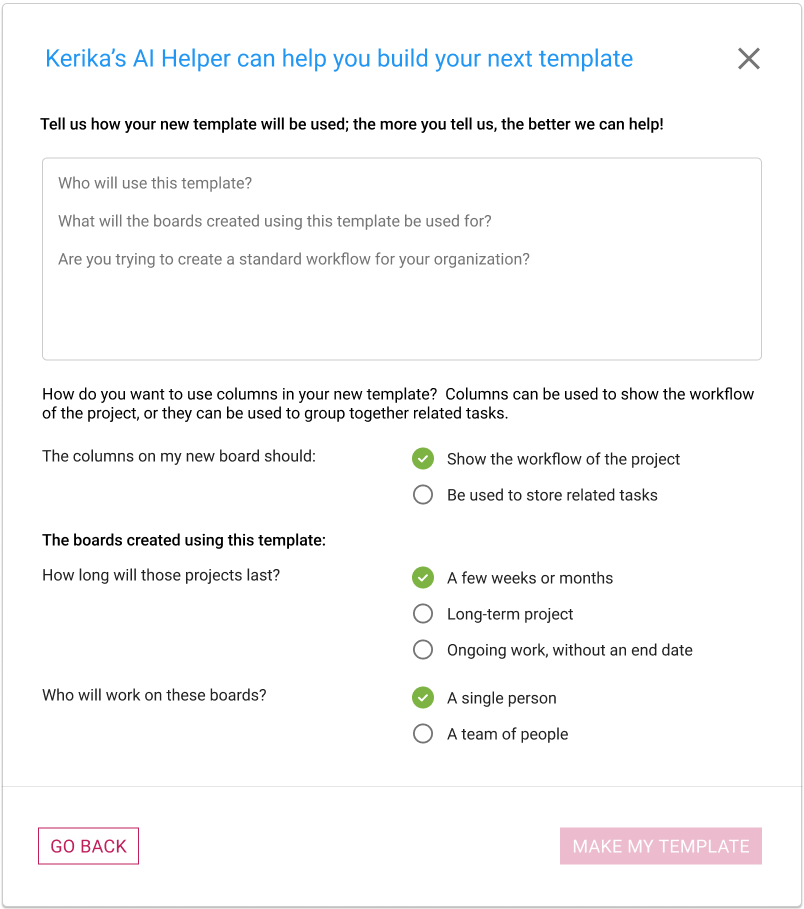
With templates there’s a little more detail that we ask for, and as with using AI to create new boards, the amount and quality of the instructions you provide to Kerika’s AI will make a big difference to how well the AI can help you make a new template.
This last one is for new users only: when people sign up as Kerika, they are given the option of browsing our many sample boards (which are organized by job function) so they can get an idea of what Kerika can do before they start their first board.
Ever since we build our sample boards we have observed that they are very popular, and that people would make copies of them to either play with, or use as a basis for building their own boards.
Making a copy to play with is fine, but making a copy to create a starting point for your new board is not very effective.
To make it easy for people to handle both needs, we now include a MAKE A BOARD LIKE THIS button that’s shown whenever a new user is viewing a sample board.
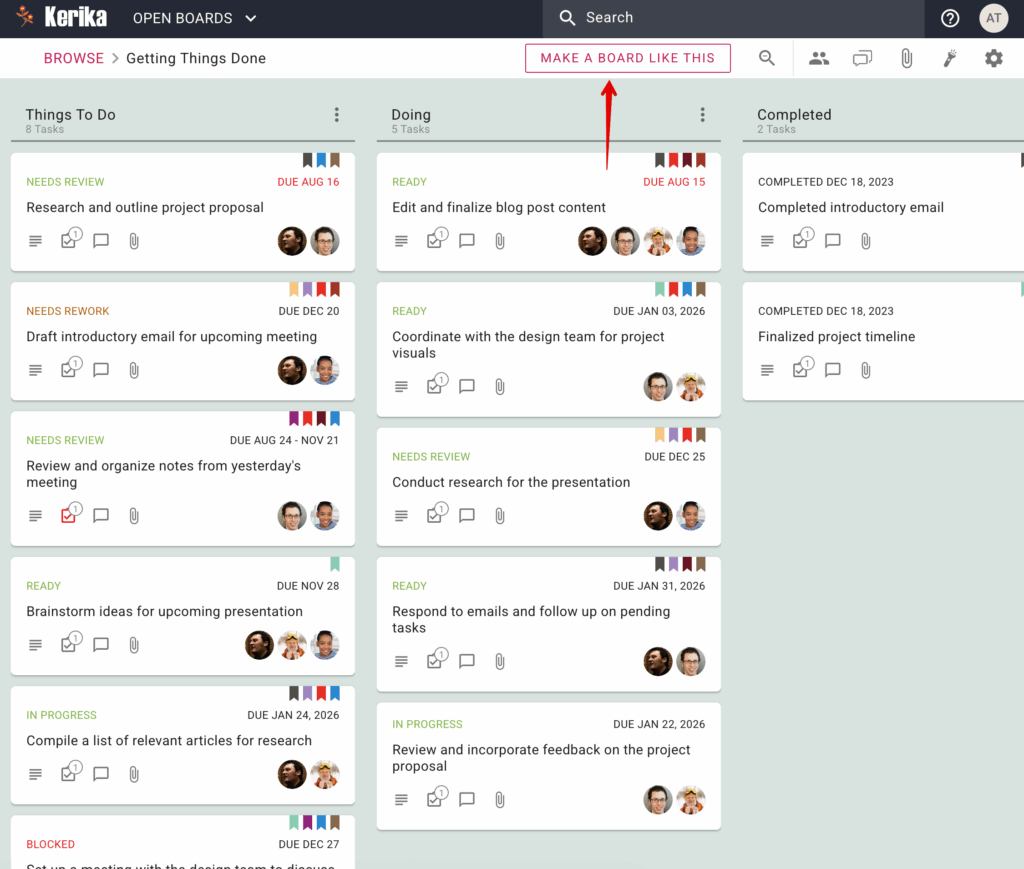
Clicking on this button brings up a dialog where the new user is asked what they would like to do with their version of this sample board:
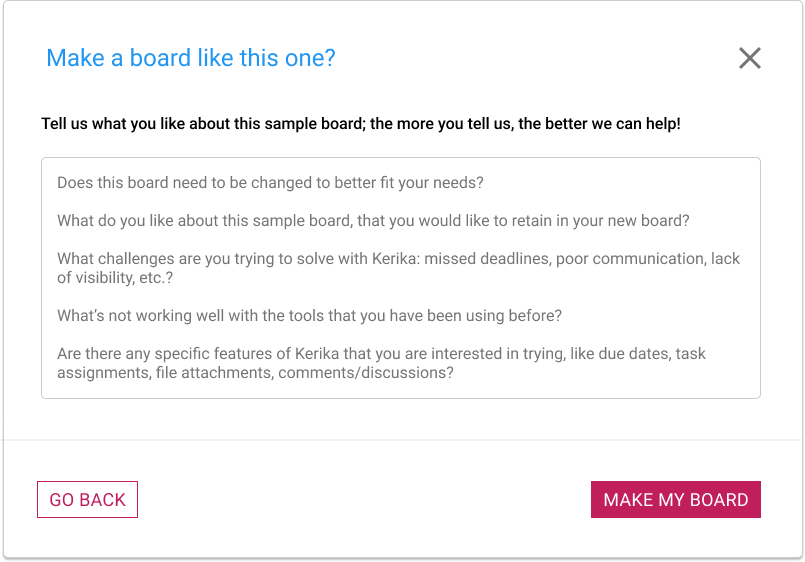
If all you need is a copy, just tell that to the AI: “Make a copy of this board”. But if you want a version of the board that’s personalized to your needs, make sure you give plenty of input to the AI!
If you are working on a Task Board, the Board Settings dialog’s Column tab can now let you hide or show columns.
To use this feature, open the Board Settings dialog by clicking on the gear button that appears on the top-right corner when you are viewing a Task Board, and then switching to the COLUMNS tab.
When you hover over any column in the list an options button (three dots) will appear:
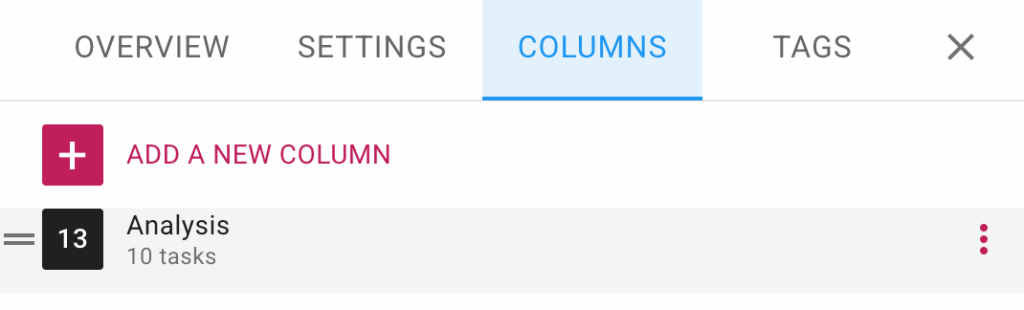
Click on that and you will see the Actions menu.:
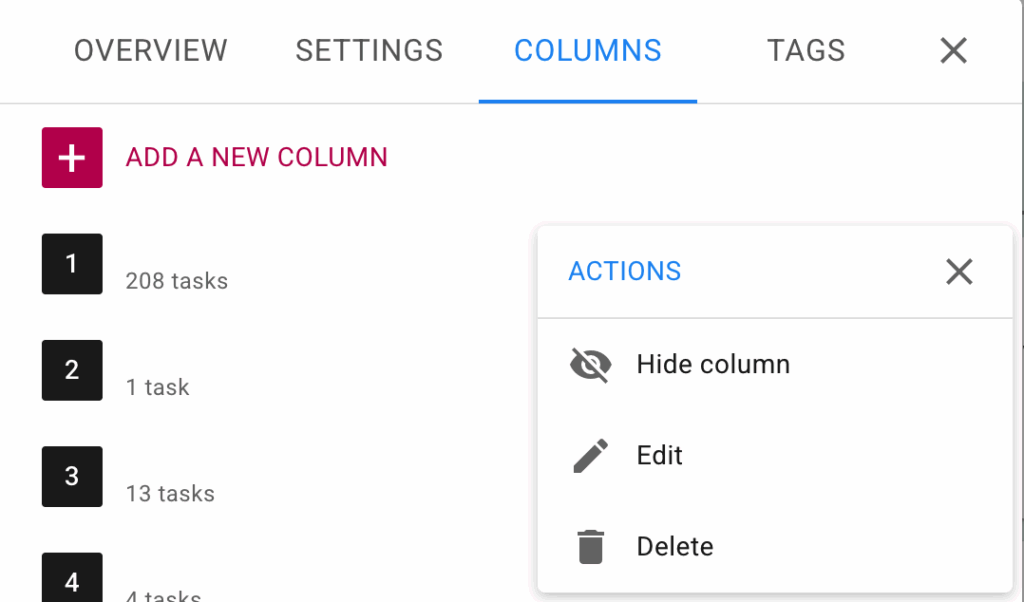
This makes it easier to manage boards with large numbers of columns.
Dobre navrhnutý pracovný tok technickej podpory je základom výnimočnej zákazníckej podpory. Zabezpečuje bezproblémovú komunikáciu, rýchlejšie riešenie problémov a vyššiu spokojnosť používateľov. Či už spracovávate interné požiadavky alebo otázky externých zákazníkov, efektívny pracovný postup pomáha tímom zostať organizovaný a zameraný na poskytovanie bezproblémovej podpory.
Vytvorenie efektívneho pracovného postupu však nie je bez problémov. Tímy často zápasia s problémami, ako sú stratené lístky, nejasná priorita úloh a prekážky v komunikácii. Bez štruktúrovaného systému môže byť rýchle riešenie zákazníckych problémov zdrvujúce, čo vedie k frustrovaným používateľom a nespokojným tímom.
V tomto článku vás prevedieme zásadné kroky na vybudovanie pracovného toku help desk, adresu potenciálne obavy ktoré by mohli brániť jeho úspechu a predstaviť vám správne nástroje vytvoriť pracovný postup, ktorý skutočne funguje:

Kliknutím na tento obrázok zobrazíte príklad toho, ako tím vytvoril výkonný Help Desk
Dobre definovaný pracovný postup Help Desk je rozhodujúci pre hladké operácie podpory, skrátené časy odozvy a výnimočnú spokojnosť používateľov. Ak chcete vytvoriť robustný a efektívny pracovný postup Help Desk, postupujte podľa týchto kľúčových krokov:
1. Definujte jasné ciele a rozsah
Identifikujte primárny účel vášho pracovného postupu. Riešite interné problémy, externú podporu alebo oboje? Jasne definujte rozsah na zosúladenie priorít a stanovenie realistických cieľov. Vytvorte dohody o úrovni služieb (SLA), aby ste stanovili očakávania týkajúce sa doby odozvy a riešenia.
Pozor na: nejasné ciele, ktoré môžu viesť k neefektívnemu pracovnému postupu a nízkej spokojnosti používateľov.
2. Vybudujte si komplexnú vedomostnú základňu
Vytvorte hodnotný zdroj pre svoj tím a používateľov analyzovaním opakujúcich sa problémov a vytváraním jasného obsahu s možnosťou vyhľadávania, ako sú často kladené otázky, podrobné príručky a tipy na riešenie problémov.
Pozor: neefektívne zdieľanie znalostí môže viesť k dlhším časom riešenia a frustrácii.
3. Centralizujte vybavovanie žiadostí
Vytvorte jediné úložisko na správu všetkých prichádzajúcich žiadostí, čím sa zabezpečí, že nezmeškáte žiadny problém. Tento centralizovaný systém eliminuje riziko rozptýlených údajov a pomáha udržiavať organizovaný prístup k riešeniu problémov.
Pozor na: chaotické vybavovanie požiadaviek bez centralizovaného systému, čo vedie k zmeškaným alebo duplicitným snahám.
4. Kategorizácia a prioritizácia úloh
Rozdeľte požiadavky podľa naliehavosti, typu alebo oddelenia. Kategorizácia úloh pomáha vášmu tímu zamerať sa na problémy s vysokou prioritou a zároveň udržiavať požiadavky s nižšou prioritou viditeľné a na správnej ceste.
Uvedomte si, že manuálna kategorizácia môže byť náchylná na chyby a môže byť nekonzistentná, čo vedie k oneskoreniam pri riešení kritických problémov.
5. Nastavte jasné zodpovednosti a roly
Prideľte členom tímu špecifické roly, aby ste zaistili zodpovednosť. Definujte, kto spracováva otázky prvej línie, kto eskaluje a rieši zložité problémy a kto je zodpovedný za aktualizácie databázy znalostí.
Majte na pamäti: nejednoznačnosť v úlohách a zodpovednostiach môže viesť k zmätku a oneskoreniam.
6. Monitorujte a vyhodnocujte výkon
Sledujte kľúčové metriky, ako je čas riešenia, čas odozvy a spokojnosť zákazníkov. Pravidelne vyhodnocujte výkon svojho tímu a získavajte spätnú väzbu od používateľov, aby ste identifikovali oblasti zlepšenia.
Nezabudnite: obmedzený prehľad o výkone pracovného toku môže sťažiť identifikáciu a riešenie úzkych miest.
Jasný a organizovaný systém helpdesku je nevyhnutný na zabezpečenie efektívneho riešenia problémov a tento vizuálny pracovný priestor ukazuje, ako možno čeliť výzvam. Poďme sa rýchlo pozrieť na to, ako tento tím riadi svoj pracovný tok, aby zostal vpredu.

Preskúmajte, ako táto ukážková tabuľa oživuje pracovný postup Helpdesku
Táto tabuľa ponúka priamy pohľad na úlohy v rôznych fázach. Žiadosti sú zaznamenané v časti Čo treba urobiť, kde sú kategorizované a prioritné podľa naliehavosti.
Úlohy sa počas priebehu plynule presúvajú do stĺpca Robiť, čo tímu umožňuje sústrediť sa na aktívne problémy bez toho, aby stratili prehľad o tom, čo bude nasledovať. Dokončené úlohy sú archivované v sekcii „Dokončené“, čo dáva pocit pokroku, pričom pracovný priestor zostáva prehľadný.
Vizuálne označenia ako „Potrebuje revíziu“, „Prebieha“ a „Vyžaduje prepracovanie“ uľahčujú rozpoznanie úloh, ktoré si vyžadujú okamžitú akciu, zatiaľ čo termíny splnenia zaisťujú, že nič neprekĺzne. Centralizáciou požiadaviek, ich efektívnou organizáciou a vytvorením jasného pracovného postupu sa tento tím vyhýba chaosu rozptýlených komunikačných nástrojov, ako je e-mail alebo chat.
Ďalej sa ponoríme hlbšie do toho, ako tento pracovný priestor funguje, pričom rozdelíme jeho funkcie, aby sme vám ukázali, ako vytvoriť efektívny systém technickej podpory pre váš tím:

Preskúmajte, ako funguje táto ukážková tabuľa
Táto tabuľa pracovného toku Help Desk je ukážkovým príkladom toho, ako môže štruktúrovaná organizácia a jasné usporiadanie zjednodušiť správu úloh podpory. Každá sekcia je účelne navrhnutá tak, aby vybavovanie žiadostí bolo bezproblémové a zároveň podporovala zodpovednosť a spoluprácu.
Stĺpec „Čo urobiť“ je východiskovým bodom, kde sa zaznamenávajú všetky prichádzajúce požiadavky. Od resetovania hesiel až po riešenie problémov s konektivitou je každá úloha jedinou vykonateľnou položkou, ktorá zaisťuje, že nezmeškáte žiadnu požiadavku. Tento centralizovaný prístup poskytuje prehľadnosť a umožňuje tímu efektívne určovať priority.
Stĺpce predstavujú rôzne fázy postupu úlohy, ako napríklad „Činnosti“, „Vykonávanie“ a „Dokončené“. Tie možno premenovať, zmeniť poradie alebo prispôsobiť tak, aby vyhovovali špecifickému pracovnému postupu vášho tímu, vďaka čomu sú prechody medzi fázami intuitívne a efektívne.
Spravujte, kto môže zobraziť a upravovať nástenku, priradením rolí. Členovia tímu môžu dostať oprávnenia na úpravy na aktualizáciu úloh, zatiaľ čo zainteresované strany môžu byť obmedzené na sledovanie pokroku. To eliminuje zmätok, zaisťuje jasné zodpovednosti a udržiava pracovný postup bezpečný.
Tímové diskusie prebiehajú priamo v správnej rade. Namiesto žonglovania s e-mailami alebo chatovacími nástrojmi môžete komentovať konkrétne úlohy, aby ste objasnili podrobnosti alebo poskytli aktualizácie. Vďaka tomu je všetka komunikácia relevantná, prístupná a prepojená s príslušnou úlohou.
Vďaka možnosti nahrávania súborov možno k úlohám pripojiť používateľské príručky, návody na riešenie problémov a ďalšie zdroje. To eliminuje stratu času pri hľadaní roztrúsených dokumentov a zabezpečuje, že každý má prístup k materiálom, ktoré potrebuje.
Stanovenie priorít je jednoduché vďaka vstavaným štítkom pre naliehavosť. Či už ide o označenie úloh ako „Kritické“, „Vysoká priorita“ alebo „Normálne“, tieto vizuálne indikátory zaisťujú, že tím vie, čo má riešiť ako prvé, a udržujú pracovný tok na správnej ceste.
Filtre vám umožňujú rýchlo triediť a identifikovať úlohy, ktoré si vyžadujú okamžitú pozornosť. Či už hľadáte oneskorené úlohy, nepriradené položky alebo problémy označené na kontrolu, tieto filtre zabezpečia, aby sa neprehliadlo nič dôležité.

Rozdelenie úloh na menšie, akcieschopné kroky je nevyhnutné pre zachovanie prehľadnosti a zabezpečenie hladkého vykonávania. Karta úloh z demo dosky sústreďuje všetky relevantné informácie, čo uľahčuje efektívne riadenie úloh. Tu je návod, ako to pomáha:
So všetkými nástrojmi a funkciami navrhnutými na zefektívnenie vášho procesu Help Desk Kerika zaisťuje, že môžete spravovať úlohy, efektívne spolupracovať a udržiavať centralizované informácie pre váš tím.
Či už ide o uprednostňovanie kritických úloh, sledovanie pokroku alebo podporu tímovej komunikácie, Kerika poskytuje dokonalé riešenie na zjednodušenie a efektívne vykonávanie vášho pracovného postupu. Začať môžete takto:
Dodržiavaním štruktúrovaného prístupu, definovaním cieľov, vytvorením vedomostnej základne, stanovením priorít úloh a podporou spolupráce môžete zefektívniť svoje operácie a poskytnúť svojim používateľom výnimočnú podporu.
Či už riešite naliehavé IT problémy alebo plánujete dlhodobé podporné iniciatívy, Kerika zaistí, že váš Help Desk bude fungovať hladko. Začnite ešte dnes a uvidíte rozdiel, ktorý môže priniesť organizovaný a efektívny pracovný postup!
A well-designed help desk workflow is the backbone of exceptional customer support. It ensures smooth communication, quicker issue resolution, and higher user satisfaction. Whether handling internal requests or external customer inquiries, an efficient workflow helps teams stay organized and focused on delivering a seamless support experience.
However, creating an effective workflow isn’t without its challenges. Teams often struggle with issues like lost tickets, unclear task prioritization, and bottlenecks in communication. Without a structured system, resolving customer issues promptly can feel overwhelming, leading to frustrated users and dissatisfied teams.
In this article, we’ll guide you through the essential steps to build a help desk workflow, address potential concerns that could hinder its success, and introduce you to the right tools to create a workflow that truly works:

Click on this image to see an example of how a team has built a powerful Help Desk
A well-defined Help Desk workflow is crucial for smooth support operations, reduced response times, and exceptional user satisfaction. To establish a robust and efficient Help Desk workflow, follow these key steps:
1. Define Clear Objectives and Scope
Identify the primary purpose of your workflow. Are you addressing internal issues, external support, or both? Clearly define the scope to align priorities and set realistic goals. Establish service-level agreements (SLAs) to set expectations for response and resolution times.
Watch out for: unclear objectives that can lead to inefficient workflow and poor user satisfaction.
2. Build a Comprehensive Knowledge Base
Create a valuable resource for your team and users by analyzing recurring problems and developing clear, searchable content such as FAQs, step-by-step guides, and troubleshooting tips.
Heads up: ineffective knowledge sharing can lead to longer resolution times and frustration.
3. Centralize Request Handling
Create a single repository to manage all incoming requests, ensuring no issue is missed. This centralized system eliminates the risk of scattered data and helps maintain an organized approach to issue resolution.
Look out for: chaotic request handling without a centralized system, leading to missed or duplicated efforts.
4. Categorize and Prioritize Tasks
Break down requests by urgency, type, or department. Categorizing tasks helps your team focus on high-priority issues while keeping lower-priority requests visible and on track.
Be aware: manual categorization can be error-prone and inconsistent, leading to delays in addressing critical issues.
5. Set Clear Responsibilities and Roles
Assign specific roles for team members to ensure accountability. Define who handles first-line queries, who escalates and resolves complex issues, and who is responsible for knowledge base updates.
Keep in mind: ambiguity in roles and responsibilities can lead to confusion and delays.
6. Monitor and Evaluate Performance
Track key metrics like resolution time, response time, and customer satisfaction. Regularly evaluate your team’s performance and gather feedback from users to identify areas of improvement.
Don’t forget: limited visibility into workflow performance can make it challenging to identify and address bottlenecks.
A clear and organized help desk system is essential to ensuring efficient issue resolution, and this visual workspace demonstrates how challenges can be tackled head-on. Let’s take a quick look at how this team is managing their workflow to stay ahead.

Explore How This Demo Board Brings theHelpdesk workflow to Life
This board offers a straightforward view of tasks across different stages. Requests are logged under “Things to Do,” where they’re categorized and prioritized based on urgency.
Tasks move seamlessly to the “Doing” column when in progress, allowing the team to focus on active issues without losing sight of what’s coming next. Completed tasks are archived in the “Completed” section, giving a sense of progress while keeping the workspace uncluttered.
Visual labels like “Needs Review,” “In Progress,” and “Needs Rework” make it easy to spot tasks that require immediate action, while due dates ensure nothing slips through the cracks. By centralizing requests, organizing them effectively, and creating a clear workflow, this team avoids the chaos of scattered communication tools like email or chat.
Next, we’ll dive deeper into how this workspace works, breaking down its features to show you how to build an effective help desk system for your team:

This Help Desk workflow board is a prime example of how structured organization and a clear layout can simplify managing support tasks. Each section is purposefully designed to make handling requests seamless while promoting accountability and collaboration.
The “Things to Do” column is the starting point, where all incoming requests are captured. From resetting passwords to troubleshooting connectivity issues, every task is a single actionable item that ensures no request is missed. This centralized approach provides clarity and allows the team to prioritize effectively.
The columns represent different stages of task progress, such as “Things to Do,” “Doing,” and “Completed.” These can be renamed, reordered, or customized to fit your team’s specific workflow, making transitions between stages intuitive and efficient.
Manage who can view and edit the board by assigning roles. Team members can be given editing privileges for updating tasks, while stakeholders can be limited to viewing progress. This eliminates confusion, ensures responsibilities are clear, and keeps the workflow secure.
Team discussions happen directly within the board. Instead of juggling emails or chat tools, you can comment on specific tasks to clarify details or provide updates. This keeps all communication relevant, accessible, and linked to the appropriate task.
With file upload capabilities, user manuals, troubleshooting guides, and other resources can be attached to tasks. This eliminates the time wasted searching for scattered documents and ensures that everyone has access to the materials they need.
Prioritizing tasks is effortless with built-in labels for urgency. Whether it’s marking tasks as “Critical,” “High Priority,” or “Normal,” these visual indicators ensure the team knows what to address first, keeping the workflow on track.
Filters allow you to quickly sort and identify tasks that need immediate attention. Whether you’re looking for overdue tasks, unassigned items, or issues flagged for review, these filters ensure nothing important is overlooked.

Breaking down tasks into smaller, actionable steps is essential for maintaining clarity and ensuring smooth execution. The task card from the demo board centralizes all relevant information, making it easier to manage tasks efficiently. Here’s how it helps:
With all the tools and features designed to streamline your Help Desk process, Kerika ensures that you can manage tasks, collaborate efficiently, and maintain centralized information for your team.
Whether it’s prioritizing critical tasks, tracking progress, or fostering team communication, Kerika provides the perfect solution to simplify and execute your workflow effectively.
By following a structured approach, defining objectives, establishing a knowledge base, prioritizing tasks, and fostering collaboration, you can streamline your operations and deliver exceptional support to your users.
Whether you’re addressing urgent IT issues or planning long-term support initiatives, Kerika ensures your Help Desk runs smoothly. Get started today and see the difference an organized, efficient workflow can make!