Giá cũ của chúng tôi đã không thay đổi trong hơn 10 năm và không còn phản ánh đúng giá trị của sản phẩm, cũng như thực tế rằng hiện tại chúng tôi có nhiều người dùng ngoài Hoa Kỳ hơn là trong nước.
Vì vậy, đã đến lúc chúng tôi cập nhật mô hình định giá của mình một cách toàn diện! Trong bài viết này, chúng tôi sẽ tóm tắt tất cả các thay đổi, và ở các phần bên dưới bạn sẽ tìm thấy liên kết đến các bài blog khác và các trang trên website trình bày chi tiết hơn từng nội dung:
Giá thấp hơn cho hầu hết các quốc gia
Trong 10 năm qua, chúng tôi chỉ có một mức giá: $7 cho mỗi thành viên trong nhóm tài khoản, thanh toán hàng năm. Mức giá này tương đối thấp so với thị trường Hoa Kỳ, nhưng lại gây khó khăn cho người dùng ở các quốc gia có nền kinh tế kém phát triển và sức mua thấp hơn.
Chúng tôi đang làm cho Kerika trở nên phải chăng hơn cho người dùng ngoài Hoa Kỳ: trong khi mức giá mới cho Gói Chuyên Nghiệp cho khách hàng ở Hoa Kỳ là $9 mỗi người mỗi tháng, hoặc $90 mỗi năm, thì khách hàng từ gần như mọi quốc gia khác đều có thể mua với mức giá thấp hơn. Điều này có nghĩa là người dùng ở các nền kinh tế nhỏ có thể đăng ký Kerika với mức giá ưu đãi hơn rất nhiều so với các nước giàu.
Bạn sẽ thấy điều này khi truy cập trang định giá của website Kerika hoặc khi xem các gói trong ứng dụng Kerika. Mức giá hiển thị sẽ là mức giá đã giảm, và sẽ hiển thị bằng đơn vị tiền tệ địa phương của bạn. Ví dụ, người dùng tại Việt Nam sẽ thấy Gói Chuyên Nghiệp có giá ₫13.400 mỗi tháng / ₫134.000 mỗi năm.
(Gói Doanh Nghiệp dành cho khách hàng Việt Nam sẽ có giá ₫194.200 mỗi tháng / ₫1.942.000 mỗi năm.)
Thanh toán bằng đồng tiền của bạn
Bên cạnh mức giá thấp hơn, chúng tôi còn cho phép khách hàng thanh toán bằng nhiều loại tiền tệ khác nhau — tổng cộng là 135 loại tiền.
Điều này giúp người dùng ở nhiều quốc gia dễ dàng hơn trong việc thanh toán, đặc biệt nếu họ gặp khó khăn khi thanh toán bằng Đô la Mỹ.
Người dùng mới thường do dự khi đăng ký gói theo năm trước khi hiểu rõ dịch vụ. Họ có xu hướng chọn các gói thanh toán theo tháng để giảm rủi ro về tài chính. Chúng tôi giúp bạn dễ dàng làm điều này.
Giờ đây bạn có thể chọn mua gói theo tháng hoặc theo năm (không thể kết hợp cả hai).
Gói theo năm sẽ có giá bằng 10 lần gói theo tháng. Vì vậy, nếu bạn có kế hoạch sử dụng Kerika hơn 10 tháng thì mua gói năm sẽ tiết kiệm hơn.
Nhưng nếu bạn là người dùng mới và còn phân vân, bạn hoàn toàn có thể tiếp tục dùng Kerika sau khi hết thời gian Dùng Thử Miễn Phí 30 ngày bằng cách đăng ký thuê bao theo tháng trong vài tháng đầu, sau đó chuyển sang gói năm để tiết kiệm chi phí.
Cam kết hoàn tiền trong 30 ngày
Để giúp người dùng mới yên tâm hơn khi mua gói năm, chúng tôi hiện đang cung cấp Chính sách Hoàn Tiền 30 Ngày rất đơn giản!
Nếu bạn đổi ý trong vòng 30 ngày kể từ ngày mua gói thuê bao năm, vì bất kỳ lý do gì, bạn có thể yêu cầu hoàn lại toàn bộ số tiền đã thanh toán.
Bạn không còn phải lo lắng mình có mắc sai lầm khi bấm nút Mua hay không nữa!
Các khoản hoàn tiền khác sẽ được cấp dưới dạng Tín dụng Kerika
Hệ thống hoàn tiền cũ của chúng tôi thực sự là một nỗi đau: nó khiến hệ thống thanh toán trở nên phức tạp và gây ra nhiều lỗi ảnh hưởng đến cả khách hàng và chúng tôi.
Giờ đây, chúng tôi áp dụng hệ thống đơn giản hơn: nếu bạn hủy gói thuê bao, bạn sẽ được cấp tín dụng theo tỷ lệ trong tài khoản Kerika của mình để dùng cho các giao dịch sau này. Tín dụng này không có thời hạn sử dụng và không thể đổi thành tiền mặt — chỉ có thể dùng để mua hàng trong tương lai.
Trước đây, gói dành cho học thuật & tổ chức phi lợi nhuận cho phép các nhóm lên đến 10 người sử dụng Kerika miễn phí. Tuy nhiên, điều này khó quản lý, dễ bị lạm dụng và không giúp ích cho mọi trường học hay tổ chức.
Giờ đây, chương trình này sẽ được chuyển thành giảm giá 50% đơn giản: nếu bạn đủ điều kiện, bạn có thể mua bất kỳ gói nào với giá chỉ bằng một nửa. Không còn giới hạn số lượng thành viên trong nhóm tài khoản.
Phần lớn các giao dịch sẽ phải được thực hiện trực tuyến
Trước đây chúng tôi cho phép yêu cầu hóa đơn để thanh toán bằng séc ngân hàng hoặc chuyển khoản, nhưng phương thức này đã bị nhiều người dùng lợi dụng — họ yêu cầu hóa đơn nhưng không thanh toán và cũng phớt lờ các email nhắc nhở!
Với hệ thống mới, phương thức thanh toán ngoại tuyến (tức là yêu cầu hóa đơn) chỉ áp dụng cho một số khách hàng đặc biệt. Một số khách hàng lâu năm đã dùng phương thức này trong nhiều năm do yêu cầu từ tổ chức (ví dụ như cơ quan chính phủ hoặc tập đoàn lớn yêu cầu xử lý qua phòng Kế Toán).
Đối với những khách hàng này, phương thức ngoại tuyến vẫn được duy trì, nhưng sẽ bị giám sát chặt chẽ: nếu hóa đơn không được thanh toán đúng hạn, thuê bao sẽ bị hủy.
Với hệ thống giá mới, khách hàng có thể thay thế một người dùng bằng người khác trong cùng một ngày mà không phát sinh thêm chi phí, miễn là việc thay thế diễn ra trong cùng ngày.
Nếu một người dùng bị xóa khỏi nhóm và một người khác được thêm vào trong cùng một ngày, hệ thống sẽ không tạo ra giao dịch thanh toán nào.
Thông tin chi tiết hơn trong Lịch Sử Thanh Toán
Màn hình Lịch Sử Thanh Toán (Billing History), có thể truy cập bằng cách nhấp vào Quản lý Tài Khoản trong menu khi bạn bấm vào ảnh đại diện ở góc phải trên cùng của ứng dụng máy tính để bàn, giờ đây sẽ hiển thị nhiều thông tin hơn về các thay đổi như bật/tắt tự động gia hạn, thêm người dùng, v.v.
Điều này sẽ giúp bạn hiểu rõ hơn về quá trình thanh toán của mình theo thời gian.
Chuyển đổi mượt mà
Đây có lẽ là phần quan trọng nhất: nếu bạn đã là khách hàng của Kerika với bất kỳ gói nào, gói hiện tại sẽ tiếp tục có hiệu lực cho đến khi hết thời hạn.
Nếu bạn đã mua với giá $84/người mỗi năm, và giá hiện tại cho khu vực của bạn là ₫134.000 mỗi năm, bạn không cần thanh toán thêm gì ngay bây giờ. Khi hết hạn, mức giá mới sẽ được áp dụng.
Tương tự, nếu bạn đang sử dụng gói học thuật & phi lợi nhuận cũ, gói này sẽ tiếp tục cho đến khi hết thời hạn. Khi đó bạn sẽ cần mua Gói Chuyên Nghiệp hoặc Gói Doanh Nghiệp, nhưng bạn sẽ tự động đủ điều kiện nhận Giảm Giá Phi Lợi Nhuận.
Có câu hỏi hoặc lo lắng?
Chúng tôi hiểu rằng việc thay đổi giá cả có thể khiến một số người dùng lo lắng, dù chúng tôi đã nỗ lực thiết kế mô hình mới một cách cẩn thận. Chúng tôi rất sẵn lòng giải đáp mọi thắc mắc và lắng nghe ý kiến của bạn. Liên hệ với chúng tôi!
Working across multiple tasks and projects can make it challenging to focus on specific types of work, like design or research tasks, without scanning through the entire project board. This process can be time-consuming and may even lead to missed deadlines.
Tags provide a simple solution. By marking tasks with clear, customizable labels, you can quickly filter and highlight exactly what you need to focus on. With just a few clicks, tags help bring order to even the busiest boards.
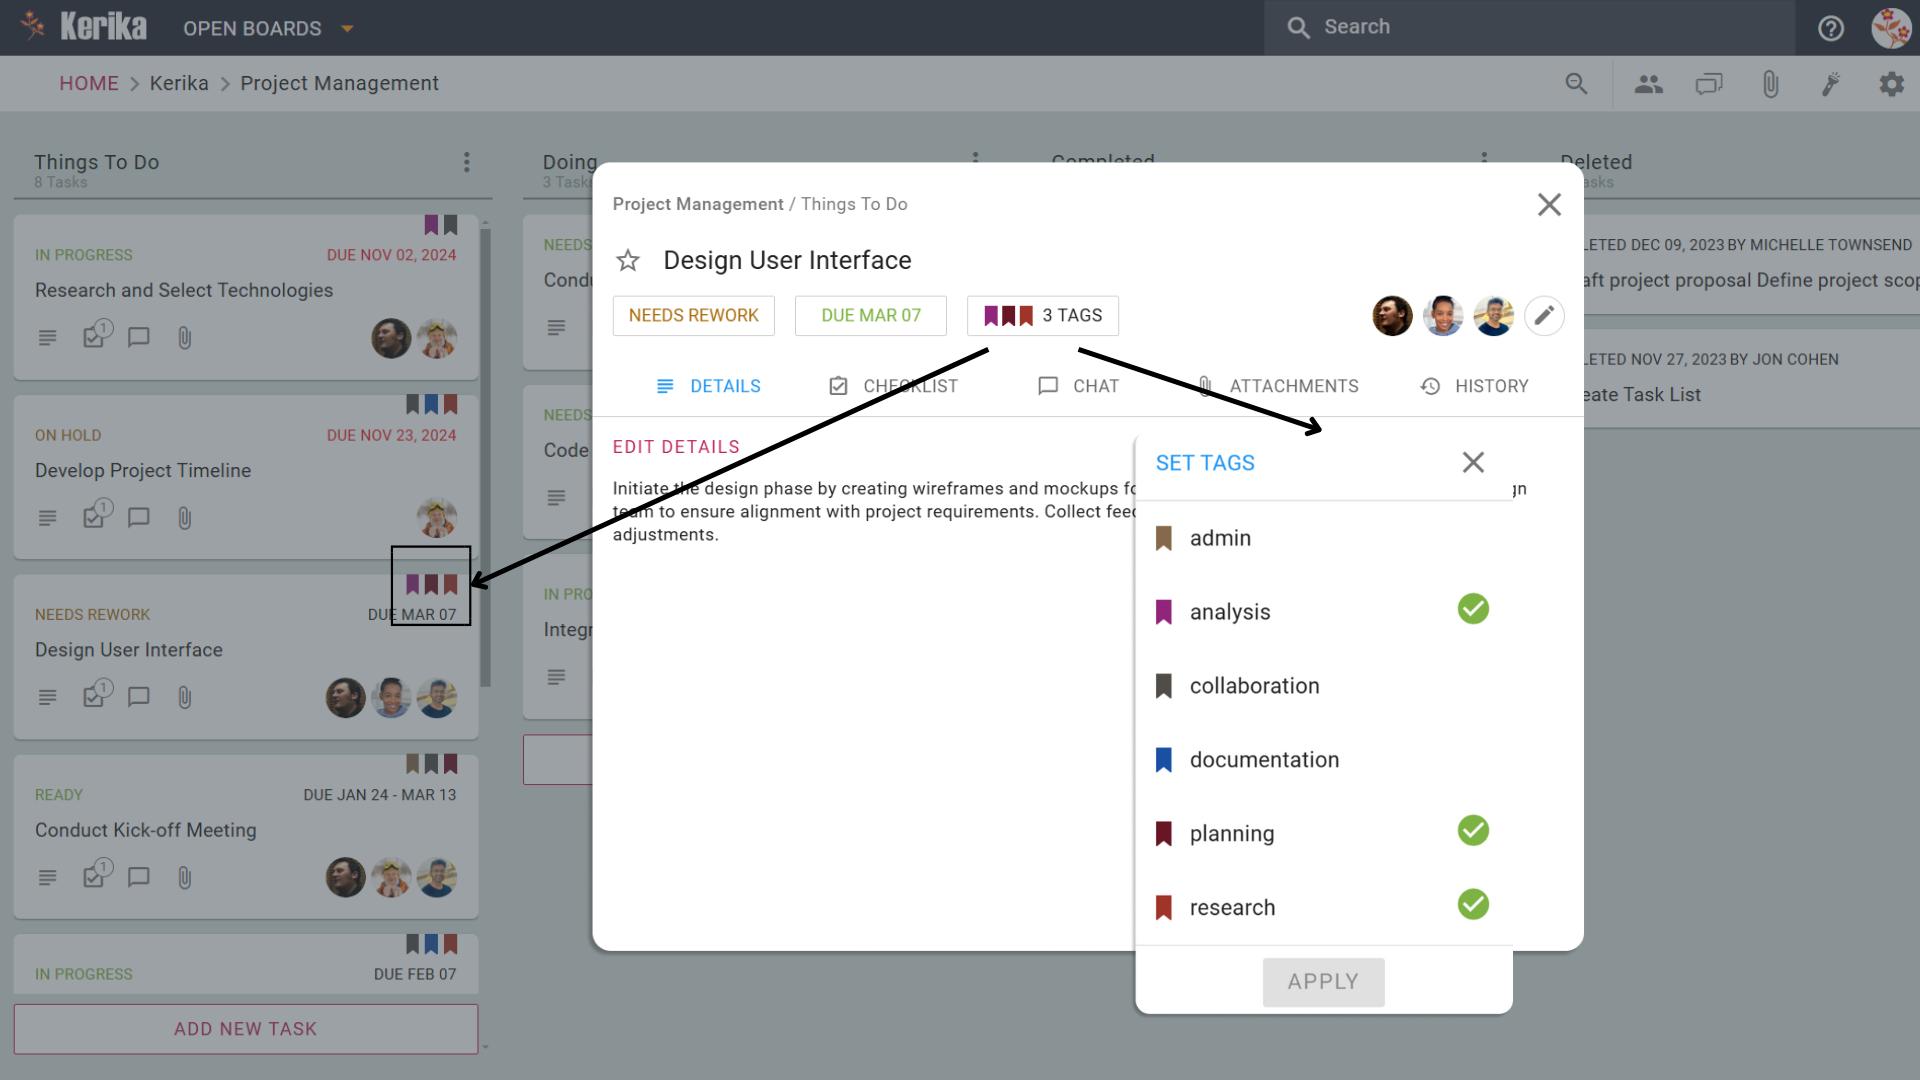
Tags act as visual markers that can be added to tasks. They let you categorize work based on topics, teams, priorities, or anything that suits your workflow. And the best part? They’re completely customizable.
Tags are not just for looks – they’re your secret weapon for filtering tasks:
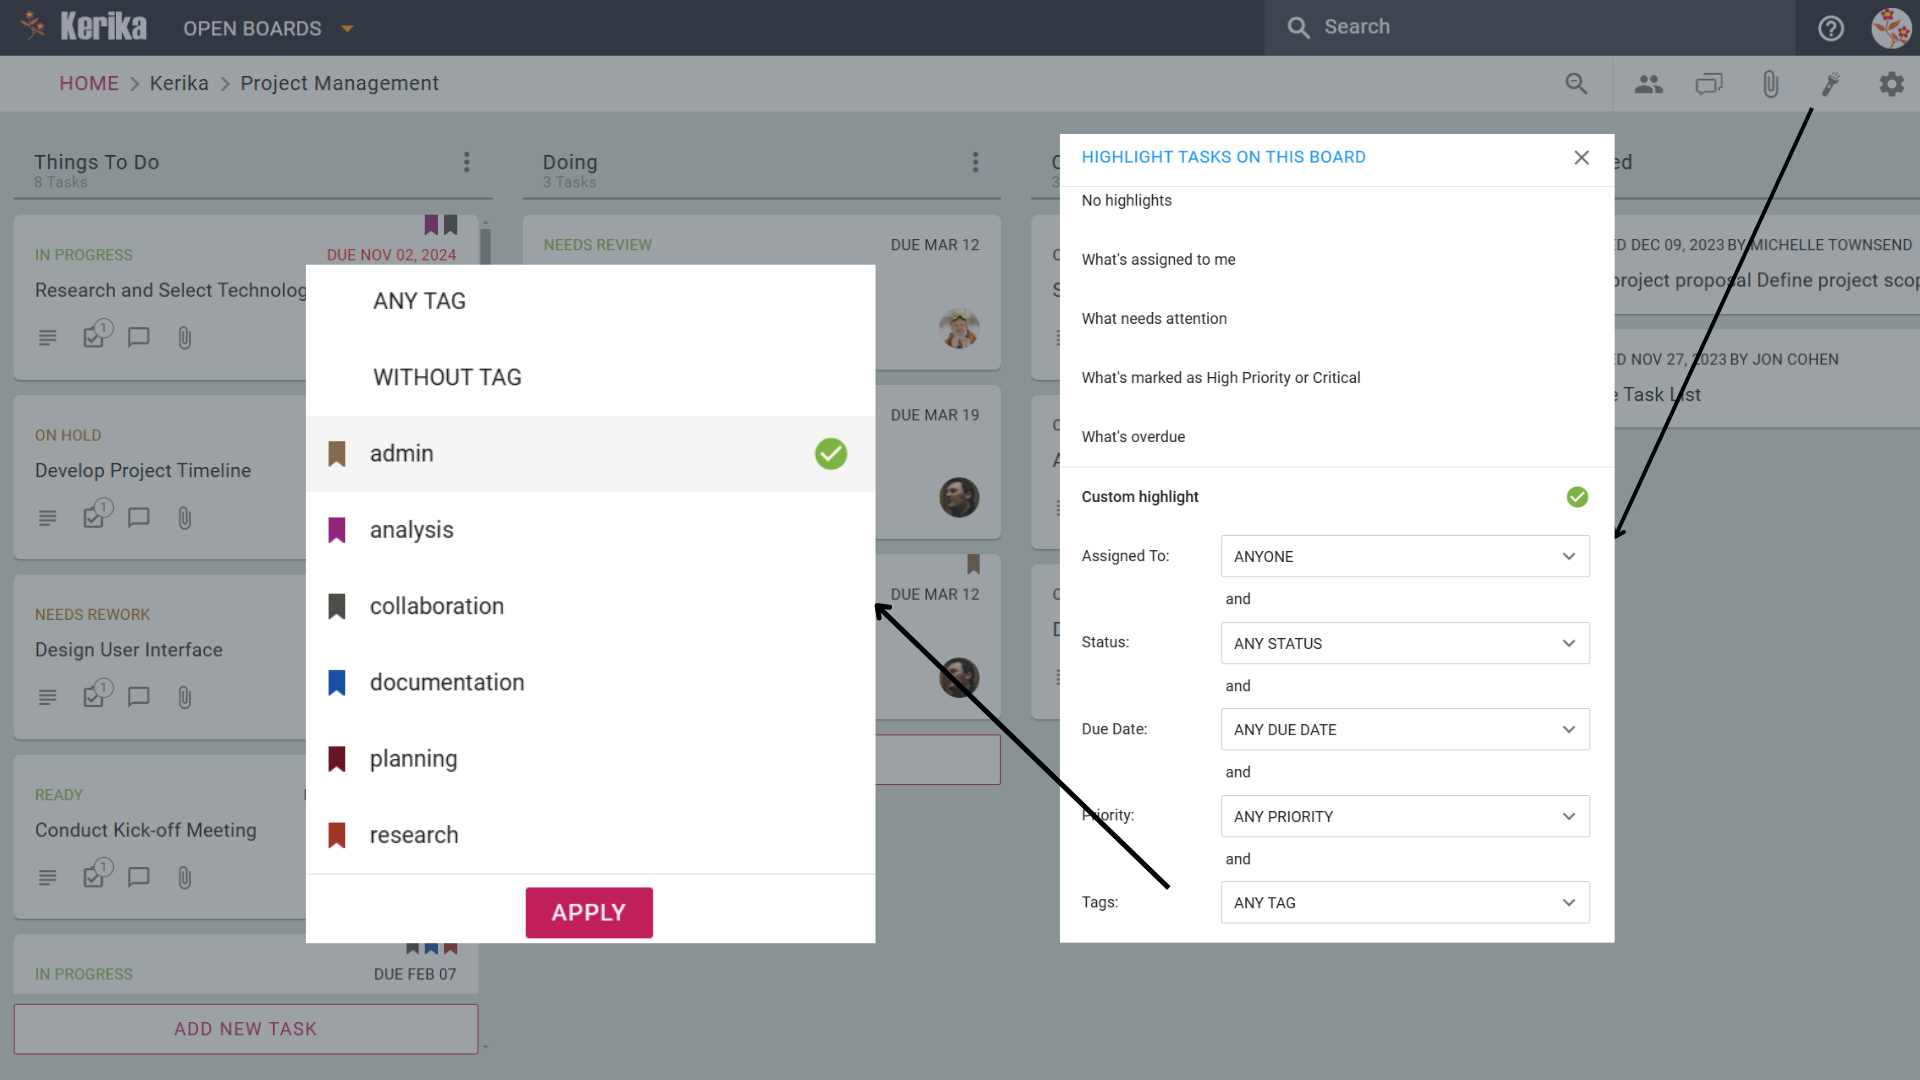
Use the Highlight Option: In the board menu, click on “Highlight Tasks on This Board.”
Select a Tag: Choose the tag you want to focus on. Instantly, only the tasks with that tag are highlighted, cutting through the noise.
Combine with Other Filters: Add due dates, priorities, or statuses to refine your search even further.
Why You’ll Love Using Tags
Streamlined Focus: Whether it’s a tag for “Urgent,” “Research,” or “Collaboration,” tags make it easy to zoom in on specific tasks.
Customizable Organization: No two projects are alike, so why should your tags be? Tailor them to suit your workflow.
Time-Saving Navigation: With tags and highlights, you’ll never waste time hunting for a task again.
Wrap-Up
Tags are more than just labels: They’re a practical tool for boosting productivity and maintaining clarity. By creating, applying, and filtering tasks with tags, you can streamline your workflow and stay organized, no matter the complexity of your project.
Big projects can often feel overwhelming, with multiple moving parts and team members juggling different responsibilities. That’s where checklists come in, offering a simple yet powerful way to break down complex tasks into manageable steps.
Why Use Checklists?
Clarity Through Simplicity: Checklists turn daunting tasks into actionable steps, helping your team understand what needs to be done.
Improved Collaboration: Assigning individual checklist items to teammates ensures clarity in roles and responsibilities.
Tracking Progress: Checklists make it easy to monitor the completion of subtasks, keeping the larger project on track.
Checklists are seamlessly integrated into task management workflows, providing flexibility and structure. Here’s how you can use them effectively:
1. Create a Checklist Within a Task Card
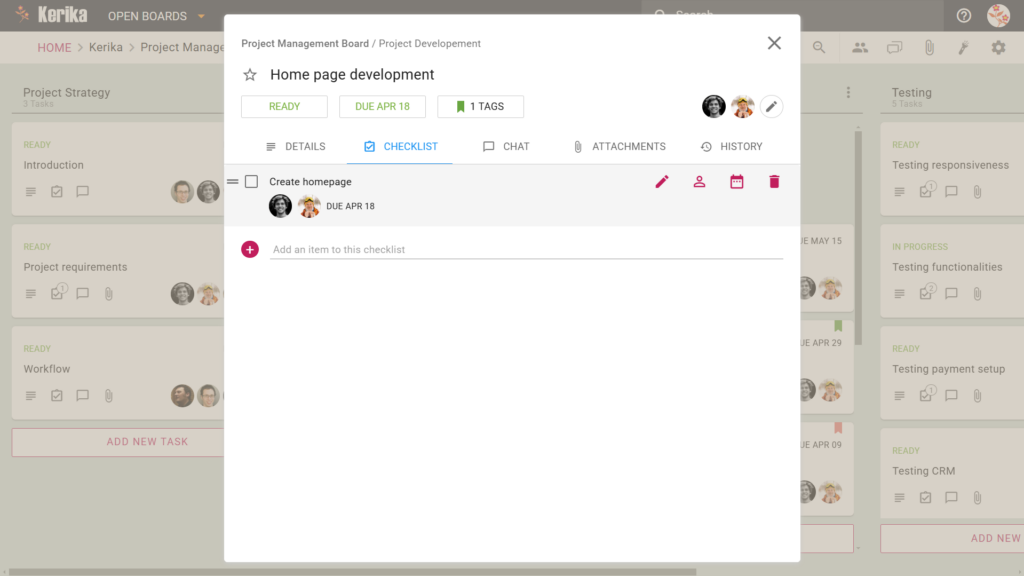
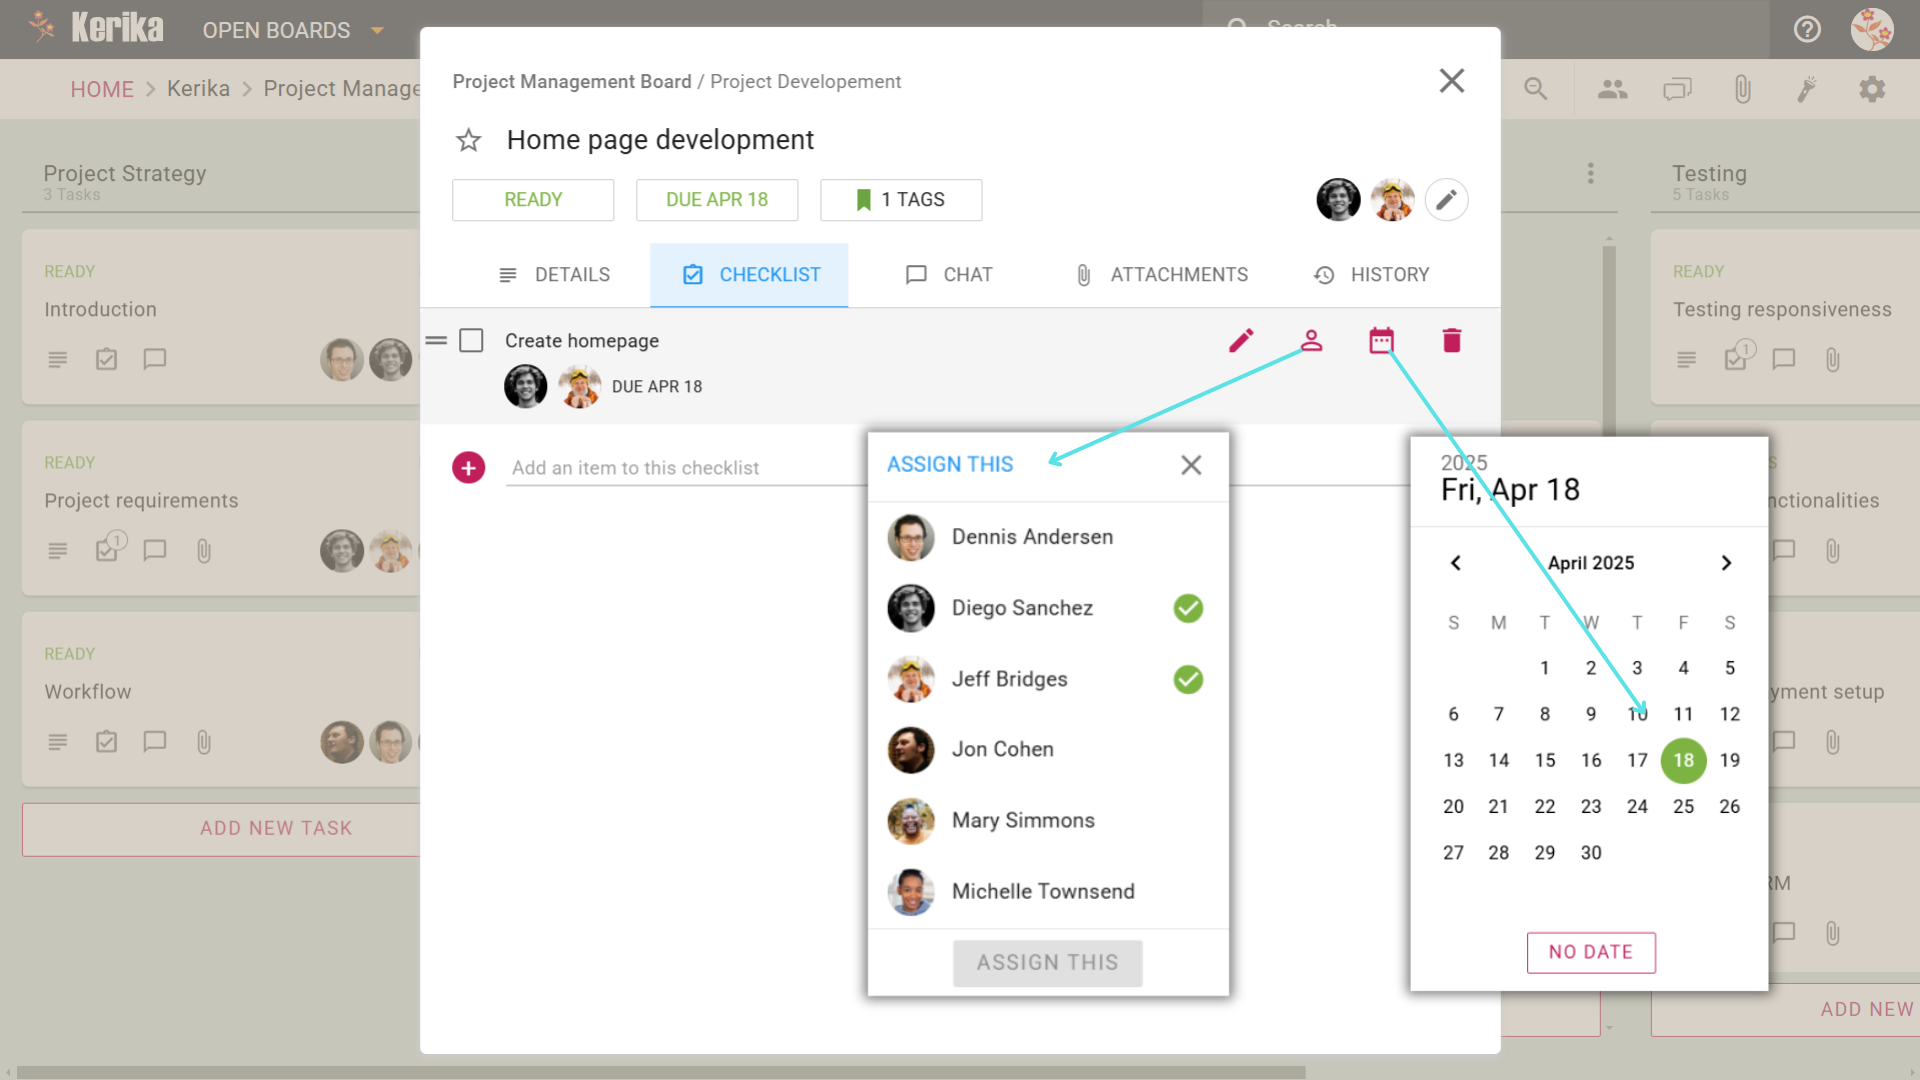
Open a task card and go to the “Checklist” tab.
Add items that represent the smaller steps needed to complete the main task.
2. Set Due Dates for Checklist Items
For each checklist item, assign specific due dates. This ensures every subtask is completed on time without losing sight of the overall deadline.
3. Assign Items to Teammates
Easily assign individual checklist items to team members, making it clear who is responsible for what. This feature eliminates ambiguity and keeps everyone aligned.
4. Use Cases for Checklists
Breaking Down Deliverables: Divide a big deliverable, like a website redesign, into smaller tasks such as wireframes, content creation, and testing.
Tracking Dependencies: Ensure subtasks are completed in the correct order by setting due dates and assigning them to the right team members.
Collaborating on Shared Goals: For team projects, assign specific checklist items to leverage individual strengths and keep everyone accountable.
5. Benefits of Using Checklists
Better Organization: Simplifies complex tasks by presenting them in a structured format.
Improved Efficiency: Ensures that smaller steps don’t fall through the cracks, speeding up the overall process.
Enhanced Communication: Provides clarity by assigning tasks to specific people and tracking their progress.
In Action
The ability to set due dates and assign team members directly from the checklist keeps everything streamlined. For example, in the “Home Page Development” task (illustrated above), individual checklist items like “Create Homepage” are assigned with specific due dates, ensuring everyone knows their role and timeline.
Wraping-Up
Checklists are more than just a to-do list, they’re a tool for breaking down complexity, fostering collaboration, and ensuring that every detail is accounted for. Whether you’re managing a small project or a large team, checklists empower you to stay organized, efficient, and focused.
Ruang kerja anda sepatutnya berfungsi untuk anda, bukan sebaliknya. Pilihan penyesuaian membolehkan anda menyesuaikan segala-galanya daripada warna latar belakang kepada pemberitahuan dan alatan papan putih, membantu anda kekal teratur dan produktif.
Untuk mula memperibadikan ruang kerja anda, anda perlu mengakses Tetapan Keutamaan dalam akaun anda. Begini caranya:
Klik pada Ikon Profil anda di penjuru kanan sebelah atas skrin.
Pilih Keutamaan Saya daripada menu lungsur.
Tetapan ini membolehkan anda mencipta pengalaman yang sesuai dengan gaya kerja unik anda. Sekarang setelah anda tahu cara mengakses tetapan, izinkan kami membimbing anda langkah demi langkah bagaimana anda boleh menggunakan setiap pilihan penyesuaian.
Cara Ia Berfungsi: Melaraskan Keutamaan
Keutamaan biasanya dikumpulkan kepada tiga kategori utama: Umum, Pemberitahuan, dan Papan putih. Setiap bahagian menyediakan pilihan mudah yang direka untuk meningkatkan aliran kerja anda dan mengoptimumkan pengalaman anda.
Berikut ialah pandangan yang lebih dekat tentang cara tetapan ini berfungsi:
Tetapan Umum: Jadikan Ruang Kerja Anda Milik Anda
Warna Latar Belakang: ● Pilih warna latar belakang yang mudah pada mata anda dan sesuai dengan gaya anda
● Pilih daripada pelbagai pilihan untuk menjadikan ruang kerja anda menarik secara visual.
Gunakan Teg untuk Papan Tugas ● Dayakan ciri ini untuk memasukkan teg secara automatik pada papan tugas baharu dan templat yang anda buat.
● Membantu anda kekal teratur dan mengkategorikan tugas dengan mudah.
Faedahnya: Menyesuaikan aspek visual ruang kerja anda menjadikannya lebih intuitif dan kurang bersepah, membantu anda kekal fokus.
Pemberitahuan: Kekal dalam Lingkaran Tanpa Beban Terlebih
Pemberitahuan Sembang ● Dapatkan e-mel apabila terdapat sembang peringkat lembaga atau apabila seseorang bersembang pada tugas yang anda terlibat.
Kemas Kini Aktiviti untuk Pentadbir ● Terima pemberitahuan apabila tugasan baharu ditambahkan, diselesaikan atau ditugaskan semula pada papan yang anda tadbir.
Peringatan Tugasan Harian ● Pilih ringkasan e-mel harian yang dihantar pada 6 PG, menunjukkan tugas tertunggak dan tugasan yang perlu dibayar minggu ini atau seterusnya.
● Kumpulan tugas mengikut tarikh atau papan untuk penjejakan mudah.
Faedahnya: Dengan pemberitahuan yang fleksibel, anda boleh terus mendapat maklumat tentang perkara yang paling penting tanpa dihujani dengan kemas kini yang tidak perlu.
Tetapan Papan Putih: Perkemas Proses Kreatif Anda
Garisan dan Bentuk ● Tetapkan gaya garisan lalai, ketebalan dan warna untuk menghasilkan visual yang bersih dan konsisten.
Teks pada Kanvas ● Pilih gaya, saiz dan warna fon pilihan anda untuk rupa yang digilap.
Pilihan Grid ● Dayakan menyentap ke grid dan tetapkan saiz grid untuk memastikan reka bentuk anda sejajar dan profesional.
Faedahnya:
Tetapan ini menjadikan papan putih sesuai untuk sumbang saran, merancang atau mereka bentuk, memastikan kerja anda kelihatan hebat dan kekal teratur.
Bungkus
Sama ada melaraskan elemen visual, menyesuaikan pemberitahuan atau memperkemas alatan kreatif, pilihan ini direka bentuk untuk meningkatkan produktiviti anda dan memastikan persekitaran kerja anda teratur. Mengambil sedikit masa untuk memperibadikan tetapan anda boleh membawa kepada pengalaman yang lebih cekap dan menyeronokkan setiap hari.
Running a successful audit program requires careful planning, attention to detail, and a focus on collaboration. The essential steps, ranging from defining the scope and objectives to analyzing data and implementing improvements, form the backbone of any effective audit. These steps ensure that compliance is maintained, risks are identified, and processes are improved to align with organizational goals.
However, the path to success is not without its challenges. Common pitfalls like vague objectives, poor communication, and disorganized workflows can derail even the most well-intentioned audit programs. These issues can lead to overlooked details, missed deadlines, and a lack of actionable insights.
Fortunately, with the right tools and strategies, these challenges can be tackled head-on. In this guide, we’ll provide you with a step-by-step framework for executing an effective audit program.
To illustrate this process, we’ll also walk you through a practical example of a well-structured workflow and share tools that can help you streamline collaboration, organize tasks, and keep your audit on track. Let’s get started!
Essential Steps For Executing a Successful Audit Program
A successful audit program doesn’t just happen; it’s built on a foundation of strategic planning, meticulous execution, and continuous evaluation. Here’s a detailed roadmap to guide you through the key steps:
1. Define the Scope and Objectives
Start by outlining the purpose of your audit. What do you aim to achieve? Whether it’s ensuring compliance with regulations, identifying process inefficiencies, or validating financial accuracy, having clear objectives sets the tone for the entire program. Identify the departments, processes, or systems to be audited.
Define success metrics and establish key performance indicators (KPIs). Click here to read about the top metrics you should look out for according to Audiboard.com Communicate objectives to stakeholders to align expectations.
Watch out for:
Unclear objectives that can lead to wasted time and incomplete or irrelevant findings.
Lack of clear success metrics and KPIs.
2. Assemble the Right Team
A competent and collaborative audit team is essential to delivering accurate and actionable results. Assign roles and responsibilities, ensuring each team member has the skills needed for their tasks. You can learn more about the key responsibilities of audit team members from Validworth in this article. Involve both internal staff and external experts, depending on the complexity of the audit. Provide training on audit procedures, tools, and reporting standards.
Watch out for:
Poor task delegation and role clarity can cause confusion, missed deadlines, or duplicated efforts.
Insufficient training or expertise among team members.
3. Develop a Comprehensive Plan
An effective plan serves as a blueprint for the entire audit process. Break the audit into phases, such as planning, execution, analysis, and reporting. Set realistic timelines for each phase, ensuring deadlines are achievable. Identify potential risks and challenges, and prepare contingency plans to address them.
Watch out for:
Inefficient collaboration and communication can result in misunderstandings, overlooked tasks, and fragmented reporting.
Unrealistic timelines or inadequate risk assessment.
4. Gather and Analyze Data
The quality of your audit depends on the accuracy and relevance of the data you collect. Use standardized tools and methods for data collection, such as surveys, interviews, and system logs. Verify the reliability of your sources to minimize errors. Analyze the data systematically to uncover patterns, anomalies, or areas for improvement.
Watch out for:
Incomplete or inaccurate data can compromise the validity of audit findings.
Inadequate data analysis or interpretation.
5. Engage Stakeholders Throughout the Process
Regular communication with stakeholders ensures transparency and builds trust. Share progress updates at key milestones to keep everyone informed. Address concerns or questions promptly to maintain alignment with objectives. Involve stakeholders in reviewing preliminary findings and shaping actionable recommendations.
Watch out for:
Limited visibility for stakeholders can lead to mistrust and misalignment.
Inadequate communication or stakeholder engagement.
6. Document Findings and Provide Recommendations
The way you present your findings can determine how effective your audit will be in driving change.
Compile results into a structured report, highlighting key insights and areas of concern. Offer clear, actionable recommendations supported by evidence. Prioritize recommendations based on their potential impact and feasibility.
Watch out for:
Poor documentation practices can result in audit findings that lack context or clarity.
Inadequate or unclear recommendations.
7. Implement and Monitor Changes
The audit’s value lies in its ability to drive improvement. Develop a plan to implement recommended changes, assigning tasks and deadlines. Monitor the impact of these changes over time to measure effectiveness. Schedule follow-up audits to ensure sustained compliance and progress.
Watch out for:
Resistance to change can hinder the implementation of recommendations.
Inadequate monitoring or evaluation of changes.
8. Evaluate and Improve the Audit Process
Every audit is an opportunity to refine your approach for the next one. Conduct a post-audit review to identify lessons learned and areas for improvement. Update your audit processes, templates, or tools based on feedback. Recognize and celebrate successes to build momentum for future audits.
Watch out for:
Lack of continuous evaluation and improvement.
Inadequate documentation or retention of lessons learned
By following these steps and being aware of potential concerns, you can create an audit program that not only ensures compliance but also drives meaningful organizational improvements.
Using the Right Tools
Executing a successful audit program requires more than just good planning – it demands a tool that can help you overcome the common pitfalls we discussed earlier. A powerful task management solution can make all the difference in organizing your workflow and ensuring nothing slips through the cracks.
The following demo board is a prime example of how an audit team has built a structured workspace to tackle each phase of their audit program seamlessly.
Take a closer look at how this audit team has designed their workspace to address every stage of the audit process. From conducting initial meetings in the Initiation Phase to validating compliance in the Fieldwork Phase and wrapping up in the Final Review, this board ensures that every step is meticulously planned, tracked, and executed.
This virtual workspace enables the team to prioritize tasks, communicate effectively, and track progress, all in one place. Let’s break down how this team uses their board to make sure their audit program stays on track.
Take a Closer Look at This Audit Program Board
1. Capturing Critical Action Steps with Detailed Task Cards
Adding tasks is straightforward and ensures that no step in the audit process is overlooked. By using the “Add New Task” button at the bottom of each column, team members can quickly create tasks, such as conducting stakeholder interviews or validating security measures. This ensures that action items are captured as they arise.
2. Flexible Workflow Customization with Column Actions
The ability to customize columns ensures the workflow adapts to the evolving needs of the audit program. This feature allows teams to rename columns, add new ones, or rearrange existing columns with ease.
For example, moving tasks from “Fieldwork Phase” to “Analysis & Validation” ensures proper task progression without confusion. The option to hide or delete columns helps declutter the workspace, keeping the board focused and efficient. This customization enables teams to maintain a dynamic workflow while ensuring no task is misplaced.
3. Assigning Roles and Permissions to Enhance Collaboration
Managing roles ensures that team members are accountable and understand their responsibilities within the audit program. This feature lets you assign roles such as Board Admin, Team Member, or Visitor based on their level of involvement.
For example, auditors responsible for key tasks can be assigned as team members, while external stakeholders can be given viewing access as visitors. This setup promotes structured collaboration, minimizes confusion, and secures sensitive project data by controlling access.
4. Centralized Communication Using Board Chat
Rather than relying on scattered emails or chat messages, the board’s built-in chat feature ensures that all discussions related to tasks remain accessible in one place. Team members can share updates, clarify issues, and leave comments directly on the board, allowing everyone to stay informed without the need to search through multiple communication channels. This approach reduces confusion and keeps conversations tied to their respective tasks, making collaboration more seamless and productive.
5. Centralized File Management for Seamless Access
The board’s attachment feature provides a streamlined way to manage and share files relevant to each task. Whether it’s audit guidelines, evidence documentation, or stakeholder reports, all files can be uploaded, created, or linked directly on the board.
This eliminates the need for external storage systems and ensures team members can access the most up-to-date documents without delays. With everything in one place, your team can focus on executing tasks efficiently.
6. Highlight and Prioritize Critical Tasks
The board’s highlight feature allows teams to quickly identify tasks that need immediate attention based on various criteria, such as assigned users, task status, due dates, and priority levels. This ensures that high-priority audits, overdue items, or tasks tagged with specific labels are easy to spot.
By using this filter, teams can streamline their focus, tackle urgent tasks, and avoid missing deadlines; keeping the entire audit program on track and well-coordinated.
7. Fine-Tune Board Settings for Optimal Control
Efficient auditing requires a board that adapts to your evolving needs. The board settings let you control access with privacy options, ensuring that only the right people see the sensitive details of the audit process. You can set WIP (Work-in-Progress) limits to manage team workload and prevent bottlenecks.
Auto-numbering tasks ensures consistent tracking, while tags help in organizing tasks across departments, phases, or categories. Additionally, the board overview provides real-time insights into the status of the audit program, making it easy to identify tasks that are completed, pending, or overdue.
With export and archive options, you can back up or pause tasks while keeping your audit workflow organized and future-ready.
Break Down Tasks Into Manageable Steps
When managing an audit program, breaking down tasks is the key to ensuring no critical detail is overlooked. This demo board exemplifies how each task is divided into actionable, trackable steps for better clarity and collaboration.
Here’s how this team approaches task segmentation effectively:
Details Tab for Task Descriptions: The Details tab allows teams to document comprehensive task descriptions, requirements, and key objectives. This ensures everyone involved understands the task scope without needing constant clarification.
Setting Task Status for Progress Tracking: Assigning a status such as Ready,In Progress, or Needs Review enables clear visibility into the progress of tasks. With updated statuses, team members can easily track completion or identify bottlenecks.
Checklist Tab for Subtasks: Complex tasks can be broken down into smaller, actionable subtasks using the Checklist tab. Each subtask can be ticked off upon completion, helping teams stay organized and avoid overlooking essential steps.
Due Dates to Maintain Deadlines: Setting deadlines ensures tasks remain on schedule, while visibility into upcoming due dates helps the team prioritize work and avoid missed timelines.
Tags for Categorization: By assigning relevant tags, such as compliance audit or disaster recovery, tasks can be categorized and filtered efficiently. This feature makes it easy to locate related tasks and ensure streamlined workflows.
Chat Tab for Task-Specific Discussions: Instead of scattered messages across different platforms, the Chat tab centralizes all task-related conversations. Teams can collaborate, provide updates, and resolve questions directly within the task card.
Task Assignments for Clear Ownership: Assigning tasks to specific team members ensures accountability. Each team member knows their responsibilities and can focus on their assigned tasks without confusion.
Attachments Tab for Storing Relevant Files: Important documents, reference files, or evidence can be attached directly to the task through the Attachments tab. This keeps everything task-specific and avoids searching through external storage systems.
With tasks broken down into manageable steps, this board demonstrates how complex audits can be simplified, making it easier to track progress, identify blockers, and ensure all objectives are met seamlessly.
Conclusion: Building an Effective and Scalable Audit Program
A well-executed audit program is the backbone of organizational compliance, risk management, and process optimization. By breaking down tasks into manageable steps, ensuring proper categorization, and fostering clear team communication, you create a workflow that is structured yet flexible enough to handle unexpected challenges.
The right planning and execution will help you stay on top of deadlines, improve collaboration, and ultimately achieve audit success with confidence.
Your workspace should work for you, not the other way around. Customization options allow you to tailor everything from background colors to notifications and whiteboard tools, helping you stay organized and productive.
To start personalizing your workspace, you’ll need to access the Preference Settings in your account. Here’s how:
Click on your Profile Icon in the top-right corner of the screen.
Select My Preferences from the dropdown menu.
These settings let you create an experience that fits your unique work style. Now that you know how to access the settings, let us guide you step by step how you can use each customization option.
How It Works: Adjusting Preferences
Preferences are typically grouped into three main categories: General, Notifications, and Whiteboard. Each section provides straightforward options designed to enhance your workflow and optimize your experience.
Here’s a closer look at how these settings work:
General Settings: Make Your Workspace Yours
Background Color: ● Choose a background color that’s easy on your eyes and suits your style
● Pick from a variety of options to make your workspace visually appealing.
Use Tags for Task Boards ● Enable this feature to automatically include tags on new task boards and templates you create.
● Helps you stay organized and categorize tasks effortlessly.
The Benefits: Customizing the visual aspects of your workspace makes it feel more intuitive and less cluttered, helping you stay focused.
Notifications: Stay in the Loop Without Overloading
Chat Notifications ● Get emails when there’s board-level chat or when someone chats on a task you’re involved in.
Activity Updates for Admins ● Receive notifications when new tasks are added, completed, or reassigned on boards you administer.
Daily Task Reminders ● Opt for a daily email summary sent at 6 AM, showing overdue tasks and those due this week or next.
● Group tasks by date or board for easy tracking.
The Benefits: With flexible notifications, you can stay informed about what matters most without getting bombarded by unnecessary updates.
Whiteboard Settings: Streamline Your Creative Process
Lines and Shapes ● Set default line styles, thickness, and colors to create clean, consistent visuals.
Text on Canvases ● Choose your preferred font style, size, and color for a polished look.
Grid Options ● Enable snapping to grid and set the grid size to keep your designs aligned and professional.
The Benefits:
These settings make whiteboards perfect for brainstorming, planning, or designing, ensuring your work looks great and stays organized.
Wrap Up
Whether it’s adjusting visual elements, tailoring notifications, or streamlining creative tools, these options are designed to enhance your productivity and keep your work environment organized. Taking a few moments to personalize your settings can lead to a more efficient and enjoyable experience every day.
Efficient project management is the backbone of delivering successful outcomes. Whether you’re designing a website, launching a product, or coordinating a complex development effort, a structured approach ensures that all tasks are aligned, timelines are met, and stakeholders remain informed.
This guide walks you through the essential steps to mastering project management, providing actionable strategies to streamline workflows, foster collaboration, and track progress.
Once you’ve grasped the fundamentals, you’ll see how a visual tool can bring these principles to life, helping your team stay focused and productive.
Essential Steps to Build an Effective Project Management Workflow
A strong project management workflow ensures that tasks are completed efficiently, deadlines are met, and team collaboration runs smoothly.
Here are the key steps to build a reliable project management process:
1. Define Clear Objectives and Goals
Every successful project begins with clear, well-defined objectives. Understanding what you aim to achieve keeps the team focused and aligned throughout the project lifecycle.
Key Actions:
Conduct stakeholder meetings to align on project goals.
Break down objectives into measurable deliverables using the SMART framework (Specific, Measurable, Achievable, Relevant, Time-bound).
Document these objectives in a centralized location to ensure team visibility.
2. Develop a Detailed Project Plan
A comprehensive project plan serves as a roadmap, outlining tasks, timelines, and dependencies. It ensures that every team member understands their role and responsibilities.
Key Actions:
Use Gantt charts to map out timelines and task dependencies.
Identify milestones and deadlines to track progress effectively.
Allocate resources based on task complexity and team expertise.
3. Assign Roles and Responsibilities
Defining roles ensures accountability and eliminates confusion about who is responsible for each task. A RACI matrix (Responsible, Accountable, Consulted, Informed) can be helpful.
Key Actions:
Assign roles based on individual skills and project needs.
Communicate responsibilities clearly during team meetings or kickoff sessions.
Encourage feedback to ensure responsibilities are distributed fairly.
4. Prioritize and Break Down Tasks
Breaking down the project into smaller, manageable tasks ensures that no aspect of the work is overlooked. Prioritization helps focus the team’s efforts on what matters most.
Key Actions:
Categorize tasks by urgency and importance using prioritization techniques like the Eisenhower Matrix.
Divide complex tasks into smaller subtasks with clear deadlines.
Use tools to track task progress and keep everyone updated.
5. Foster Collaboration and Communication
Open and transparent communication is critical for effective project management. It helps teams stay aligned, resolve conflicts, and ensure progress is on track.
Key Actions:
Set up regular meetings (e.g., daily stand-ups or weekly check-ins) to review progress and address roadblocks.
Encourage team members to share updates and feedback in real-time.
Use collaborative tools to centralize communication and document decisions.
6. Monitor Progress and Adjust Plans
Tracking project progress helps identify potential risks and bottlenecks before they escalate. Regular monitoring allows for adjustments to keep the project on course.
Key Actions:
Use KPIs (Key Performance Indicators) such as project completion percentage, budget adherence, and resource utilization.
Conduct periodic reviews to reassess goals and timelines.
Create contingency plans to address unforeseen challenges.
7. Evaluate and Document Learnings
After completing the project, evaluate its success by measuring outcomes against initial goals. Documenting lessons learned helps improve future workflows.
Key Actions:
Hold a post-project review to discuss what went well and what could be improved.
Collect feedback from all stakeholders to identify strengths and weaknesses.
Update standard operating procedures (SOPs) based on findings.
Using the Right Tools to Build a Project Management Workflow
While mastering the essential steps of project management is key, implementing those steps effectively requires the right tools. A reliable task management system can bridge the gap between theory and execution, ensuring that projects are not only well-organized but also actionable.
The right tool streamlines task delegation, prioritization, and collaboration, enabling your team to stay focused and deliver results on time.
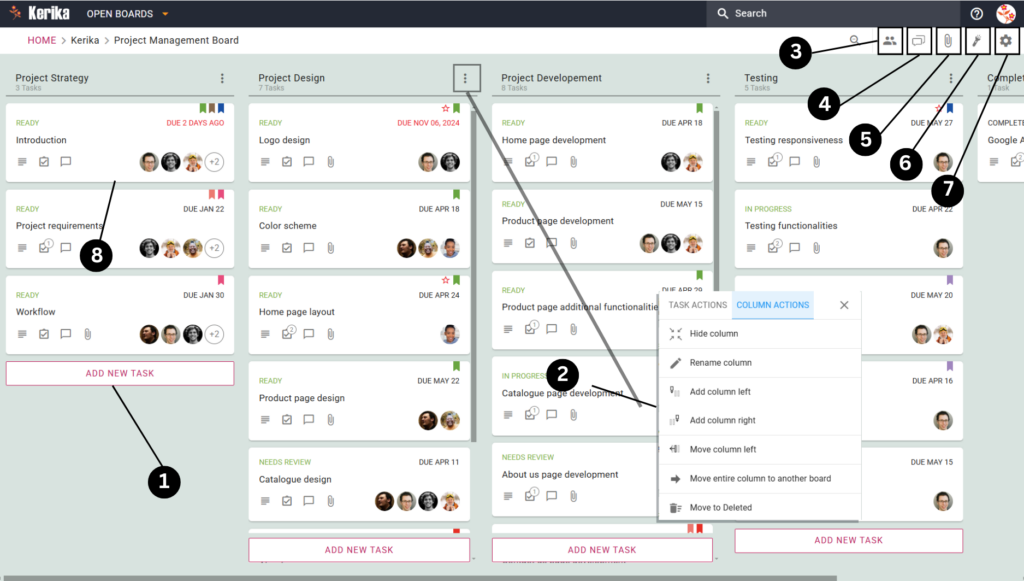
The demo board below exemplifies an efficient project management workflow in action. This board visually represents tasks progressing through stages such as “Project Strategy,” “Project Design,” “Development,” and “Testing,” ensuring nothing falls through the cracks.
By centralizing information, tracking progress at a glance, and identifying bottlenecks, this workspace provides a clear and actionable overview of your project.
Now let’s dive deeper into this demo board and understand how each section works together to create a robust project management system designed for success.
You can see in the image above how this team organizes their workflow using a board that simplifies project management. It’s designed to handle every stage of the process.
Let’s take a closer look at this team’s board to understand how each feature contributes to an effective project management system.Here’s how it all comes together.
1. Adding New Tasks to the Board
Every project starts with a list of tasks, and this board makes it incredibly simple to add them. By clicking on the “Add New Task” button (highlighted in the bottom left corner of the board), you can create a new card. Each card represents a specific task, such as “Homepage Design” or “Product Page Development.” This ensures your workflow stays clear and nothing gets left behind.
2. Customizing Columns for Your Workflow
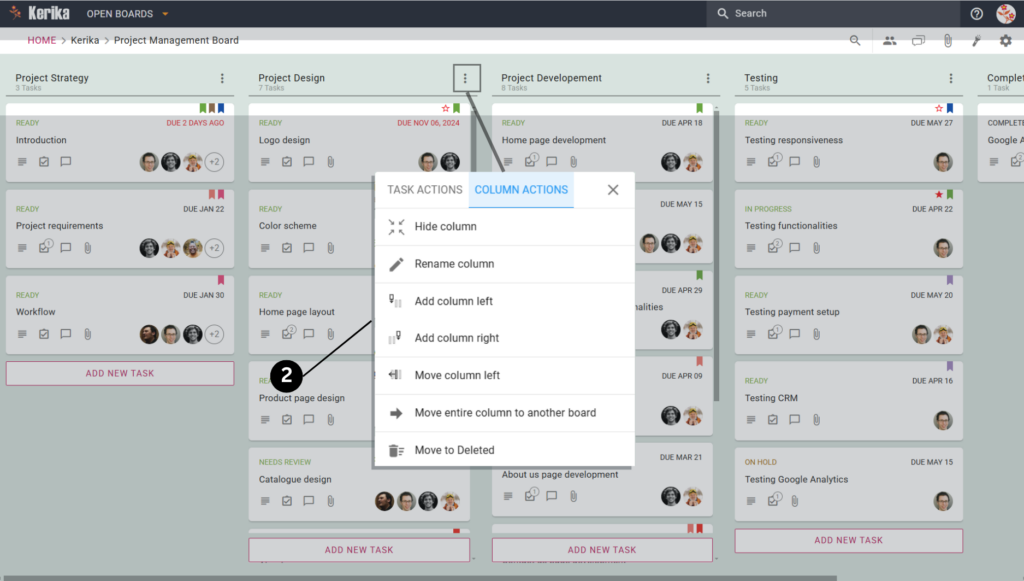
Need to adjust how your board is set up? You can easily rename columns, add new ones, or move existing columns to match your workflow. Simply click on the column menu (three dots) at the top of any column to access these options. For example, if a new phase of your project emerges, you can add a column like “Testing” without disrupting your existing tasks.
3. Managing Team Members and Roles
Effective collaboration starts with the right roles. Use the Team Members menu to add or remove members from the board. Each person can be assigned as an Admin, Member, or Visitor based on their responsibilities. For instance, assign Admin rights to project leads while giving clients Visitor access to view progress.
4. Centralizing Team Communication
Keep all discussions relevant to the board using the Board Chat feature. This allows your team to share updates, ask questions, or address challenges in one central location. For instance, a designer might share feedback on the “Logo Design” task directly in the chat to keep everyone on the same page.
5. Attaching and Sharing Files
Every project involves a fair amount of documentation, and this board handles it beautifully. With the Attachments section, you can upload files, link Google Docs, or even create new documents directly from the board. For instance, attach style guides or client briefs to ensure all necessary materials are accessible to the team.
6. Highlighting Important Tasks
Prioritize what matters with the Highlight feature. This lets you filter tasks based on due dates, priority levels, tags or specific assignments. You can combine these filters to find tasks as well.
For example, You can highlight tasks assigned to a particular teammate, tagged as ‘mockups’, along with their status as ‘Ready’. This saves you a lot of manual work to find what you are looking for.
7. Adjusting Privacy Settings
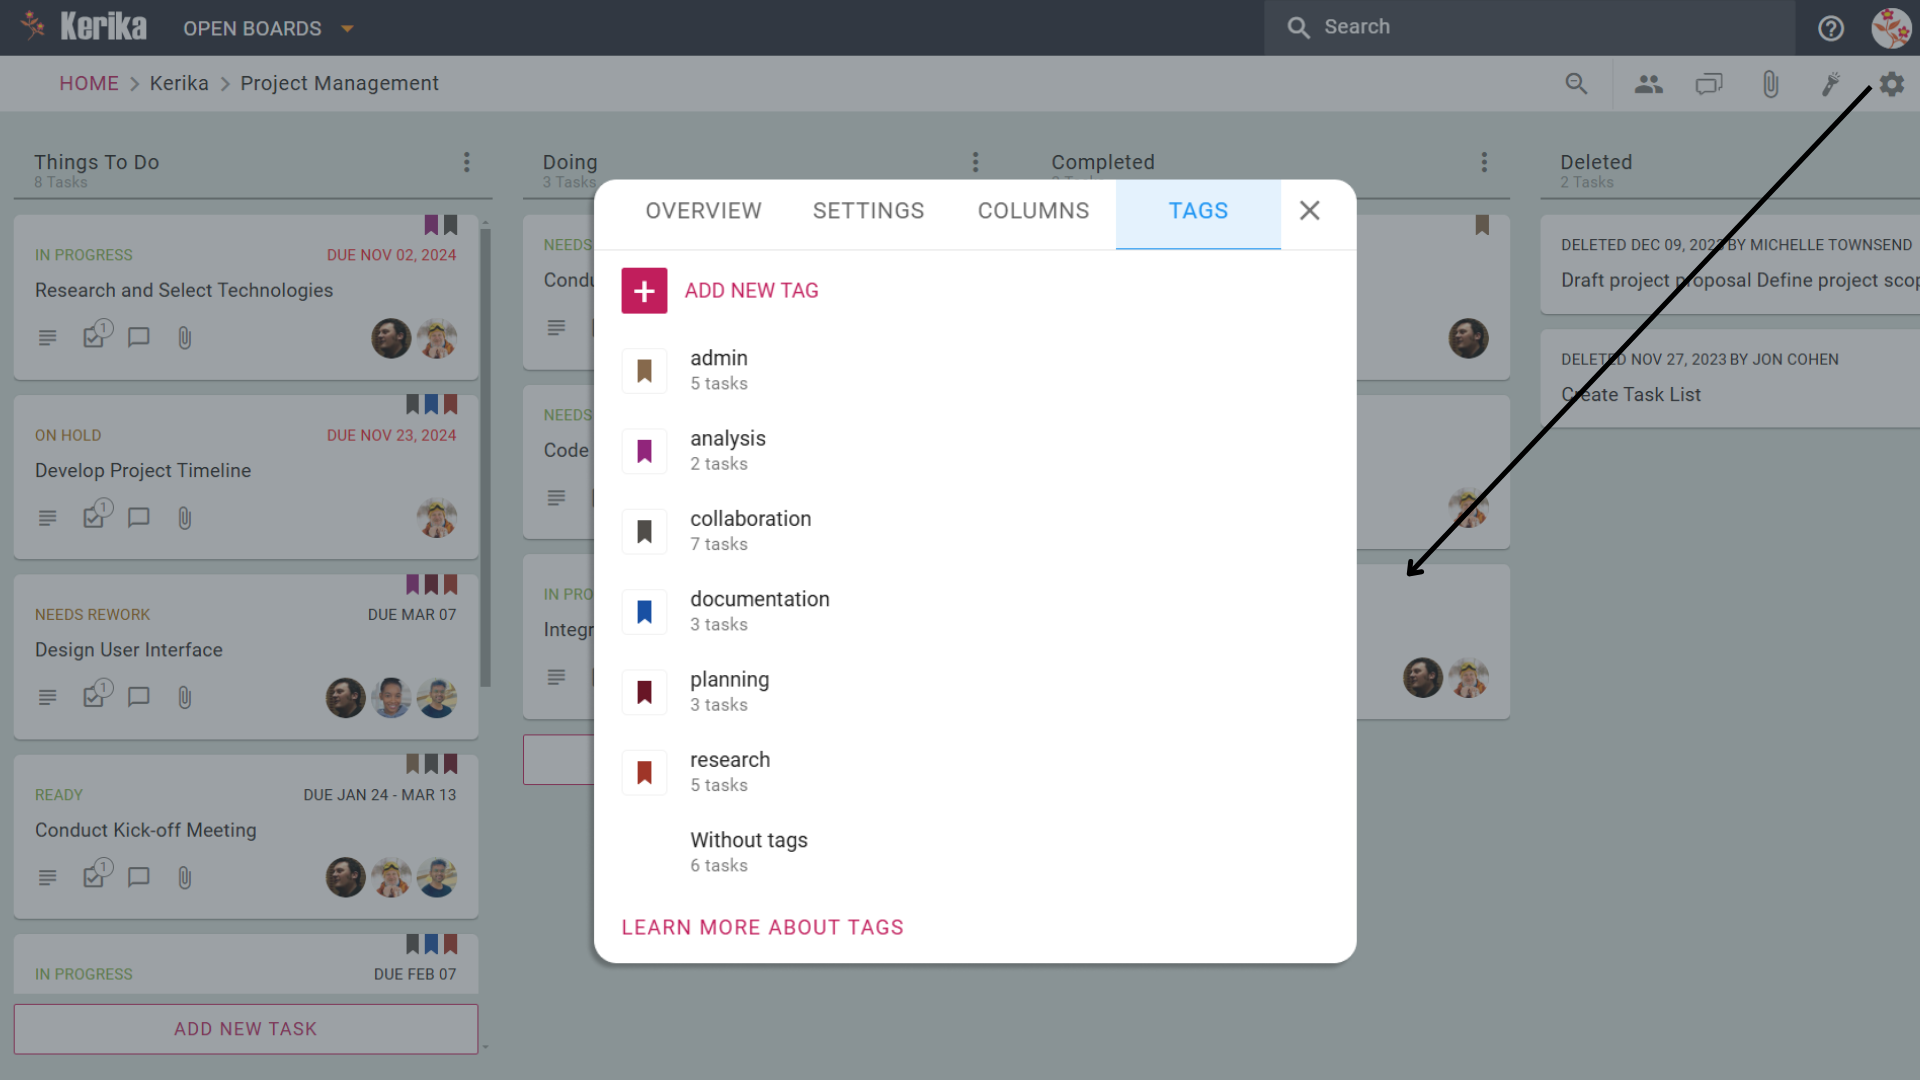
The Settings Menu is where this team fine-tunes their board for maximum efficiency. Clicking the gear icon in the top-right corner reveals four tabs: Overview, Settings, Columns, and Tags. Each tab plays a specific role in optimizing the workflow. Let’s break them down:
Overview Tab:
Provides a snapshot of the board’s progress, a description of its purpose, options for exporting tasks in Excel format, and the ability to archive completed boards for future reference.
Settings Tab:
Controls board privacy and access permissions, letting you choose between team-only access, organizational access, or public sharing via a link. It also manages edit permissions to maintain workflow integrity.
Columns Tab:
Allows customization of the board structure by adding, renaming, or reordering columns. This helps align the workflow with the team’s specific project requirements.
Tags Tab:
Facilitates task categorization by creating, managing, and applying tags. Tags make it easier to filter tasks by priority, type, or other custom labels, improving task organization and retrieval.
Now, let’s dive into how the team uses these task cards to break down the entire project management process into manageable steps. We will show you how you can use this feature to break down each tasks into an actionable item.
Break Down Tasks Into Manageable Steps
Task cards serve as the central hub where you and your team can capture and organize all the necessary details for completing a task. Here’s how to use them effectively:
Add Key Details:
Start by clearly defining the task’s objectives and any steps required for completion. For example, for a homepage design task, outline the layout and content requirements.
Track Progress:
Update the task’s progress by marking it as “In Progress,” “Needs Review,” or “Completed” so everyone can stay informed about its status.
Set Deadlines:
Assign a specific due date to each task to ensure that deadlines are met and nothing gets delayed.
Break Tasks Into Actionable Steps:
Decompose complex tasks into smaller, manageable steps. For example, “Create homepage content” might include subtasks like writing copy, selecting images, and designing the layout.
Use Tags For Clarity:
Use Tags to categorize tasks. You can prioritize by urgency or group tasks by themes like “Design,” “Development,” or “Testing.”
Attach Files:
Keep all project resources organized by attaching files directly to the task card. Upload design mockups, reports, or PDFs, create new Google Docs or Kerika Canvases, or link external resources – all in one place. This ensures your team can quickly access everything they need without wasting time searching through emails or folders.
Maintain Focused Communication:
Use the Chat tab to keep all discussions tied to specific tasks, ensuring that communication is clear and easy to track.
Assign Team Members:
Assign each task to specific team members, so it’s clear who is responsible for what. This enhances accountability and ensures tasks move forward efficiently.
Set Task Priority for Clear Focus:
Prioritizing tasks is key to keeping your project on track, and the Set Priority feature makes this effortless. You can assign one of three levels to each task:
Normal: For routine tasks that can proceed without urgency.
High Priority: For tasks requiring quick action or increased focus from the team.
Critical: For time-sensitive or high-impact tasks that demand immediate attention.
By leveraging these features, task cards help your team stay organized, collaborate seamlessly, and ensure no important detail is overlooked. With these steps in place, managing your project becomes easier and more effective.
Set Up Your Kerika Account
Getting started with Kerika is quick, simple, and sets the stage for organizing your project workflow seamlessly. Here’s how you can set up your account and get started on the right foot:
If you use Google Workspace, select the SIGN UP WITH GOOGLE option.
If you’re an Office 365 user, opt for SIGN UP WITH MICROSOFT.
You can also choose SIGN UP WITH BOX for file storage integration.
Follow the prompts, and you’ll be ready to go in moments—no credit card required, and you’ll receive a free 30-day trial for your team.
A Global Workspace for Everyone
Kerika supports 38 languages, so you and your team can work in the language you’re most comfortable with, creating a truly inclusive experience.
Create Your First Board
Once you’ve signed up, it’s time to create your first board and bring your project management workflow to life. Here’s how:
Click “Create New Board”: From the Kerika dashboard, select the option to create a new board.
Choose the Board Type: For project management, select the Task Board template. This comes preloaded with columns like “To Do,” “Doing,” and “Completed.”
Name Your Board: Give your board a name that reflects your project, such as “Website Redesign” or “Marketing Plan.”
Customize Your Workspace: Add or rename columns to suit your workflow, and start adding tasks to keep your team aligned.
You now have a fully functional, visual workspace ready to help you track progress, manage tasks, and foster collaboration within your team.
Wrapping Up: Your Blueprint for Project Success
Mastering project management isn’t just about completing tasks; it’s about creating a system that keeps your team on the same page, fosters collaboration, and ensures every milestone is met. With a detailed workflow and the right tools, you can stay organized, productive, and focused on achieving your goals.
This board demonstrates how every aspect of your project can be broken into actionable steps. By prioritizing tasks, tracking progress, and using features like task cards to manage details, you’ll ensure nothing gets overlooked.Kerika isn’t just a tool; it’s a framework to streamline teamwork, maintain accountability, and bring your project vision to life. Ready to take the next step? Start building your board, organize your tasks, and watch your projects succeed with Kerika!
Your workspace should work for you, not the other way around. Customization options allow you to tailor everything from background colors to notifications and whiteboard tools, helping you stay organized and productive.
To start personalizing your workspace, you’ll need to access the Preference Settings in your account. Here’s how:
Click on your Profile Icon in the top-right corner of the screen.
Select My Preferences from the dropdown menu.
These settings let you create an experience that fits your unique work style. Now that you know how to access the settings, let us guide you step by step how you can use each customization option.
How It Works: Adjusting Preferences
Preferences are typically grouped into three main categories: General, Notifications, and Whiteboard. Each section provides straightforward options designed to enhance your workflow and optimize your experience.
Here’s a closer look at how these settings work:
General Settings: Make Your Workspace Yours
Background Color: ● Choose a background color that’s easy on your eyes and suits your style
● Pick from a variety of options to make your workspace visually appealing.
Use Tags for Task Boards ● Enable this feature to automatically include tags on new task boards and templates you create.
● Helps you stay organized and categorize tasks effortlessly.
The Benefits: Customizing the visual aspects of your workspace makes it feel more intuitive and less cluttered, helping you stay focused.
Notifications: Stay in the Loop Without Overloading
Chat Notifications ● Get emails when there’s board-level chat or when someone chats on a task you’re involved in.
Activity Updates for Admins ● Receive notifications when new tasks are added, completed, or reassigned on boards you administer.
Daily Task Reminders ● Opt for a daily email summary sent at 6 AM, showing overdue tasks and those due this week or next.
● Group tasks by date or board for easy tracking.
The Benefits: With flexible notifications, you can stay informed about what matters most without getting bombarded by unnecessary updates.
Whiteboard Settings: Streamline Your Creative Process
Lines and Shapes ● Set default line styles, thickness, and colors to create clean, consistent visuals.
Text on Canvases ● Choose your preferred font style, size, and color for a polished look.
Grid Options ● Enable snapping to grid and set the grid size to keep your designs aligned and professional.
The Benefits:
These settings make whiteboards perfect for brainstorming, planning, or designing, ensuring your work looks great and stays organized.
Wrap Up
Whether it’s adjusting visual elements, tailoring notifications, or streamlining creative tools, these options are designed to enhance your productivity and keep your work environment organized. Taking a few moments to personalize your settings can lead to a more efficient and enjoyable experience every day.
Kerika is a project management and collaboration software designed to help teams work together more efficiently. It offers a range of tools to manage tasks, projects, and workflows, particularly for distributed teams. Key features of Kerika include:
Task Management: Create, assign, and track tasks with due dates, priorities, and status updates.
Visual Boards: Use Kanban boards, whiteboards, and flowcharts to visualize workflows and project progress.
Collaboration: Real-time collaboration allows team members to work together on documents, share feedback, and communicate within the platform.
Integration: Kerika integrates with tools like Google Drive, Box, and Slack, making it easier to manage files and communications in one place.
Access Control: Set permissions to control who can view or edit specific projects or tasks.
Mobile Access: Kerika offers mobile apps for iOS and Android, enabling users to stay connected and manage tasks on the go.
Kerika is particularly popular among teams that require a high level of collaboration and transparency, such as remote teams, consultants, and organizations with complex workflows. Its user-friendly interface and focus on visual project management make it a versatile tool for various industries.
Note: the part about integrating with Slack is not true. At least, not yet.
Kerika is a project management and collaboration software designed to help teams work together more efficiently. It offers a range of tools to manage tasks, projects, and workflows, particularly for distributed teams. Key features of Kerika include:
Task Management: Create, assign, and track tasks with due dates, priorities, and status updates.
Visual Boards: Use Kanban boards, whiteboards, and flowcharts to visualize workflows and project progress.
Collaboration: Real-time collaboration allows team members to work together on documents, share feedback, and communicate within the platform.
Integration: Kerika integrates with tools like Google Drive, Box, and Slack, making it easier to manage files and communications in one place.
Access Control: Set permissions to control who can view or edit specific projects or tasks.
Mobile Access: Kerika offers mobile apps for iOS and Android, enabling users to stay connected and manage tasks on the go.
Kerika is particularly popular among teams that require a high level of collaboration and transparency, such as remote teams, consultants, and organizations with complex workflows. Its user-friendly interface and focus on visual project management make it a versatile tool for various industries.
Note: the part about integrating with Slack is not true. At least, not yet.