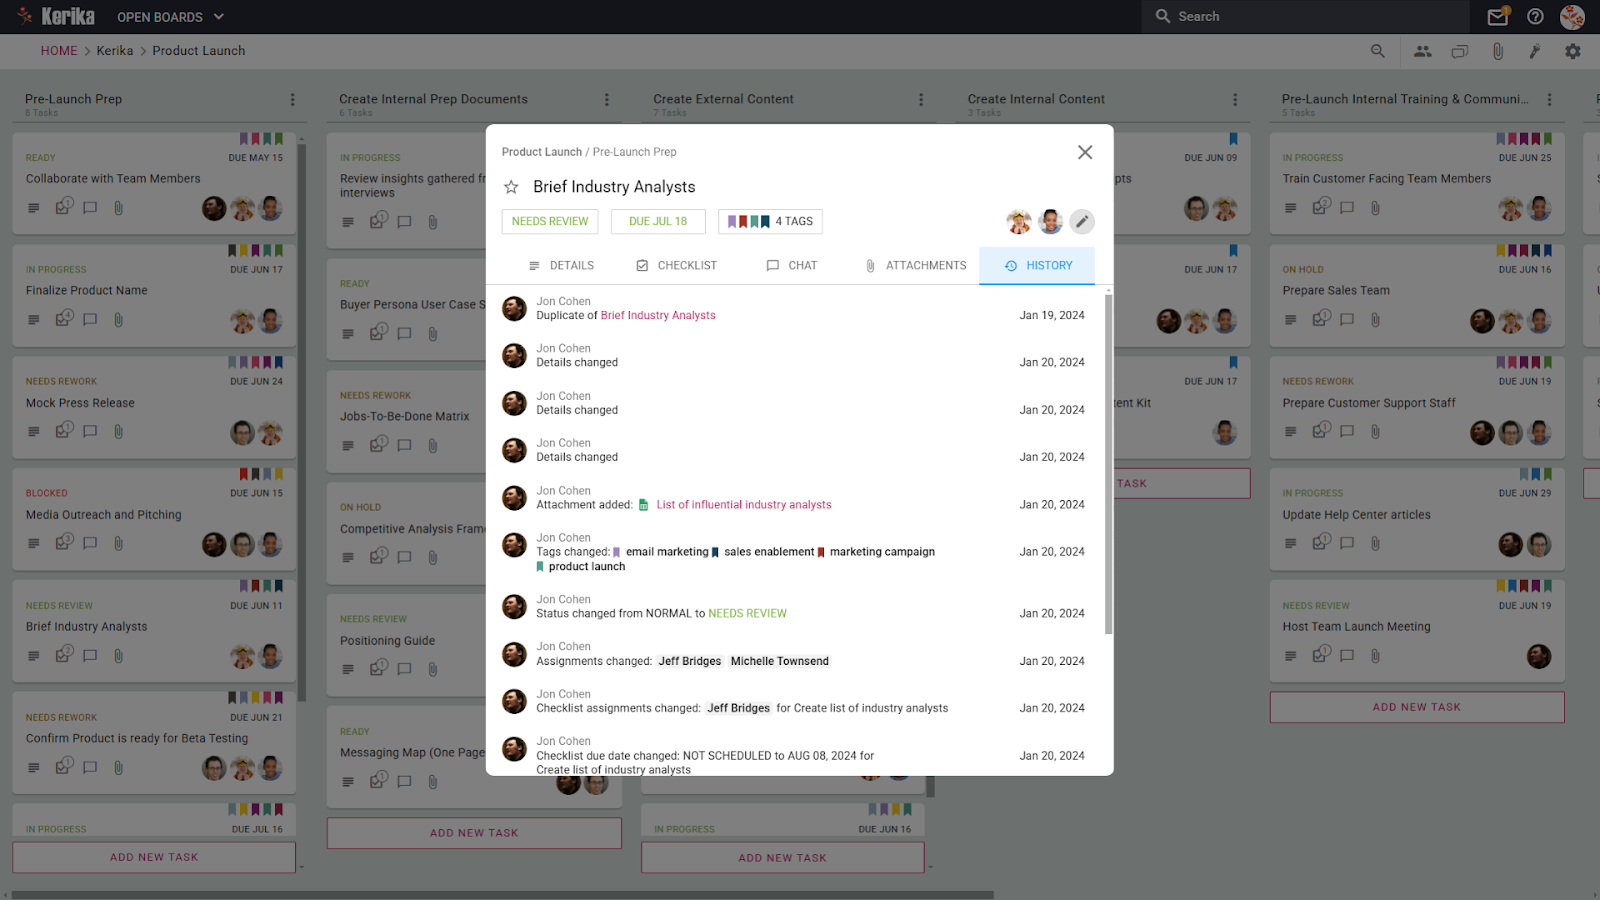
Mistakes happen – tasks can sometimes be deleted by accident. That’s why having a safeguard in place is essential to ensure nothing important is lost forever.
When tasks are deleted, they don’t disappear permanently; instead, they’re moved to a Deleted Column of your board. This provides a safety net, allowing tasks to be reviewed or restored if needed. However, the ability to permanently delete tasks is restricted to Board Admins.
This setup ensures accountability while maintaining flexibility. Team members can delete tasks knowing they can be recovered if needed, but permanent removal requires an Admin’s oversight, keeping task management secure and deliberate.
When a task is deleted, it’s not gone forever. Instead, it’s moved to the Deleted Column, where it stays until further action is taken.
Recover Tasks Anytime: Anyone on the board can restore deleted tasks from this column if they realize a mistake has been made.
No Pressure: You don’t need to worry about accidental clicks or hasty decisions – everything remains recoverable.
2. Only Board Admins Can Permanently Delete
When it’s time to clean up the Deleted Column for good, only the Board Admins can step in to permanently remove tasks.
Added Protection: By restricting this authority to admins, you can make sure that no task is permanently deleted without careful consideration.
Clear Accountability: This feature adds a layer of control, ensuring that critical tasks are not lost due to unintentional actions.
Why This Matters
Avoid Losing Important Work The Deleted Column acts as a safety net, allowing team members to delete tasks without the fear of losing them permanently. Tasks remain recoverable until a Board Admin decides otherwise, offering both flexibility and security.
Maintain Control Board Admins have the authority to oversee permanent deletions, ensuring that only unnecessary or duplicate tasks are removed. This structure helps maintain clarity and keeps projects well-organized.
Promote Accountability Restricting permanent deletion rights encourages teams to manage tasks carefully, reducing errors and promoting a reliable, transparent system. This approach fosters trust and responsibility across the board.
Conclusion
Deleted tasks are recoverable until a Board Admin takes action, ensuring safety, accountability, and control. This approach prevents accidental losses and keeps your workflow secure and organized.
Efficient project management is the backbone of delivering successful outcomes. Whether you’re designing a website, launching a product, or coordinating a complex development effort, a structured approach ensures that all tasks are aligned, timelines are met, and stakeholders remain informed.
This guide walks you through the essential steps to mastering project management, providing actionable strategies to streamline workflows, foster collaboration, and track progress.
Once you’ve grasped the fundamentals, you’ll see how a visual tool can bring these principles to life, helping your team stay focused and productive.
Essential Steps to Build an Effective Project Management Workflow
A strong project management workflow ensures that tasks are completed efficiently, deadlines are met, and team collaboration runs smoothly.
Here are the key steps to build a reliable project management process:
1. Define Clear Objectives and Goals
Every successful project begins with clear, well-defined objectives. Understanding what you aim to achieve keeps the team focused and aligned throughout the project lifecycle.
Key Actions:
Conduct stakeholder meetings to align on project goals.
Break down objectives into measurable deliverables using the SMART framework (Specific, Measurable, Achievable, Relevant, Time-bound).
Document these objectives in a centralized location to ensure team visibility.
2. Develop a Detailed Project Plan
A comprehensive project plan serves as a roadmap, outlining tasks, timelines, and dependencies. It ensures that every team member understands their role and responsibilities.
Key Actions:
Use Gantt charts to map out timelines and task dependencies.
Identify milestones and deadlines to track progress effectively.
Allocate resources based on task complexity and team expertise.
3. Assign Roles and Responsibilities
Defining roles ensures accountability and eliminates confusion about who is responsible for each task. A RACI matrix (Responsible, Accountable, Consulted, Informed) can be helpful.
Key Actions:
Assign roles based on individual skills and project needs.
Communicate responsibilities clearly during team meetings or kickoff sessions.
Encourage feedback to ensure responsibilities are distributed fairly.
4. Prioritize and Break Down Tasks
Breaking down the project into smaller, manageable tasks ensures that no aspect of the work is overlooked. Prioritization helps focus the team’s efforts on what matters most.
Key Actions:
Categorize tasks by urgency and importance using prioritization techniques like the Eisenhower Matrix.
Divide complex tasks into smaller subtasks with clear deadlines.
Use tools to track task progress and keep everyone updated.
5. Foster Collaboration and Communication
Open and transparent communication is critical for effective project management. It helps teams stay aligned, resolve conflicts, and ensure progress is on track.
Key Actions:
Set up regular meetings (e.g., daily stand-ups or weekly check-ins) to review progress and address roadblocks.
Encourage team members to share updates and feedback in real-time.
Use collaborative tools to centralize communication and document decisions.
6. Monitor Progress and Adjust Plans
Tracking project progress helps identify potential risks and bottlenecks before they escalate. Regular monitoring allows for adjustments to keep the project on course.
Key Actions:
Use KPIs (Key Performance Indicators) such as project completion percentage, budget adherence, and resource utilization.
Conduct periodic reviews to reassess goals and timelines.
Create contingency plans to address unforeseen challenges.
7. Evaluate and Document Learnings
After completing the project, evaluate its success by measuring outcomes against initial goals. Documenting lessons learned helps improve future workflows.
Key Actions:
Hold a post-project review to discuss what went well and what could be improved.
Collect feedback from all stakeholders to identify strengths and weaknesses.
Update standard operating procedures (SOPs) based on findings.
Using the Right Tools to Build a Project Management Workflow
While mastering the essential steps of project management is key, implementing those steps effectively requires the right tools. A reliable task management system can bridge the gap between theory and execution, ensuring that projects are not only well-organized but also actionable.
The right tool streamlines task delegation, prioritization, and collaboration, enabling your team to stay focused and deliver results on time.
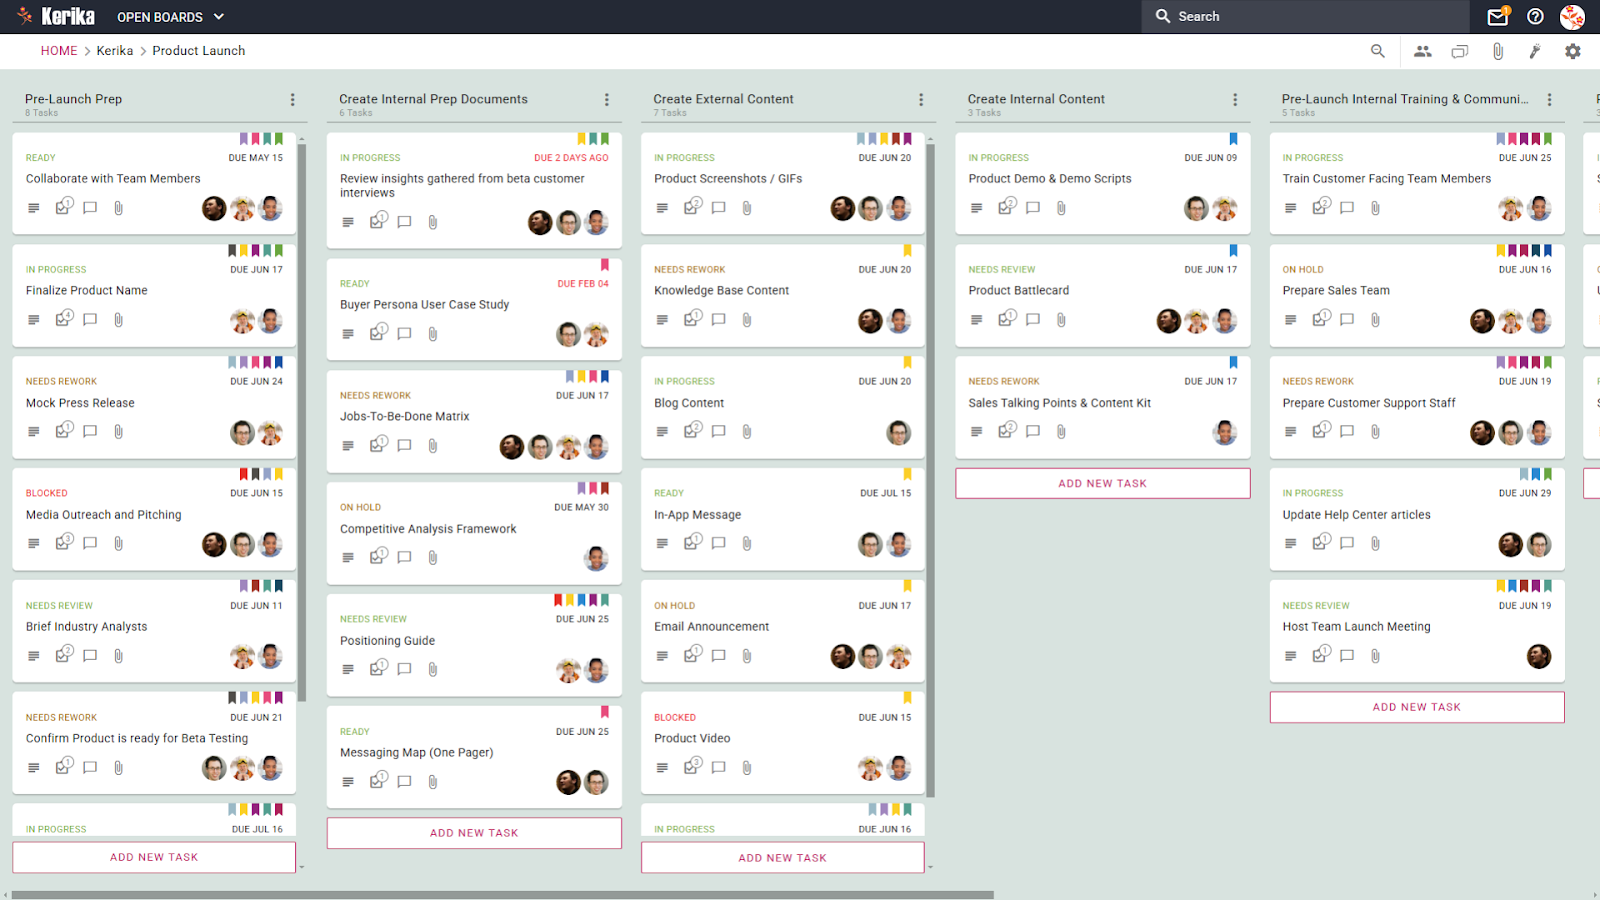
The demo board below exemplifies an efficient project management workflow in action. This board visually represents tasks progressing through stages such as “Project Strategy,” “Project Design,” “Development,” and “Testing,” ensuring nothing falls through the cracks.
By centralizing information, tracking progress at a glance, and identifying bottlenecks, this workspace provides a clear and actionable overview of your project.
Now let’s dive deeper into this demo board and understand how each section works together to create a robust project management system designed for success.
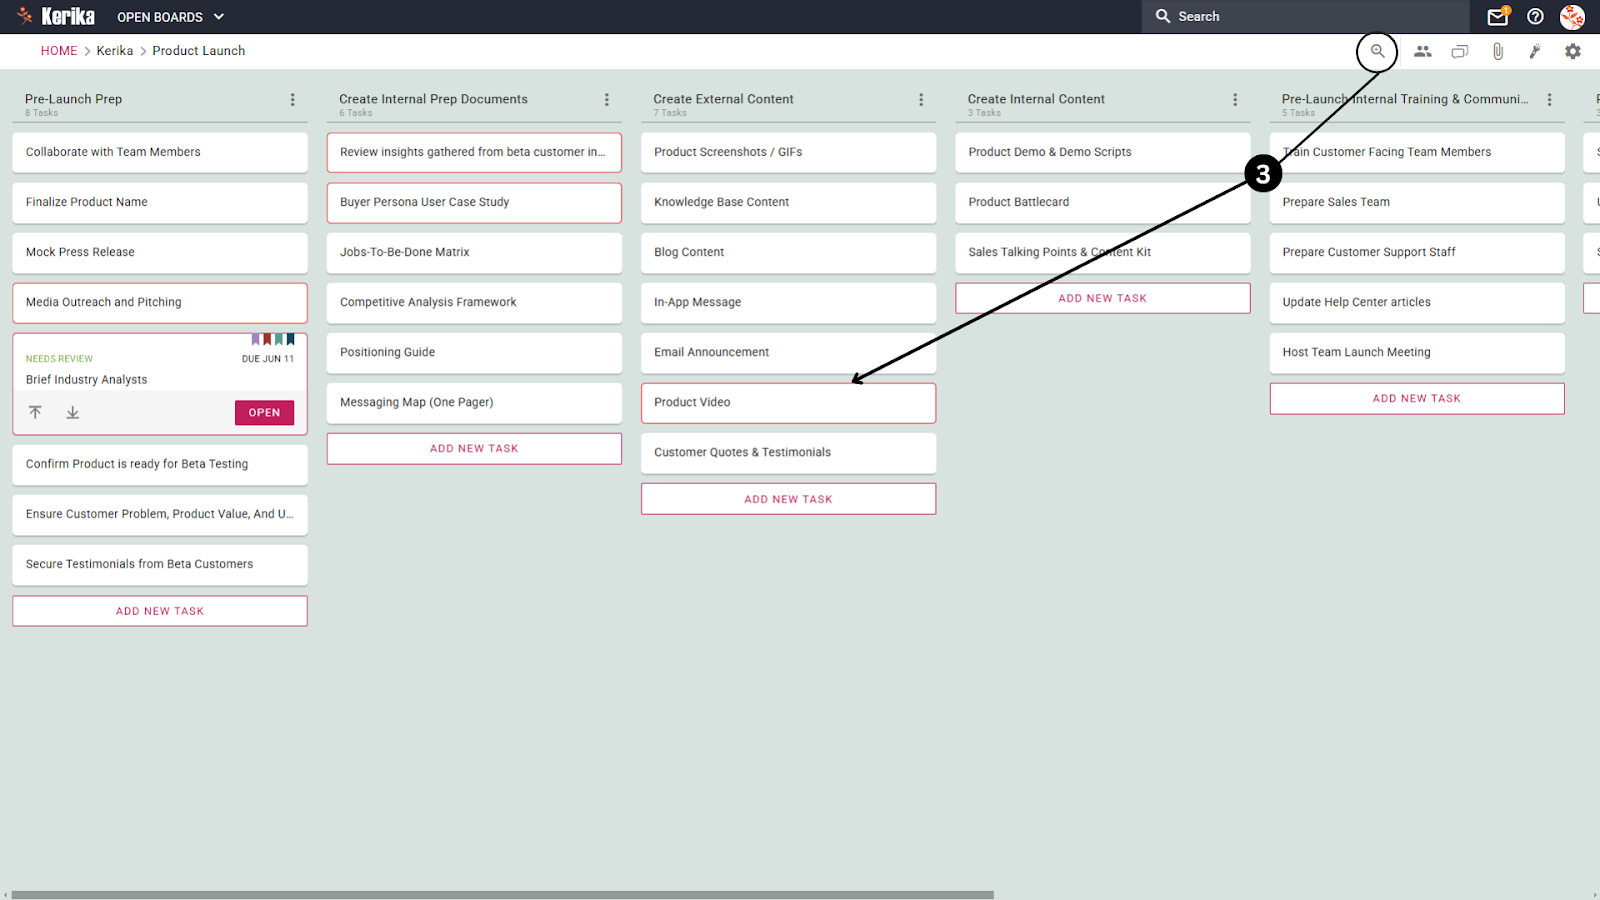
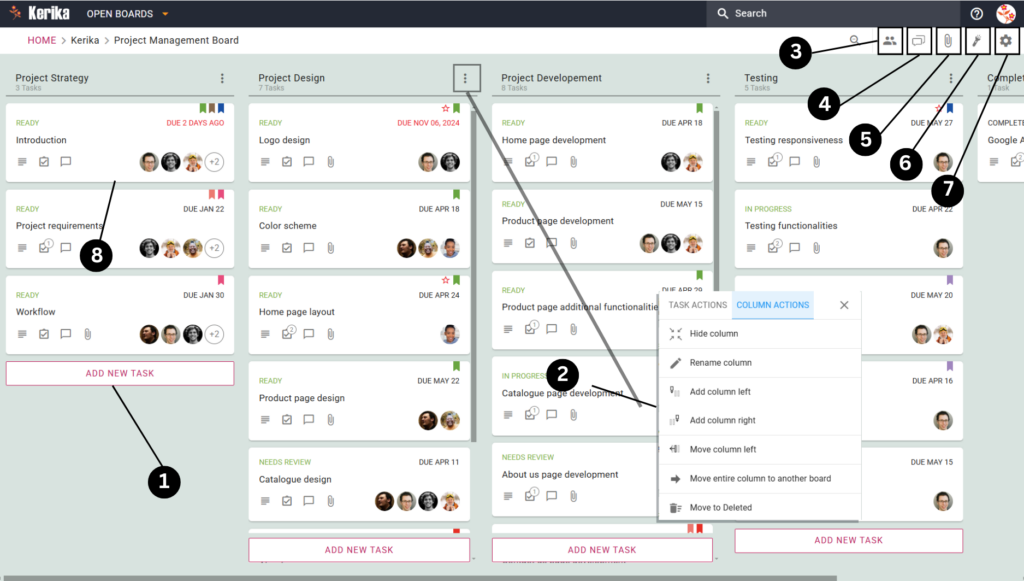
You can see in the image above how this team organizes their workflow using a board that simplifies project management. It’s designed to handle every stage of the process.
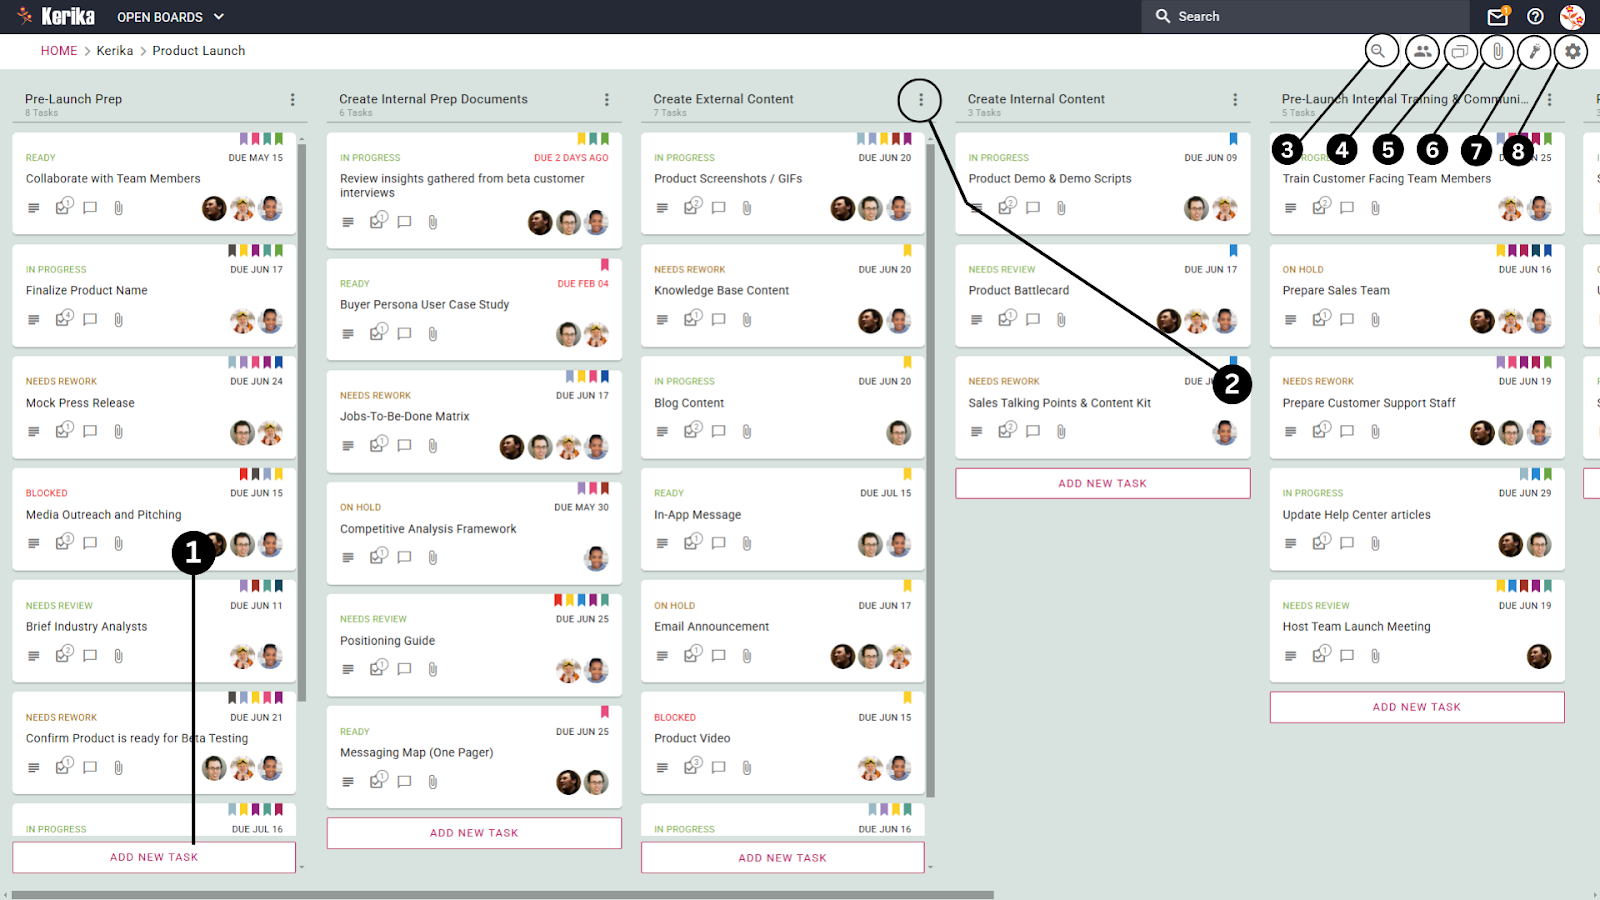
Let’s take a closer look at this team’s board to understand how each feature contributes to an effective project management system.Here’s how it all comes together.
1. Adding New Tasks to the Board
Every project starts with a list of tasks, and this board makes it incredibly simple to add them. By clicking on the “Add New Task” button (highlighted in the bottom left corner of the board), you can create a new card. Each card represents a specific task, such as “Homepage Design” or “Product Page Development.” This ensures your workflow stays clear and nothing gets left behind.
2. Customizing Columns for Your Workflow
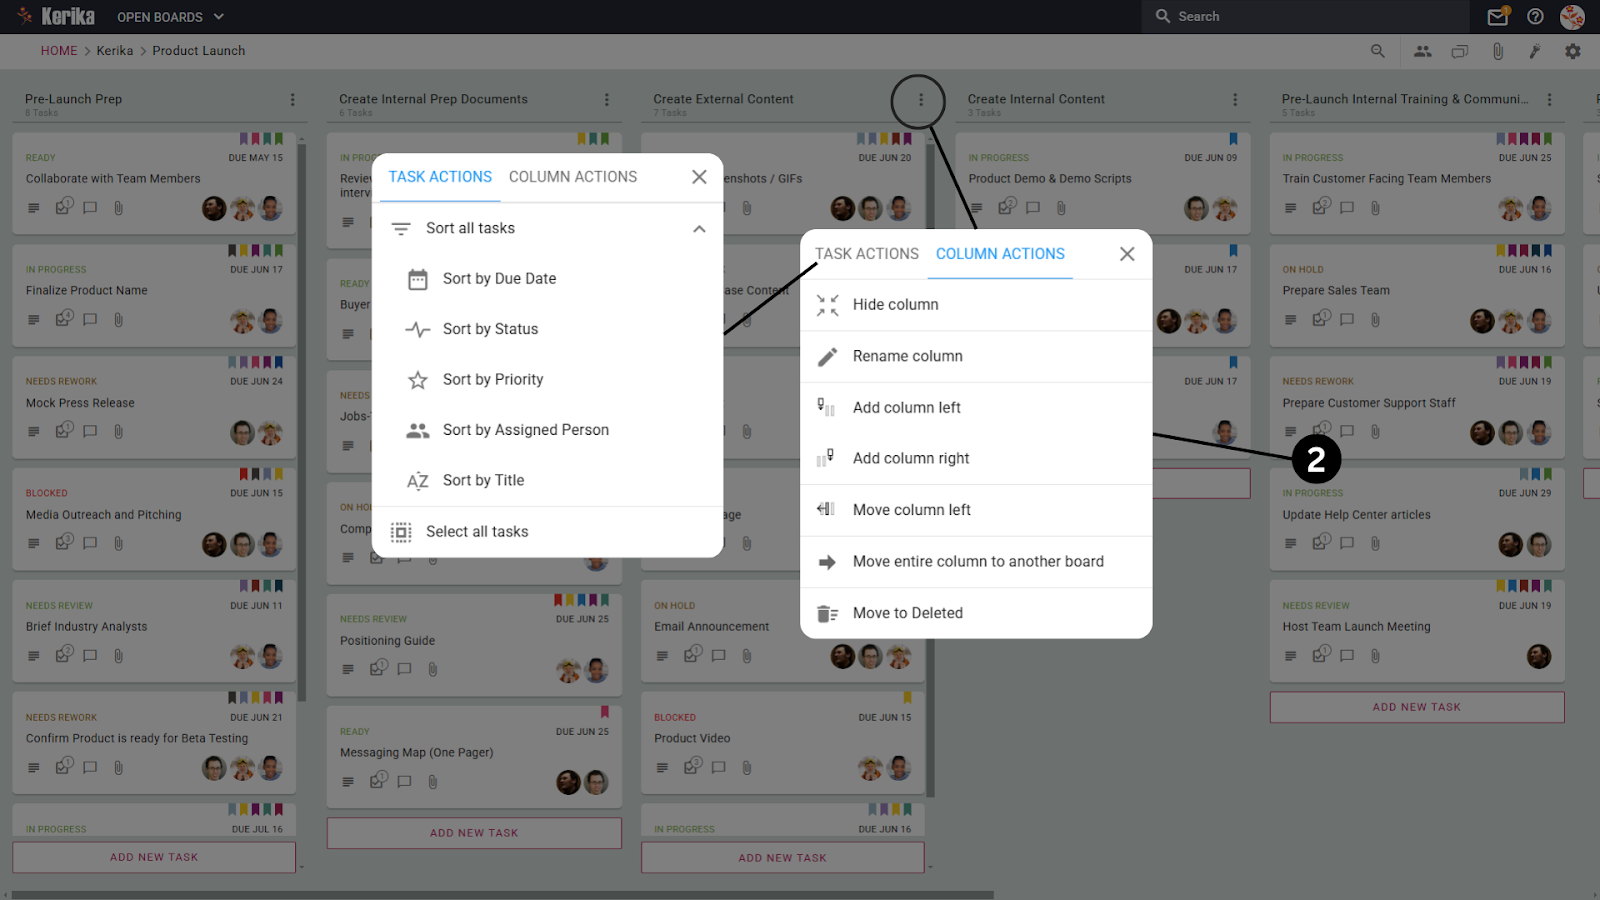
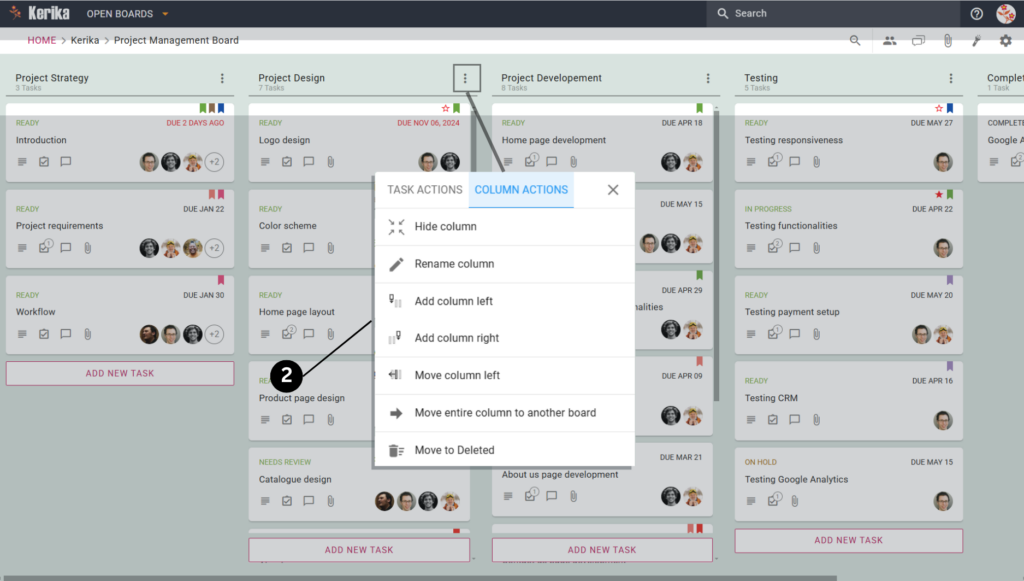
Need to adjust how your board is set up? You can easily rename columns, add new ones, or move existing columns to match your workflow. Simply click on the column menu (three dots) at the top of any column to access these options. For example, if a new phase of your project emerges, you can add a column like “Testing” without disrupting your existing tasks.
3. Managing Team Members and Roles
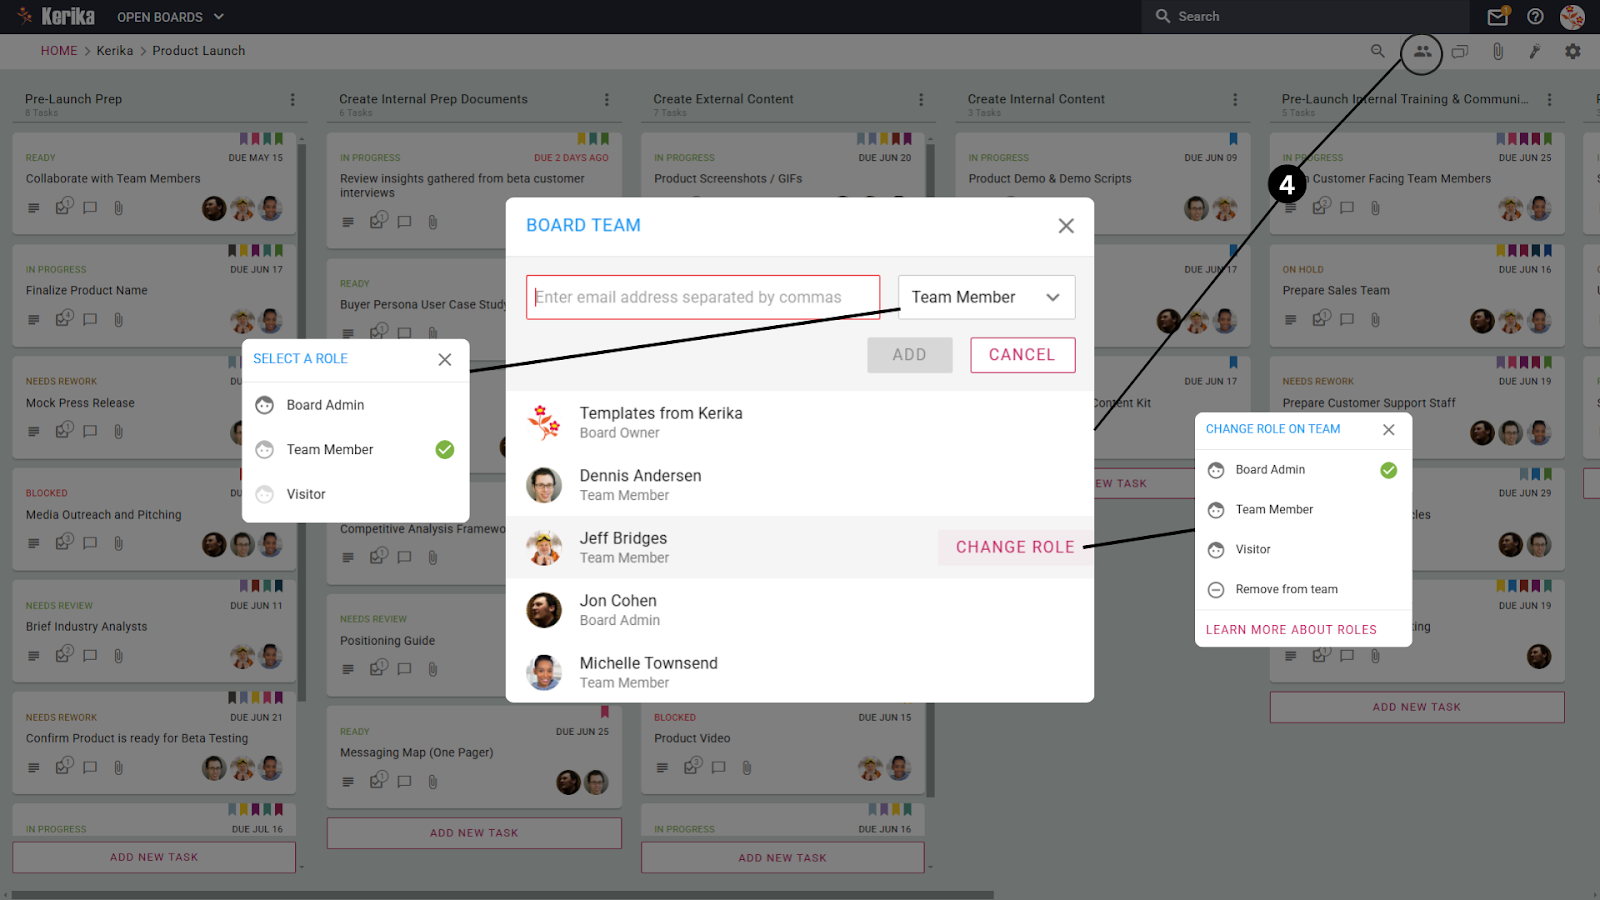
Effective collaboration starts with the right roles. Use the Team Members menu to add or remove members from the board. Each person can be assigned as an Admin, Member, or Visitor based on their responsibilities. For instance, assign Admin rights to project leads while giving clients Visitor access to view progress.
4. Centralizing Team Communication
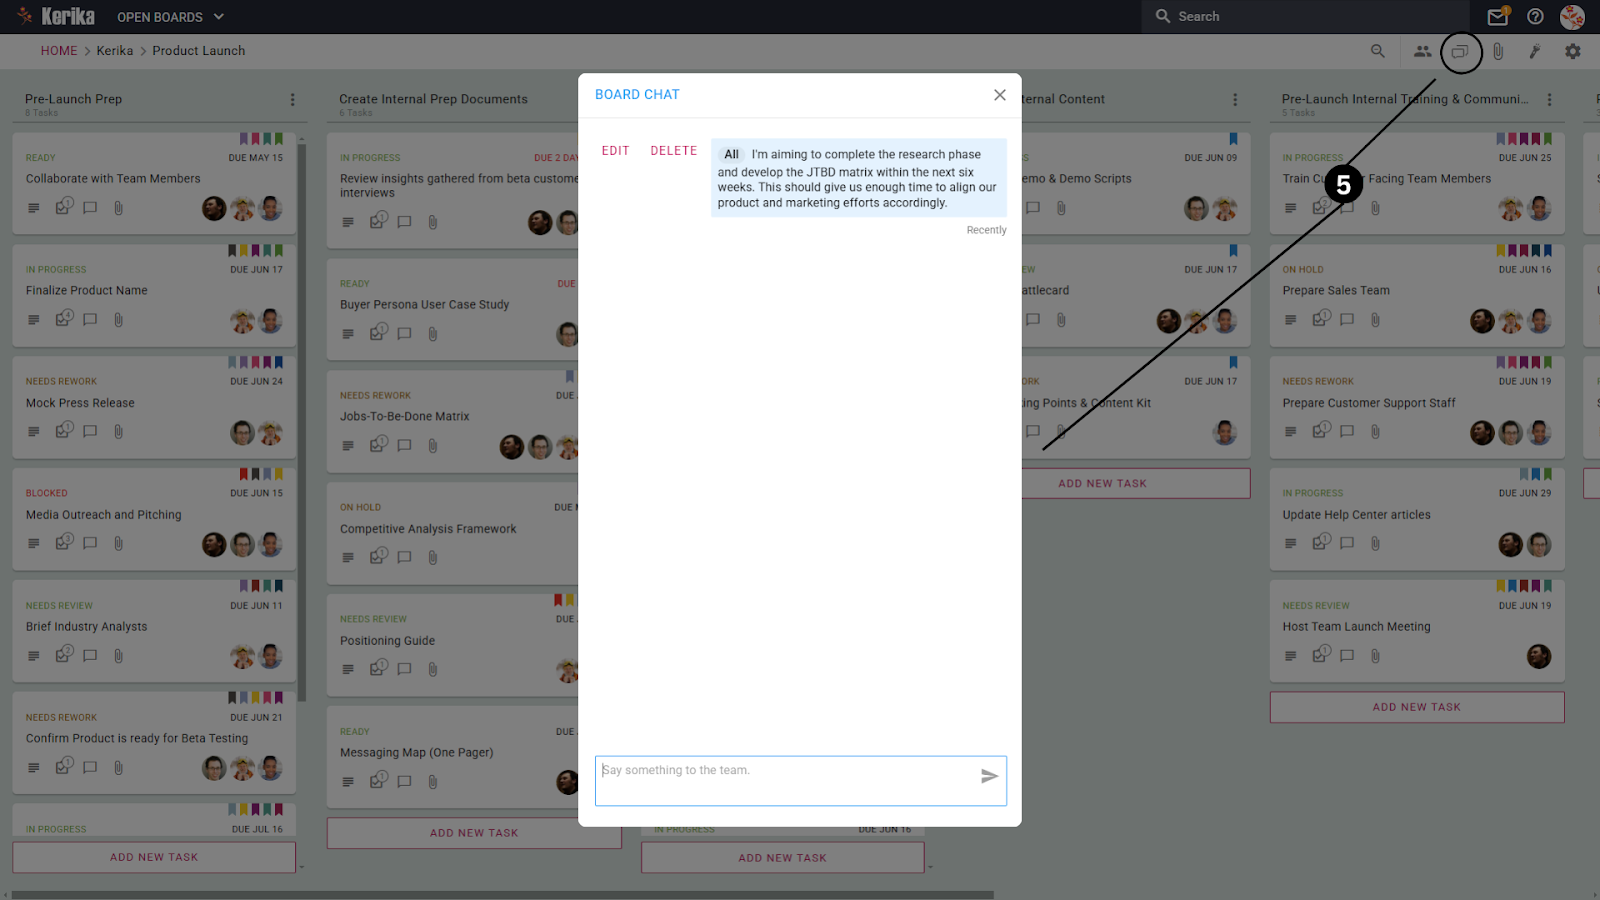
Keep all discussions relevant to the board using the Board Chat feature. This allows your team to share updates, ask questions, or address challenges in one central location. For instance, a designer might share feedback on the “Logo Design” task directly in the chat to keep everyone on the same page.
5. Attaching and Sharing Files
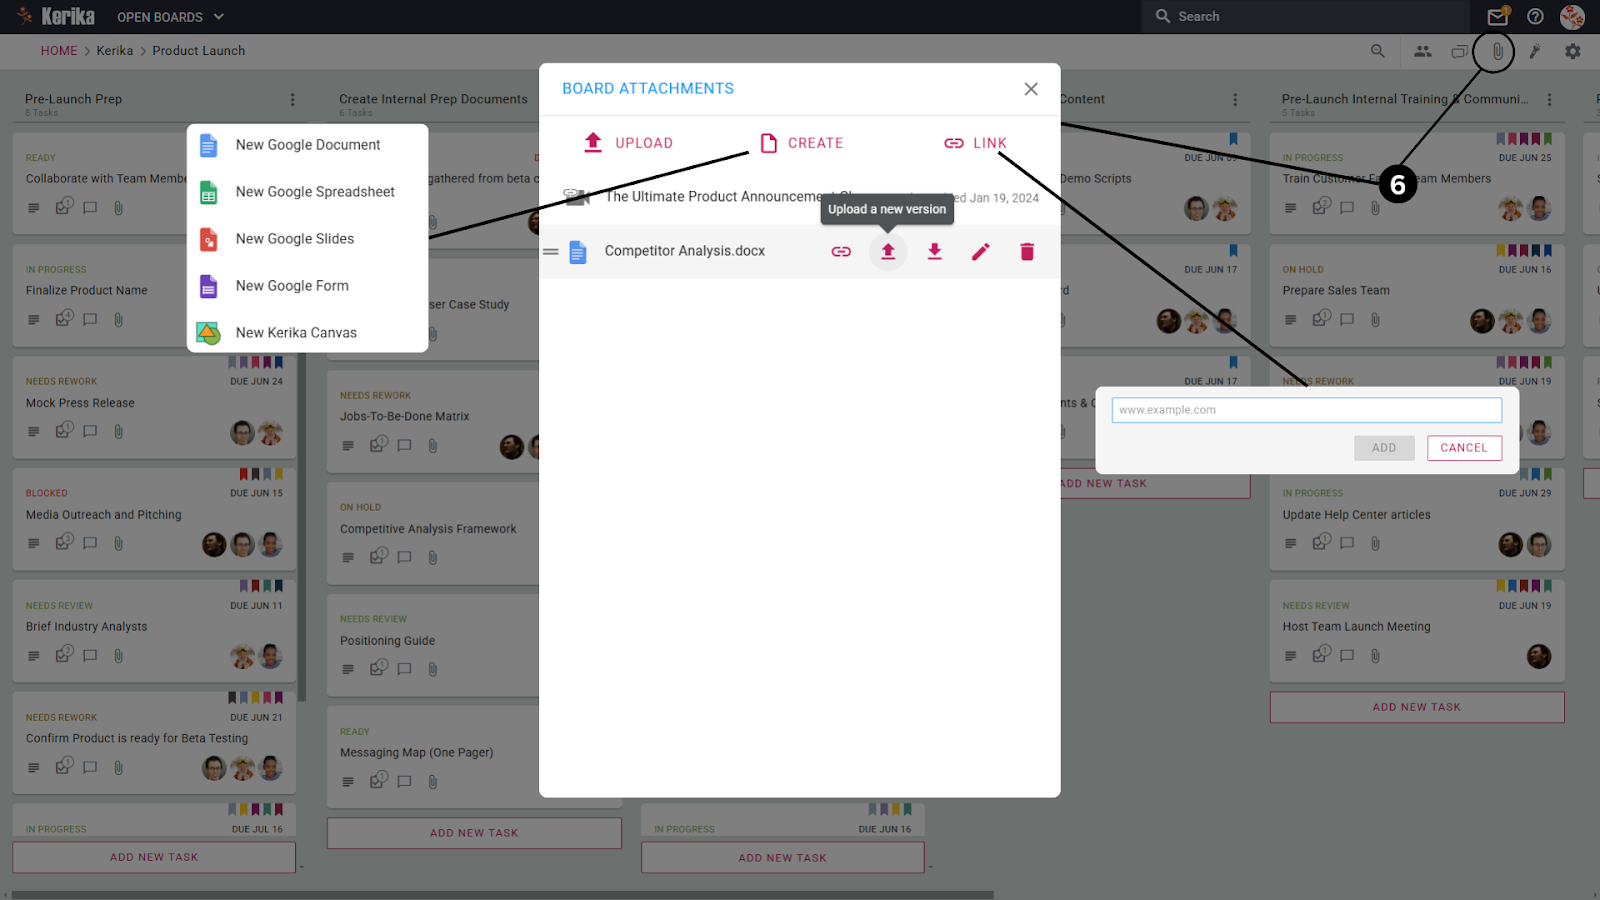
Every project involves a fair amount of documentation, and this board handles it beautifully. With the Attachments section, you can upload files, link Google Docs, or even create new documents directly from the board. For instance, attach style guides or client briefs to ensure all necessary materials are accessible to the team.
6. Highlighting Important Tasks
Prioritize what matters with the Highlight feature. This lets you filter tasks based on due dates, priority levels, tags or specific assignments. You can combine these filters to find tasks as well.
For example, You can highlight tasks assigned to a particular teammate, tagged as ‘mockups’, along with their status as ‘Ready’. This saves you a lot of manual work to find what you are looking for.
7. Adjusting Privacy Settings
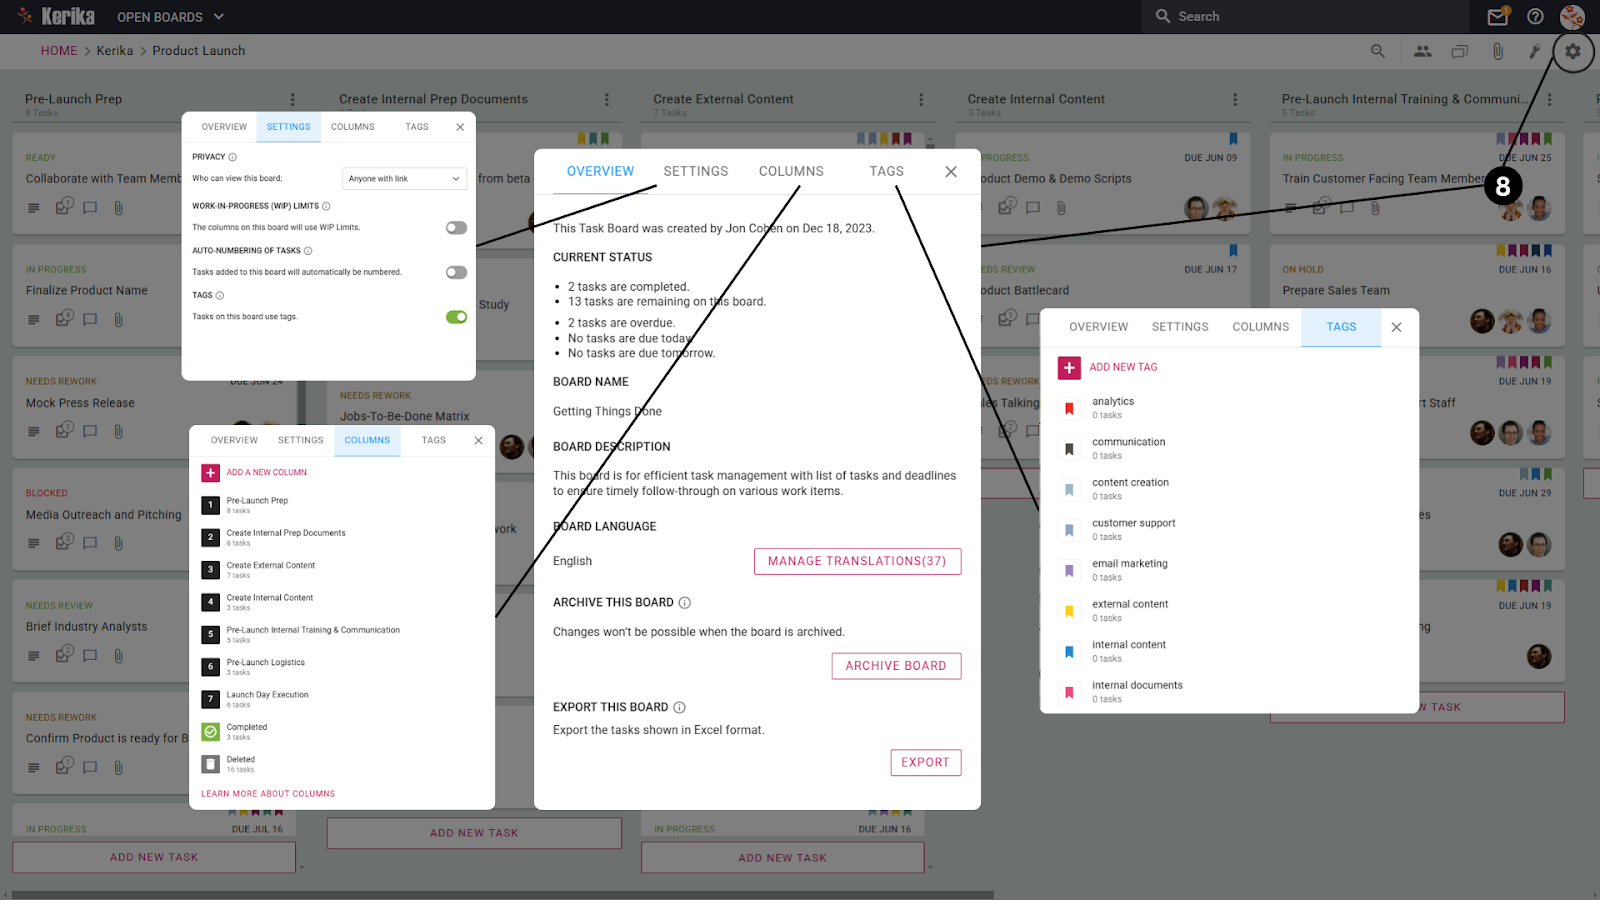
The Settings Menu is where this team fine-tunes their board for maximum efficiency. Clicking the gear icon in the top-right corner reveals four tabs: Overview, Settings, Columns, and Tags. Each tab plays a specific role in optimizing the workflow. Let’s break them down:
Overview Tab:
Provides a snapshot of the board’s progress, a description of its purpose, options for exporting tasks in Excel format, and the ability to archive completed boards for future reference.
Settings Tab:
Controls board privacy and access permissions, letting you choose between team-only access, organizational access, or public sharing via a link. It also manages edit permissions to maintain workflow integrity.
Columns Tab:
Allows customization of the board structure by adding, renaming, or reordering columns. This helps align the workflow with the team’s specific project requirements.
Tags Tab:
Facilitates task categorization by creating, managing, and applying tags. Tags make it easier to filter tasks by priority, type, or other custom labels, improving task organization and retrieval.
Now, let’s dive into how the team uses these task cards to break down the entire project management process into manageable steps. We will show you how you can use this feature to break down each tasks into an actionable item.
Break Down Tasks Into Manageable Steps
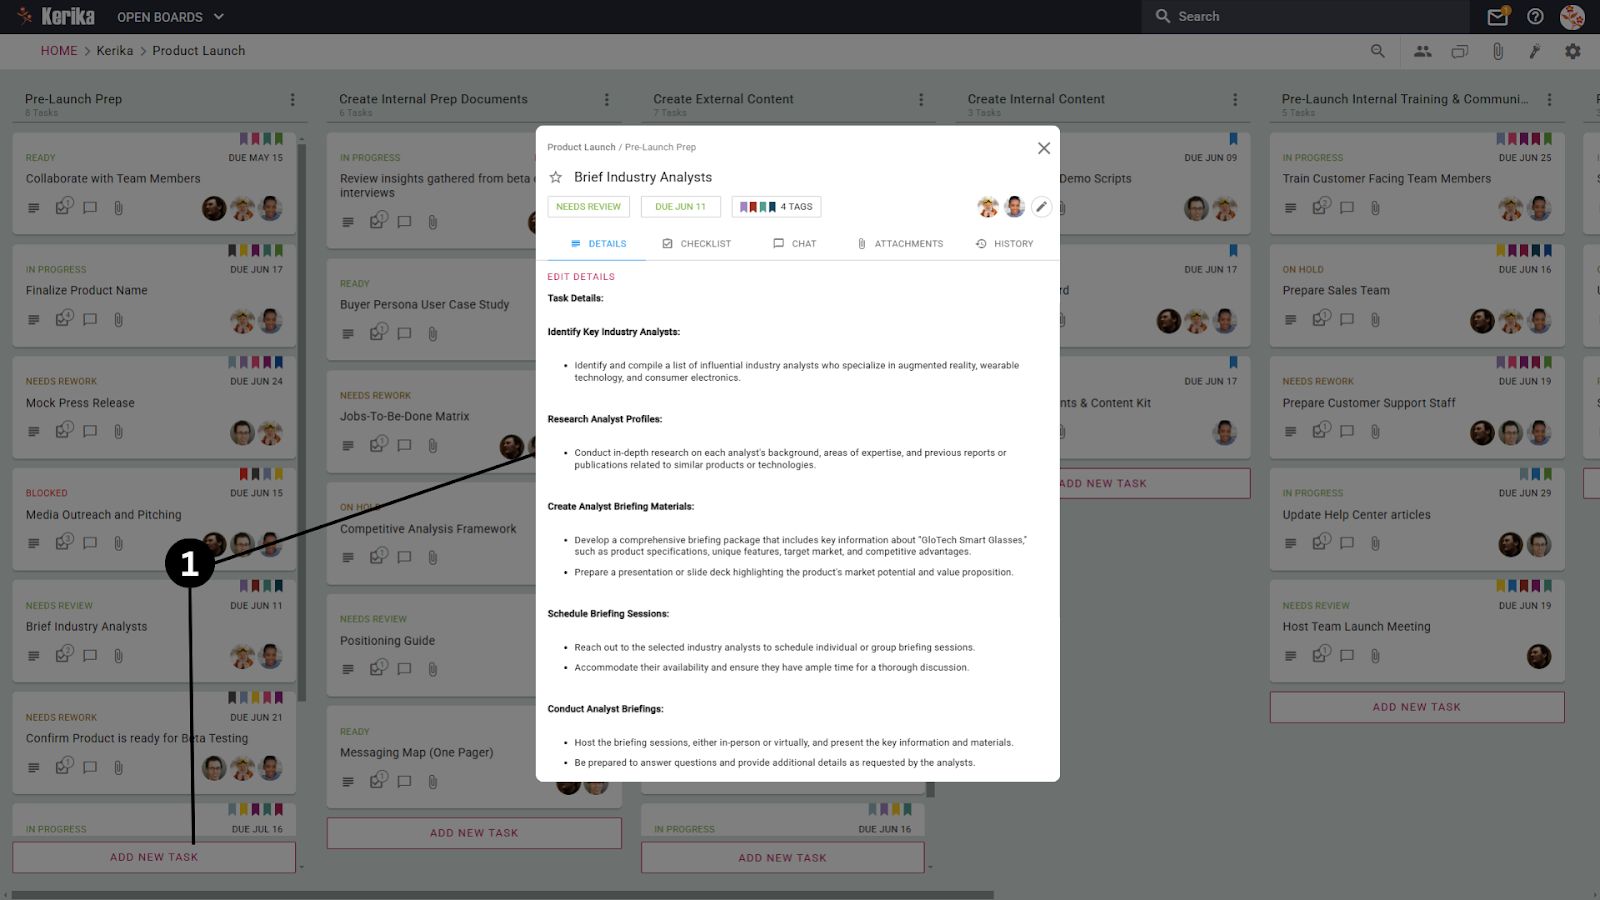
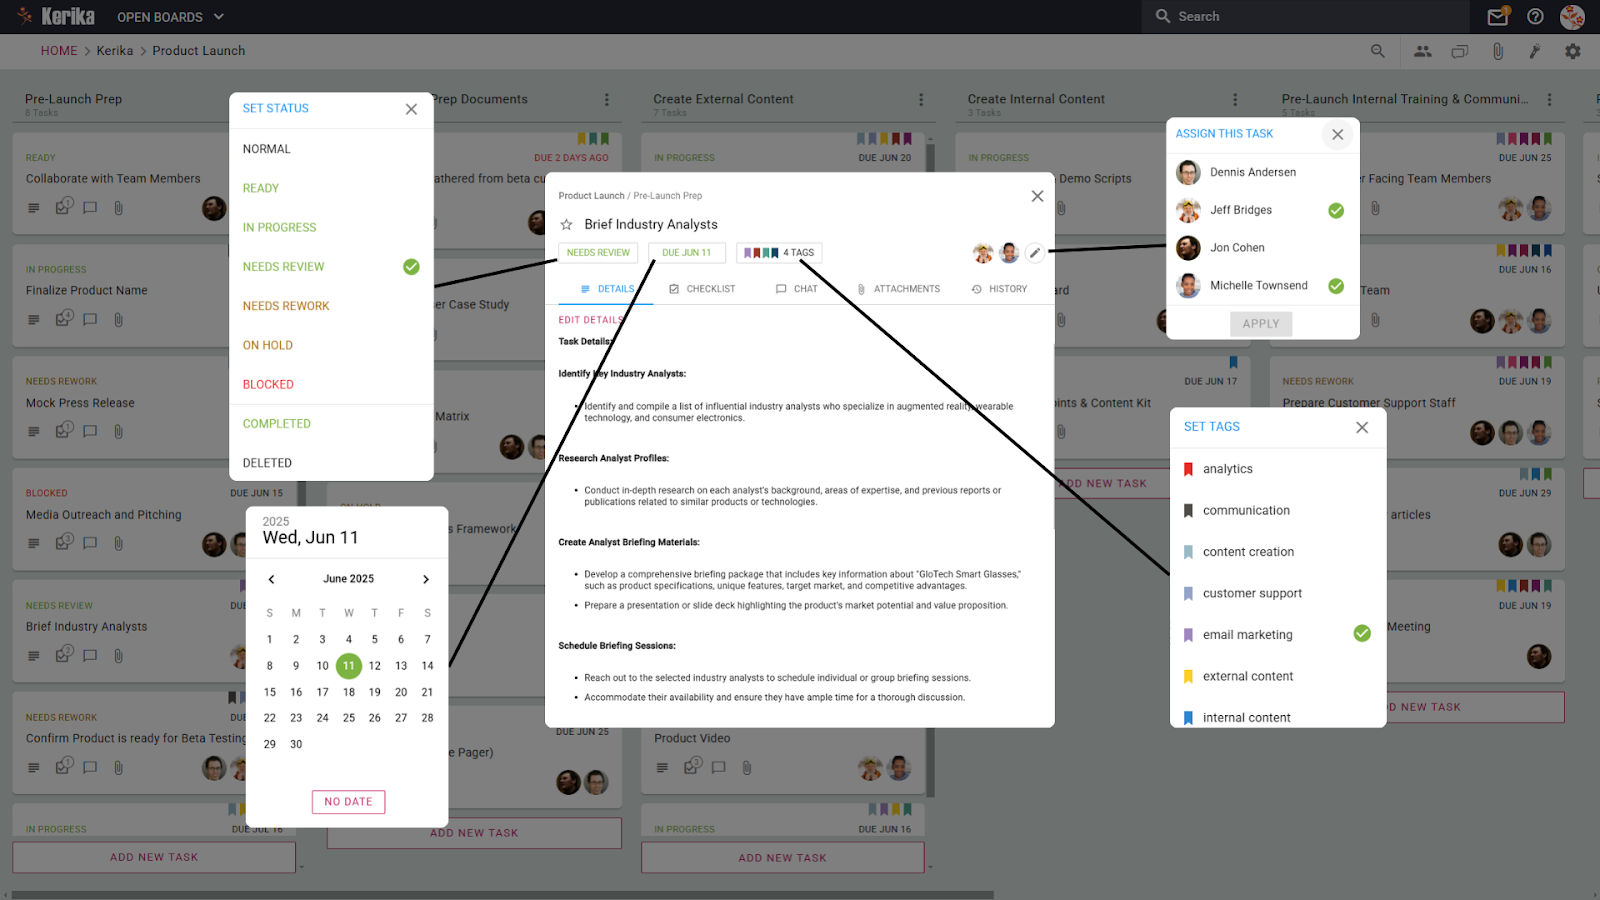
Task cards serve as the central hub where you and your team can capture and organize all the necessary details for completing a task. Here’s how to use them effectively:
Add Key Details:
Start by clearly defining the task’s objectives and any steps required for completion. For example, for a homepage design task, outline the layout and content requirements.
Track Progress:
Update the task’s progress by marking it as “In Progress,” “Needs Review,” or “Completed” so everyone can stay informed about its status.
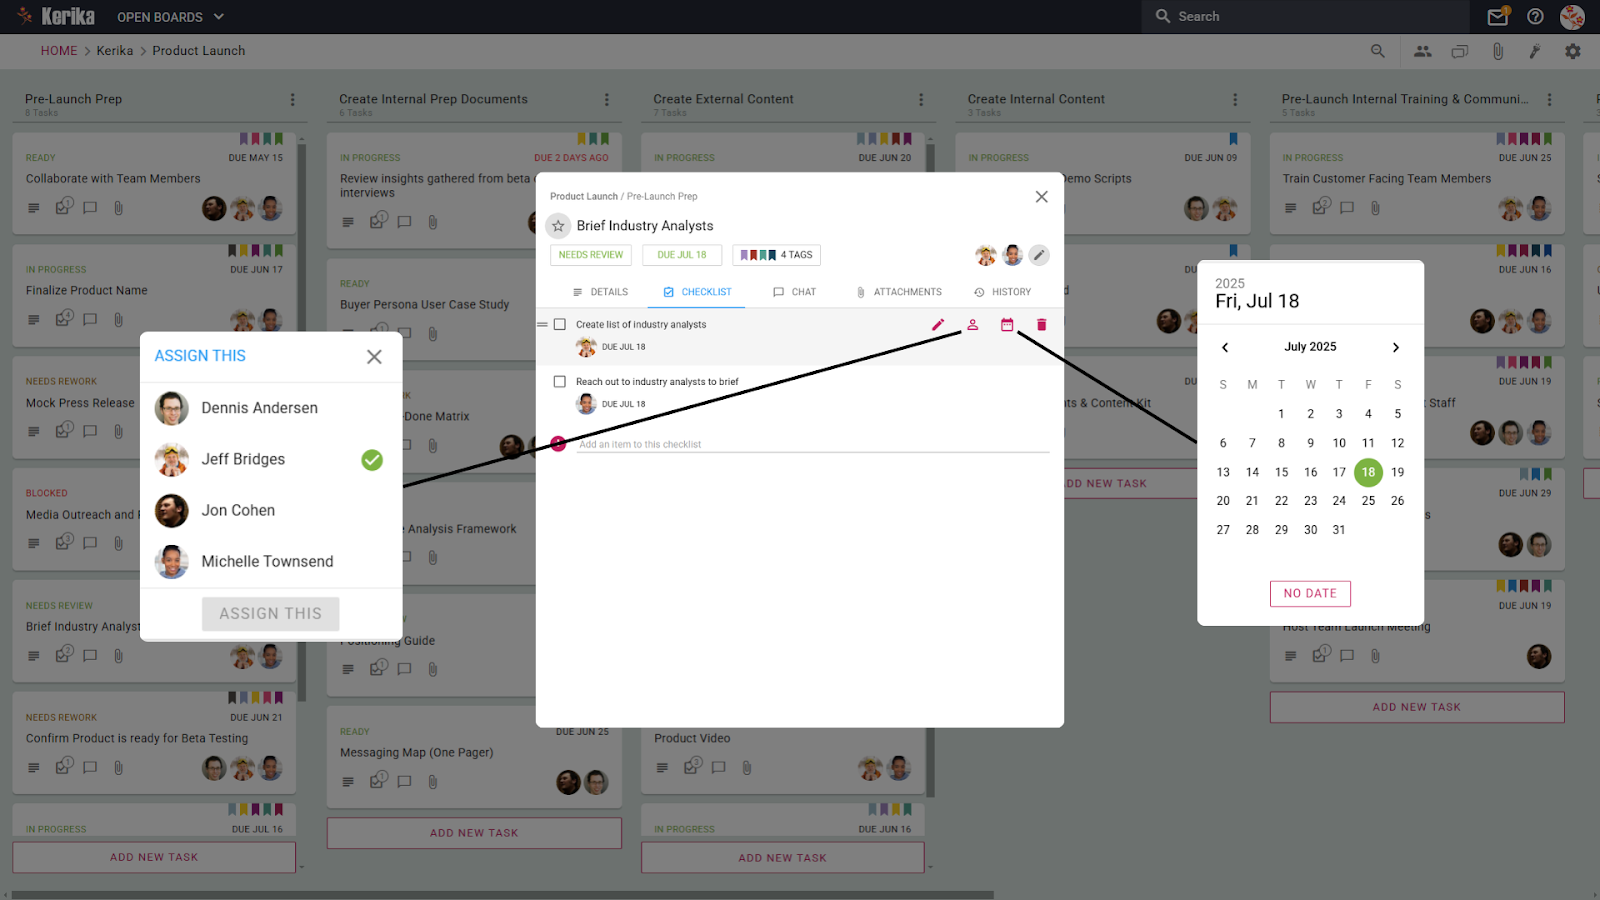
Set Deadlines:
Assign a specific due date to each task to ensure that deadlines are met and nothing gets delayed.
Break Tasks Into Actionable Steps:
Decompose complex tasks into smaller, manageable steps. For example, “Create homepage content” might include subtasks like writing copy, selecting images, and designing the layout.
Use Tags For Clarity:
Use Tags to categorize tasks. You can prioritize by urgency or group tasks by themes like “Design,” “Development,” or “Testing.”
Attach Files:
Keep all project resources organized by attaching files directly to the task card. Upload design mockups, reports, or PDFs, create new Google Docs or Kerika Canvases, or link external resources – all in one place. This ensures your team can quickly access everything they need without wasting time searching through emails or folders.
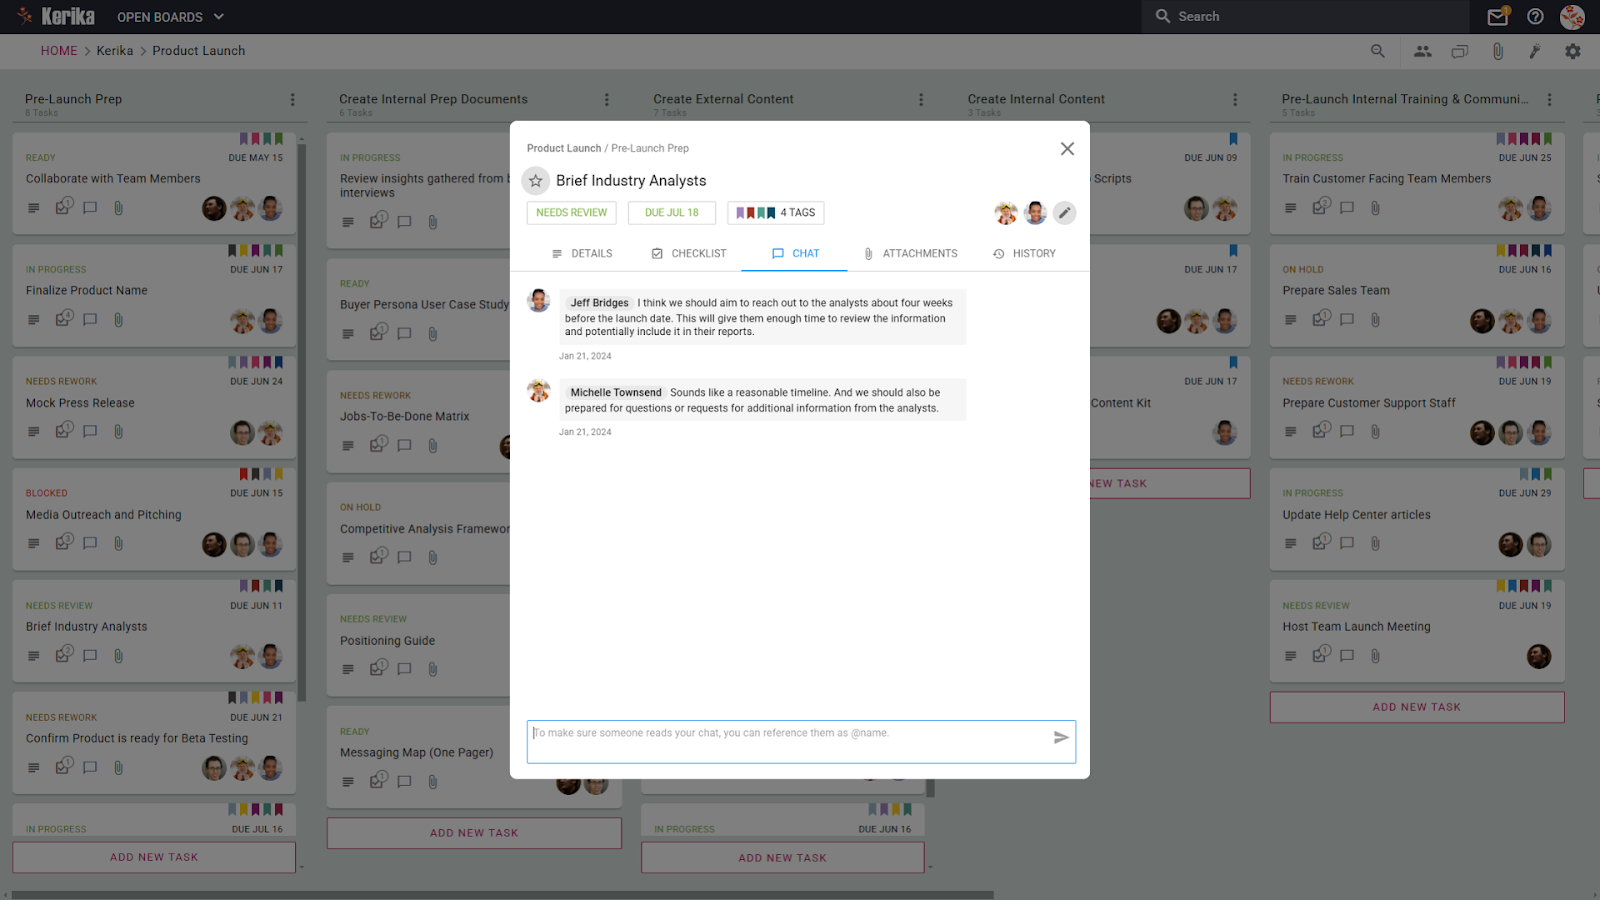
Maintain Focused Communication:
Use the Chat tab to keep all discussions tied to specific tasks, ensuring that communication is clear and easy to track.
Assign Team Members:
Assign each task to specific team members, so it’s clear who is responsible for what. This enhances accountability and ensures tasks move forward efficiently.
Set Task Priority for Clear Focus:
Prioritizing tasks is key to keeping your project on track, and the Set Priority feature makes this effortless. You can assign one of three levels to each task:
Normal: For routine tasks that can proceed without urgency.
High Priority: For tasks requiring quick action or increased focus from the team.
Critical: For time-sensitive or high-impact tasks that demand immediate attention.
By leveraging these features, task cards help your team stay organized, collaborate seamlessly, and ensure no important detail is overlooked. With these steps in place, managing your project becomes easier and more effective.
Set Up Your Kerika Account
Getting started with Kerika is quick, simple, and sets the stage for organizing your project workflow seamlessly. Here’s how you can set up your account and get started on the right foot:
If you use Google Workspace, select the SIGN UP WITH GOOGLE option.
If you’re an Office 365 user, opt for SIGN UP WITH MICROSOFT.
You can also choose SIGN UP WITH BOX for file storage integration.
Follow the prompts, and you’ll be ready to go in moments—no credit card required, and you’ll receive a free 30-day trial for your team.
A Global Workspace for Everyone
Kerika supports 38 languages, so you and your team can work in the language you’re most comfortable with, creating a truly inclusive experience.
Create Your First Board
Once you’ve signed up, it’s time to create your first board and bring your project management workflow to life. Here’s how:
Click “Create New Board”: From the Kerika dashboard, select the option to create a new board.
Choose the Board Type: For project management, select the Task Board template. This comes preloaded with columns like “To Do,” “Doing,” and “Completed.”
Name Your Board: Give your board a name that reflects your project, such as “Website Redesign” or “Marketing Plan.”
Customize Your Workspace: Add or rename columns to suit your workflow, and start adding tasks to keep your team aligned.
You now have a fully functional, visual workspace ready to help you track progress, manage tasks, and foster collaboration within your team.
Wrapping Up: Your Blueprint for Project Success
Mastering project management isn’t just about completing tasks; it’s about creating a system that keeps your team on the same page, fosters collaboration, and ensures every milestone is met. With a detailed workflow and the right tools, you can stay organized, productive, and focused on achieving your goals.
This board demonstrates how every aspect of your project can be broken into actionable steps. By prioritizing tasks, tracking progress, and using features like task cards to manage details, you’ll ensure nothing gets overlooked.Kerika isn’t just a tool; it’s a framework to streamline teamwork, maintain accountability, and bring your project vision to life. Ready to take the next step? Start building your board, organize your tasks, and watch your projects succeed with Kerika!
A busy board can sometimes feel like a maze, especially when you’re juggling tasks with varying priorities. The Highlight Feature makes it easy to cut through the noise, letting you filter and visually emphasize tasks that meet specific criteria.
Here’s how to use this feature to stay on top of your projects:
How to Use the Highlight Feature
1. Access the Highlight Option
Click the Highlight Icon on your board.
2. Choose What to Highlight
Select from predefined options or create custom filters:
What’s assigned to me: Instantly see all the tasks assigned to you, so you can stay on top of your responsibilities.
What needs attention: Highlights tasks that may require follow-up or have upcoming deadlines, ensuring nothing falls through the cracks.
What’s marked as High Priority or Critical: Focus on tasks that are essential to the project’s success.
What’s overdue: Clearly identifies tasks that are past their due dates, helping you address delays quickly.
Custom Highlight: Create tailored filters by combining parameters like assignees, task status, due dates, priorities, and tags. You can use one or multiple filters at a time to find out what matters to you most on the board.
Why It Works
Focus on Your Tasks with “What’s Assigned to Me”Filter tasks assigned to you to concentrate on your responsibilities without getting sidetracked by other items on the board. It’s an efficient way to stay on top of your personal workload.
Identify Urgent Work with “What Needs Attention”Highlight tasks that require immediate focus, whether due to an upcoming deadline or stalled progress. This filter helps you spot bottlenecks and maintain project momentum.
Stay on Top of Critical Work with “What’s Marked as High Priority or Critical”High-priority tasks demand attention. This option ensures that crucial work gets the focus it deserves, helping you drive the project toward success.
Address Overdue Items with “What’s Overdue”Quickly identify overdue tasks and take action by reallocating resources or following up with team members to bring them back on track.
Customize Your Workflow with Custom HighlightsThe Custom Highlight feature allows you to set multiple conditions, such as showing tasks assigned to a specific person, marked as “Needs Review,” and due within a week. Tailor these settings to create a personalized focus view that suits your specific workflow.
Conclusion
With the Highlight Feature, you can cut through distractions and focus on what matters, ensuring a clear and efficient workflow. Whether managing your workload or overseeing the entire team, highlights help you stay productive and focused.
A well-designed help desk workflow is the backbone of exceptional customer support. It ensures smooth communication, quicker issue resolution, and higher user satisfaction. Whether handling internal requests or external customer inquiries, an efficient workflow helps teams stay organized and focused on delivering a seamless support experience.
However, creating an effective workflow isn’t without its challenges. Teams often struggle with issues like lost tickets, unclear task prioritization, and bottlenecks in communication. Without a structured system, resolving customer issues promptly can feel overwhelming, leading to frustrated users and dissatisfied teams.
In this article, we’ll guide you through the essential steps to build a help desk workflow, address potential concerns that could hinder its success, and introduce you to the right tools to create a workflow that truly works:
Essential Steps and Common Pitfalls to Build a Solid Help Desk Workflow
A well-defined Help Desk workflow is crucial for smooth support operations, reduced response times, and exceptional user satisfaction. To establish a robust and efficient Help Desk workflow, follow these key steps:
1. Define Clear Objectives and Scope
Identify the primary purpose of your workflow. Are you addressing internal issues, external support, or both? Clearly define the scope to align priorities and set realistic goals. Establish service-level agreements (SLAs) to set expectations for response and resolution times.
Watch out for: unclear objectives that can lead to inefficient workflow and poor user satisfaction.
2. Build a Comprehensive Knowledge Base
Create a valuable resource for your team and users by analyzing recurring problems and developing clear, searchable content such as FAQs, step-by-step guides, and troubleshooting tips.
Heads up: ineffective knowledge sharing can lead to longer resolution times and frustration.
3. Centralize Request Handling
Create a single repository to manage all incoming requests, ensuring no issue is missed. This centralized system eliminates the risk of scattered data and helps maintain an organized approach to issue resolution.
Look out for: chaotic request handling without a centralized system, leading to missed or duplicated efforts.
4. Categorize and Prioritize Tasks
Break down requests by urgency, type, or department. Categorizing tasks helps your team focus on high-priority issues while keeping lower-priority requests visible and on track.
Be aware: manual categorization can be error-prone and inconsistent, leading to delays in addressing critical issues.
5. Set Clear Responsibilities and Roles
Assign specific roles for team members to ensure accountability. Define who handles first-line queries, who escalates and resolves complex issues, and who is responsible for knowledge base updates.
Keep in mind: ambiguity in roles and responsibilities can lead to confusion and delays.
6. Monitor and Evaluate Performance
Track key metrics like resolution time, response time, and customer satisfaction. Regularly evaluate your team’s performance and gather feedback from users to identify areas of improvement.
Don’t forget: limited visibility into workflow performance can make it challenging to identify and address bottlenecks.
Using the Right Tools to Overcome Help Desk Challenges
A clear and organized help desk system is essential to ensuring efficient issue resolution, and this visual workspace demonstrates how challenges can be tackled head-on. Let’s take a quick look at how this team is managing their workflow to stay ahead.
This board offers a straightforward view of tasks across different stages. Requests are logged under “Things to Do,” where they’re categorized and prioritized based on urgency.
Tasks move seamlessly to the “Doing” column when in progress, allowing the team to focus on active issues without losing sight of what’s coming next. Completed tasks are archived in the “Completed” section, giving a sense of progress while keeping the workspace uncluttered.
Visual labels like “Needs Review,” “In Progress,” and “Needs Rework” make it easy to spot tasks that require immediate action, while due dates ensure nothing slips through the cracks. By centralizing requests, organizing them effectively, and creating a clear workflow, this team avoids the chaos of scattered communication tools like email or chat.
Next, we’ll dive deeper into how this workspace works, breaking down its features to show you how to build an effective help desk system for your team:
Take a Closer Look at This Help Desk Workflow Board
This Help Desk workflow board is a prime example of how structured organization and a clear layout can simplify managing support tasks. Each section is purposefully designed to make handling requests seamless while promoting accountability and collaboration.
1. Capture and Organize Every Request
The “Things to Do” column is the starting point, where all incoming requests are captured. From resetting passwords to troubleshooting connectivity issues, every task is a single actionable item that ensures no request is missed. This centralized approach provides clarity and allows the team to prioritize effectively.
2. Tailor Workflow Stages to Your Needs
The columns represent different stages of task progress, such as “Things to Do,” “Doing,” and “Completed.” These can be renamed, reordered, or customized to fit your team’s specific workflow, making transitions between stages intuitive and efficient.
3. Control Access and Permissions
Manage who can view and edit the board by assigning roles. Team members can be given editing privileges for updating tasks, while stakeholders can be limited to viewing progress. This eliminates confusion, ensures responsibilities are clear, and keeps the workflow secure.
4. Centralize Communication
Team discussions happen directly within the board. Instead of juggling emails or chat tools, you can comment on specific tasks to clarify details or provide updates. This keeps all communication relevant, accessible, and linked to the appropriate task.
5. Streamline Resource Sharing
With file upload capabilities, user manuals, troubleshooting guides, and other resources can be attached to tasks. This eliminates the time wasted searching for scattered documents and ensures that everyone has access to the materials they need.
6. Prioritize with Clarity
Prioritizing tasks is effortless with built-in labels for urgency. Whether it’s marking tasks as “Critical,” “High Priority,” or “Normal,” these visual indicators ensure the team knows what to address first, keeping the workflow on track.
7. Maintain Focus with Filters
Filters allow you to quickly sort and identify tasks that need immediate attention. Whether you’re looking for overdue tasks, unassigned items, or issues flagged for review, these filters ensure nothing important is overlooked.
Breaking down tasks into smaller, actionable steps is essential for maintaining clarity and ensuring smooth execution. The task card from the demo board centralizes all relevant information, making it easier to manage tasks efficiently. Here’s how it helps:
Details Tab: Provides a clear task description and objectives, ensuring all team members understand the scope and purpose of the task (e.g., installing software on a user’s computer).
Checklists: Breaks tasks into actionable steps, such as downloading software, activating the license, testing functionality, and providing user training.
Priority and Deadlines: Helps prioritize tasks (e.g., Critical, High Priority) and displays deadlines prominently to ensure timely completion.
Role Assignments: Assigns tasks to specific team members, promoting accountability and transparency.
File Attachments: Centralizes resources like installation packages, manuals, and license keys, eliminating time wasted searching for files.
Comments: Facilitates task-specific communication to keep discussions focused and relevant.
Status Updates: Tracks progress with labels like In Progress, Needs Review, or Blocked, keeping the team aligned.
Tags and Categories: Organizes tasks with labels (e.g., Troubleshooting, Security Audit) for easy filtering and management.
With all the tools and features designed to streamline your Help Desk process, Kerika ensures that you can manage tasks, collaborate efficiently, and maintain centralized information for your team.
Whether it’s prioritizing critical tasks, tracking progress, or fostering team communication, Kerika provides the perfect solution to simplify and execute your workflow effectively.
Wrapping Up:
By following a structured approach, defining objectives, establishing a knowledge base, prioritizing tasks, and fostering collaboration, you can streamline your operations and deliver exceptional support to your users.
Whether you’re addressing urgent IT issues or planning long-term support initiatives, Kerika ensures your Help Desk runs smoothly. Get started today and see the difference an organized, efficient workflow can make!
Managing multiple projects can quickly lead to a cluttered workspace, making it challenging to stay focused on what matters most. Archiving boards offers an easy way to move completed or inactive projects out of sight while keeping them accessible for future reference.
Here’s a closer look at how archiving boards can help you stay organized:
How to Archive Boards
1. Move a Board to Archive
Click the three dots on the board you want to archive.
Select Move to Archive from the dropdown menu.
2. Access Archived Boards
Use the Include from Archive checkbox in your Home view to display archived boards.
Retrieve archived boards anytime for reference or reuse.
When to Archive Boards
Project Completion: Once a project is finished and doesn’t require active management, archive its board to clear your workspace.
Inactive Projects: Temporarily archive boards for projects that are on hold or waiting for approval.
Focus on Active Tasks: Archiving keeps your Home view streamlined, ensuring only current and relevant tasks are visible.
Why It Works
Declutter Your Workspace: Focus only on active boards and tasks.
Quick Access to Past Projects: Safely store completed or paused boards for future reference.
Streamlined Workflow: Keep your Home view neat and organized for better productivity.
Conclusion
Archiving boards is a simple yet effective way to declutter your workspace, allowing you to focus on what matters most while keeping past projects accessible. Whether it’s completed tasks or paused initiatives, archiving ensures your workflow remains streamlined and organized without losing valuable information.
A solid business model is the cornerstone of any thriving business: it outlines how your company creates, delivers, and sustains value for customers and stakeholders alike.
However, crafting a robust business model is a complex process. It requires understanding your customers, defining your core value proposition, exploring revenue streams, and coordinating with teams and stakeholders.
We understand these hurdles because we’ve faced them too, and based upon our experiences over the years we have created a simple, workable model that you can benefit from as well.
In this article, we’ll guide you through practical steps to build a business model that works
Start by understanding your audience. Breaking down your potential customers into specific segments based on demographics, behaviors, and preferences can help you to design offerings that truly resonate with different communities of people who could use your product.
Research is key here; survey potential customers or analyze existing data to pinpoint who you’re serving and what they need most. You can use the available data on Statista to better understand who you’re going cater to.
Once you know who your customers are, it’s time to figure out what makes your product or service stand out. Your value proposition should clearly address the problems your audience faces and how you solve them better than anyone else. Don’t worry if it’s not perfect the first time;this step benefits from iteration and customer feedback.
Here’s a template we created to give you a good headstart in drafting a solid value proposition. Feel free to download, modify, and create your own version of it: Value Proposition Template
3. Explore Channel Options
Deciding how to reach your audience is just as important as defining what you offer. Explore a mix of online and offline channels to see which works best for connecting with your customers. Think about social media, email campaigns, partnerships, or even in-person events, depending on your audience’s preferences.
Customer relationships are more than just transactions; they’re about engagement and loyalty. Consider how you’ll interact with your audience. Will it be personal and hands-on, automated and scalable, or community-driven? The right approach depends on your product and customer expectations.
If you’re unsure where to begin, a structured approach can make this process easier. To help you get started, we’ve created a detailed guide that walks you through researching customer relationship types effectively.
This guide covers everything from identifying customer personas to leveraging analytics and mapping customer journeys. Use it to refine your strategies and build meaningful connections that foster long-term loyalty.
5. Explore Revenue Generation Methods
Revenue streams are the foundation of any sustainable business model. Whether it’s through subscriptions, one-time purchases, or advertising, explore various options to see what aligns with your offering and audience. Don’t be afraid to test different methods before finalizing the best approach.
To help you dive deeper into this process, we’ve created a comprehensive guide that outlines actionable steps to explore, validate, and optimize your revenue generation methods.
This guide will walk you through everything from understanding your value exchange to leveraging analytics and diversifying revenue streams. Use it as a roadmap to create sustainable and scalable revenue strategies for your business.
6. Plan Key Activities
Think about the core activities your business needs to perform to deliver value. This could include production, marketing, customer support, or innovation. Breaking these activities down into smaller, actionable steps will help you stay organized and focused on what truly matters.
7. Identify Key Resources
Every business requires resources, whether physical, intellectual, or human. Identify the ones essential to delivering your value proposition effectively. This might include tools, technology, or skilled team members. Knowing your resource needs early can save time and money later.
8. Explore Potential Partnerships
Collaborations can amplify your capabilities. Look for partnerships that complement your strengths or fill in gaps. These could be with suppliers, distributors, or even other businesses that share a similar audience. Partnerships often lead to creative solutions and expanded opportunities.
9. Refine Value Propositions
Your value proposition isn’t set in stone;it should evolve as you learn more about your customers and market trends. Regularly revisit this step, incorporating feedback and insights to keep your offering relevant and competitive.
10. Choose Channel Strategies
Once you’ve tested different channels, focus on the ones that work best. Optimize these channels for consistent communication and delivery of value. This might mean doubling down on a social media platform or refining your email outreach strategy.
11. Define Customer Relationship Strategy
Customer relationships thrive when they’re built on intentionality. Whether you’re engaging through personalized emails, loyalty programs, or community forums, ensure your approach reflects your brand values and keeps customers coming back.
12. Finalize Revenue Streams
After testing and refining your revenue strategies, settle on the ones that align with your business goals. A solid revenue model ensures financial sustainability while supporting future growth.
13. Establish Key Partnerships
Formalizing partnerships can add significant value to your business. Look for opportunities that align with your goals, whether it’s resource sharing, co-marketing, or distribution agreements. Strong partnerships often open doors to new markets or capabilities.
14. Finalize Customer Segments
This is the culmination of your research. Synthesize data from market analysis, demographic studies, and customer feedback to clearly define your target groups. By understanding the unique needs and preferences of these segments, you can tailor your products or services to deliver maximum value. Finalizing this step ensures precision in your offerings and marketing strategies.
Avoid These Pitfalls When Building Your Business Model
Even when following the essential steps to build a business model is crucial, the process often brings hidden challenges. Addressing the following pitfalls can set the stage for smoother execution and pave the way to simplify and enhance the process.
1. Struggling with Incomplete Customer Insights
Understanding your audience is foundational, but fragmented data often leads to unreliable segmentation. Without a centralized way to consolidate customer insights, businesses risk creating value propositions that miss the mark. Without a proper tool to organize and analyze data can stall progress and leave teams guessing instead of making informed decisions.
2. Drafting Value Propositions Without Collaboration
Value propositions thrive on iteration and feedback, yet miscommunication or disconnected teams often lead to underwhelming results. Without a platform for seamless collaboration, valuable ideas get lost, and refining your proposition becomes a lengthy, frustrating process.
3. Choosing Channels Without Real-Time Visibility
When exploring ways to reach your audience, businesses often struggle to track the effectiveness of various channels. Teams working in silos may choose conflicting approaches, creating inefficiencies and missed opportunities. A clear, visual way to experiment with and evaluate channel options is key.
4. Misaligned Customer Relationship Strategies
Customer engagement requires intentionality, but disconnected workflows can lead to misaligned or poorly implemented strategies. Without a structured system to map customer journeys and relationship types, businesses risk alienating their audience instead of building loyalty.
5. Overlooking Revenue Stream Validation
Testing revenue streams is essential, but it can quickly become a fragmented process without a centralized approach. Relying only on spreadsheets often results in missed opportunities to identify the most profitable and scalable options.
6. Losing Track of Key Activities and Resources
Defining core activities and essential resources is critical for success, yet many teams find themselves overwhelmed by the sheer number of tasks. Without a tool to break these down into manageable steps, it’s easy to lose focus on what truly matters.
7. Coordination Issues with Partnerships
Exploring and managing partnerships requires clarity and accountability, but poor communication and misaligned expectations often lead to friction. A system to track partnership opportunities and formalize collaborations can make the difference between success and stagnation.
Check out how this virtual workspace is designed for the each step of the business modelling process. From identifying customer segments to finalizing revenue streams, this ensures that every detail is accounted for while making it simple to see the progress at a glance.
This workspace is entirely created in Kerika. Tools like Kerika provide an intuitive framework that makes it simple to plan, execute, and refine your strategy.
Ready to dive deeper into how this workspace works for business modelling? Let’s get started!
Take a Closer Look at This Company’s Business Model Board
1. Add Tasks for Each Business Model Step
At the core of this process are the tasks that make up your workflow. This is where new tasks like “Identify Customer Segments” or “Draft Value Propositions.” created to break down each step into actionable tasks ensures that no part of your business model is overlooked.
2. Customize Columns to Match Your Workflow
Each column represents a stage of the business modeling process. You can rename, add new, or rearrange them to suit your workflow. This customization allows your board to adapt to the unique requirements of your business model.
3. Manage Board Access
This allows you to manage who’s incharge of the board, who can make changes, and who can only view the board. This avoids the overlapping of responsibilities and ensures that every stakeholder knows their role in the process.
4. Communicate With Everyone
Use the Board Chat to address your team and help them focus on the goals. This ensures everyone stays informed and aligned, eliminating the confusion caused by fragmented communication channels.
5. Collective File-Sharing
This is where you can share files with everyone on your team without needing additional permissions. This keeps resources organized and eliminates the hassle of manual sharing, streamlining collaboration.
6. Make Sure Nothing Gets Overlooked
This is where you filter out tasks that matter to you the most. Find out what’s assigned to you, what needs attention, or what’s overdue to prioritize your workflow effectively. This helps you ensure that critical tasks don’t get overlooked and helps your team stay focused on high-priority objectives.
7. Adjust the Board to Fit Your Needs
The settings menu in the top right corner of your board is packed with options to fine-tune your workspace. Here’s a closer look at its seven key features and how they can help your team.
Overview
The Overview tab provides a quick summary of your board’s status, including completed, ongoing, and overdue tasks. You can name your board, write a description for added context, and even manage translations to accommodate team members working in different languages. Archiving old boards or exporting tasks into Excel is just a click away, making it easy to keep your workflow organized and accessible.
Settings
The Settings tab offers control over privacy and functionality. You can decide who can view the board, restrict it to team members, open it to anyone with the link, or keep it private. Features like Work-in-Progress (WIP) limits help maintain focus by capping the number of tasks in each column, while options like auto-numbering tasks or enabling tags allow you to further refine your workflow.
Columns
In the Columns tab, you can customize your board’s structure by adding new columns for workflow stages like “Backlog” or “On Hold.” You can also rename existing columns or rearrange them to better reflect your team’s process. Deleting unnecessary columns keeps the board clean and focused, ensuring only relevant stages are visible.
Tags
The Tags tab helps categorize tasks for better organization. You can create new tags like “Critical,” “Feedback,” or “Milestone” to sort tasks efficiently. Managing tags is just as simple, edit existing ones or delete those that are no longer relevant to keep the workspace tidy and easy to navigate.
Break Down Tasks Into Manageable Steps (illustration of task card)
Task cards are where your team can organize all the details needed to complete specific steps of your business model. Here’s how you can use them effectively:
Add key details like the objective, questions to address, and methods for completing the task. For example, outline research methods or demographic analysis for defining customer segments.
Update the task’s progress by marking it as ongoing, needing review, or completed to keep everyone informed about its current state.
Assign deadlines to ensure tasks stay on track. For example, set a due date for completing customer segmentation research.
Break tasks into smaller, actionable steps. Add subtasks like conducting surveys, analyzing trends, or reviewing data to ensure nothing is overlooked.
Categorize tasks using labels to prioritize or group them by themes like collaboration, documentation, or high importance.
Share important files directly within tasks so your team can access resources like reports or presentations without searching elsewhere.
Keep discussions focused by adding comments or updates specific to the task, ensuring communication is clear and organized.
Assign teammates to tasks so everyone knows who’s responsible, promoting accountability and efficiency.
With all these features designed to simplify the business modeling process, streamlined collaboration, centralized information, and actionable task management, Kerika provides everything you need to plan and execute your strategy effectively.
Ready to get started? Let’s walk you through setting up your Kerika account and creating your first board!
Set Up Your Kerika Account
Setting up your Kerika account and creating your first board is a straightforward process that lets you dive right into planning your business model. Here’s how to get started:
If you already use Google Apps, click on the SIGN UP WITH GOOGLE button.
If you are already using Office 365, click on the MICROSOFT button.
No additional setup is required, simply follow the prompts, and you’re in!
Kerika comes in 38 languages so you and everyone else can work in the most comfortable setup that you prefer!
Create Your First Board
Once logged in, click on the Create a New Board button.
Select the board type that best fits your needs (e.g., Task Board) and name your board.
You now have a visual workspace ready to help you organize tasks, track progress, and collaborate with your team, the next step is to customize the columns, add tasks, and start building your own business model.
Wrapping Up: Your Roadmap to Business Success
Building a business model can be a complex journey, but with a well-structured workflow and the right tools, you can simplify the process and ensure nothing falls through the cracks. This demo board illustrates how you can break down every critical aspect of your business into manageable tasks. From identifying customer segments to defining key activities and partnerships, every card offers a stepping stone toward creating a robust and actionable business strategy.
By following this approach, you can foster better collaboration, enhance organization, and maintain a clear focus on your goals. Whether you’re refining existing plans or starting from scratch, these cards and their methodologies provide a framework to tailor your own business model. Ready to take the next step? Start turning these insights into action and watch your business vision come to life!
Managing multiple file versions can quickly become overwhelming. You’ve probably found yourself staring at files labeled “final,” “final-2,” or “final-really-this-time,” wondering which one is the latest. It’s a common frustration when juggling project updates.
A more efficient system eliminates this guesswork entirely. By automatically tracking and replacing old file versions, you can ensure your team is always working with the most current file, without the clutter or confusion.
Here’s a guide to organizing and updating files efficiently in both task-specific and board-level contexts:
Task Cards are where all the magic happens when it comes to organizing files related to specific tasks. Here’s how you update a file:
Locate Your File: Open the Task Card where the file is attached.
Upload a New Version: Click the Upload New Version icon next to the existing file. This automatically replaces the old version with the new one while keeping the history intact. No need to delete the old version or rename the file.
Benefits: The updated file is instantly tied to the task, so your team can continue collaborating without skipping a beat.
Task Cards ensure your file updates stay relevant to the task at hand, keeping everyone on the same page.
Board Attachments are ideal for files that impact the entire project such as project charters or shared templates. Updating files here is just as straightforward:
Navigate to Board Attachments: Click the Attachments icon on the board menu.
Update the File: Select the file you want to replace and click the Upload New Version button. The older version is replaced seamlessly, so there’s no confusion about which version is current.
Benefits: Your entire team gets instant access to the latest version, no matter where they’re working from.
Board Attachments ensure project-wide files stay organized and up-to-date without creating duplicates.
Conclusion
Efficient file management simplifies project workflows and enhances collaboration. By eliminating the confusion of multiple file versions, you can keep your team organized and focused on what truly matters.
From the moment a new hire walks in the door, they start forming opinions about your company culture, their role within the organization, and what it will be like to work for you. That’s why when it comes to hiring new employees, first impressions matter.
When done correctly, on-boarding can help new hires feel welcome, valued, and prepared to do their best work. But when done poorly, there are a lot of things that could go wrong. Here are a few tips to help make your on-boarding process as smooth as possible:
1. Start with the background check
Before you bring a new employee on board, it’s important to run a background check. This will help you verify that the person is who they say they are and that they don’t have any red flags in their past that could negatively impact your business.
A background check can also give you peace of mind that you’re making the best hiring decision possible. To know about a candidate, you need a process that ensures the new employee is the right fit for the job. Check out how this company conducts a background check for its new employees.
Click to view this live board
Check one business reference
When it comes to bringing on new employees, it’s important to do your due diligence and check their business references. This will help you get a better sense of their work ethic and what they’re capable of.
Check one business reference
Check one personal reference
Personal references can give you valuable insights into an applicant’s character, work ethic and overall suitability for the job. They can also alert you to any red flags that might not be apparent from their resume or cover letter.
Asking for personal references is a simple but effective way to screen applicants and make sure you’re making the best possible hiring decision.
Check one personal reference
Check applicant’s resume/CV for completeness & accuracy
While on-boarding a new employee, it’s important to check their resume or CV for completeness and accuracy. This will help you ensure that there are no discrepancies in their work history.
If you find any inaccuracies, be sure to follow up with the employee to get clarification. It’s also a good idea to run a background check to verify the information on the resume. By taking these precautions, you can help ensure a successful on-boarding process for your new employee.
Check applicant’s CV for completeness & accuracy
Confirm that applicant has all claimed academic & professional qualifications
It’s always a good idea to confirm that an applicant has all of the claimed academic and professional qualifications before onboarding a new employee. This can help ensure that the individual is qualified for the role and can help avoid any potential issues down the road.
There are a few ways to go about doing this, such as contacting references or requesting transcripts. Take the time to do your due diligence and it will pay off in the long run.
Confirm that applicant has all claimed academic & professional qualifications
Credit Checks
Credit checks are an important part of the onboarding process for new employees. They help employers to verify an applicant’s identity and to ensure that the person is who they say they are. Credit checks also help to determine an applicant’s financial stability and to assess their risk of defaulting on their financial obligations.
(Optional) Credit Checks
2. Get the necessary paperwork
Make sure you have all the necessary paperwork in order before the new employee starts. Here is a good example of how a US-based company collects all the necessary paperwork upfront from a new employee. The paperwork includes the W-4 form to calculate taxes, the I-9: form to verify the employee’s identity and eligibility to work in the US, the direct deposit form, and the employee handbook acknowledgment.
Complete the necessary paperwork
3. Set clear expectations from the start.
New employees should know what is expected of them in their new role, and the best way to do this is to set up an Orientation Program and Schedule mandatory training sessions.
Orientation Program
The Orientation Program is a great opportunity for employees to learn more about their role, and ask questions and get to know their colleagues.
For the Orientation Program to go smoothly, choose a date and time that work for both you and the employee. You’ll want to make sure the program is informative and engaging. If your new employee feels welcomed and comfortable, they’ll be more likely to hit the ground running and be productive from day one.
Schedule Orientation Program
Schedule mandatory training sessions
Training sessions for compliance and regulation are important for several reasons. First, they ensure that new employees understand the company’s policies and procedures from the day one.
Second, they help to ensure that employees are up-to-date on any changes in the law that may affect their job.
Finally, training sessions provide an opportunity for employees to ask questions and get clarification on any points that are unclear.
Schedule mandatory training sessions
4. Make sure they have all the information about their team and department.
New employees should feel informed about their role, the company, and the team they’ll be working with. In the following example, the HR has organized a team lunch. This is a great to way to introduce a new employee, this gives a employees get to know each other well.
The department is also getting introduced to the new employee, and this is just as important. So a formal announcement about the new employee, helps existing employee know them better.
Prepare departmental announcement
And last, but not least, don’t forget a Team Lunch on Day One!