Tag Archives: Templates

About the Templates feature in Kerika.

New AI Helper for starting Boards and making Templates

We have made substantial improvements to the previously released AI Helper to make it more useful for anyone who wants to start a new Task Board or Template.

Creating New Boards

The AI Helper is always available when you want to start a new Task Board:

Screenshot showing the Start New Board dialog, which contains the new CREATE WITH AI button

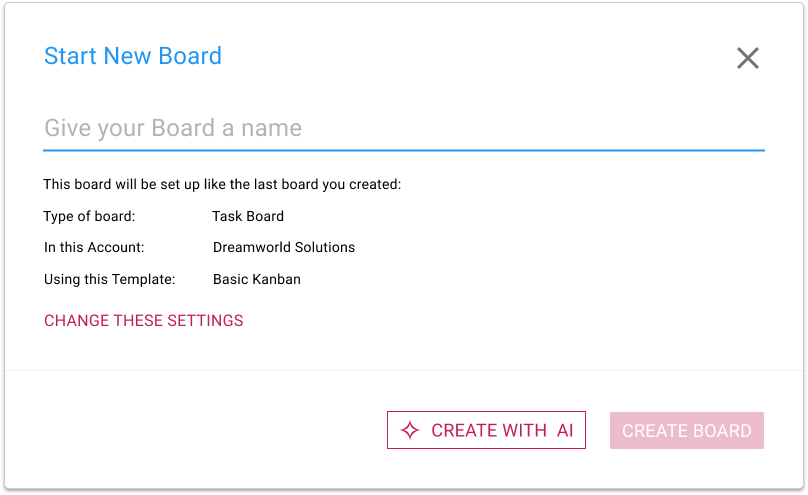
What’s different now is that clicking on the CREATE WITH AI button will open a new AI Helper pane on the right side of the window:

Screenshot showing a Kerika Home page with the AI Helper dialog open in a separate pane on the right edge of the screen.

The AI Helper has asked the user which of several accounts to which he has access he wants to create the new board.

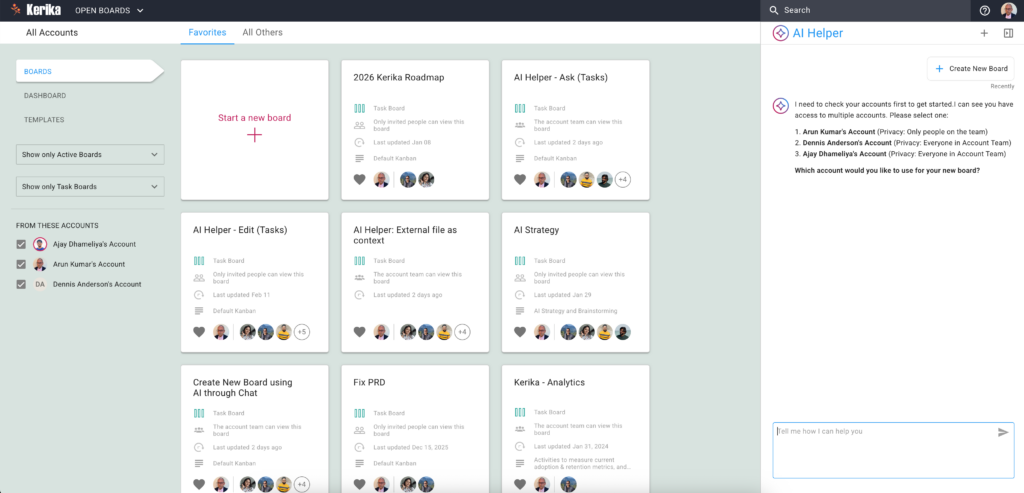
If you have access to multiple accounts — for example, if you are working with different organizations or companies that all have their own Kerika accounts — the AI Helper will first ask you which account you want to create the new board in.

(If you are working in a single account, which is true for the vast majority of Kerika users, the AI Helper skips this step.)

Screenshot showing the AI Helper pane asking what type of board the user wishes to create.

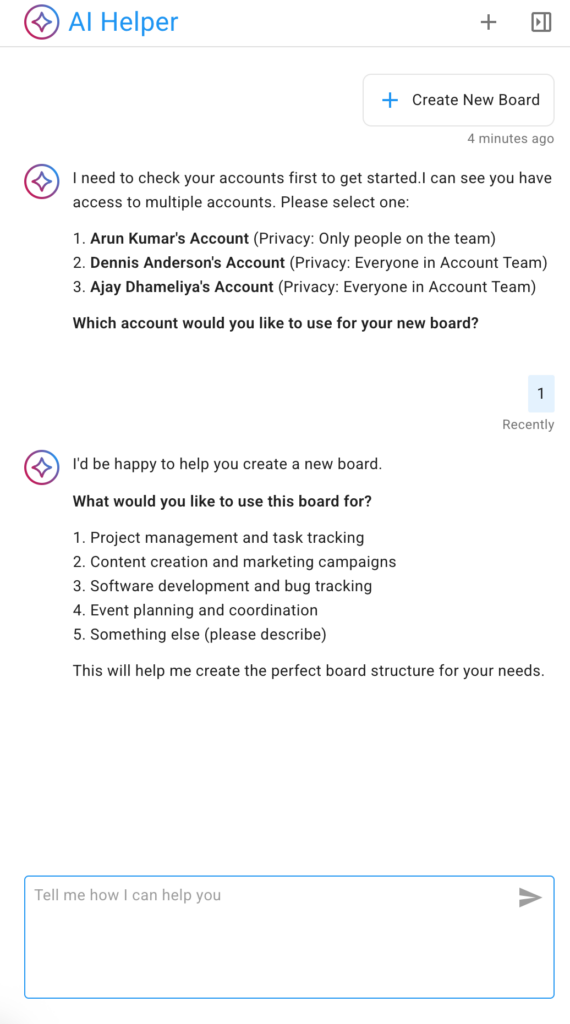
The AI Helper offers some suggested areas, as shown above. You can choose one, or simply provide more specifics about the kind of board you want to create.

In the example below the user selects the first suggested category: project management and task tracking:

Screenshot shows the AI Helper offering suggestions to help the user clarify what his new board should focus on.

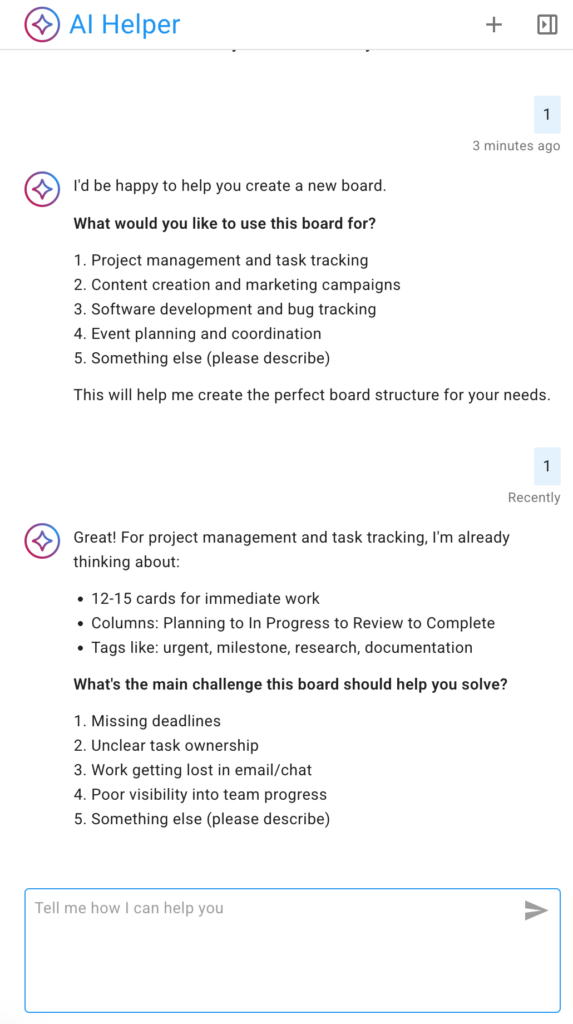
Unlike our first (experimental) version of an AI Helper, the new version is much more interactive: it provides suggestions and prompts to help the user think about what the new board should do, and, in particular, what kinds of management and collaboration problems they are currently facing.

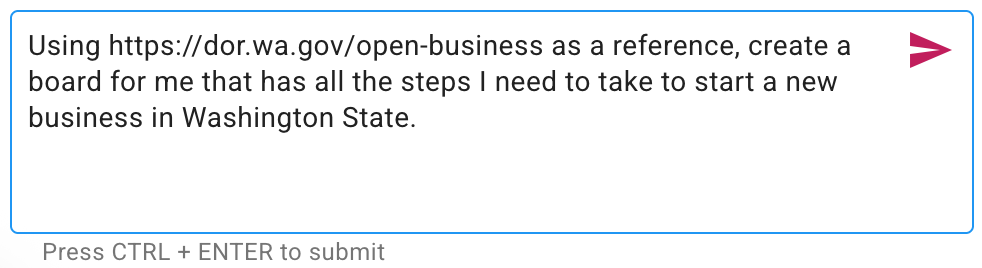
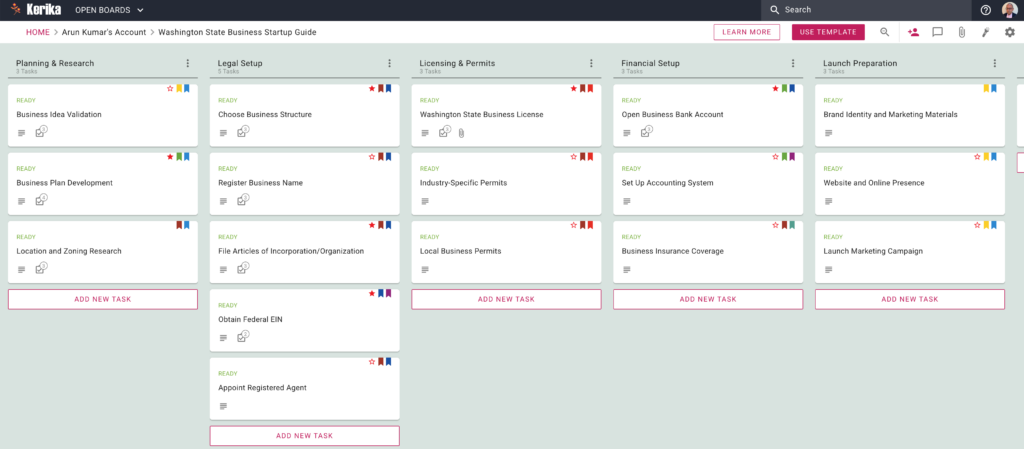
If you have something very specific in mind, you can skip the back-and-forth with the AI Helper and provide a specific request, like this example for a board that contains all the steps necessary to start a new business in Washington State:

Screenshot shows an example of a user request that is very specific.

Given a specific enough request, the AI Helper can quickly suggest a board that will meet the user’s needs:

AI Helper offers a preview of a proposed new board.

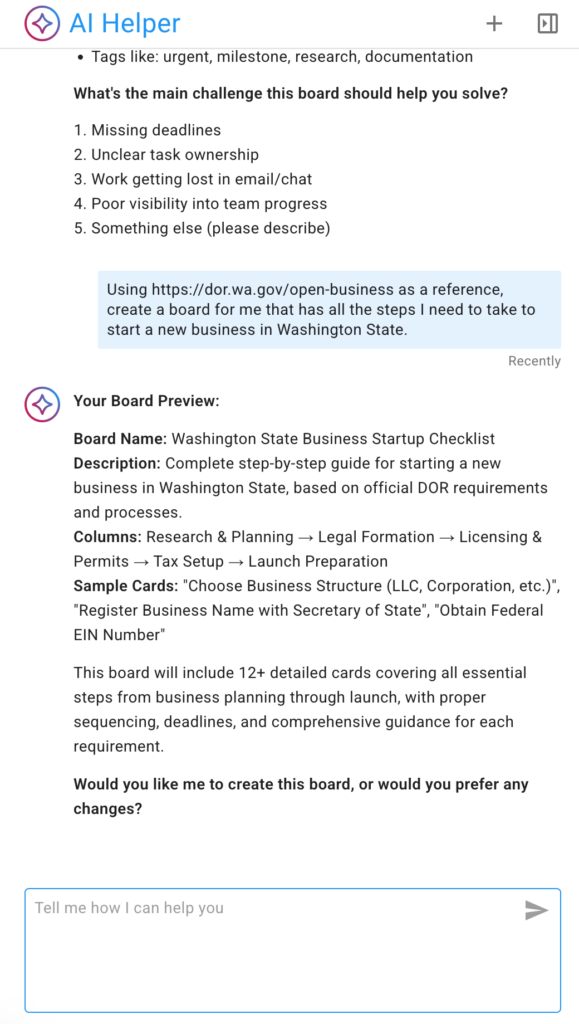
The AI Helper doesn’t immediately create a new board; instead, if first offers a preview so the user can confirm the new board will meet their needs.

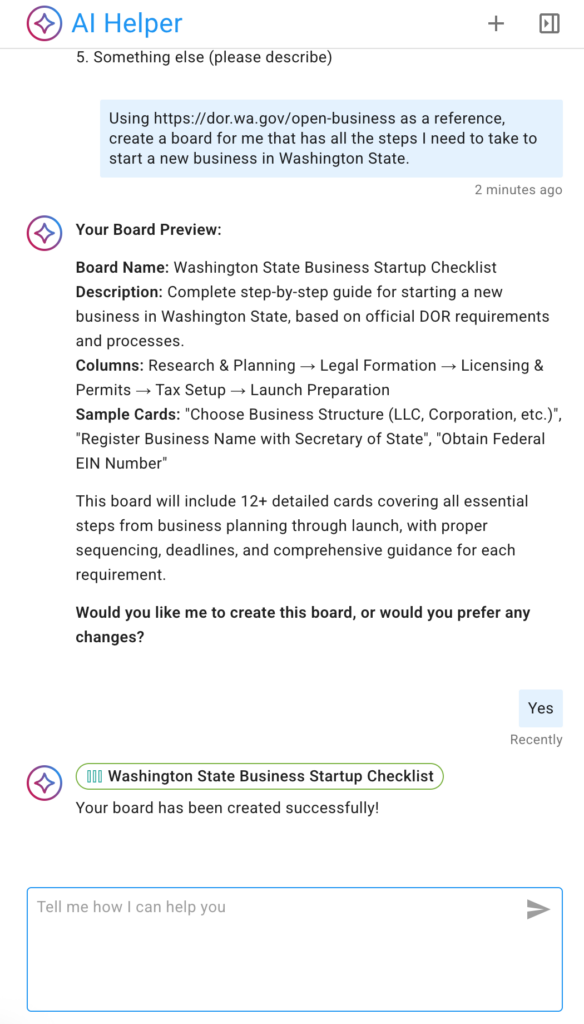
If the preview looks good, the user can ask the AI Helper to make the new board (this step can take a little time):

Once the new board is created, the AI Helper give a quick link to it:

Screenshot showing that the AI Helper has created a new board

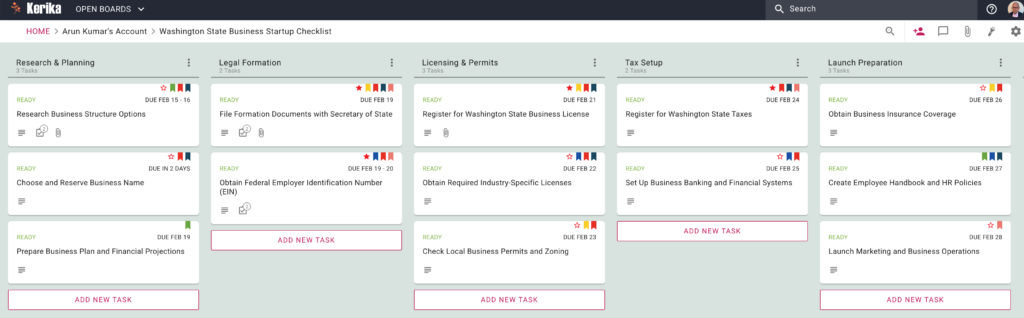
Here’s the new board created by the AI Helper: as you can see, the AI has also created appropriate and helpful tags, assigned the work to the user (since the user hadn’t said anything in their request about working with a team), and even estimated how long each task might take and assigned due dates accordingly.
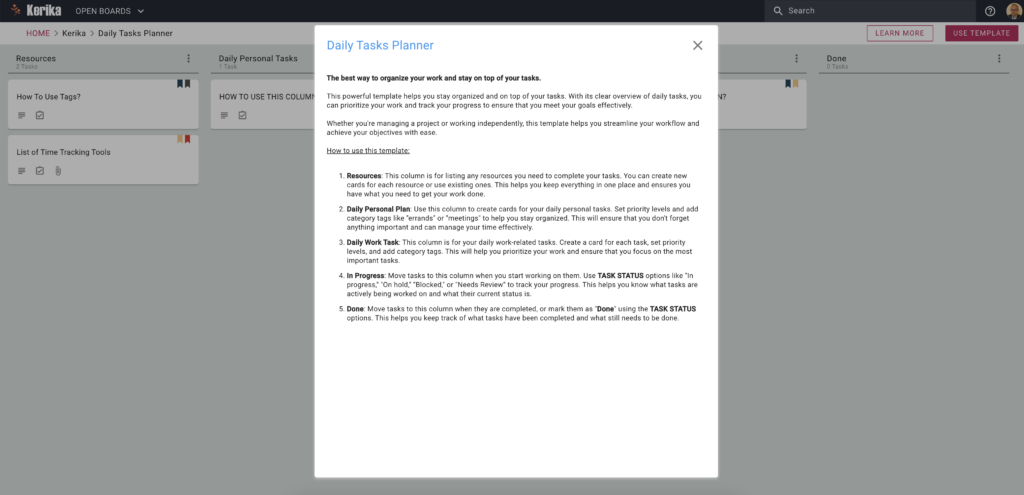
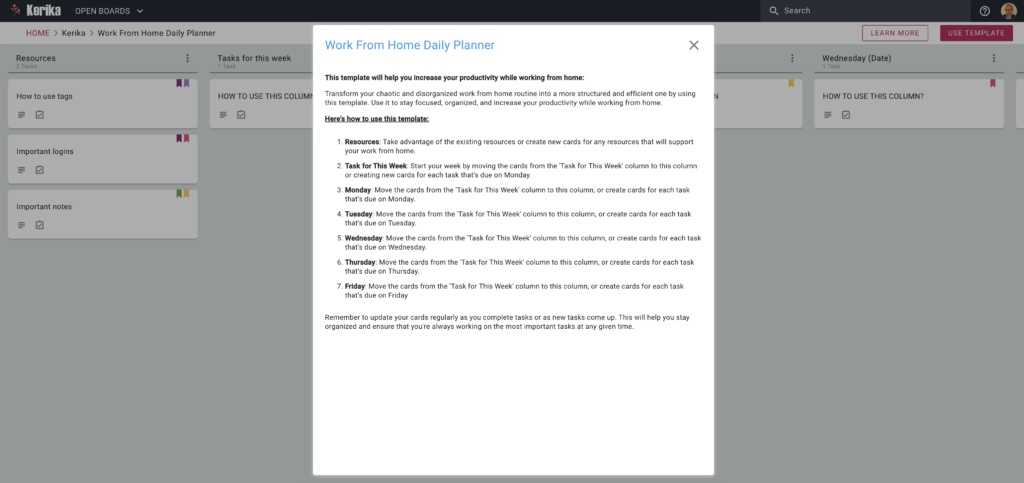
Screenshot showing the new board created by the AI Helper
Click to see a larger image

Creating Templates

Creating templates works in the exact same way: for example, the user could have asked for a template to be created using the same reference source (Washington State’s Department of Revenue Guide for Starting Businesses).

This is what the output looks like:

Screenshot showing a template created by the AI Helper
Click to see a larger image

Mobile & Tablet

The AI Helper is available on phones and tablet as well; the user interface is, naturally, a little different to accommodate the more limited screenshot

Please give this a try and let us know what you think!

Kerika + Twine: a great partnership for freelancers everywhere

We are thrilled to announce a partnership with Twine, a global expert network that major companies are using to outsource all kinds of work:

  • Designers
  • Animators
  • Musicians
  • Filmmakers
  • Photographers
  • Marketers
  • Developers
  • Illustrators

Twine has over 500,000 registered members already, and is growing fast — and we are thrilled to be partnering with them to help Twine’s freelancers and clients get more done using our Task Boards.

Twine’s users are exactly the kind of folks that Kerika was designed for: creative people, developers, freelancers and businesses that need to come together quickly to execute on a project.  In an environment that’s that fast-moving, having access to a task management tool that’s designed specially for remote and distributed teams, with a design that’s simple enough for anyone to get going with, is essential.

And that’s where Kerika can help Twine’s community.

As part of this partnership we will develop custom templates that can help Twine projects get going faster.  And that’s just a starting point: we hope, over the coming months, to deepen this relationship!

Kerika has a free Template for Daily Tasks Planner

The best way to organize your work and stay on top of your tasks.
This powerful template helps you stay organized and on top of your tasks. With its clear overview of daily tasks, you can prioritize your work and track your progress to ensure that you meet your goals effectively.
Whether you’re managing a project or working independently, this template helps you streamline your workflow and achieve your objectives with ease.
How to use this template:
  1. Resources: This column is for listing any resources you need to complete your tasks. You can create new cards for each resource or use existing ones. This helps you keep everything in one place and ensures you have what you need to get your work done.
  2. Daily Personal Plan: Use this column to create cards for your daily personal tasks. Set priority levels and add category tags like “errands” or “meetings” to help you stay organized. This will ensure that you don’t forget anything important and can manage your time effectively.
  3. Daily Work Task: This column is for your daily work-related tasks. Create a card for each task, set priority levels, and add category tags. This will help you prioritize your work and ensure that you focus on the most important tasks.
  4. In Progress: Move tasks to this column when you start working on them. Use TASK STATUS options like “In progress,” “On hold,” “Blocked,” or “Needs Review” to track your progress. This helps you know what tasks are actively being worked on and what their current status is.
  5. Done: Move tasks to this column when they are completed, or mark them as “Done” using the TASK STATUS options. This helps you keep track of what tasks have been completed and what still needs to be done.

Kerika has a free Template for Remote Team Meetings

Click on the image to view the Template

This template can help organize and schedule your remote team meetings. 

With this template, you can effectively organize and schedule your remote team meetings, ensuring that all the meetings go successfully!

How to use this template:

  1. Use Resources: Use this column to gather useful tools and content that will help you manage your remote team meetings. You can use the existing resources as a starting point, and start adding your resources down the line.
  2. Upcoming Meetings and Agendas: Create a card in this column for all the upcoming meetings and agendas
  3. In Progress/Due Today: Create a card or move the card from the previous column to this column to ensure that everything knows which meetings are currently in progress or due today.
  4. Notes From The Past Meetings: Once the meeting is completed, create a card in this column to keep the notes from those meetings. This will help you and your teammates keep track of everything discussed in the meetings.
  5. On Hold: For meetings that need to be temporarily paused or canceled, you can move their cards to this column. This might be because the team is waiting on additional information or resources, or because the task is a lower priority compared to other meetings
  6. Done: After a card has completed all the stages of your project, simply mark it as ‘Done’ or move the card to this column.

Kerika has a free Template for a Mise-En-Place Personal Productivity System

Click on the image to view this Template.

This template can help increase your personal productivity each week:

This personal productivity template is designed to help you organize your daily and weekly schedules in a way that maximizes your efficiency and suits your needs.

How to use this template:

  1. Resources: Use this column to gather useful tools and content that will help you manage your daily and weekly routine. This can include existing resources as a starting point, as well as any new ones you come across down the line.
  2. Inbox: Start by creating cards in this column for all the tasks that you must complete in the future. Be sure to include the due date, estimated time required, any dependencies, and any notes or comments.
  3. Today: Move cards from the Inbox column to this column for the tasks that are due today. Make sure to prioritize them based on their urgency and importance.
  4. Tomorrow: Move cards from the Inbox column to this column for the tasks that are due tomorrow. This will help you plan ahead and stay organized.
  5. Next Week: Move cards from the Inbox column to this column for the tasks that are due next week. This will help you stay on track and make progress towards your goals.
  6. Pending: Move cards from other columns to this column for the tasks that are pending. Make sure to prioritize them based on their importance and deadlines. This will help you keep track of outstanding work and ensure that nothing falls through the cracks.
  7. Done: Move cards that have completed all the stages of your project to this column. This will help you track your progress and celebrate your accomplishments.
Remember to update your cards regularly as you complete tasks or as new tasks come up. This will help you stay organized and ensure that you’re always working on the most important tasks at any given time.

Kerika has a free Template for Go To Market Strategy

Click on the image to view the Template

This template helps you create your marketing and optimize your marketing efforts to its maximum potential.

Designing and executing marketing strategies can be difficult, but this template can help you simplify the process and manage your marketing team effectively.

With this template, you can organize and optimize your marketing efforts, maintain team alignment, and achieve better results.

How to use this template:
  1. Use Resources: Use this column to gather useful tools and content that will help with your marketing campaign. You can use the existing resources as a starting point, and start adding your resources down the line.
  2. Ideas & Launch Plans: List your project-related ideas in this column. Collaborate and discuss ideas with your teammates, and decide which idea is the best to work on.
  3. In Progress: Once you decide which idea to work on, create a card or move the card you already created to this column. Update the card regularly so other teammates know what’s going on.
  4. Measurement and Optimization:  When the task is completed, move the card from the ‘In Progress’ column to this column. In this column, you can measure your campaign’s performance and analyze the data to optimize your marketing strategy.
  5. Done: After a card has completed all the stages of your marketing campaign, simply mark it as ‘Done’ or move the card to this column.

Kerika has a free Template for Work From Home Daily Planner

Click on the image to view the template

This template will help you increase your productivity while working from home:

Transform your chaotic and disorganized work from home routine into a more structured and efficient one by using this template. Use it to stay focused, organized, and increase your productivity while working from home.

Here’s how to use this template:

  1. Resources: Take advantage of the existing resources or create new cards for any resources that will support your work from home.
  2. Task for This Week: Start your week by moving the cards from the ‘Task for This Week’ column to this column or creating new cards for each task that’s due on Monday.
  3. Monday: Move the cards from the ‘Task for This Week’ column to this column, or create cards for each task that’s due on Monday.
  4. Tuesday: Move the cards from the ‘Task for This Week’ column to this column, or create cards for each task that’s due on Tuesday.
  5. Wednesday: Move the cards from the ‘Task for This Week’ column to this column, or create cards for each task that’s due on Wednesday.
  6. Thursday: Move the cards from the ‘Task for This Week’ column to this column, or create cards for each task that’s due on Thursday.
  7. Friday: Move the cards from the ‘Task for This Week’ column to this column, or create cards for each task that’s due on Friday
Remember to update your cards regularly as you complete tasks or as new tasks come up. This will help you stay organized and ensure that you’re always working on the most important tasks at any given time.

Kerika has a free Template for your Blog Content Calendar

Click on the image to view this Template

The most effective way to organize and schedule your blogs: with this template, you can generate new blog content ideas and collaborate seamlessly with your team.
The different columns allow you to track progress and prioritize content, so you can easily see which tasks require attention and which are ready to be published.
This streamlined approach will not only make the content creation process more efficient, but it will also ensure that your blog posts are high-quality and published on schedule.
How to use columns:
  1. Resources: In this column, you can list all the resources that can assist you with your blogging process. Whether it’s a useful tool or a reference guide, you can create new cards or use existing ones to keep track of them.
  2. Ideas: Brainstorm your content ideas and add them to this column. Use it as a collaborative space to discuss with your team and to seek feedback to refine your ideas.
  3. Draft: Once you’ve chosen a solid idea, it’s time to move the card to the Draft column. Assign the card to the appropriate team member and add any necessary notes or attachments to help them get started.
  4. Scheduled: January, February, and beyond: As you and your team work on your drafts, move them to the appropriate month’s column to indicate when they are scheduled for publication. This will help you keep track of your publishing schedule and ensure that all content is timely.
  5. Done: When a blog post has been published, move the card from the Scheduled column to the Done column to indicate that it’s finished. Alternatively, you can use the “Done” option in the Task Status to mark it as complete. This column provides a great overview of all your finished blog posts, making it easy to track your progress and celebrate your accomplishments.

Kerika has a free Template for setting up a Remote Team Hub

Click to view this Template

Kerika has a free Template for setting up a Remote Team Hub

Manage your remote team’s tasks, and collaborate effectively, no matter where you are:

This template will help you streamline your workflow, improve team productivity, and ensure that everyone is on the same page. It simplifies adding and assigning tasks, setting due dates, and tracking progress of your remote team in real-time.
So, whether you’re working on a small project or managing a large project, this template will help you and your remote team stay on top of your work and achieve your goals.
How to use columns in this template:
  1. Resources: This is a place where you can add useful resources to the board or use the existing ones.
  2. Backlog: Start by adding all your new tasks to this column. This serves as a central repository for all the work that needs to be completed.
  3. In Progress: Once you start working on a task, create a new task card in this column or move a task from the Backlog column to this column by simply dragging and dropping the card from the Backlog column to this column.
  4. In Review: Move tasks from the In Progress column to this column once they are ready for review. In the In Review column, you can assign the task to a team member for review and set a due date for when it should be reviewed.
  5. Done: Once the task has been reviewed, you can move the card to the ‘Done’ column. Simply drag and drop the task card to the ‘Done’ column or mark it as ‘Done’ from the Task Status option. In the Done column, you can keep a record of all completed tasks and their corresponding details.

Kerika has a free Template for Teachers to plan their classes

Click on the image to view this Template/

This template is for teachers and professors that want to manage their teaching schedule. It offers all the tools you need to manage your teaching schedule. It gives you the flexibility to create new cards and columns inside the template.

If you want one place to manage your multiple lectures and classes, this template is perfect for you!

How to use this template:

  1. Use Resources: you will find many useful tools that will help you manage your teaching schedule. You can add your resources by editing the existing cards or creating new ones.
  2. Start of the semester: Each new semester requires creating a plan, booking specialized areas, sharing material with students, etc. And each card in this column is designed to help you with that.
  3. Week 1: Use this column when you’re finished creating a semester plan, and you are ready for the first of the semester. Create a card for each lesson plan for the first week in this column. Or use the existing cards and start filling details.
  4. Week 2: Use this column when the first week of your semester is over. Create a card for each lesson plan for the second week in this column. Or use the existing cards and start filling details.
  5. Week 3: Use this column when the second week of your semester is over. Create a card for each lesson plan for the third week in this column. Or use the existing cards and start filling details.
  6. Add more columns: When you click on the vertical three dots in any column, it will show you a tab named ‘COLUMN ACTIONS‘. It will allow you add a column to the left or right, depending on where you want a new column. This is useful when your semester is longer than three weeks, and you want more columns for them.
  7. End of the semester: This column is useful when your semesters are over, and you want to plan things for your last semester. For example, final exams.