A new tutorial video that shows you how Kerika’s powerful Filter feature lets you customize your view of any Task Board or Scrum Board: just see those cards that are assigned to you, or create more custom views of a board by selecting cards based upon their status, tags, or the people assigned to work on them.
You can even hide entire columns on the board if you like :-)
A new tutorial video that shows you how the Trash works in Kerika (like a Recycle Bin): you can retrieve any card, canvas or even entire projects or templates that got deleted by mistake!
A new tutorial video, featuring our so-very-soon-to-be-released new user interface, that shows you how you can use Planning Views to manage your due dates, across all your Task Boards and Scrum Boards.
A new tutorial video on how to use Work-In-Progress (WIP) Limits on your Kerika Task Boards and Scrum Boards — even if you are not strictly following the Kanban model.
We have created a new tutorial video on how Notifications work in Kerika. It is based upon our new user interface, which hasn’t been released yet, so some of the menu options shown on the top-right of Kerika boards will look a little unfamiliar :-)
You can attach as many canvases as you like to cards on Task Boards or Scrum Boards, and if you don’t need them anymore, you can delete the canvases.
Here’s how you add a canvas to a card:
Adding a canvas to a card
By default, the new canvas is simply called “Canvas”, but like with any other attachments on a card, you can easily rename it by clicking on the pencil icon that appears to the right when you hover your mouse over it:
Renaming a canvas
Clicking on the “x” button at the far end will let you delete a canvas that you no longer need:
Deleting a canvas
If the canvas is empty — which means that there is nothing visible on the canvas, and nothing in the canvas’ Trash either — you see a simple confirmation message asking if you are sure you want to delete it:
Deleting an empty canvas (confirmation)
But, if the canvas is not empty, you see a Restore option instead:
Restoring a deleted canvas
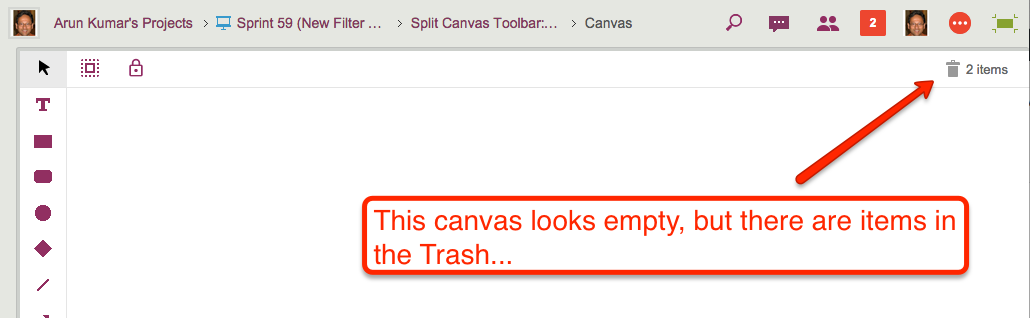
If it seems puzzling why a canvas that appears empty isn’t really empty, make sure you open the canvas and take a look at the Trash: there may be items there that you had previously removed from the canvas:
A canvas that looks empty but isn’t
In this example, above, the canvas looks empty but isn’t really: there are items in the Trash.
In situations like this, Kerika is careful to avoid losing all your work: until you empty the Trash on a canvas, the canvas isn’t considered to be truly empty, and until a canvas is truly empty, it cannot be removed from a card.
So, in this example, you see the Restore option rather than the Delete option:
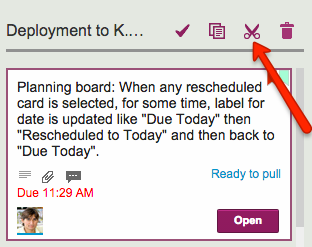
Cutting and pasting cards from one Task Board to another, or from a Task Board to a Scrum Board for that matter, is easy and simple with Kerika: just select the card, and then click on the “Cut” button that appears at the top of the column:
Cut button
You can cut several contiguous cards within the same column by shift-selecting them, and then clicking on the Cut button.
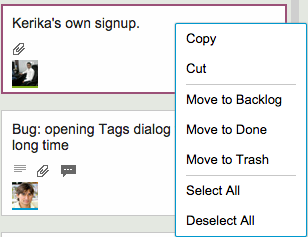
And, you can also access the Cut operation by using the right-click mouse menu:
Right-click menu
Cutting-and-pasting is effectively a move operation: it moves the card intact, along with its details, tags, attachments and chat, from one place to another.
You can cut and paste within the same board, of course, but this is pointless since it is much easier to drag cards from one column to another.
Cutting and pasting cards from one board to another is much more useful, and it doesn’t matter if the source is a Task Board or Scrum Board, and the destination is a board of different type — or even if the destination is a Template.
But what should you do if you click on the Cut by mistake? Well, that’s easy to undo: just click on the cut cards — which will appear slightly greyed-out — and the cut operation will be cancelled!
Some techies in Seattle may like up to 50 shades of grey, but at Kerika we try to stick with just three:
Kerika Grey
This is easier said than done: there’s a lot of grey in the Kerika user interface, and as we add new features or tweak old ones, it’s easy to slip and introduce new shades of grey.
So, periodically, we need to take digital color meter and examine the Kerika UI in detail, pixel-by-pixel, to look for stray shades of grey.
Limiting the palette of grey to just 3 shades is an example of how constraints can help designers.
Kerika’s Scrum Boards look a lot like regular Task Boards (which you can use for Kanban-style) work; the main difference is that each Scrum Board can share a backlog with other Scrum Board.
We were doing some fairly complicated bookkeeping when people added tags to their Scrum Boards, and we decided it was getting messy both for the system and probably the users as well.
So, we are simplifying tags for Scrum Boards:
Every Scrum Board is connected to a shared Backlog. (And, if there was no backlog to connect to, Kerika will automatically start a new backlog for you.)
Cards on the Backlog may use a certain taxonomy for their tags, while each Scrum Board could add to this taxonomy, e.g. by adding a new tag that makes sense for a particular Scrum cycle (Sprint).
Now, whenever you add a new tag to a Scrum Board, this will automatically get added to the Backlog’s taxonomy as well, and to all the Scrum Boards that share that Backlog.
The effect of all this is to ensure consistency of your tags taxonomy across all Scrum Boards that share the same Backlog: this will make it easier to pull cards from that Backlog into any Scrum Board and know that you will automatically get all the right tags set up for you by the system.