How great is Kerika’s integration with the Box Platform (that powers our direct signups?)
Category Archives: Kerika
Kerika’s internal product development workflow
It will come as no surprise to our users that the Kerika team uses the software for every aspect of the company’s internal operations, including, of course, our product development.
(There really isn’t anything better on the market for planning and executing product roadmaps — we know, because we have checked and made sure we are better than everybody :-))
We are sometimes asked about our own internal workflow: how we plan releases and manage our Sprints, and in particular how we have gone without using regular old email for over 4 years now!
Well, here’s a glimpse at our internal workflow:
We work in two-week long Sprints; we have found two weeks to be the ideal Sprint length since it provides enough time to produce something — at least some usable part of a new feature — while not being so long that we forget we are supposed to be working as a Scrum team.
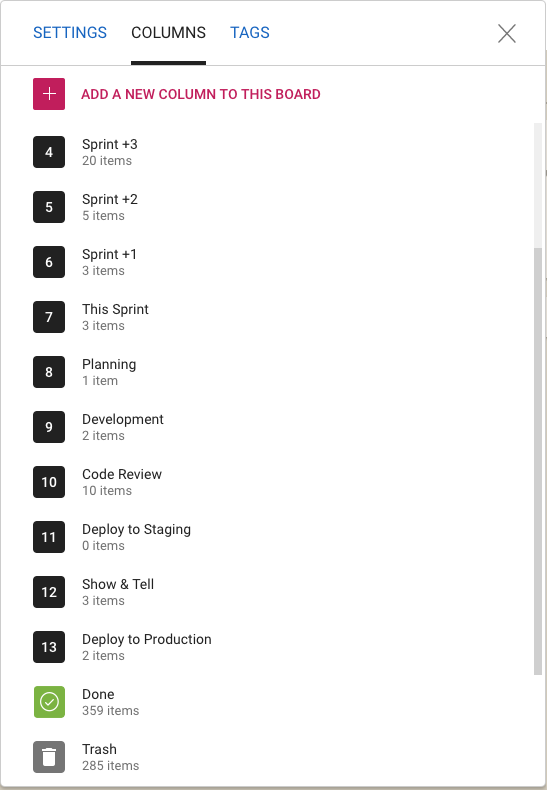
Planning
Whenever we plan a new Sprint, we are always also looking forward as well: hence the columns titled “Sprint +1” (i.e. the Sprint that will come after the current Sprint), “Sprint +2” (the Sprint that will come after the next Sprint), etc.
This gives a view into the next several weeks of our product roadmap which makes sure we don’t approach any single work item with tunnel vision.
Now you might notice that “Sprint +3” in the list above is way larger than “Sprint +1” or “Sprint +2”: that doesn’t mean that we expect a sudden spurt in productivity (i.e. increase in team velocity) in 4 weeks time. It just means that as we go further out in our planning there is more uncertainty about priorities and so the Sprints that are well into the future are not well defined — and that’s perfectly OK.
Quality Assurance
Within each Sprint we have a fairly conventional flow: Planning, Development and QA. The QA step actually consists of three separate stages:
- Code Review: we try to make sure we review all the code we are writing in any Sprint, unless it is a really trivial change we are making (e.g. changing the label on a button).
- Deploy to Staging: we have a separate set of servers where we test our new releases. This also happens to be where we have all our real projects running: we believe very much in the idea that “developers should eat their own dogfood”, so we run out entire business on the latest build that went past Code Review.
This can be a little scary or frustrating at times: if there was a bad release to our staging environment, it can bring every project and board to a screeching halt. But, from our perspective, that’s the whole point: make it everyone’s business to ensure that we produce high-quality code, and make it everyone’s priority to fix any problems that come up.
This model of living on the bleeding edge of our product gives us a really good incentive to write good quality code!
- The final QA step is Show & Tell, where the team formally presents the new features or bug fixes to the Product Owner. With each new feature we will have identified a set of test cases, as part of the Planning phase, and these are used to formally check the new feature in a meeting attended by everyone on the team.
Very occasionally something will get rejected at the Show & Tell stage, in which case the card gets moved back to Planning or Development and flagged as “Needs Rework”. It’s more common for work to get rejected at the Code Review phase, not because it is buggy, but because it might not meet our internal coding standards.
Deployment
Once a feature or bug fix has passed Show & Tell, it is ready for Deployment to Production.
We have a continuous integration process for handling code changes — pulling them from our internal git code repository — but we don’t do continuous deployment. Instead we prefer to deploy on the last day of each 2-week Sprint. We usually time this for Friday morning, Indian Standard Time, so that our developers in India can take one final look at the system working in production.
Documentation
We have an unusually strong emphasis within the team on creating documentation at the same time as we write code. Many small companies skip documentation because they think it will slow them down.
In our own (sometimes bitter) experience, skipping documentation is false savings: if there are problems to be fixed later, or even if a feature simply has to be extended in the future, it’s very hard for even the original developer to recall the logic that she used to write the code in a particular way.
What’s important to note, however, is that we don’t have very big documents: most documents are less than a page long, because they refer to very specific work items. But we have thousands of these small documents, since every feature we have ever produced, and every bug we have fixed, has been documented.
And thanks to Kerika’s very cool integration with Google Docs (we use Kerika+Google), managing these thousands of documents is very easy: just open the relevant card for a specific feature or bug fix and you will find all the relevant documents as well:
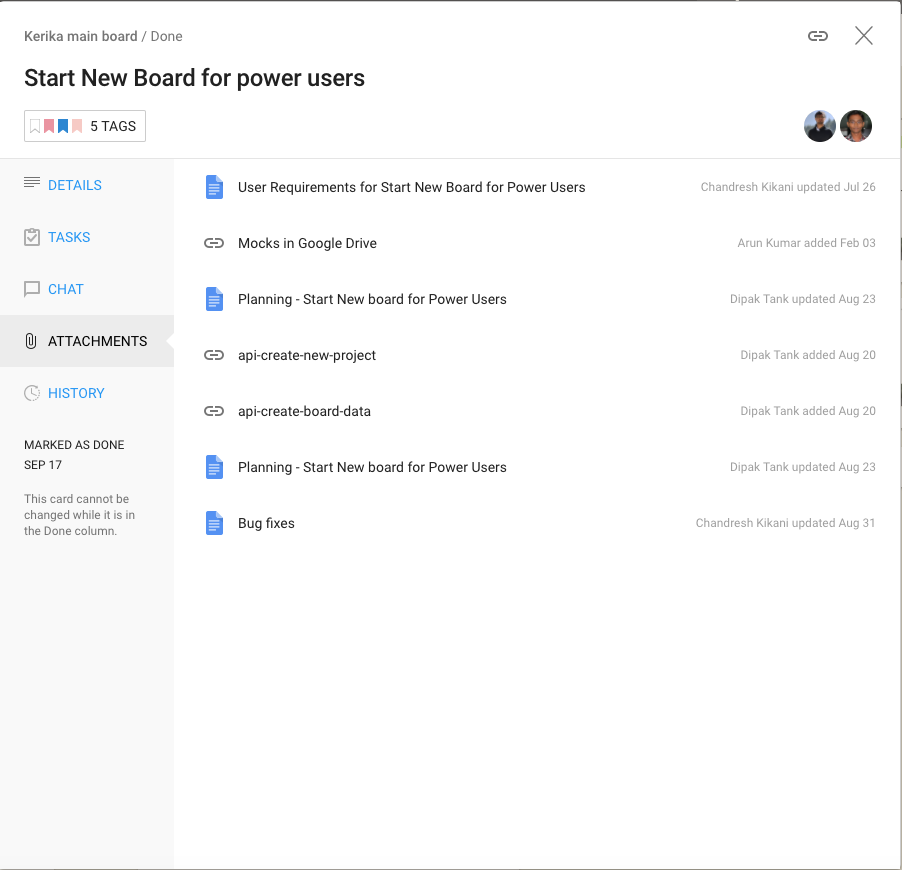
For new features we always have a short Planning Document that identifies any existing modules that will be affected and provides an outline of the new code that will be written. Here’s an example:
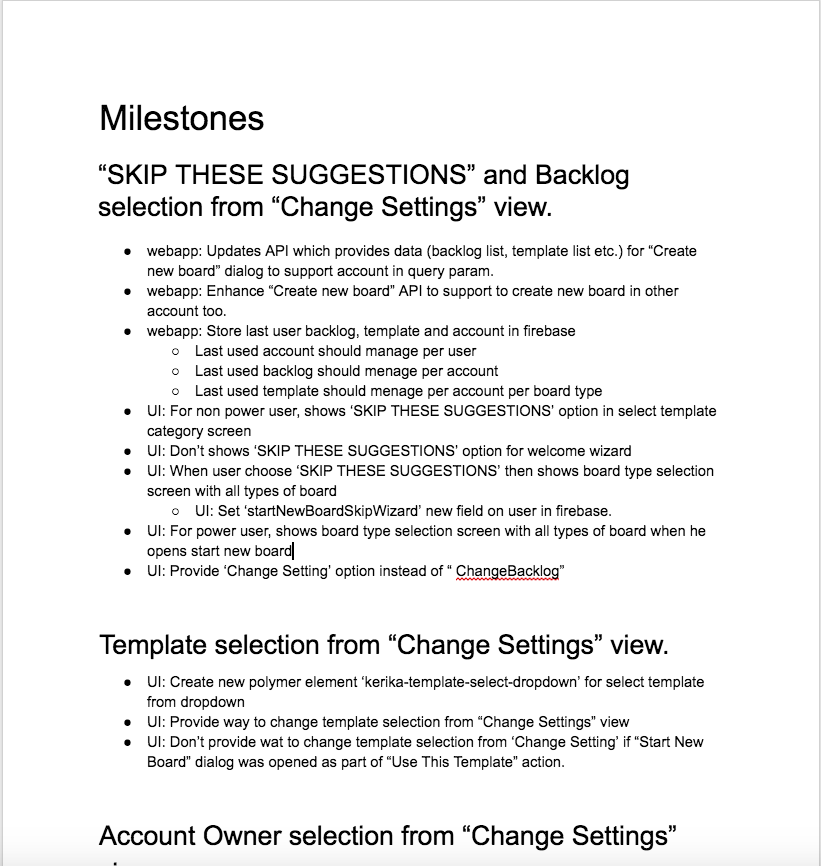
There may be other documents created, depending upon the complexity of the new feature, but even the smallest new feature will have at least one planning-related document that’s written before the code is written.
Bug Fixes
For bug fixes, we have a Repro, Cause & Fix document that methodically analyzes the cause of a bug:
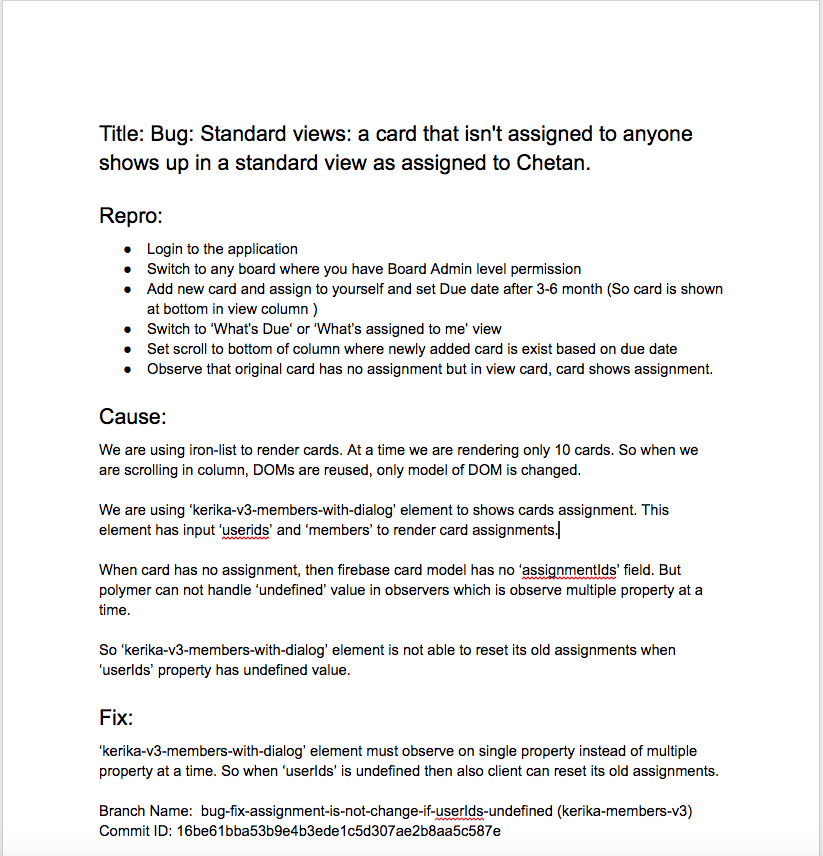
The most important section of this document is the Introduced Since piece, where we trace the origin of the bug back to its source, to understand what new feature or bug fix we were originally working on that resulted in this new bug appearing.
This methodical root cause analysis, which we do for even the most minor bugs, helps us identify patterns in our code writing that we need to improve. Sometimes it can even point to bugs that we haven’t discovered yet: the root cause analysis may identify an assumption that we have applied in other places, all of which need to be looked at to make sure there aren’t other variations of the same bug that haven’t been identified yet.
After the bug has been fixed, the Repro, Cause & Fix document is updated to reference the git branches where the code fix can be found. This completes the circle of careful analysis, careful execution, and methodical review that we strive to adopt (and improve continuously).
The End of Email
We stopped using regular email towards the end of 2013. There was never any formal decision to renounce email; instead there was a formal decision to “eat our own dogfood” in a very serious way.
And as we started to build our entire company using our own product, we found that using Kerika is so much better than using email that there really wasn’t any need for email any more.
So people simply started drifting away from email. There was no explicit decision or formal movement to do so, people just realized, on their own, that email is an exceptionally poor way of managing work within a distributed team.
Conclusion
Considering the size of our team — and entire company, for that matter — you may be surprised by the degree of formalism we have adopted, and the heavy emphasis on analysis and documentation.
We spend at least as much time on analysis and documentation as we do on “pure coding”, and if we add in the Code Reviews and other elements of formal QA, the actual coding time is a relatively small portion of our total expenditure.
But trying to skimp on analysis and documentation really doesn’t pay off, in our experience: if you are building a company and product for the long-run, as we very assuredly are, you need to build it right, not just fast.
Updating the look of Board Settings
One final (?) bit of restyling, to make all of Kerika consistent with our new look-and-feel, has been updating the Board Settings dialogs.
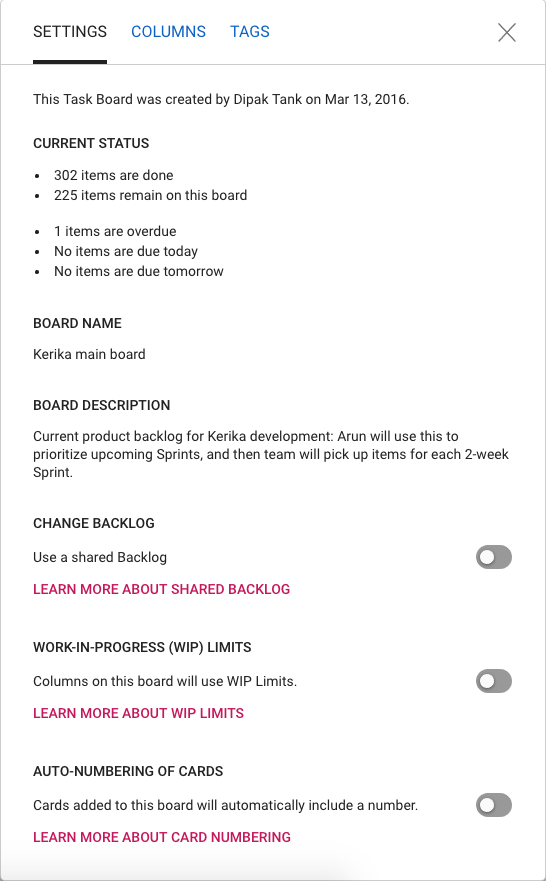
The functionality is essentially the same, but the appearance is cleaner, lighter and more in keeping with the Material Design standards we have (mostly) adopted.
(We say “mostly”, because there are some elements of Material Design that we find unattractive. For example, for the on/off toggle switches we prefer the iOS style buttons.)
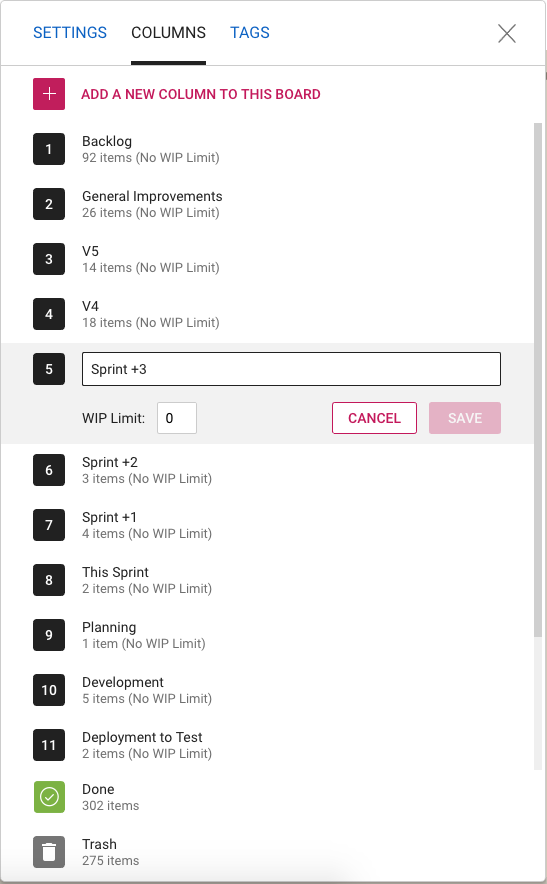
The Column Settings dialog has also been restyled, and looks nicer and cleaner. The example above shows a board that uses Work-In-Progress Limits.

And the same with Tag Settings: we have a restyled color picker, and better messages for warnings when tag names or colors might clash.
Enjoy.
Helping people parachute into projects faster
In many of our customers, we find there are specialists who get pulled into many different projects (boards) at the same time, to do very specific tasks.
An example would be an security specialist who is called in to do a vulnerability assessment on every development effort that’s underway within an IT organization. Or, corporate counsel who are asked to review final drafts of every contract, after everything else about the negotiation has completed.
In all situations it’s important to help new team members come up to speed as quickly as possible, but for situations where people are parachuting in to handle specialist tasks, the motivations are a little different: the specialists often don’t care about every detail of the board — which means they don’t care for most of the cards that are already on the Task Board or Scrum Board.
Instead, they want to quickly see what’s been assigned to them, get these work items done, and (hopefully) get out quickly.
So, how can Kerika help people who parachute into projects in mid-stream? By drawing their attention to what’s expected of them.
Here’s how it works:
When you invite someone to join a board’s team, their status is shown as Pending invitation in the Board Team dialog:
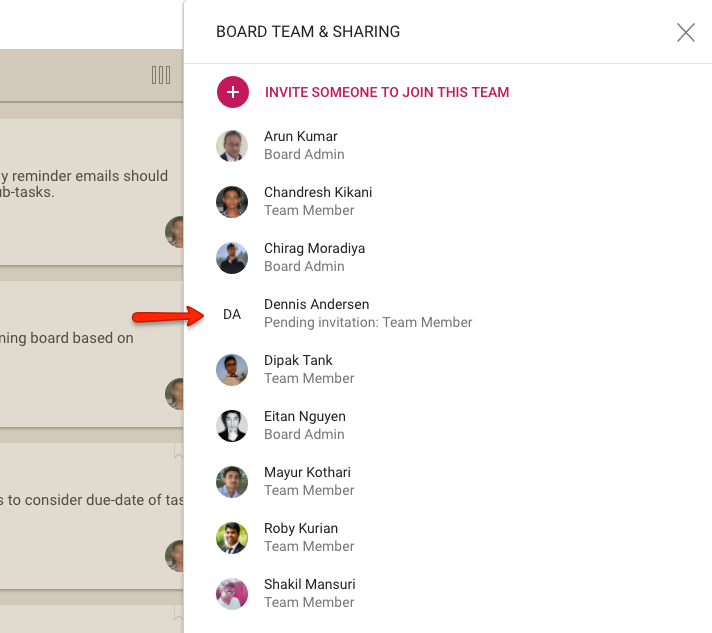
Kerika lets you pre-assign cards while you are waiting for the new team member to join: in the example above, Dennis could be assigned cards while the team is waiting for him to act upon the invitation.
When Dennis does accept the invitation, the Kerika welcome dialog works to guide him to a fast start in his new project:

The welcome dialog starts by giving the new team member a quick overview of the project’s state: how long it’s been going on, how many cards are on the board — and, critically, how many cards are already assigned to the newly arrived team member.
Clicking on the See My Cards button in the welcome dialog provides a fast way for the new user to see what’s expected of him/her in this new project:
This feature will be especially useful for specialists who are called in to handle specific tasks on many simultaneous projects: they won’t care about all the cards on each board, just what’s assigned to them.
Get in quick, get your work done fast, and then get out again.
Changing the Owner of a Board
People usually don’t pay attention to the question of who owns a particular board, but it is an important question to consider when you create a new board: the Account Owner owns not just the board, but also all the files attached to cards and canvases on that board.
This is not always important (and often not important in day-to-day use of Kerika): our deep integration with Google and Box ensures that everyone who is part of the board team has automatic access to all the files needed for that board, with access permissions managed according to each individual’s role on the board: Board Admins and Team Members get read+write access; Visitors get read-only access.
(And, as people join or leave board teams, or their roles on a particular board’s team changes, Kerika automatically manages their access to the underlying project files, regardless of whether these are being stored in Google or Box.)
But when someone is planning to leave an organization, the question of ownership can suddenly become important: you don’t want an ex-employee to continue to own critical project files.
Changing ownership of boards was not something that was easily done in the past — there were workarounds, but they were fairly cumbersome and obscure — and we mostly handled these as special requests, on a case-by-case basis.
With our newest update to Kerika, this is no longer the case: changing the ownership of a board is a simple process that can be initiated at any time by the current owner of a board:
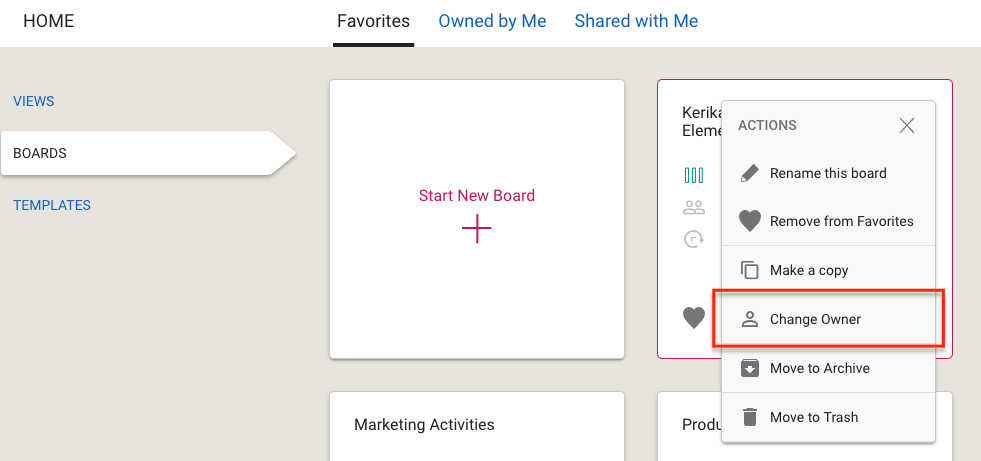
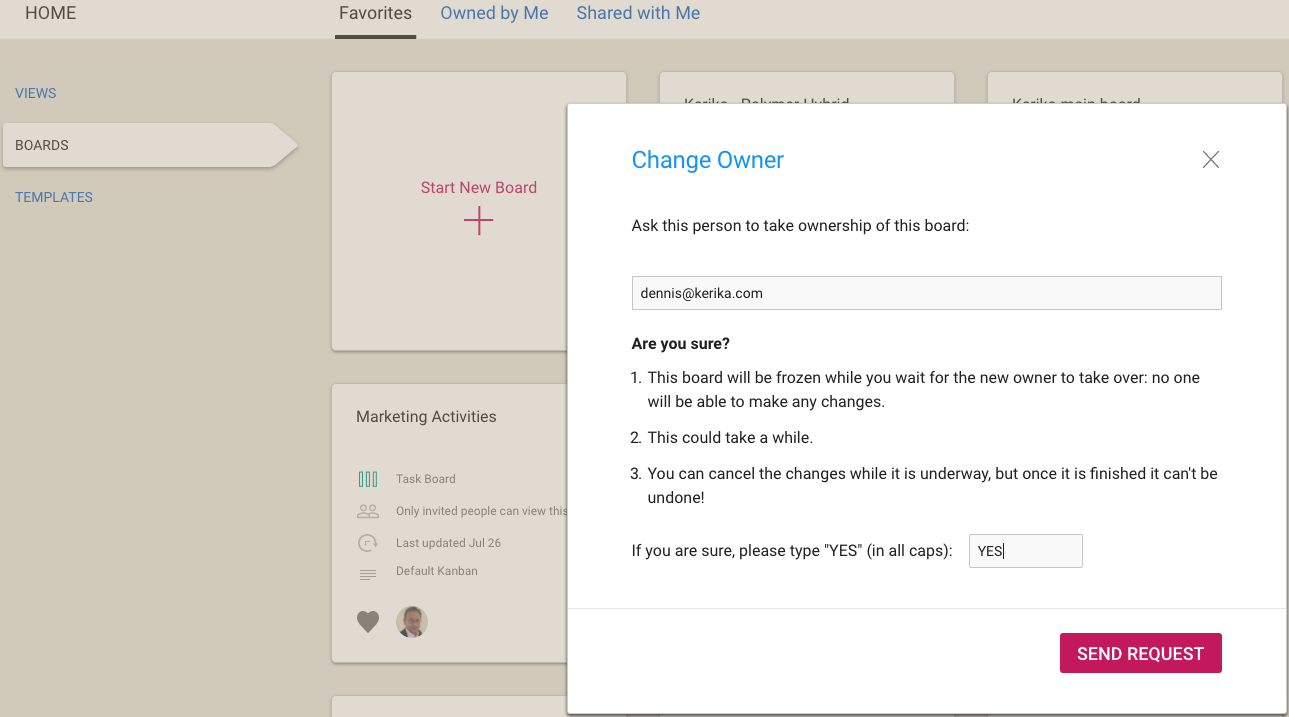
You can ask any other Kerika user, who has signed up the same way as you did (i.e. either as Kerika+Google, Kerika+Box, or by directly signing up) to take ownership of a board. Because this is a consequential action, not something you should rush into, you are asked to confirm your intention by typing the word “YES”:
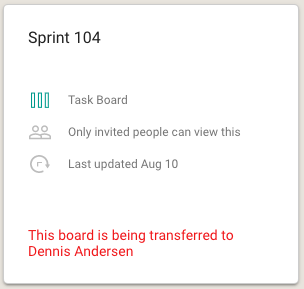
Once your request is sent off to the other user, the board is in a frozen state: existing members of the board team can continue to view the board, but no one can make any changes:

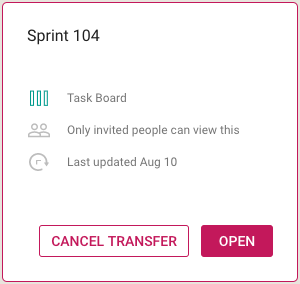
If you change your mind, you can cancel the request before it has been accepted. This can be done by selecting the board from your Home Page:
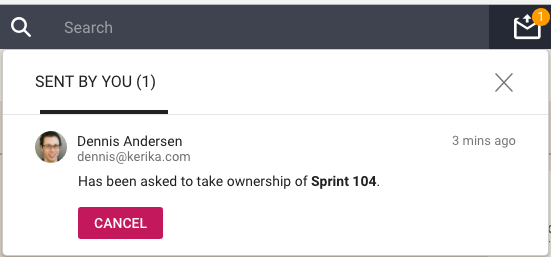
You can also find your pending request in your Sentbox, and cancel it from there:
Note: once a board’s transfer is complete, it can’t be undone by you. If you really need to get ownership back of a board, you will need to ask the new owner to transfer the board to you.
An important caveat for Kerika+Google users
We try to ensure that files attached to a Kerika+Google board have their ownership changed at the same time as the board itself is transferred, but there are some limits to how Google will allow for a change in ownership:
All Kerika-related files are stored in a set of folders in a user’s Google Drive, organized by account and board.
Google let’s us change the owner of a folder, so we can make sure that when a board is transferred the ownership of the associated Google Drive folder is also changed.
However, for the individual files contained within the folder, Google only allows for a change of ownership of files that are part of Google Docs: documents, spreadsheets, presentations, forms, etc.
Files like images (.jpg, .png, .gif), zip files, and PDFs, for example, retain their old ownership between the Google API doesn’t let Kerika change the ownership of these “non-Google-formatted” file types.
Free up your brain
A fun video we made recently featuring Faith Trimble and Kate King, from the Athena Group, talking about how a consulting company can function as a truly distributed team — and get great work-life balance as a result!
Restyling Preferences
We have restyled your Preferences page, to be more in line with the new design of Kerika that we released a couple of months ago. It now looks like this:
We are using the familiar “card container” style for showing different categories of preferences, like WIP limits, along with the left-side tabs that are similar to those you find on the Home page.
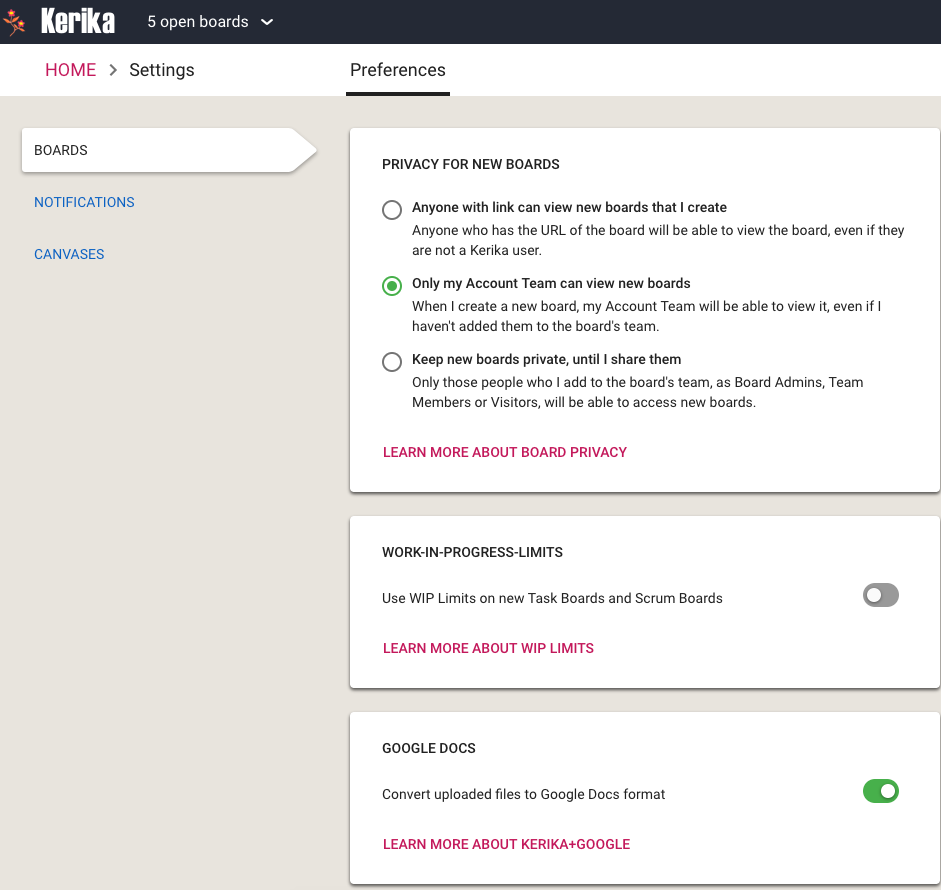
The Boards tab lets you set the following preferences:
- The privacy of new boards you create: you can make them accessible to anyone with a link; to just people who are part of your Account Team; or to only those people you invite to the board as Board Admins, Team Members or Visitors.
- Whether to use Work-In-Progress (WIP Limits) on new Task Boards or Scrum Boards that you create.
- Whether to have your documents converted to the Google Docs format, if you are using Kerika+Google, or whether you want to retain them in their original format e.g. Microsoft Office. (This preference isn’t shown to Kerika+Box users, or those users who signed up directly.)
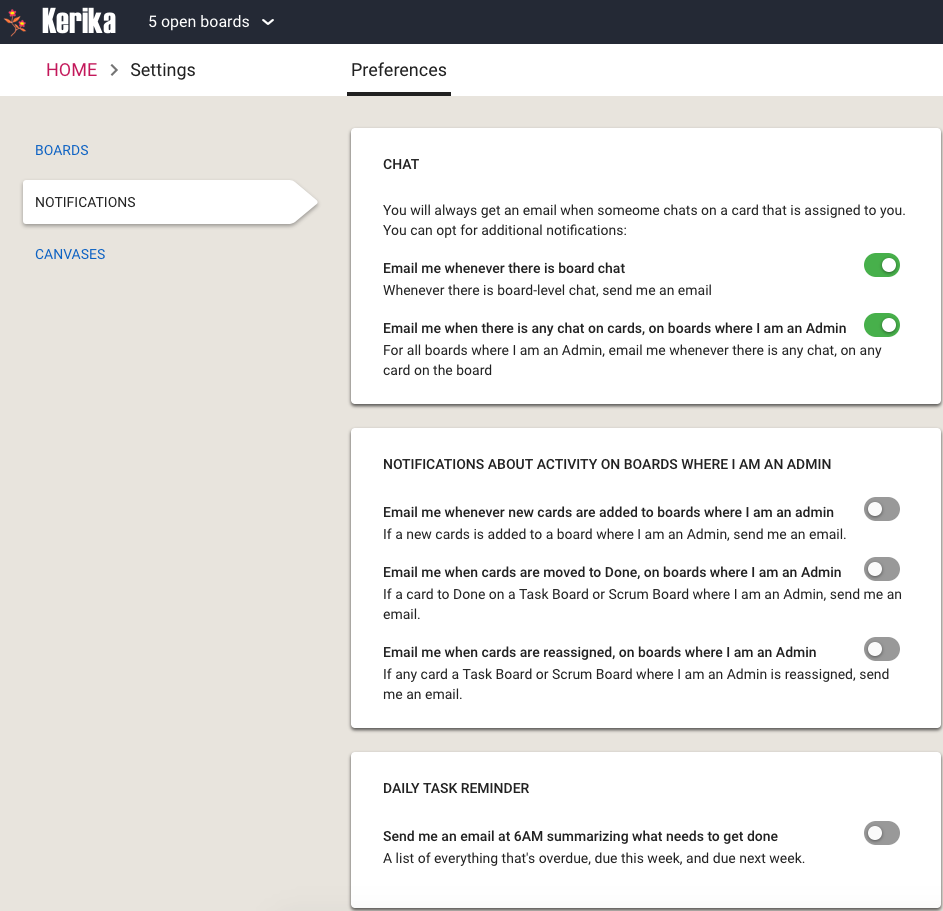
In the Notifications tab you can decide how much you want to hear from Kerika when stuff happens (that concerns you).
If you are assigned a card on a Task Board or Scrum Board, and someone does chat on that card, Kerika will always push that to you as an email: we assume that since you are responsible for a card, you need to know sooner rather than later when someone has a comment or question about that work item.
If you are a Board Admin, however, you can decide how many notifications you want when stuff happens on boards that you are responsible for.
For example, you could be notified if someone adds a new card on a board: this usually means that there is new/more work to be done by your team, so you might want to quickly check whether it is important — or whether it is even relevant for that particular board.
And, as a Board Admin, you might want to know whenever someone moves a card to Done. This is usually a welcome notification: people like to hear that stuff is getting done, but if a team/board gets a lot of stuff done every day these emails can be a nuisance and you might want to turn off this preference.
And, depending upon how involved you want to be with each card and each Team Member, you can get notified whenever a card is reassigned from one person to another. Some Board Admins like to be very much in control over who is doing what, so if a Team Member takes the initiative to reassign work to another Team Member the Board Admin may want to know right away. Other Board Admins take a more relaxed, hands-off approach and let the team handle its own work allocation.
Finally, you can choose to get a 6AM email summary of everything that is overdue, due this week, and due next week: for all cards assigned to you personally, as well as a all cards on boards where you are one of the Board Admins. You have the additional option of getting this list summarized by date, or by board — or both.

The Canvas Preferences let you determine how lines, shapes and text look like, by default, when you use Whiteboards.
One useful preference in this tab is to have items snap to grids: this helps you lay out process diagrams more neatly.
Views across all your boards
At long last, we have built Views — one of the most commonly requested features, and something that we had been obsessively designing and redesigning over years, trying to figure out the best way to handle this need.
We have done it now. Views has been built, and is automatically available across all your Task Boards and Scrum Boards, whether they are owned by you or shared with you.
We are starting off with four standard Views, and we will built more in the future, and add a way for you to build your own Views as well.
The Views we have built are:
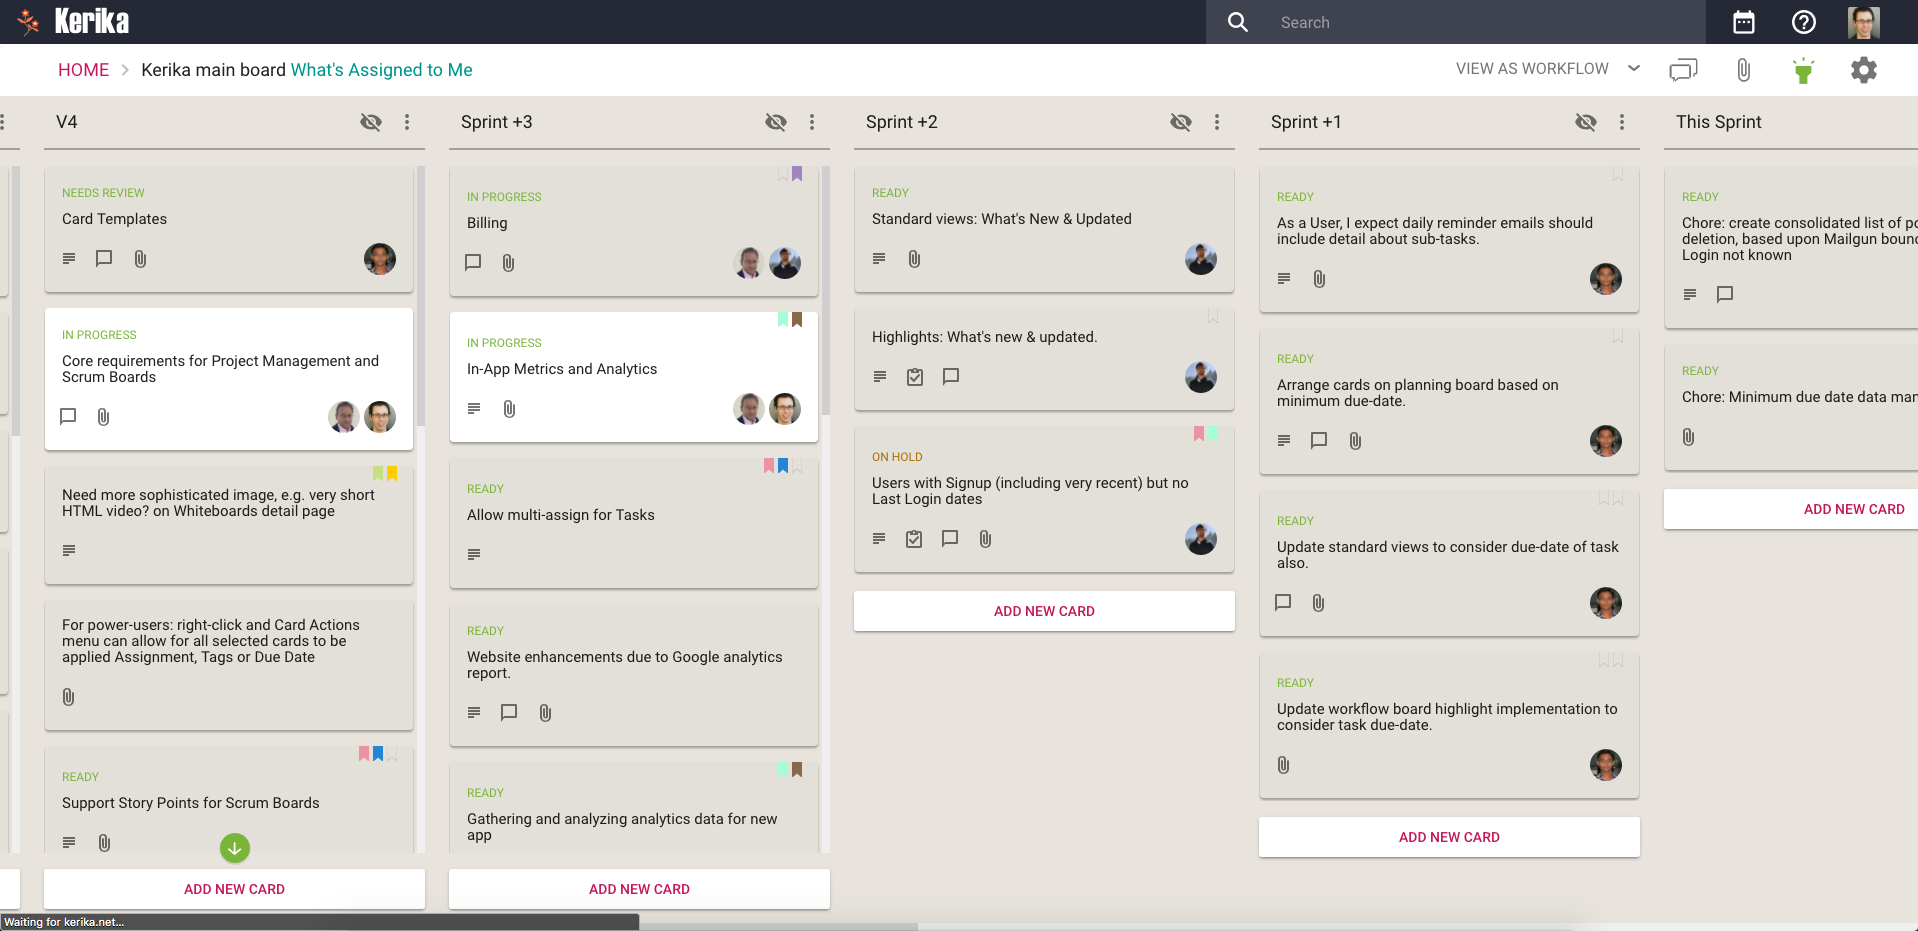
What’s Assigned To Me
The most commonly asked for feature by people who are working on several projects — and, hence, several boards — at the same time. This is what it looks like:
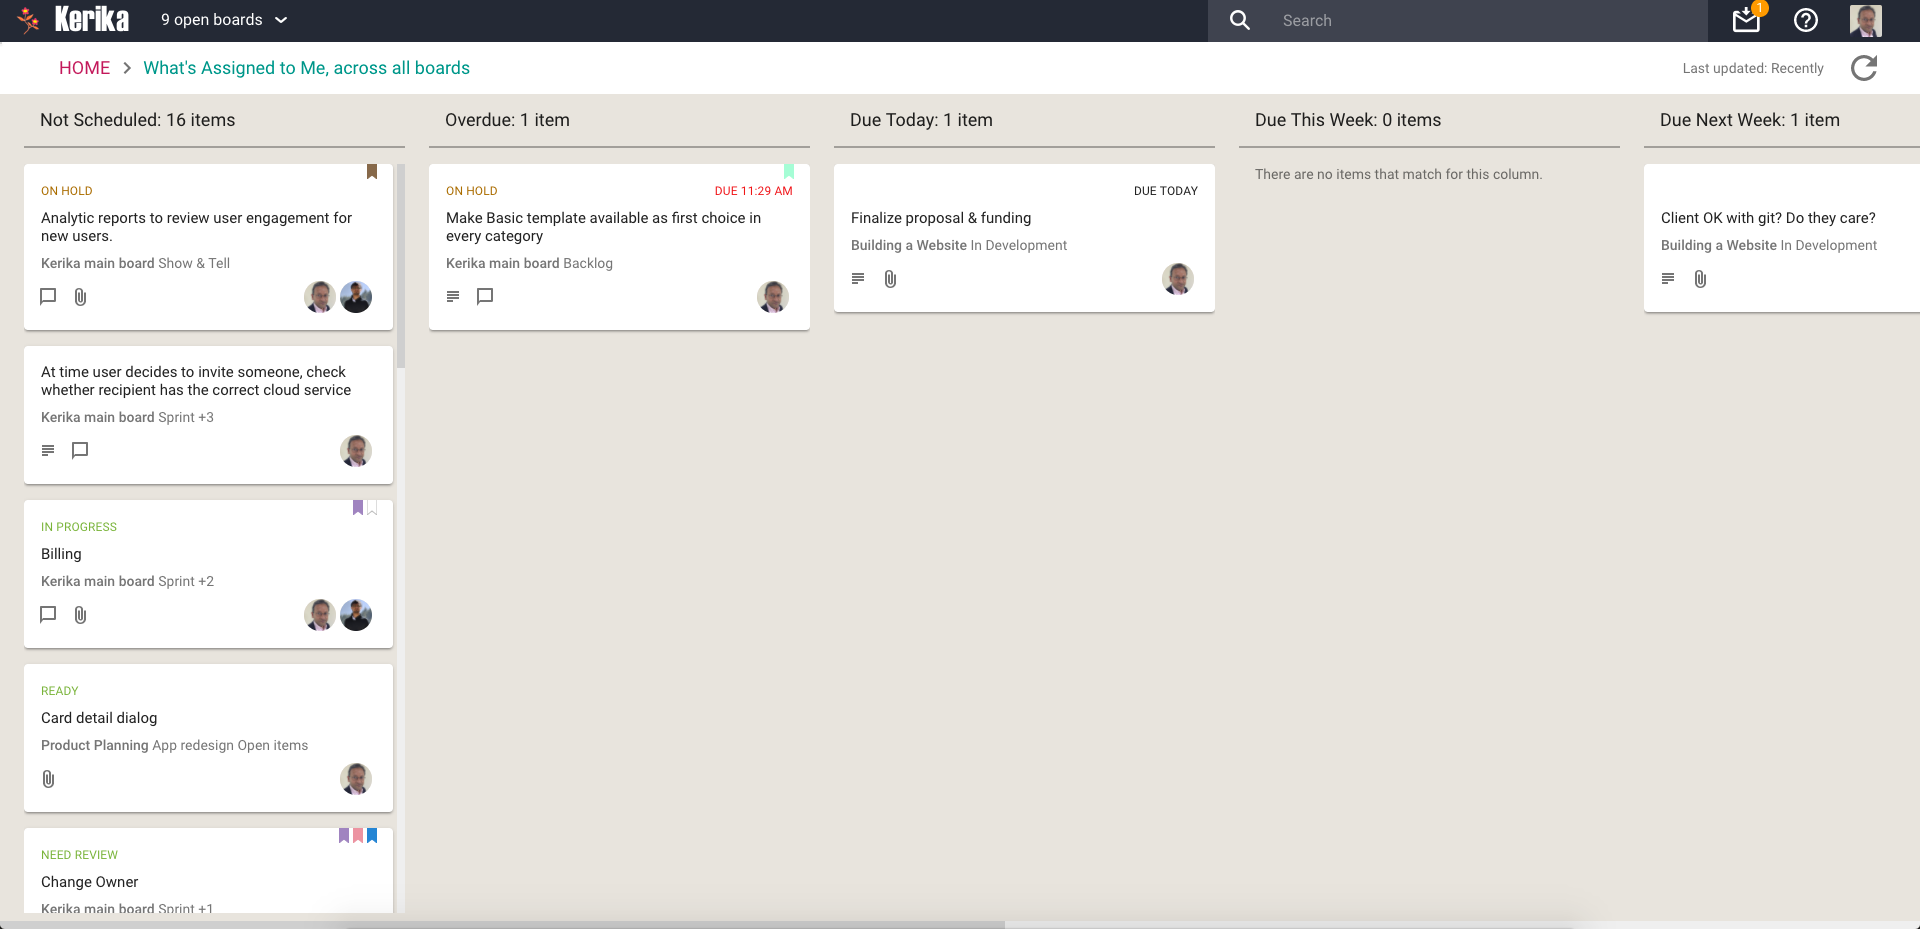
Everything that’s currently assigned to, on all boards except for those that are in the Trash or Archive, are collected for you into a single View, where cards are organized as follows:
- Not Scheduled
- Overdue
- Due Today
- Due This Week (excluding what’s already included in Due Today)
- Due Next Week
- Due This Month (excluding what’s already included in Due Today and Due This Week)
- Due This Quarter
- Due Next Quarter
It is a comprehensive summary of everything you need to get done, and it will be invaluable for managers and anyone else who has to work on multiple projects at the same time.
If you select a card in a View, like this
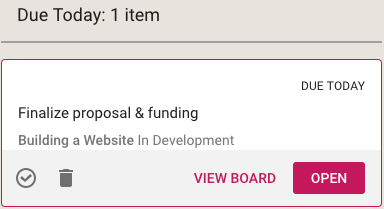
You get quick access to key actions:
- Move to Done
- Move to Trash
- View Board
- Open
Open opens the card right there, inside the View itself. View Board, on the other hand, opens the card in the board in which it is located.
Both are useful, depending upon the card and what you want to do: in some cases you just need to update a particular card — e.g. reschedule it, add a comment or file — and opening the card in the View itself, which is very fast, is enough.
In other situations you might want to be sure you are understanding the context of the card, and it is better to see where it is on the board that contains it. This can be helpful for cards that you are not quite sure about.
What’s Due
This View will be particularly helpful to managers (Board Admins): it summarizes everything that’s due, on all boards where you are one of the Board Admins:
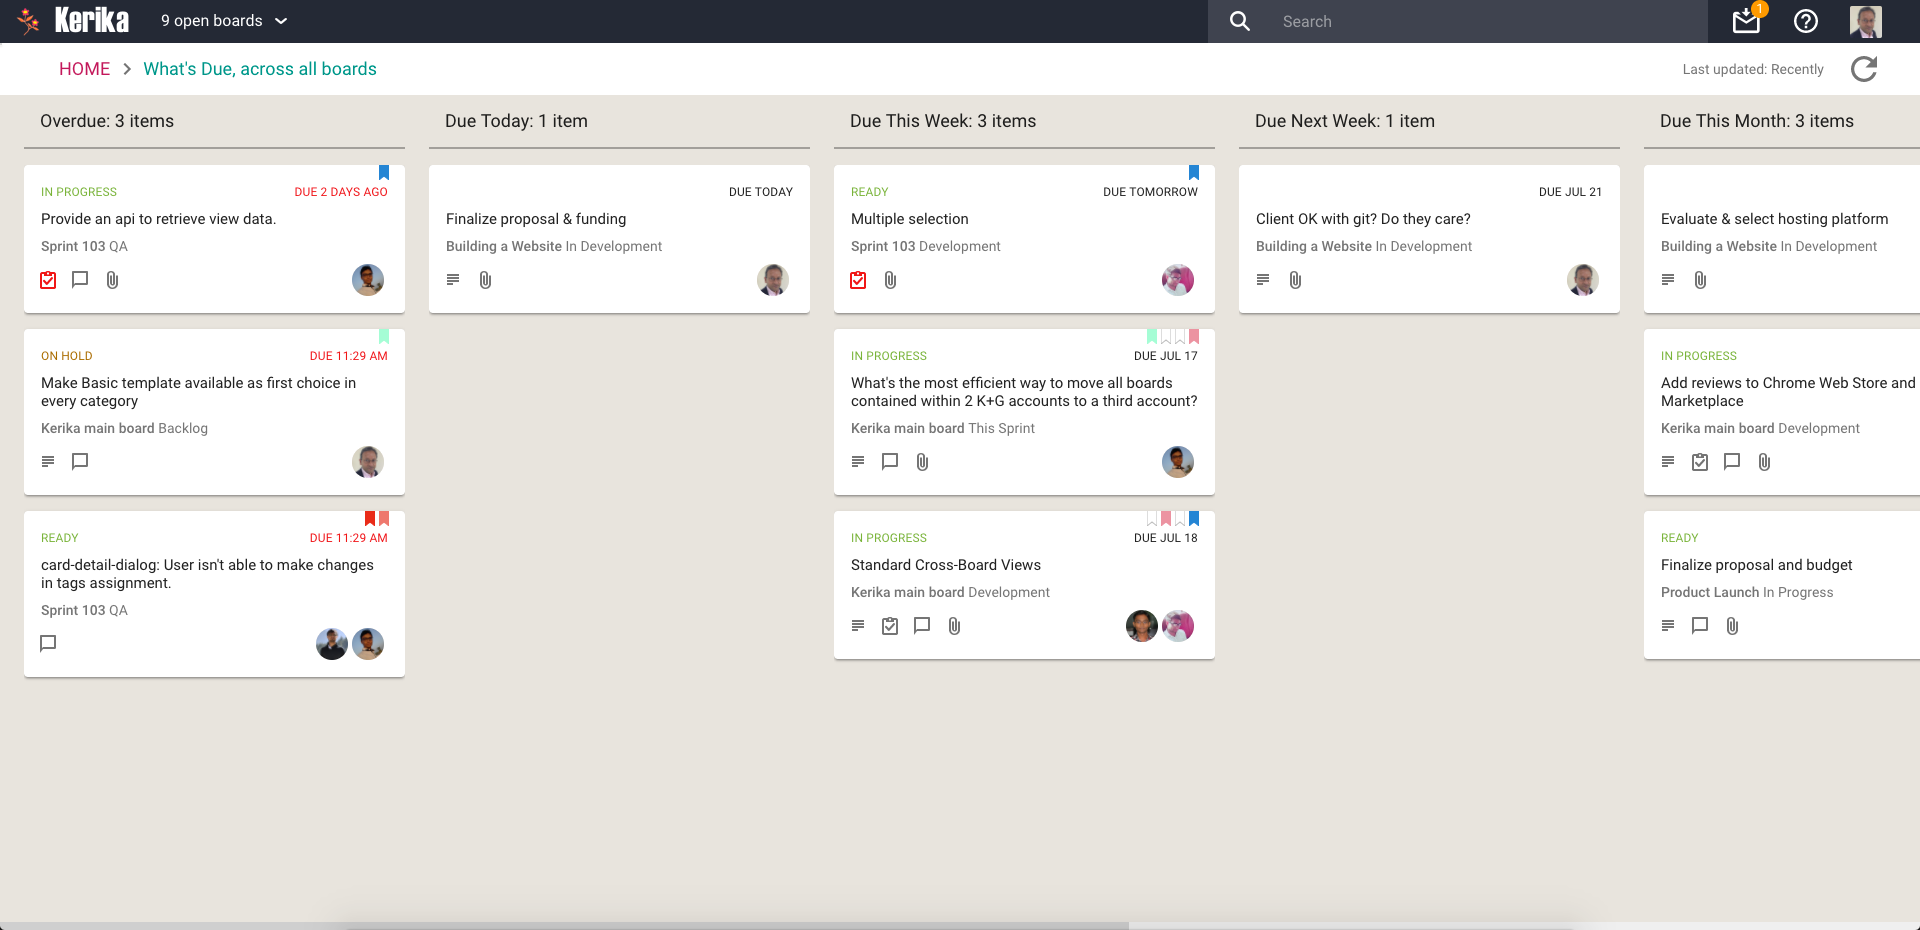
Cards are organized for you as follows:
- Overdue
- Due Today
- Due This Week (excluding what’s already shown as Due Today)
- Due Next Week
- Due This Month
- Due Next Month
For this View, as with the What’s Assigned to Me View, we try to be smart about not showing duplicate cards: if something is due today, for example, it will show up in the Due Today column, but not get duplicated in the Due This Week or Due This Month column.
This makes it easier for you to plan your schedule: you can see what needs to get right away, and what needs to get done later.
What Needs Attention
Again, a View that will be of particular interest to managers concerned with several ongoing boards:
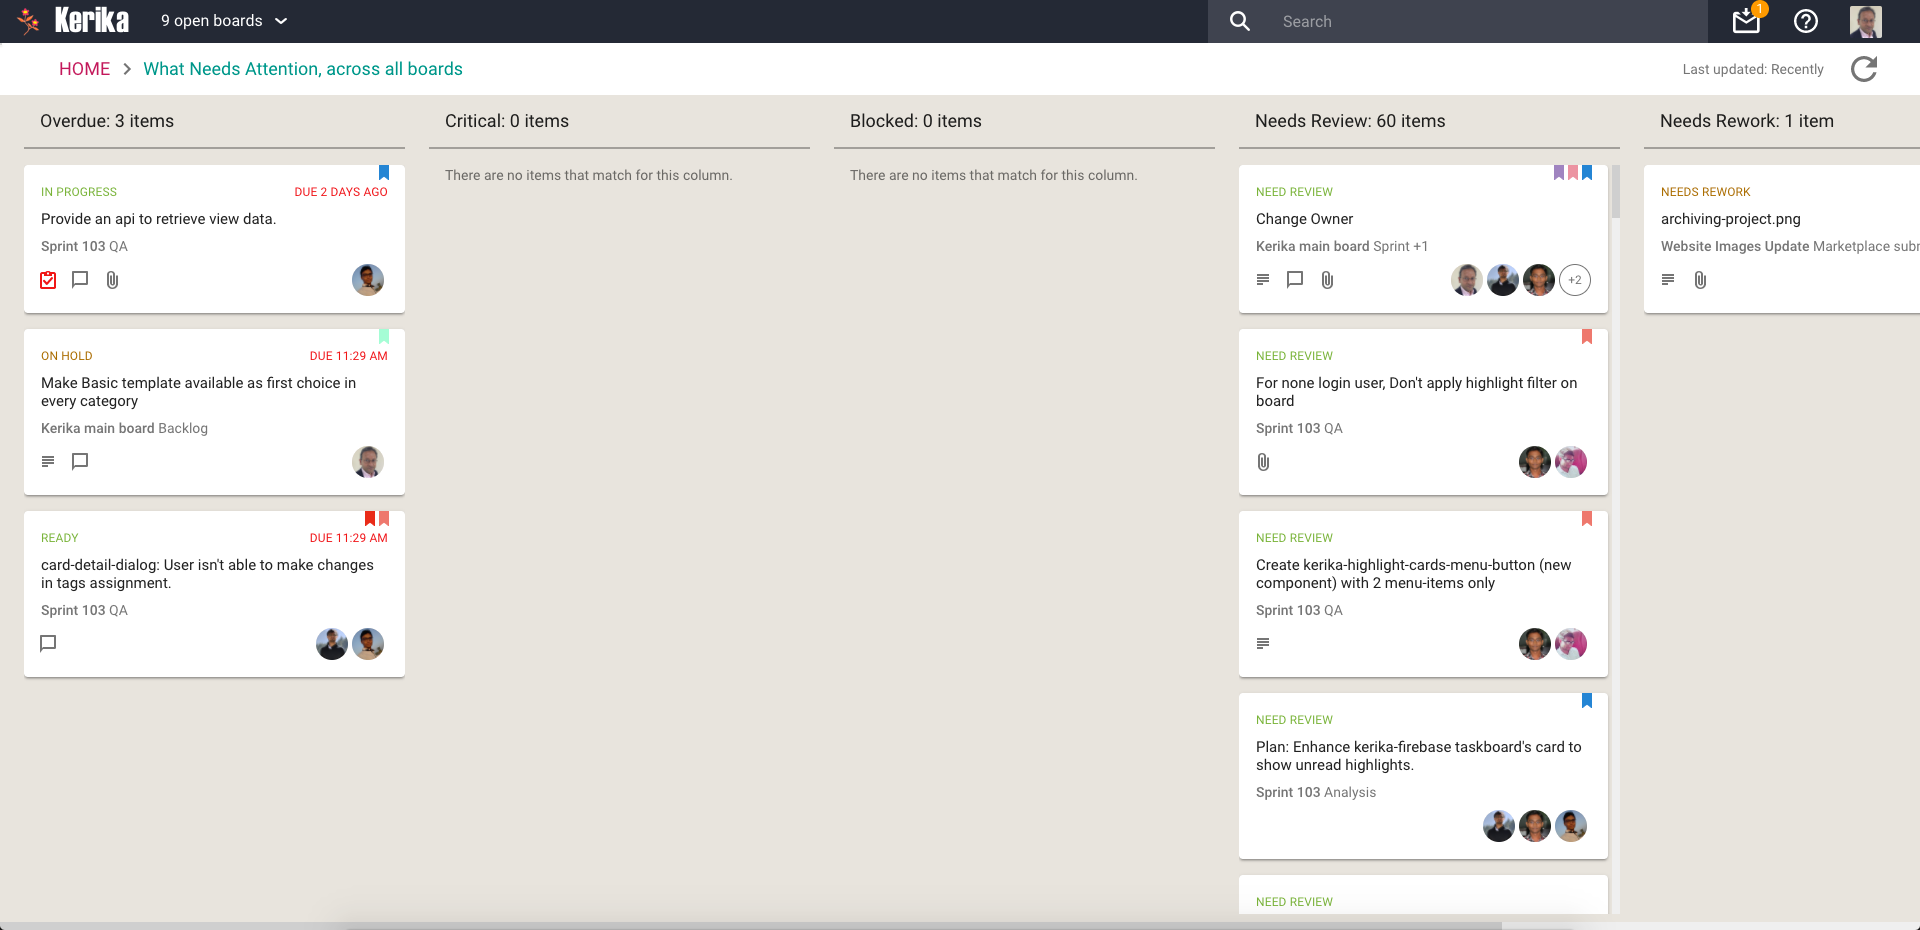
Here, Kerika tries to show everything that needs a little extra attention: things that are
- Overdue
- Flagged as Critical
- Flagged as Blocked
- Flagged as Needs Review
- Flagged as Needs Rework
- Flagged as being On Hold
These items typically represent your risk profile across all your boards, and Kerika brings it all together in a single View.
What Got Done
Great for anyone who needs to produce a status report, or any manager who needs to monitor progress across many different projects:
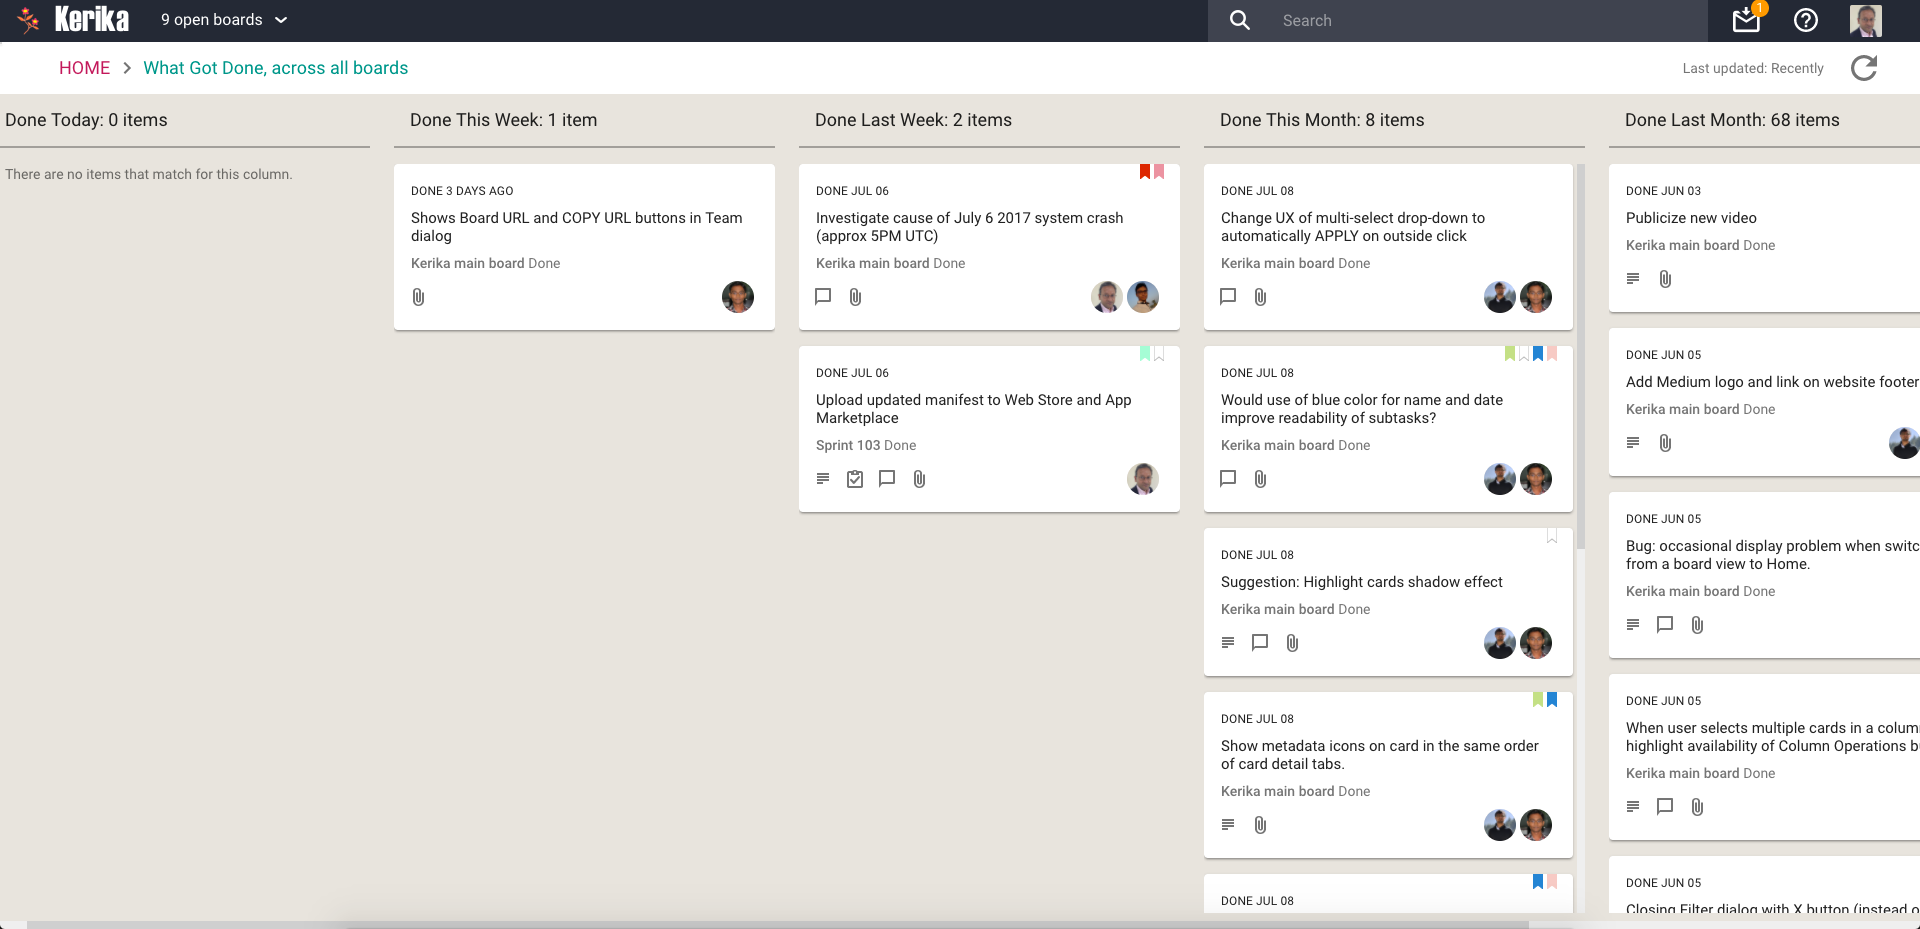
Across all boards where you are a Board Admin, this View summarizes
- What got done Today
- What got done This Week (excluding items shown in This Week)
- What got done Last Week
- What got done This Month (again, excluding items shown for Today and This Week)
- What got done Last Month
- What got done This Quarter
Accessing Views:
All your Views can be accessed from a new tab called Views (naturally) on your Home Page:
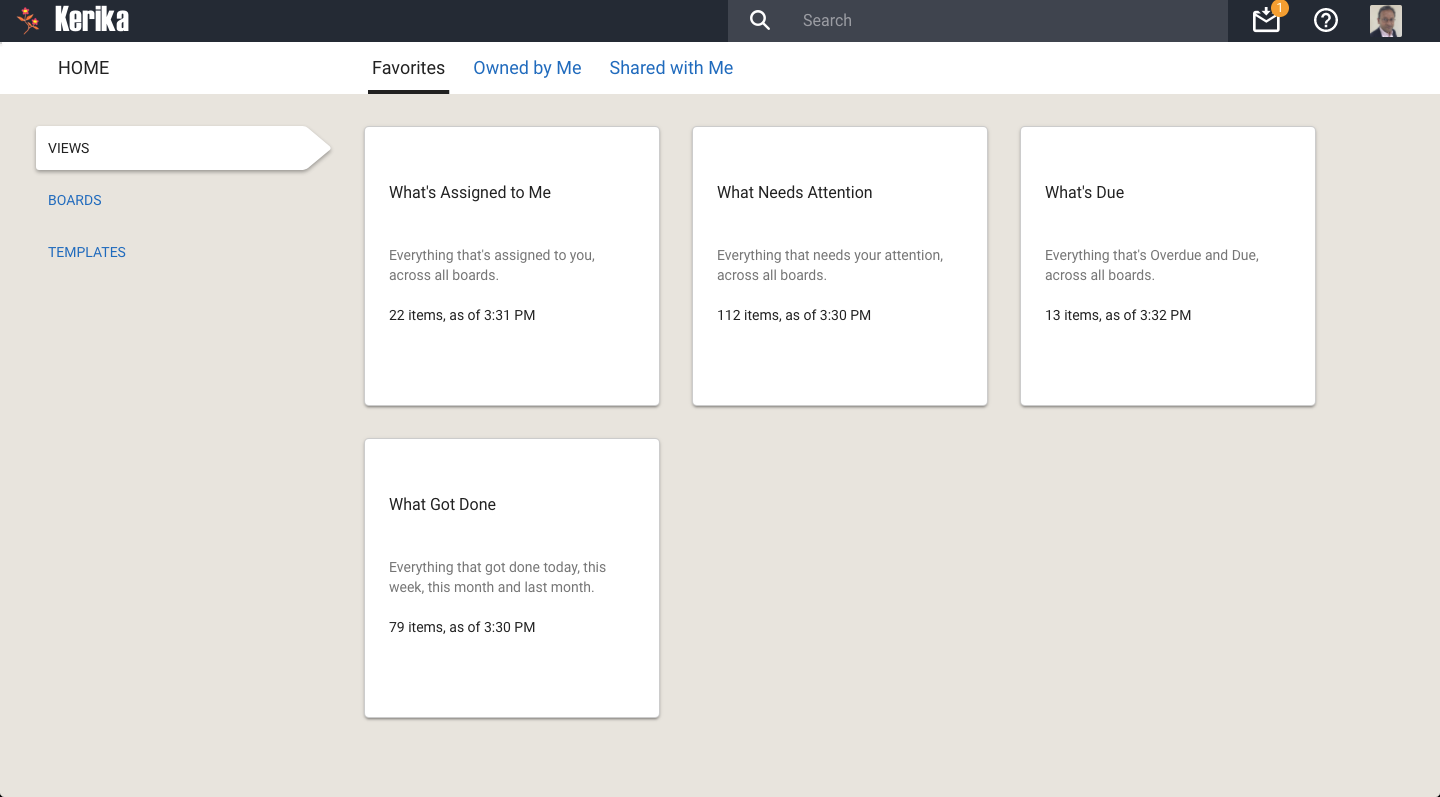
On each View card, Kerika shows how many items are included in that View, and as of when. The Views are automatically refreshed when you open them, but in-between they are not updated because we do not expect the information shown to change on a second-by-second basis.
If you are worried that your View is out of date, you can update it by selecting it on your Home Page:
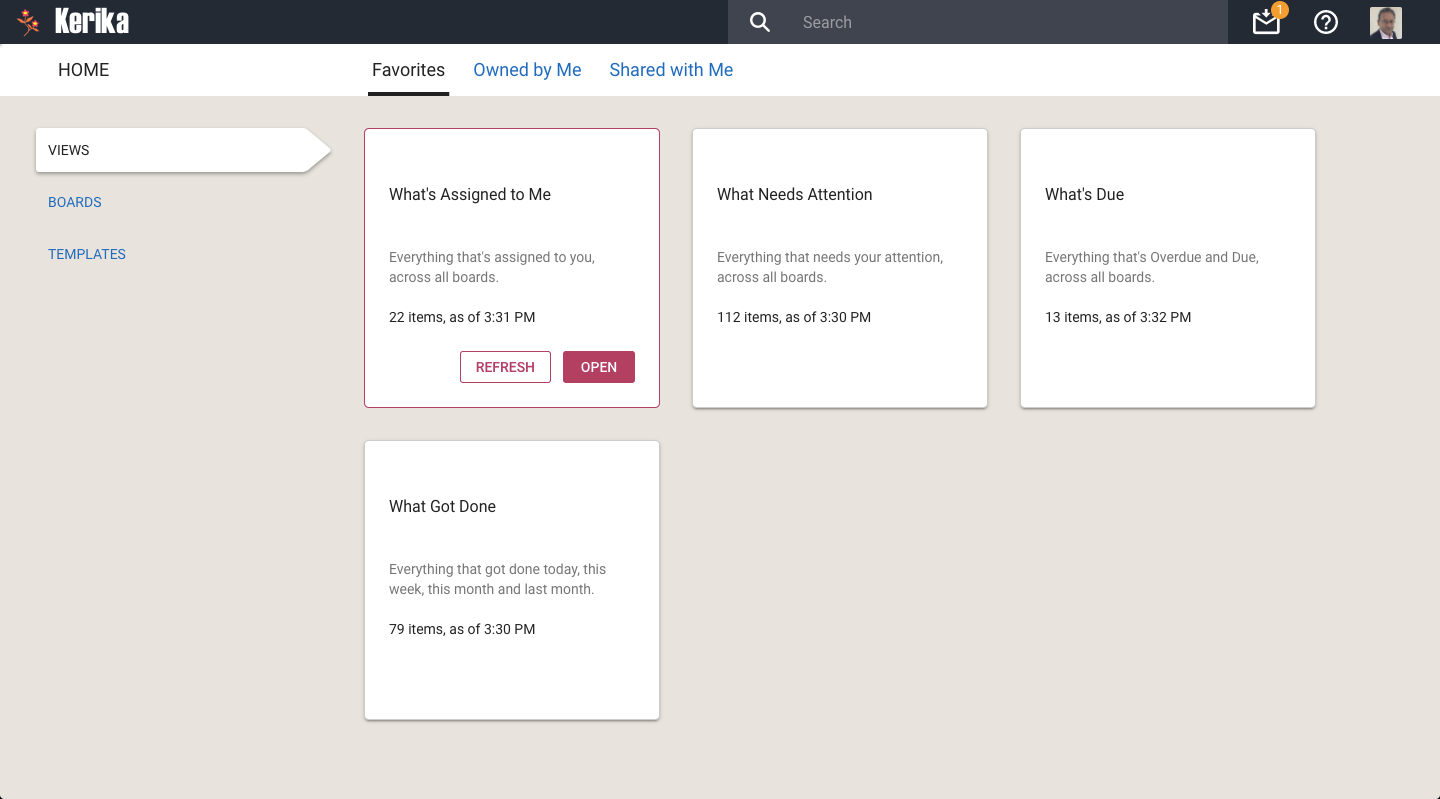
You can also update any View that you currently have open, by clicking on the Refresh button shown on the top-right of the View:

We will let you go crazy with these Views, for now. In the future we will add more (we already have some ideas on that front, but would love to hear from you as well!) and also add a Custom View capability.
Meanwhile, enjoy.
A bunch of bug fixes and usability improvements for Tasks
We have done a bunch of small bug fixes and usability tweaks to the Tasks feature we introduced a few weeks ago:
- When a user’s last Task within a card is marked as Done, the user’s name is removed from the list of people shown as being assigned to that card. (Previously you had to do this cleanup manually.)
- When a Task that was previously marked as Done is changed to be “undone” (open/remaining), the user who had previously been assigned to that Task is added back to the list of people shown assigned to the card.
- Bug fix: If someone is assigned to a Task, and this person had previously completed a Done Task, this user wasn’t getting added automatically to the list of people shown on the card. This has been fixed.
We had a problem today
Kerika was unavailable for about 15-20 minutes this morning; our apologies to everyone who was affected.
It’s back now, and we are still investigating the root cause. All we know right now is our Amazon Web Services (AWS) Load Balancer, which acts as the immediate front-end to every browser that tries to connect to Kerika, reported a problem.
UPDATE:
It is starting to look like Amazon Web Services was having an internal networking problem; our server’s error logs included entries like
[97207ms] ago, timed out [81830ms] ago, action [cluster:monitor/nodes/liveness], node [{#transport#-1}{thl-D8yeRmGg9N_4GyNNUQ}{elasticsearch}{172.18.0.12:9300}], id [133181]
06-07-2017 16:44:53.077 [ConsumerPrefetchThread-1] ERROR com.amazon.sqs.javamessaging.AmazonSQSMessagingClientWrapper - AmazonClientException: receiveMessage.
com.amazonaws.AmazonClientException: Unable to execute HTTP request: sqs.us-east-1.amazonaws.com: System error
Restoring service was unexpectedly hard: we couldn’t reboot the AWS EC2 instances from the AWS Console, and couldn’t even login to the machine using ssh.
Eventually we had to power down our EC2 instances and restart them from scratch. Not good.