Our last blog post noted that a very useful Box Notes hack had gone away, following an unexpected update to the Box platform a couple of weeks ago.
We asked Box if they could consider adding something to their API that would allow us to restore this functionality, and their response has been very helpful and very fast!
Here’s how fast they responded:
July 15, we enter a support request at 6PM.
The next morning, Box Support put us in touch with Jon Berger, the Product Manager for Box Notes.
The same day, Jon talks to his dev team and commits to providing us with a fix.
We have created a new tutorial video on how Notifications work in Kerika. It is based upon our new user interface, which hasn’t been released yet, so some of the menu options shown on the top-right of Kerika boards will look a little unfamiliar :-)
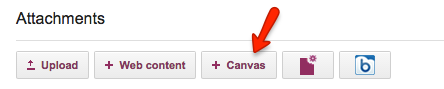
You can attach as many canvases as you like to cards on Task Boards or Scrum Boards, and if you don’t need them anymore, you can delete the canvases.
Here’s how you add a canvas to a card:
Adding a canvas to a card
By default, the new canvas is simply called “Canvas”, but like with any other attachments on a card, you can easily rename it by clicking on the pencil icon that appears to the right when you hover your mouse over it:
Renaming a canvas
Clicking on the “x” button at the far end will let you delete a canvas that you no longer need:
Deleting a canvas
If the canvas is empty — which means that there is nothing visible on the canvas, and nothing in the canvas’ Trash either — you see a simple confirmation message asking if you are sure you want to delete it:
Deleting an empty canvas (confirmation)
But, if the canvas is not empty, you see a Restore option instead:
Restoring a deleted canvas
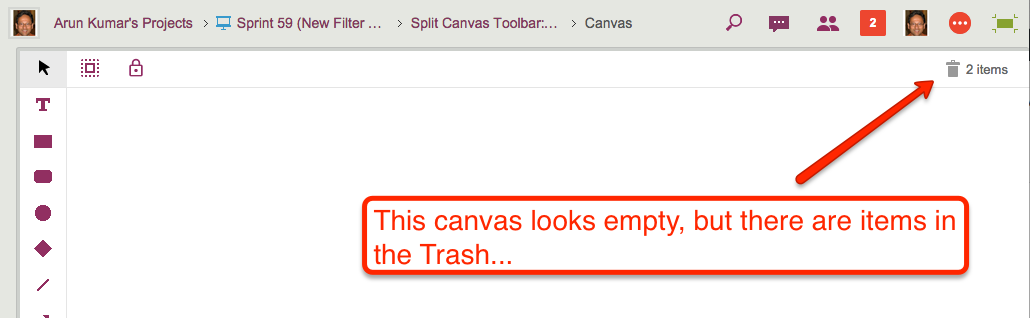
If it seems puzzling why a canvas that appears empty isn’t really empty, make sure you open the canvas and take a look at the Trash: there may be items there that you had previously removed from the canvas:
A canvas that looks empty but isn’t
In this example, above, the canvas looks empty but isn’t really: there are items in the Trash.
In situations like this, Kerika is careful to avoid losing all your work: until you empty the Trash on a canvas, the canvas isn’t considered to be truly empty, and until a canvas is truly empty, it cannot be removed from a card.
So, in this example, you see the Restore option rather than the Delete option:
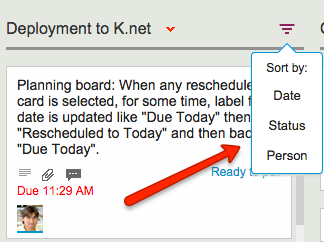
When working with Task Boards and Scrum Boards, you get a variety of options for quickly sorting a column of cards:
Sort options
Sort by Date is easy enough to understand, but what about sort by status?
Sort by Status organizes the cards in a column as follow:
Critical
Is blocked
Needs rework
Needs review
In progress
Normal
On hold
This sort order reflects the normal priorities of most projects: the most important stuff would ideally show up at the top of the column to get dealt with first.
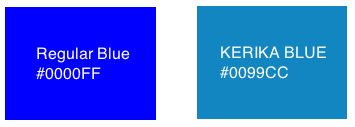
We try to be consistent in our use of colors and shades throughout the application, although it is easy to slip up from version to version, particularly since we do so many releases a year.
One recent diversion we corrected was in the use of the color blue: we have a specific shade we call Kerika Blue (#0099CC) which is used to indicate the concept of “new”:
Kerika Blue
Kerika Blue is more muted than the regular blue that you might find elsewhere: we generally try to keep our color scheme muted, so that the decoration of the Kerika app doesn’t compete with your data — after all, your data are far more important to you than anything we do in terms of decorating your screen ;-)
All of Kerika’s servers, which run on Amazon Web Services (AWS), operate within a Virtual Private Network (VPN), so they can be configured to only listen on local ports, e.g. ports like 10.0.0.1, etc.
This means that they cannot be accessed directly from the Internet: instead, all connections are routed through an Elastic Load Balancer (ELB), which is a special kind of AWS server that handles connections from all users.
The ELB is very secure: it implements SSL 2.0, and when vulnerabilities like Heartbleed and POODLE are discovered, it is relatively easy for us, with Amazon’s help, to quickly ensure that the the ELBs are patched. Patching the ELBs quickly gives us breathing room to patch all the other servers involved, particularly if vulnerabilities are found at the platform level itself.
But, running a VPN isn’t enough: while it blocks people outside the Kerika server environment from directly accessing our database, there is still — at least a theoretical possibility — that an attacker can find his way inside the VPN, and then try to connect to our database server on a local port.
To avoid this scenario, we use SSL within the VPN as well, so that the connections from the load balancers to the database servers are also authenticated and encrypted.
Many of our users work in globally dispersed teams; our own team is spread out between Seattle and India.
With multiple timezones, particularly when they are widely spaced apart, commitments like “I will get this done today” become a little tricky to understand.
If someone in India says “I will get this done today”, is that India time or Seattle time? Well, that depends upon where you are, when you log into Kerika.
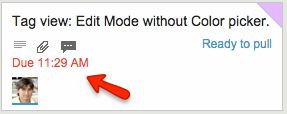
Kerika automatically factors in differences in timezones when showing due dates: someone who commits to getting something done “today” in India is actually committing to get it done by 11:30AM Pacific Standard Time, now that the US is in Daylight Savings Mode.
So, the due date is shown in a way that’s relevant to the user’s local time: our Seattle folks see an Indian’s commitment like this
Local time due date
These timezone differences automatically adjust for Daylight Savings Time: there’s nothing you need to do to see when a commitment is actually due.
Except, perhaps, notice that the item is now overdue, as indicated in red in the example above…
As with Android tablets, we have been doing a bunch of testing and bug fixing related to using Kerika on Windows tablets and touch devices generally (i.e. the many combinationss of touch and keyboard that make up the Windows computer ecosystem)
And, as with iPads and Android tablets, you don’t need to install a special app in order to run Kerika: you can just use the Internet Explorer browser (or any other browser you have installed) to access Kerika, and use your finger to move stuff around just as you would with a mouse.
There were some problems with the touch interface that we have fixed; the overall experience should be a lot better than it was before!
For a very long time we had a feature which was kind of cool (although we don’t know how many people actually used it!) — you could embed another website on a Kerika canvas, using a technique known as IFRAME.
IFRAMEs were common a few years ago, but have steadily dropped out of favor as browsers have increasingly become more secure.
By running another website inside your own, you can be vulnerable to various cross-scripting errors if you cannot fully trust that third-party website you have embedded. And, at the same time, people who run websites have become less keen on having their sites embedded into other sites — a practice known as “clickjacking”.
(You can read more about this on Mozilla’s website, if you are interested in the technical details.)
Since it became impossible for us to provide a consistently good experience across all modern browsers, particularly as the number of websites that allow themselves to be IFRAMEd dropped drastically, we decided to drop this feature. If you were using this feature in the past, you will find your old IFRAME is now just a simple bookmark…
We were trying out Kerika using Amazon’s Silk browser on one of their Fire (color) tablets, and found that Kerika worked surprisingly well.
On standard (un-forked) Android tablets, the Chrome browser works better than the standard browser that comes with all tablets, mainly because Google has been improving Chrome with a lot more enthusiasm than they have been improving “stock Android“.
So, we weren’t sure how good the Silk browser would behave with Kerika, given that Silk is a relatively old fork of the standard Android browser.
It turns out that you can use Kerika on Amazon’s Fire tablets quite well: just open the Silk browser, go to kerika.com, and login like you would on a laptop or desktop. Just let your finger do the dragging-and-dropping…