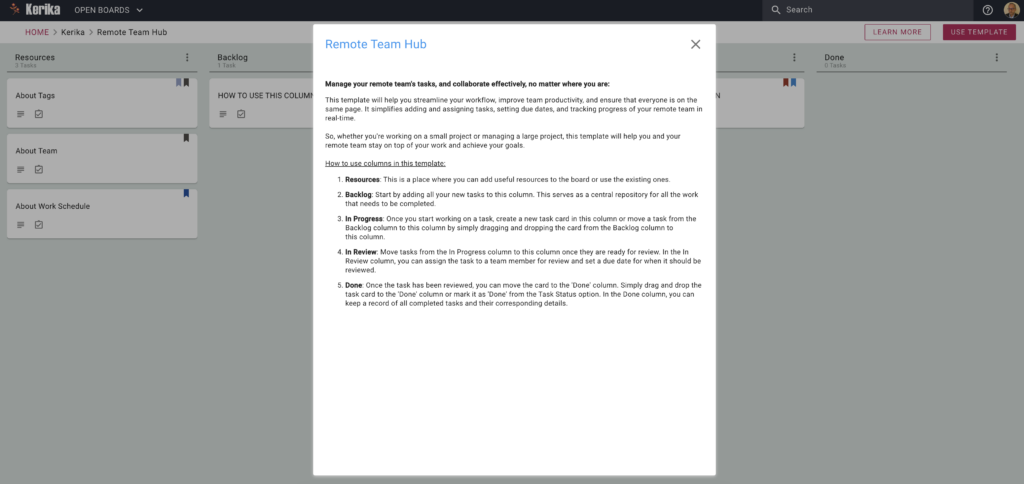
Manage your remote team’s tasks, and collaborate effectively, no matter where you are:
This template will help you streamline your workflow, improve team productivity, and ensure that everyone is on the same page. It simplifies adding and assigning tasks, setting due dates, and tracking progress of your remote team in real-time.
So, whether you’re working on a small project or managing a large project, this template will help you and your remote team stay on top of your work and achieve your goals.
How to use columns in this template:
Resources: This is a place where you can add useful resources to the board or use the existing ones.
Backlog: Start by adding all your new tasks to this column. This serves as a central repository for all the work that needs to be completed.
In Progress: Once you start working on a task, create a new task card in this column or move a task from the Backlog column to this column by simply dragging and dropping the card from the Backlog column to this column.
In Review: Move tasks from the In Progress column to this column once they are ready for review. In the In Review column, you can assign the task to a team member for review and set a due date for when it should be reviewed.
Done: Once the task has been reviewed, you can move the card to the ‘Done’ column. Simply drag and drop the task card to the ‘Done’ column or mark it as ‘Done’ from the Task Status option. In the Done column, you can keep a record of all completed tasks and their corresponding details.
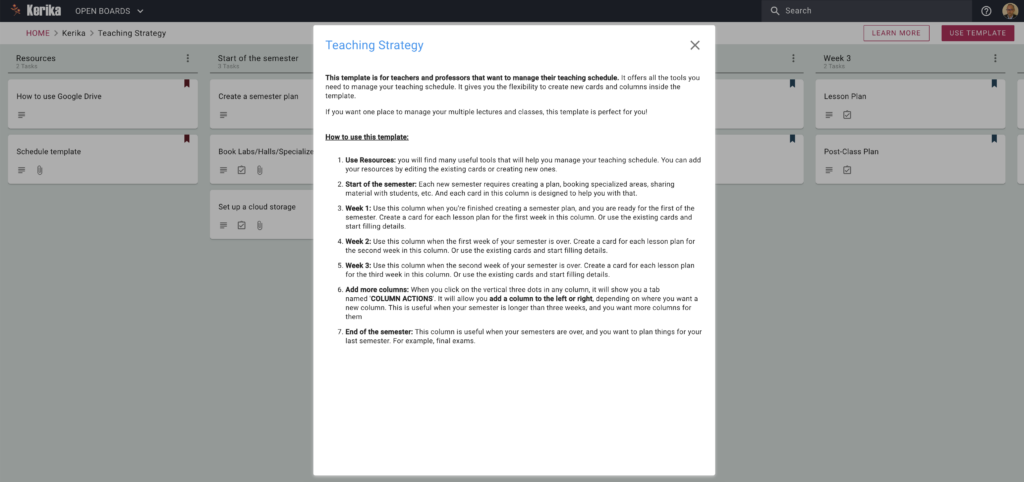
This template is for teachers and professors that want to manage their teaching schedule. It offers all the tools you need to manage your teaching schedule. It gives you the flexibility to create new cards and columns inside the template.
If you want one place to manage your multiple lectures and classes, this template is perfect for you!
How to use this template:
Use Resources: you will find many useful tools that will help you manage your teaching schedule. You can add your resources by editing the existing cards or creating new ones.
Start of the semester: Each new semester requires creating a plan, booking specialized areas, sharing material with students, etc. And each card in this column is designed to help you with that.
Week 1: Use this column when you’re finished creating a semester plan, and you are ready for the first of the semester. Create a card for each lesson plan for the first week in this column. Or use the existing cards and start filling details.
Week 2: Use this column when the first week of your semester is over. Create a card for each lesson plan for the second week in this column. Or use the existing cards and start filling details.
Week 3: Use this column when the second week of your semester is over. Create a card for each lesson plan for the third week in this column. Or use the existing cards and start filling details.
Add more columns: When you click on the vertical three dots in any column, it will show you a tab named ‘COLUMN ACTIONS‘. It will allow you add a column to the left or right, depending on where you want a new column. This is useful when your semester is longer than three weeks, and you want more columns for them.
End of the semester: This column is useful when your semesters are over, and you want to plan things for your last semester. For example, final exams.
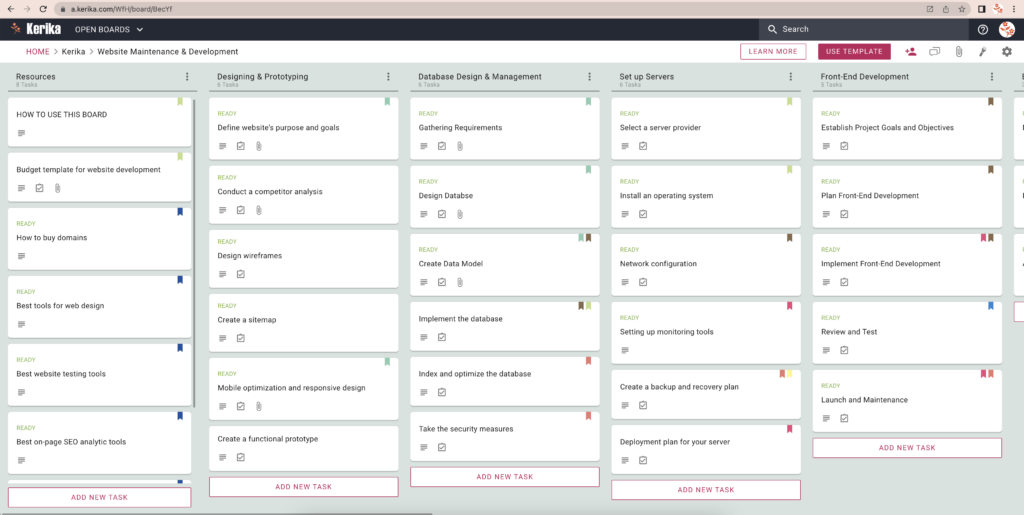
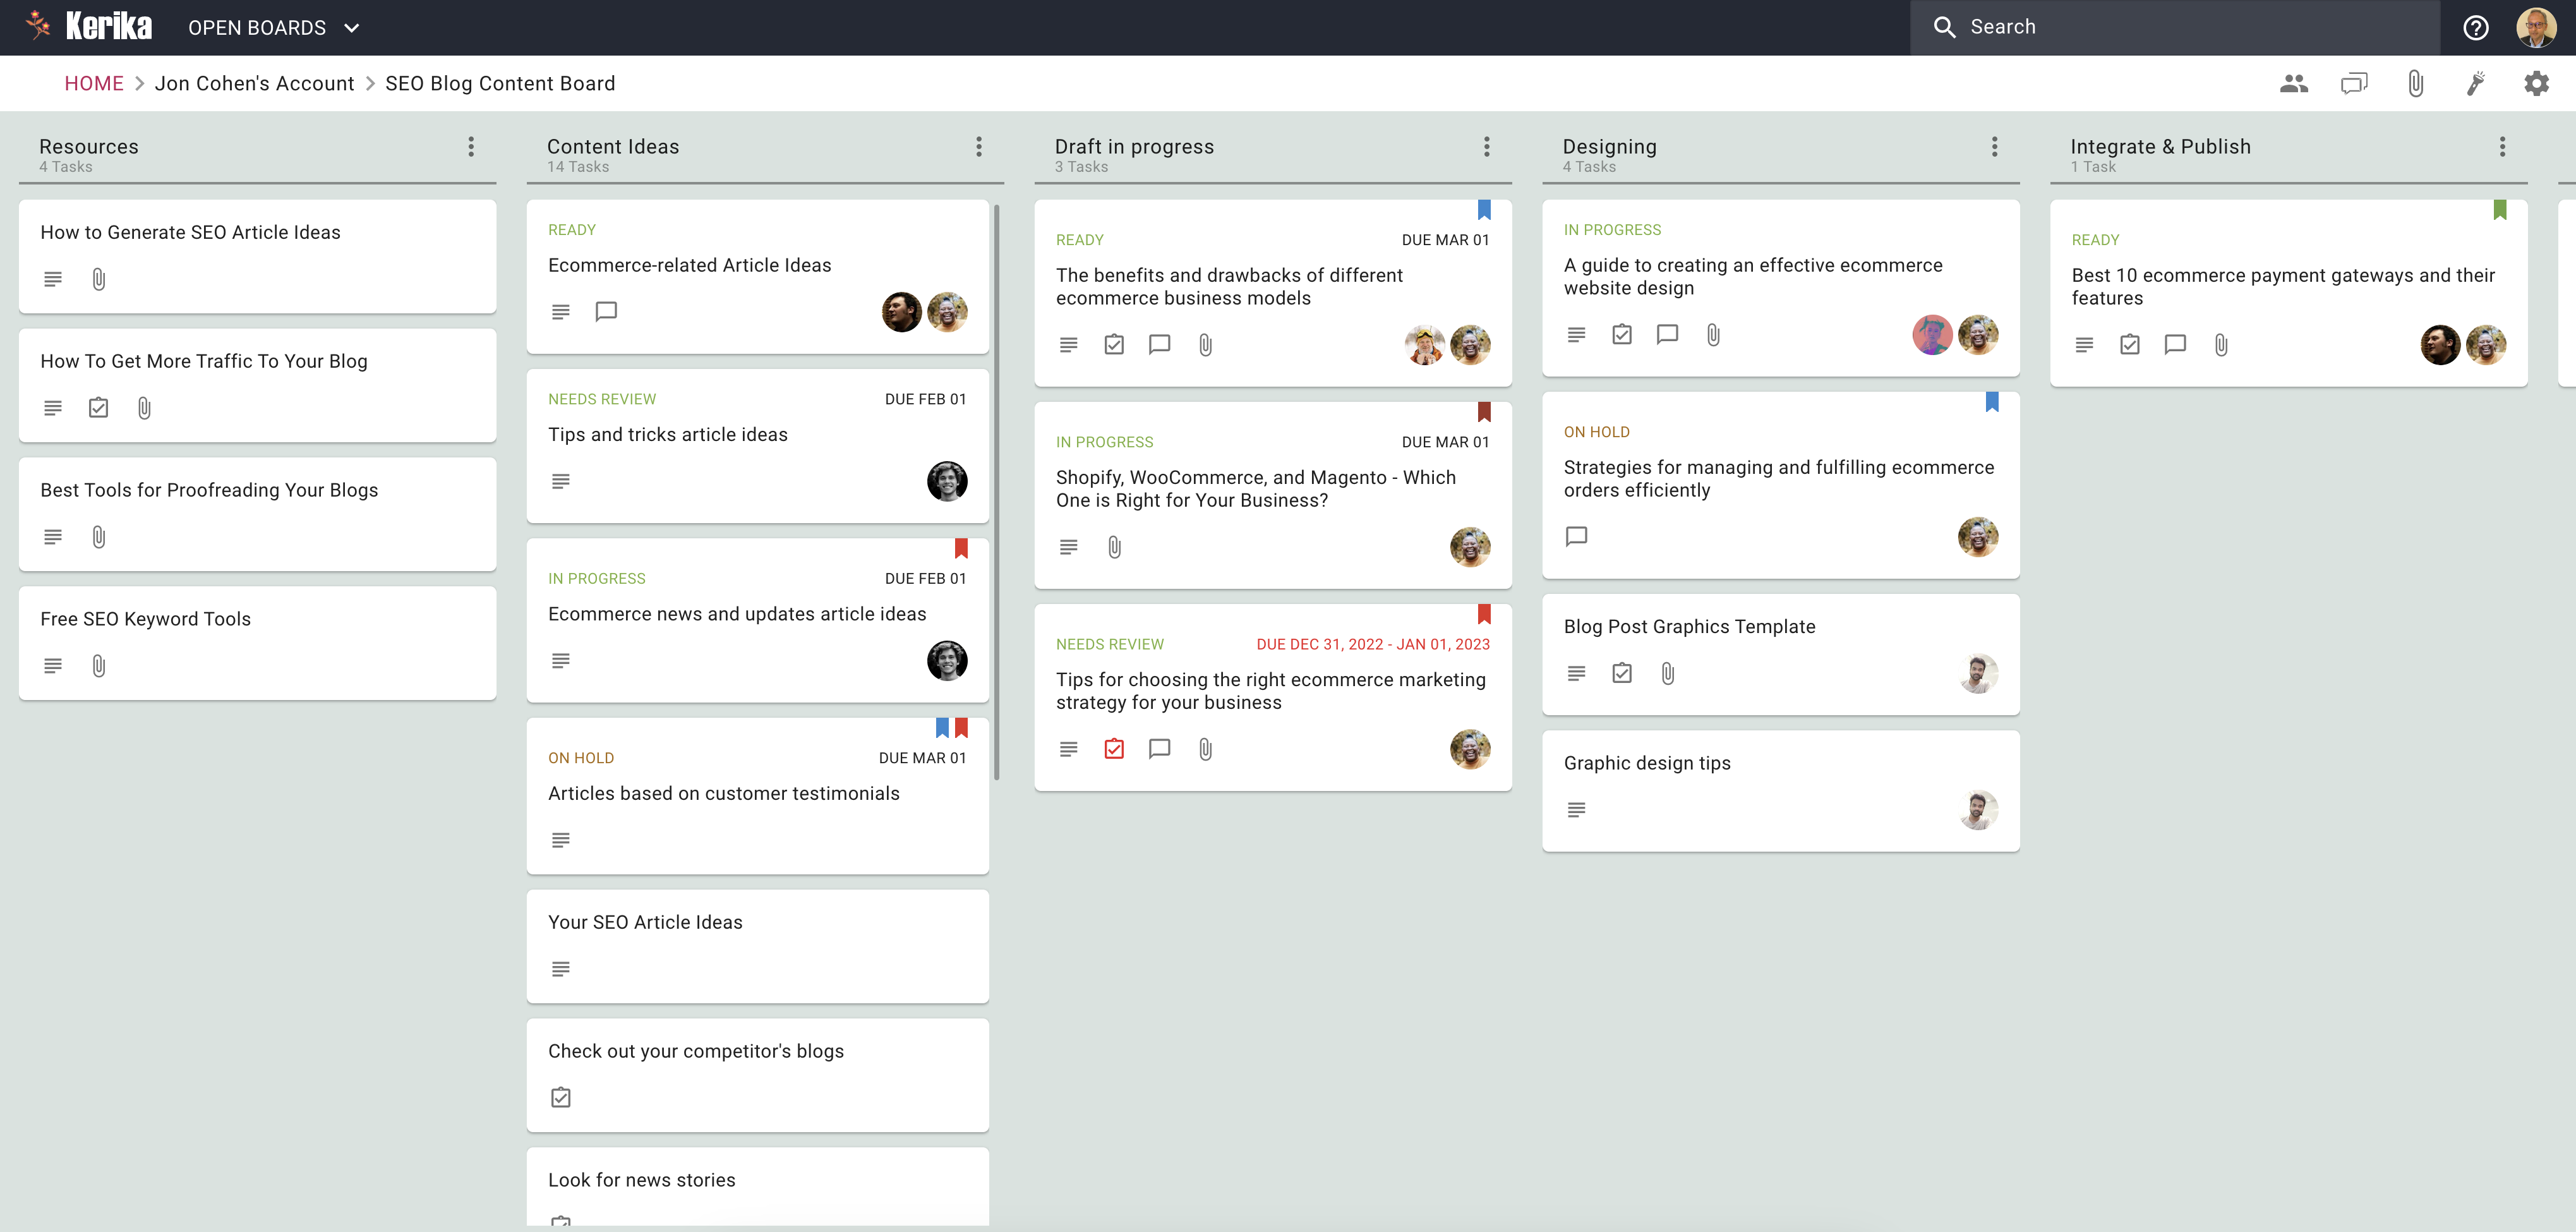
This template can be used by software and IT teams to handle website development and maintenance projects.
It comes with helpful resources and suggestions, and all the tasks that are typically needed in such projects.
How to use this template:
The first column on this board is Resources: the cards in here are not tasks, but instead contain helpful resources.
Start with the Resources column and open the cards. If the card’s suggestions and tips seem helpful, leave the card here for future reference; otherwise move the card to the Trash column.
Next, start with the Design column and open the cards one-by-one, starting with the topmost.
Cards can be assigned to people and scheduled; as work gets underway, make sure the tasks are properly assigned so everyone knows who is doing what, and when to expect deliverables.
While work is underway mark the card as IN PROGRESS (using the Task Status): this will let everyone on the team know that someone is working on the task.
If a card needs to be reviewed by someone, assign the card to that person (or persons), and mark the Task Status as NEEDS REVIEW. This will make it easy for everyone on this board’s team to know what’s going on. The people who were assigned the task will get notified.
Sometimes tasks will need rework; in that case use the NEEDS REWORK task status to indicate that. When someone discovers that a task needs rework, it’s a good practice for that person to document their concerns using the task’s chat tab before assigning it to the people who need to rework it.
Other useful task status are:
ON HOLD: this conveys to the team that work has been temporarily been stopped on a particular task, usually because the people involved got pulled away to work on something more urgent.
BLOCKED: this conveys that work on the task is blocked. It’s best practice for the team to unblock cards as soon as possible. When marking a card as BLOCKED, make sure you document the reason why, using the task’s Chat tab.
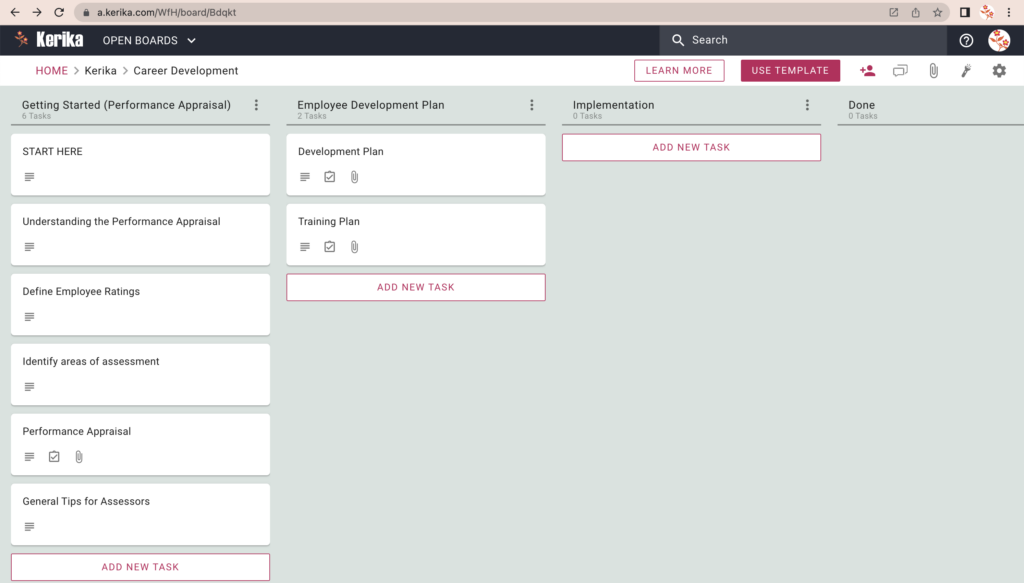
This template can be used to set goals and deliverables, assess performance, manage career growth, and get needed training to master knowledge and skills.
Performance management and career development is an ongoing process: it’s not done just once a year; it requires continuous follow-up, adjustment when needed, and giving feedback.
Your main deliverables:
Matching an employee’s performance to desired objectives
Identifying and addressing performance gaps
Implementing personal development plans
Assessing the employee’s performance after implementation
How to use this template:
Click on the USE TEMPLATE button on the top-right of the app and create your own Task Board; Kerika will set it up as using this template.
If you are going to do it with others, add the people to this board’s team as Team Members. (Use the Board Team button on the top-right of the board.)
If you have other stakeholders, e.g. management, add them as Visitors to this Board Team: they will be able to see what’s going on, but not make any changes.
Start with the leftmost column, and pick up tasks one by one:
The tasks are in order, so start at the top.
Set the status of the task to IN PROGRESS so everyone knows that it has started.
Assign the task to yourself or your Team Members: you can assign tasks to more than one person.
Set a due date! This really helps in getting stuff done; Kerika will then alert you when things are slipping.
As work proceeds, use the chat feature to communicate within the team.
As you take photos or create contracts, be sure to add them to the tasks as attachments; Kerika will make sure they stay with the tasks so they are always easy to find.
Once a task completes, move it to the Done column.
This template can help you gather your designers, creatives, and other stakeholders to discuss and review your design projects, share updates and feedback, and collaborate to find design solutions.
It gives you a structured layout that includes design ideas, project updates, and feedback option. If you want one place to manage your multiple design projects and ideas, this template is perfect for you!
How to use this template:
Use Resources: Use this column to gather useful tools and content that will help with the design project. You can use the existing resources as a starting point, and start adding your resources down the line.
Concepts & Ideas: List your design concepts and ideas in this column. Collaborate and discuss ideas with your teammates, and decide which idea is the best to work on.
In Progress: Once you decide which design idea to work on, create a card or move the card you already created to this column. Update the card regularly so other teammates know what’s going on.
In Review: When the task is completed, move the card from the ‘In Progress’ column to this column. In this column, you can ask the stakeholders for feedback or review your work.
Implementation: Once your task is reviewed, and everyone is happy with the design, move the card to this column for the implementation.
Done: After implementing the design, simply mark it as ‘Done’ or move to this column.
If you’re a business owner or a freelance content writer, it’s important to have a content strategy. Without a solid content strategy, you end up wasting a lot of time managing your content.
By having a solid plan and sticking to it, you won’t have to spend time coming up with new ideas or scrambling to meet deadlines. One of the best ways to build a content strategy is to use a content planner.
A Sample Board to View
Whether you’re working alone or with a team, a good content planner can really boost your productivity. So, let’s see how this company uses a content planner to plan and publish its SEO content.
Click on this image to view this sample board, live!
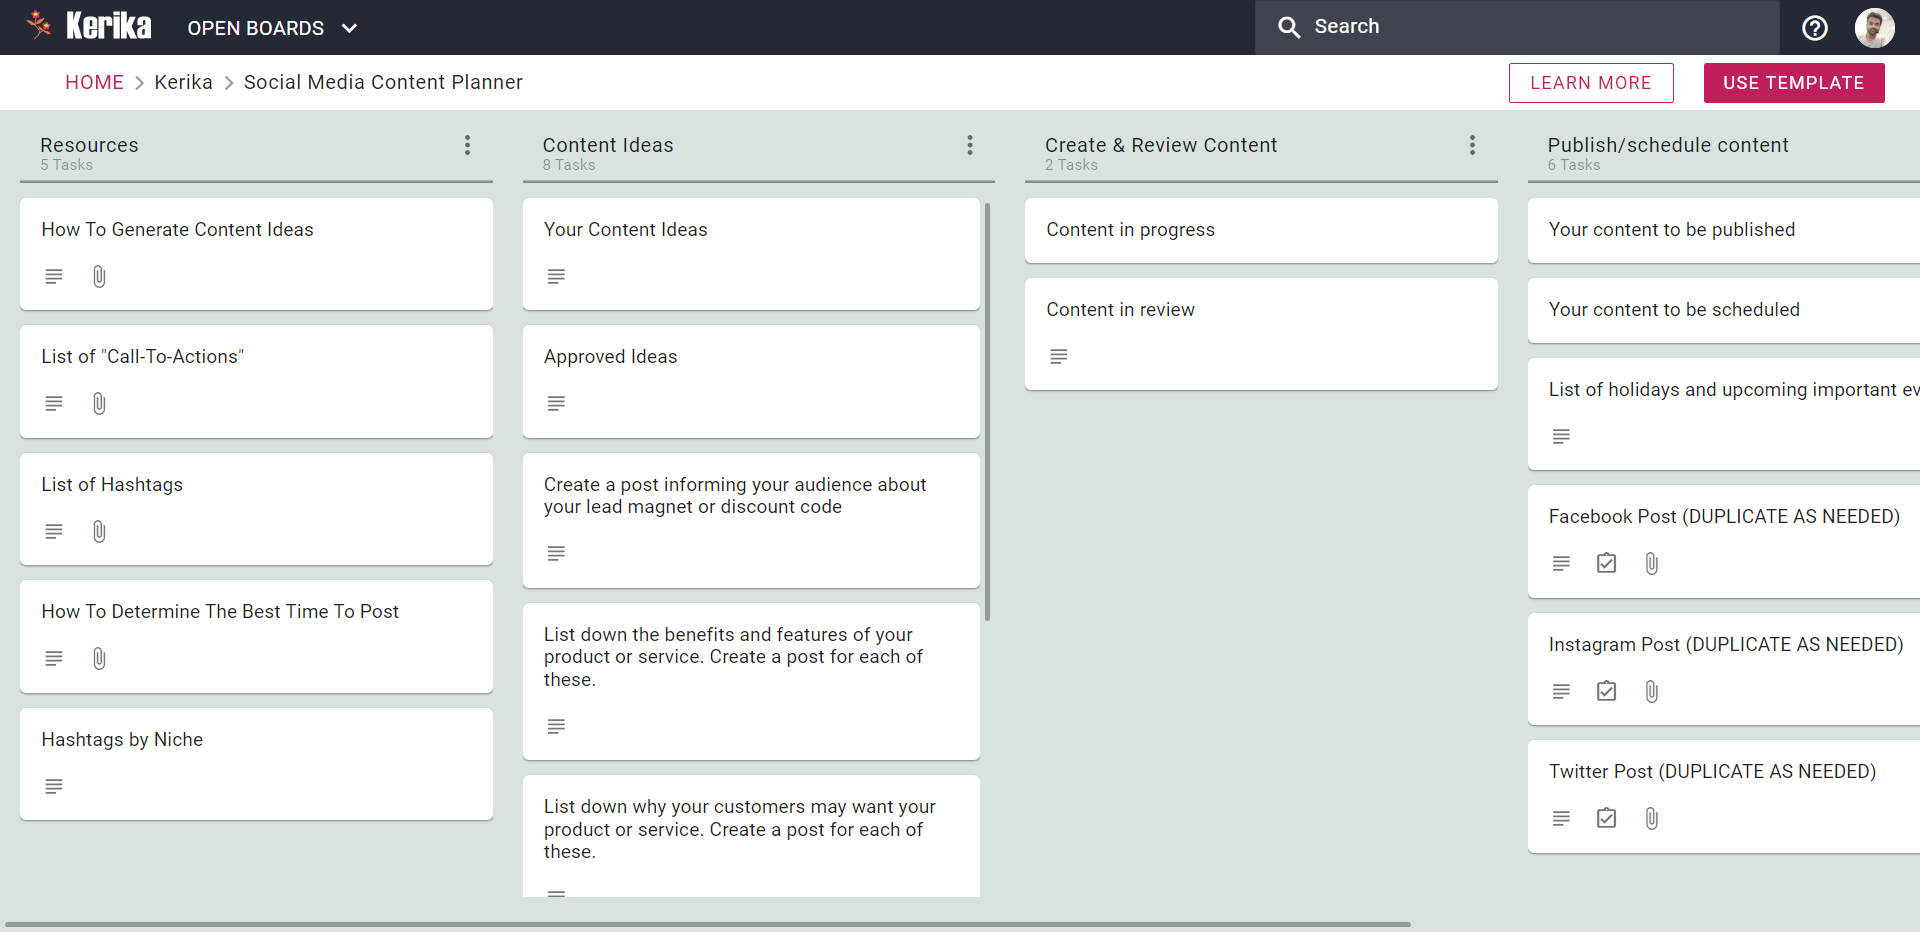
A Free Template to Use
If you found this board interesting, here’s a free Template from Kerika that you can use to set up your own board in just seconds:
Click on this image to view the Template.
The rest of this article will walk you through the process of using this template:
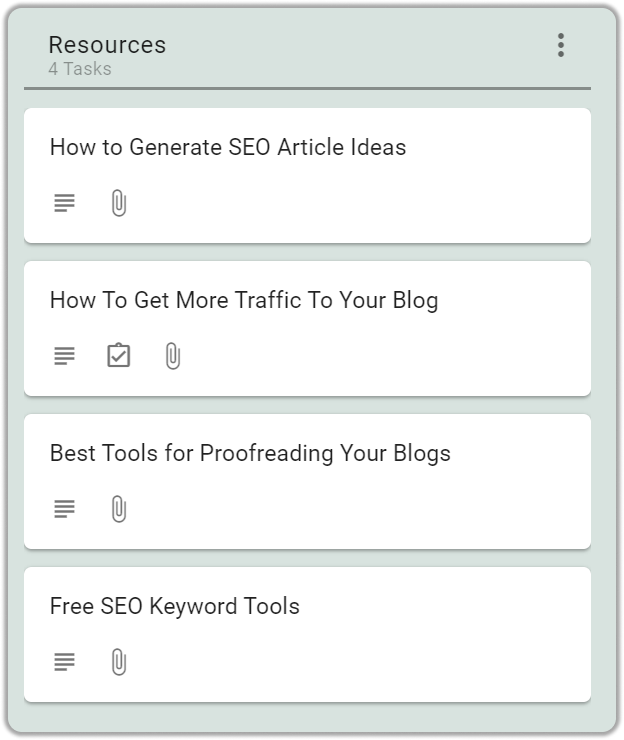
Step 1: Gather resources
If you’re a serious content writer, you already know the importance of gathering resources before you start writing. After all, you need to have something to write about!
One of the best ways to manage your gathered resources is to use a Content Planner. A Content Planner can help you organize your thoughts and ideas, and it can also help you find new and relevant information to write about.
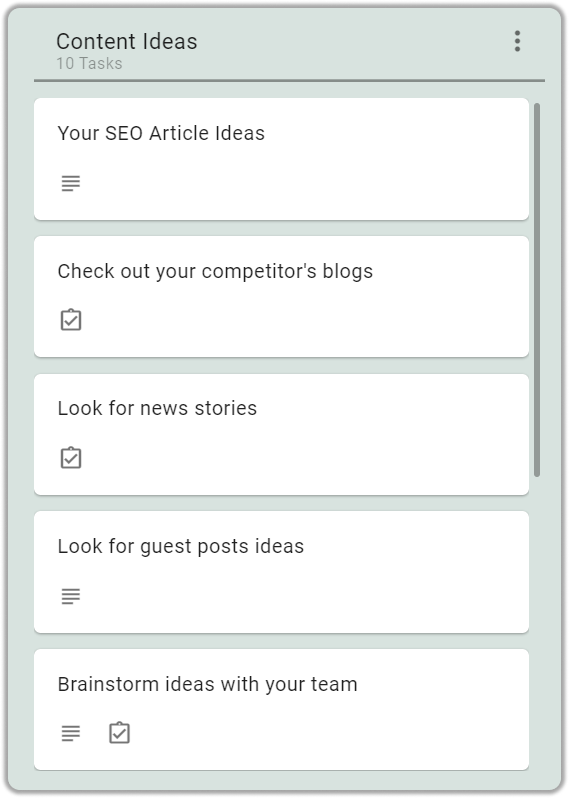
Step 2: Research Content Ideas
Before you start writing, you need to have an idea of what you want to write about. Make a list of content ideas that you think would be popular with your audience.
You can get content ideas by checking out your competitors, looking for news stories, looking for guest post ideas, and brainstorming ideas with your team.
Step 3: Drafting
Now it’s time to start writing your content. Keep your keywords in mind as you write and try to include them naturally in your text.
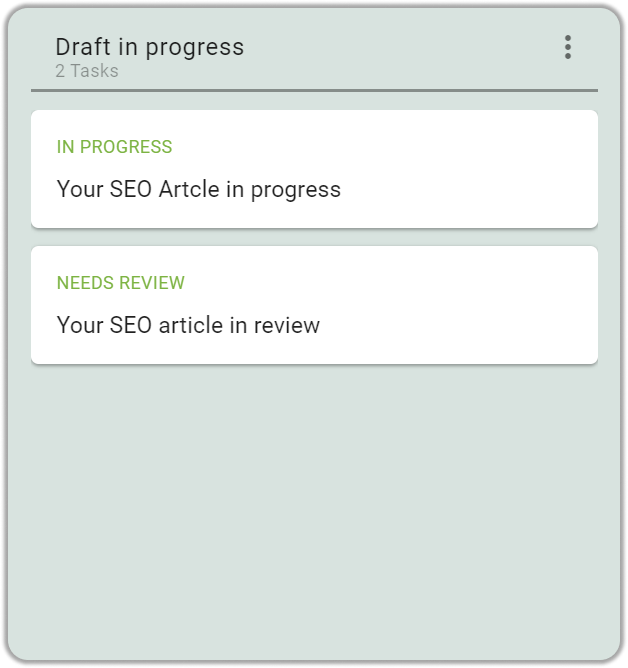
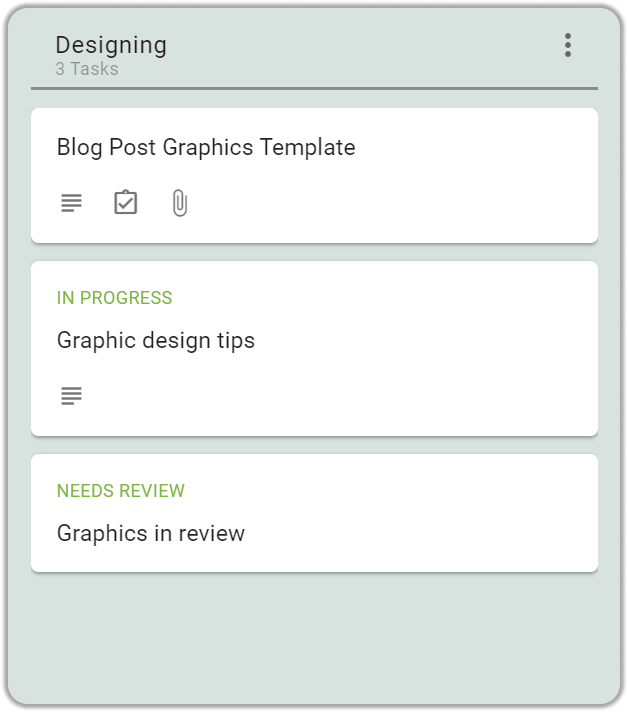
Step 4: Designing graphics content
Graphics in blogs capture your reader’s attention, communicate your message more clearly, and overall make your blog more visually appealing.
Once the article is ready, the next step is to add graphics to it. Graphics are important to capture your reader’s attention and make your blog more visually appealing.
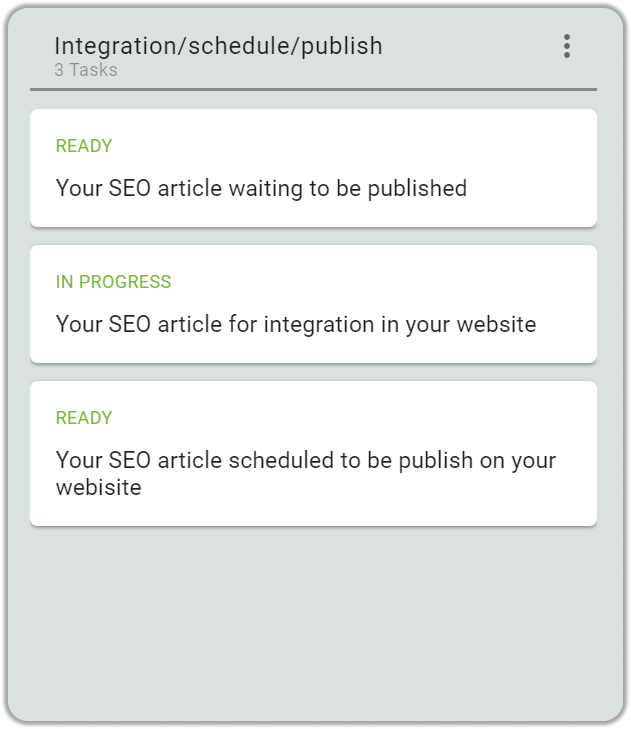
Step 5: Integration/Schedule Content:
Once you’re finished writing, you need to integrate your content into your website. You can do this by adding a blog to your website or by scheduling your content to be published on your website later on.
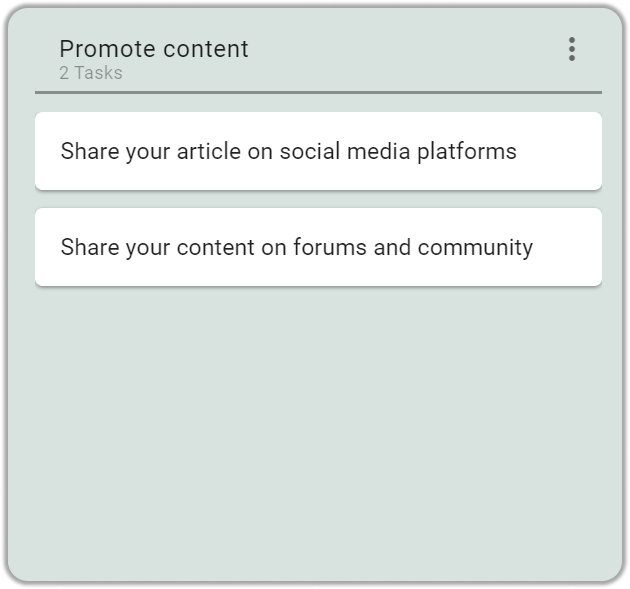
Step 6: Promote Content
Finally, you need to promote your content. You can do this by sharing it on social media, writing guest posts on other blogs, or by paying for advertising.
From the moment a new hire walks in the door, they start forming opinions about your company culture, their role within the organization, and what it will be like to work for you. That’s why when it comes to hiring new employees, first impressions matter.
When done correctly, on-boarding can help new hires feel welcome, valued, and prepared to do their best work. But when done poorly, there are a lot of things that could go wrong. Here are a few tips to help make your on-boarding process as smooth as possible:
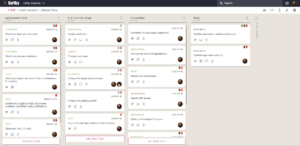
1. Start with the background check
Before you bring a new employee on board, it’s important to run a background check. This will help you verify that the person is who they say they are and that they don’t have any red flags in their past that could negatively impact your business.
A background check can also give you peace of mind that you’re making the best hiring decision possible. To know about a candidate, you need a process that ensures the new employee is the right fit for the job. Check out how this company conducts a background check for its new employees.
Click to view this live board
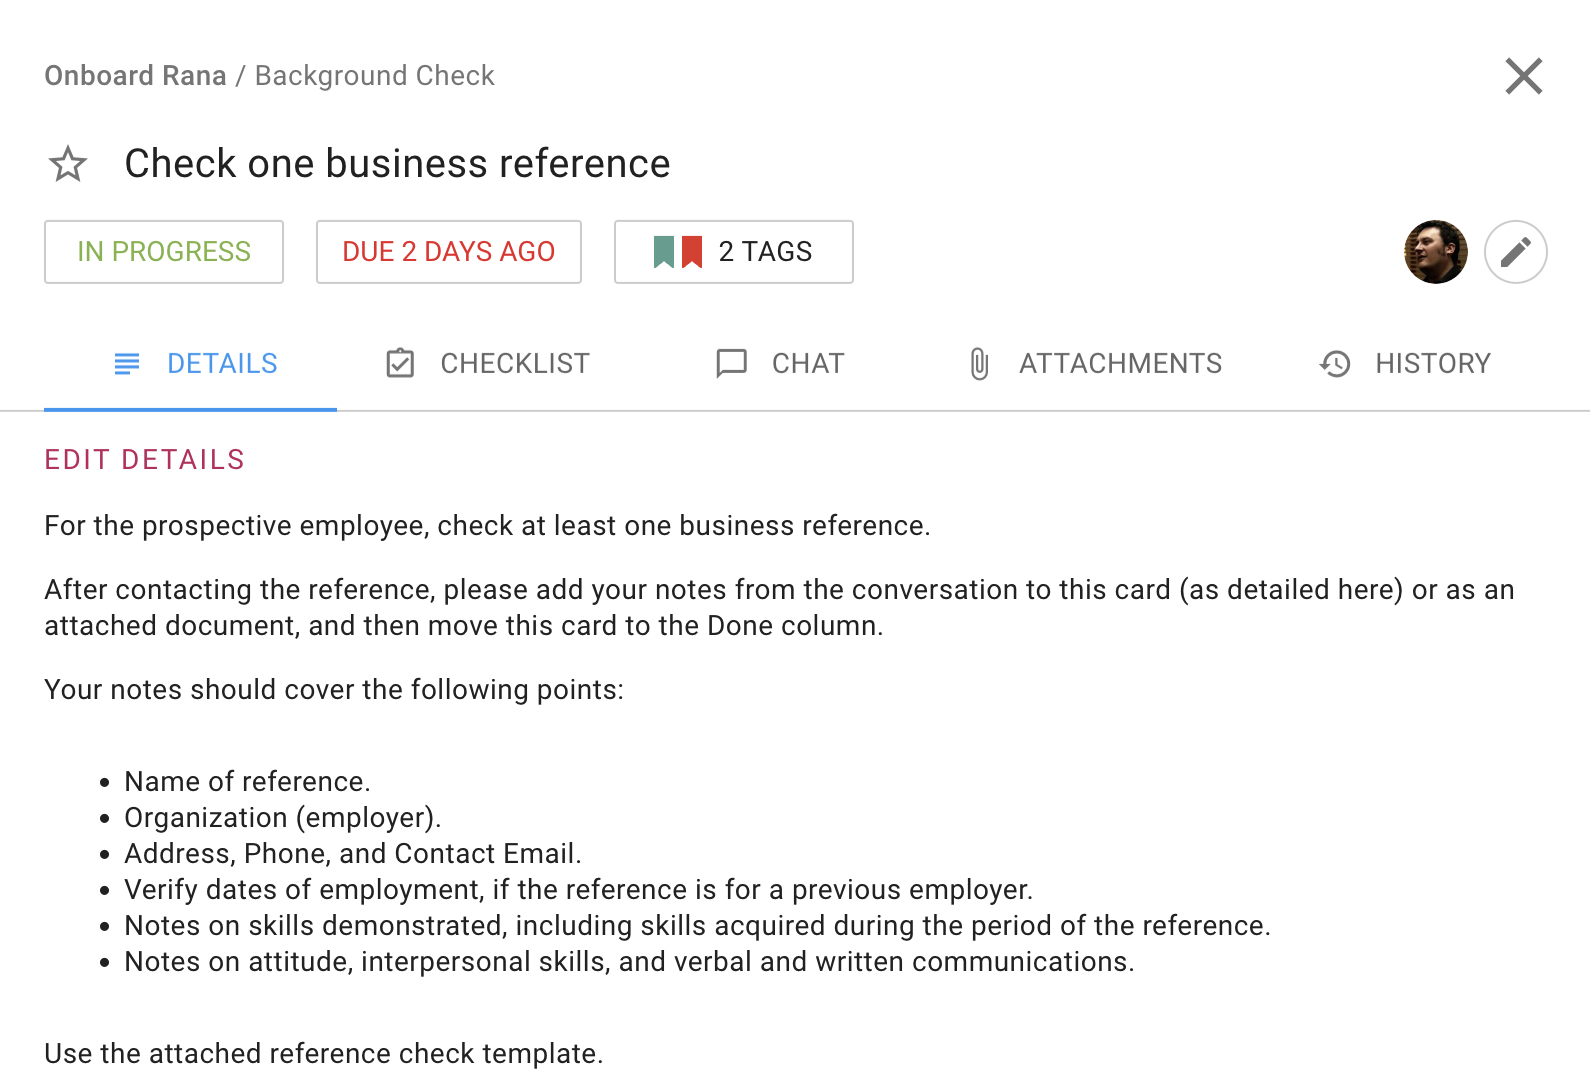
Check one business reference
When it comes to bringing on new employees, it’s important to do your due diligence and check their business references. This will help you get a better sense of their work ethic and what they’re capable of.
Check one business reference
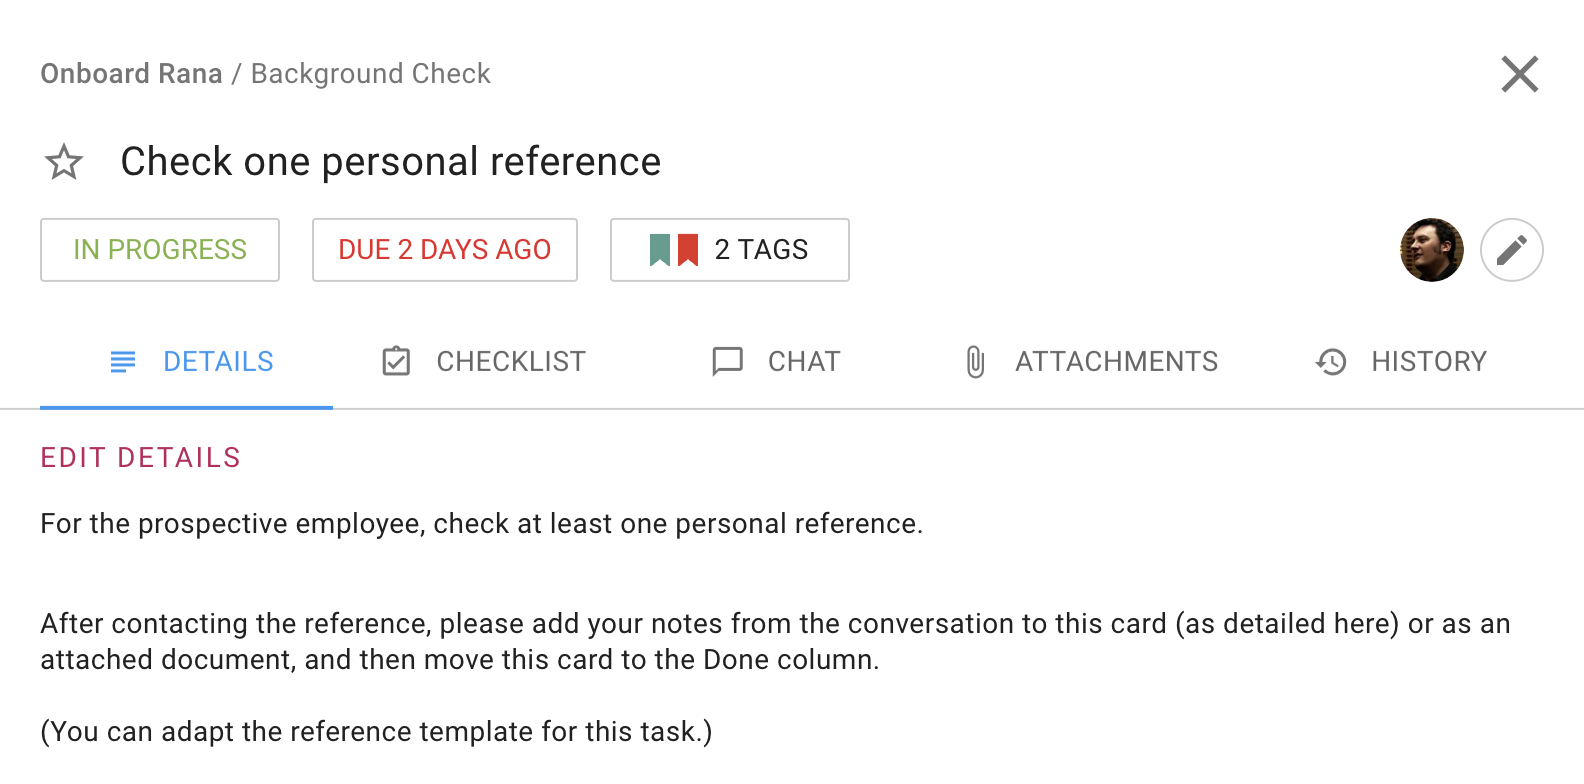
Check one personal reference
Personal references can give you valuable insights into an applicant’s character, work ethic and overall suitability for the job. They can also alert you to any red flags that might not be apparent from their resume or cover letter.
Asking for personal references is a simple but effective way to screen applicants and make sure you’re making the best possible hiring decision.
Check one personal reference
Check applicant’s resume/CV for completeness & accuracy
While on-boarding a new employee, it’s important to check their resume or CV for completeness and accuracy. This will help you ensure that there are no discrepancies in their work history.
If you find any inaccuracies, be sure to follow up with the employee to get clarification. It’s also a good idea to run a background check to verify the information on the resume. By taking these precautions, you can help ensure a successful on-boarding process for your new employee.
Check applicant’s CV for completeness & accuracy
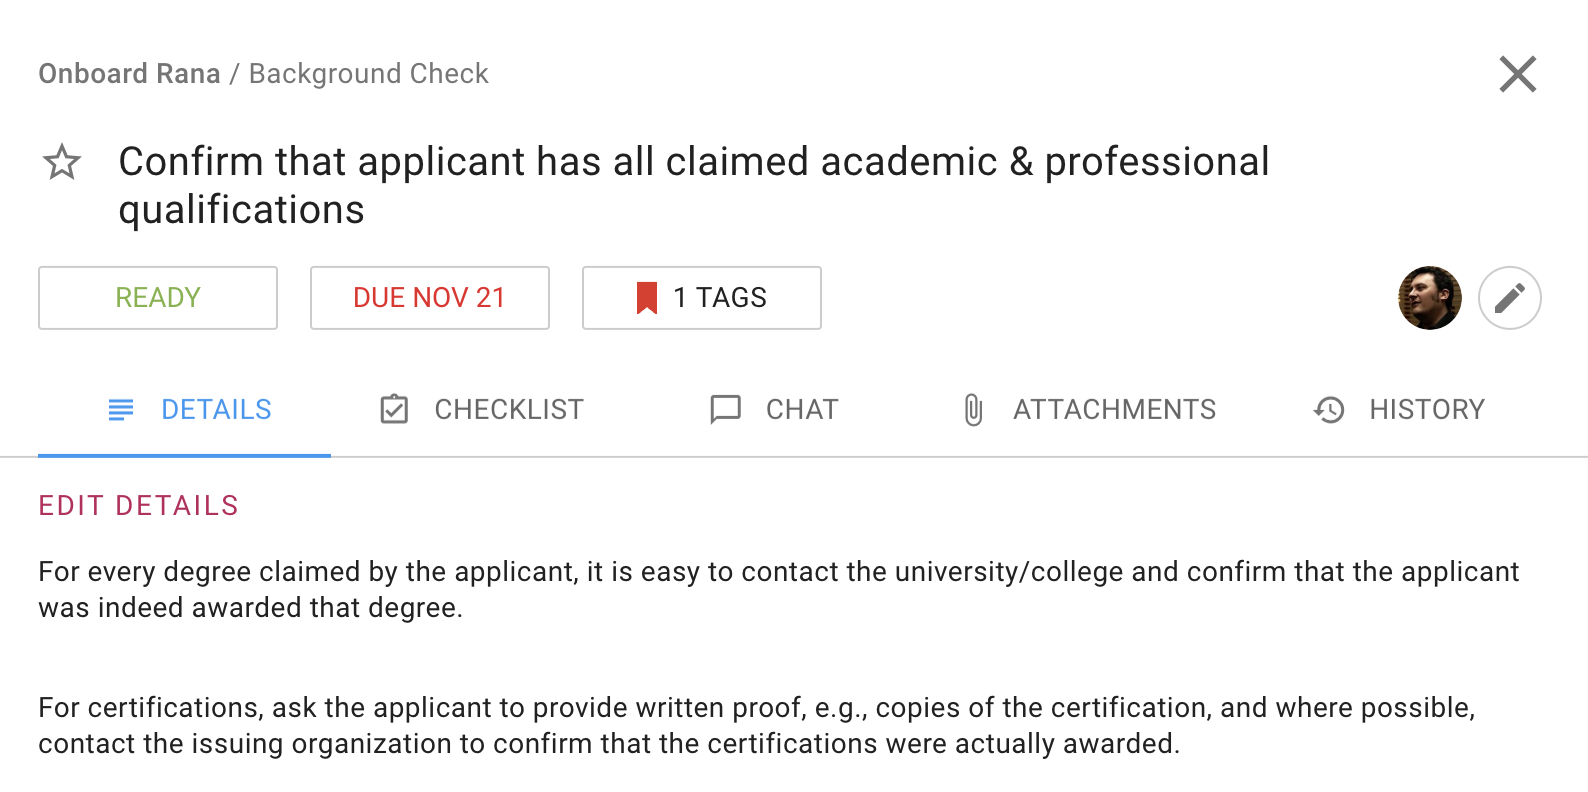
Confirm that applicant has all claimed academic & professional qualifications
It’s always a good idea to confirm that an applicant has all of the claimed academic and professional qualifications before onboarding a new employee. This can help ensure that the individual is qualified for the role and can help avoid any potential issues down the road.
There are a few ways to go about doing this, such as contacting references or requesting transcripts. Take the time to do your due diligence and it will pay off in the long run.
Confirm that applicant has all claimed academic & professional qualifications
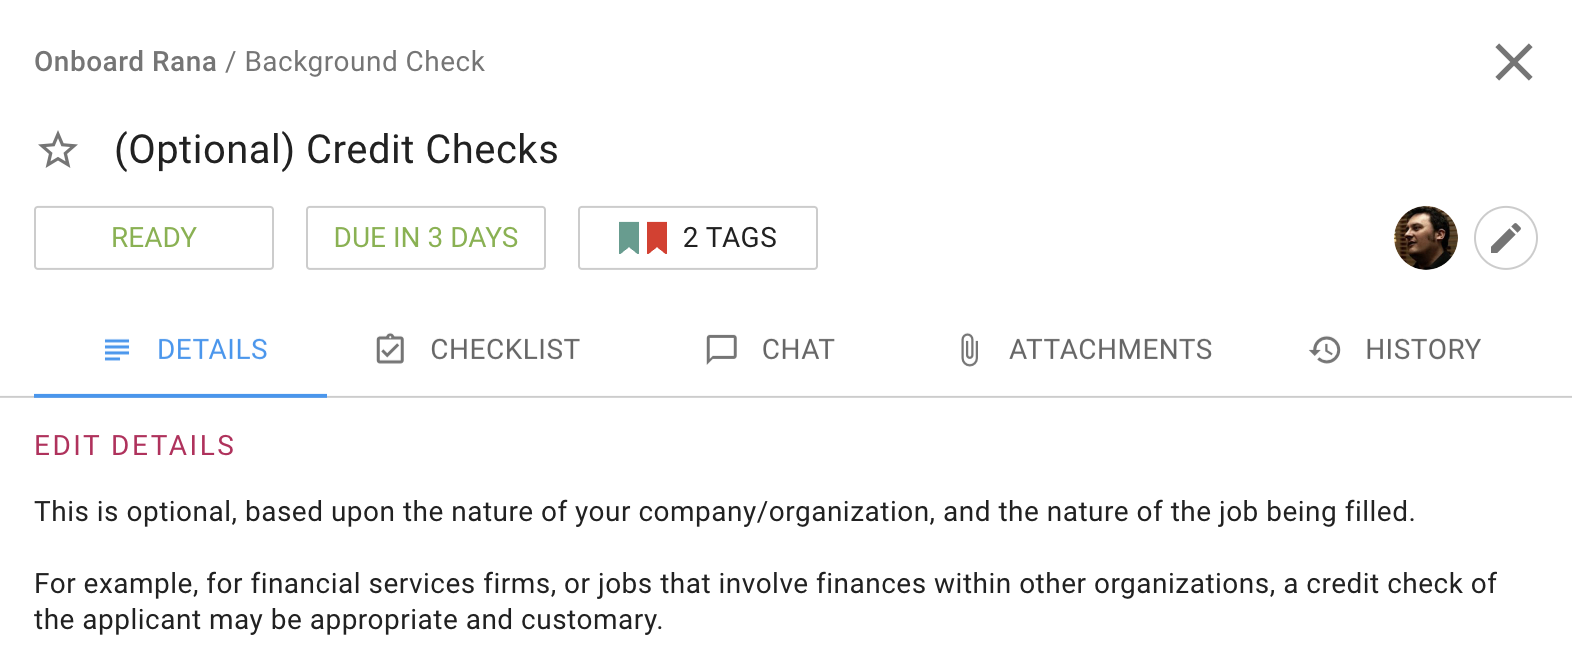
Credit Checks
Credit checks are an important part of the onboarding process for new employees. They help employers to verify an applicant’s identity and to ensure that the person is who they say they are. Credit checks also help to determine an applicant’s financial stability and to assess their risk of defaulting on their financial obligations.
(Optional) Credit Checks
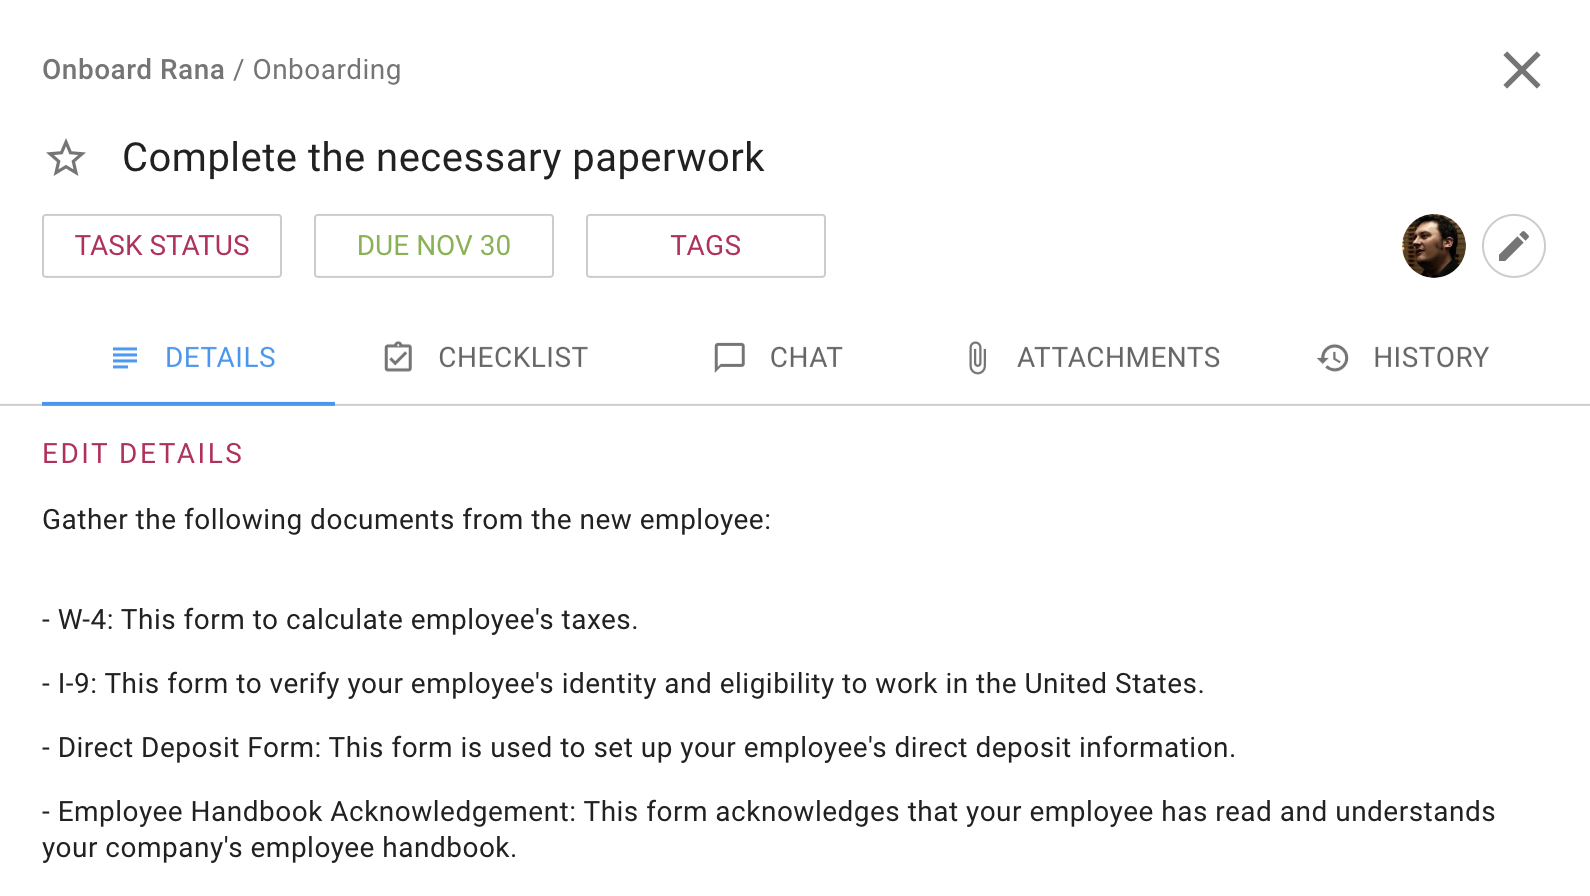
2. Get the necessary paperwork
Make sure you have all the necessary paperwork in order before the new employee starts. Here is a good example of how a US-based company collects all the necessary paperwork upfront from a new employee. The paperwork includes the W-4 form to calculate taxes, the I-9: form to verify the employee’s identity and eligibility to work in the US, the direct deposit form, and the employee handbook acknowledgment.
Complete the necessary paperwork
3. Set clear expectations from the start.
New employees should know what is expected of them in their new role, and the best way to do this is to set up an Orientation Program and Schedule mandatory training sessions.
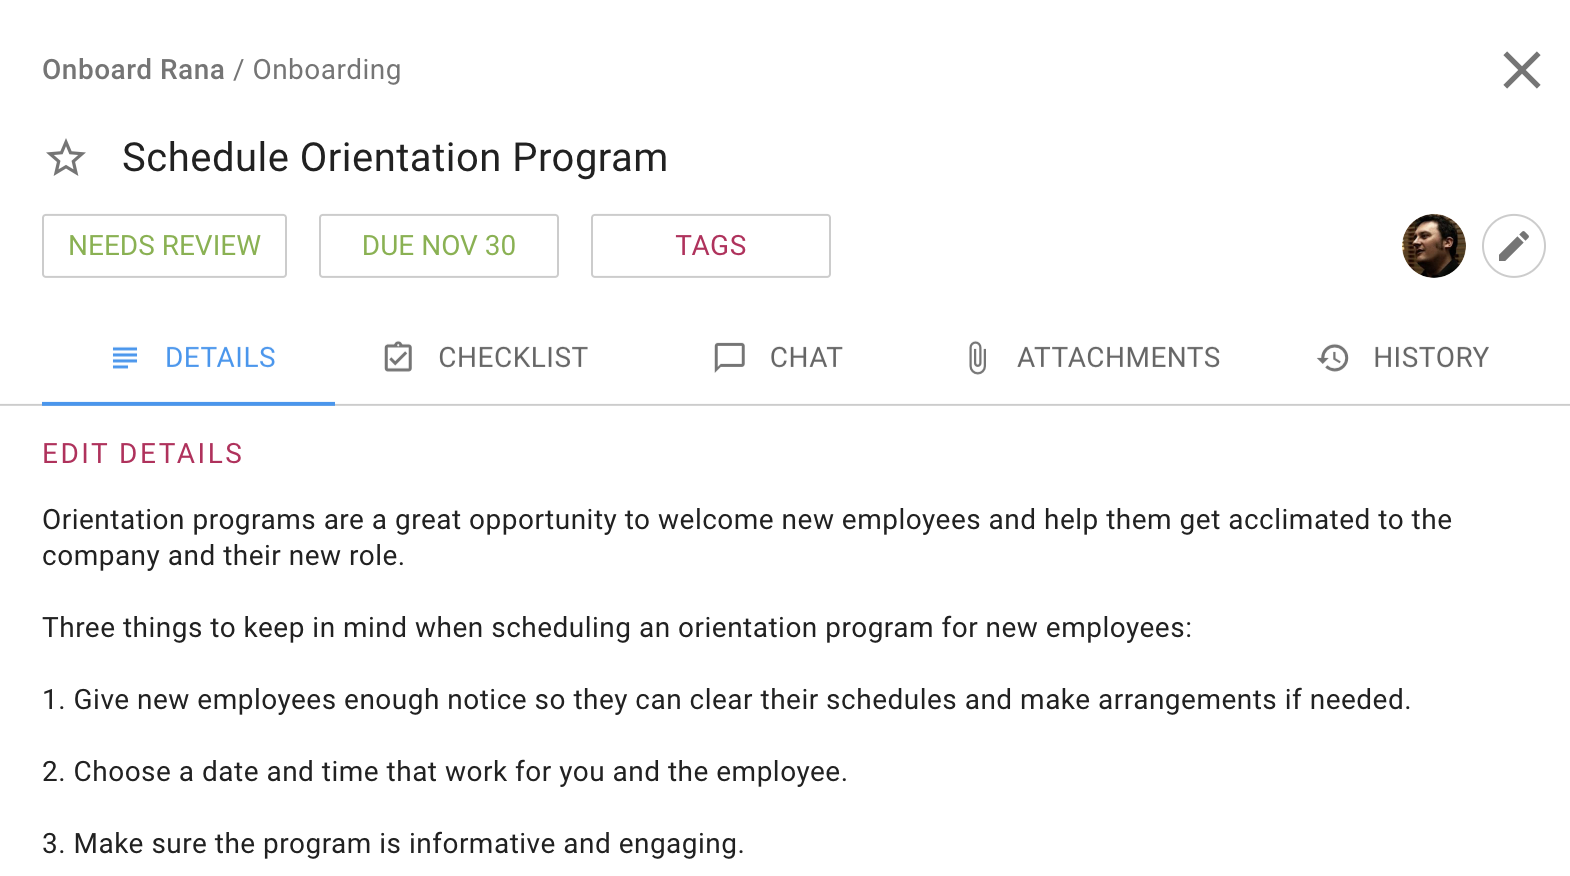
Orientation Program
The Orientation Program is a great opportunity for employees to learn more about their role, and ask questions and get to know their colleagues.
For the Orientation Program to go smoothly, choose a date and time that work for both you and the employee. You’ll want to make sure the program is informative and engaging. If your new employee feels welcomed and comfortable, they’ll be more likely to hit the ground running and be productive from day one.
Schedule Orientation Program
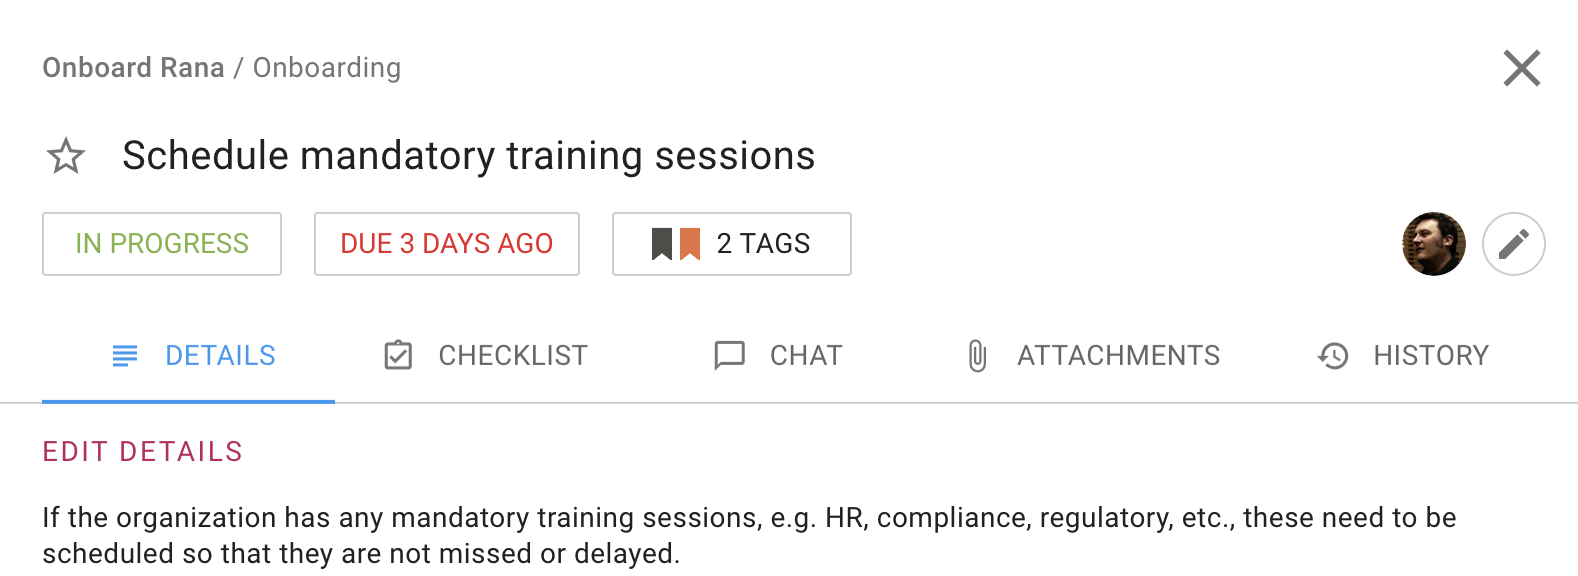
Schedule mandatory training sessions
Training sessions for compliance and regulation are important for several reasons. First, they ensure that new employees understand the company’s policies and procedures from the day one.
Second, they help to ensure that employees are up-to-date on any changes in the law that may affect their job.
Finally, training sessions provide an opportunity for employees to ask questions and get clarification on any points that are unclear.
Schedule mandatory training sessions
4. Make sure they have all the information about their team and department.
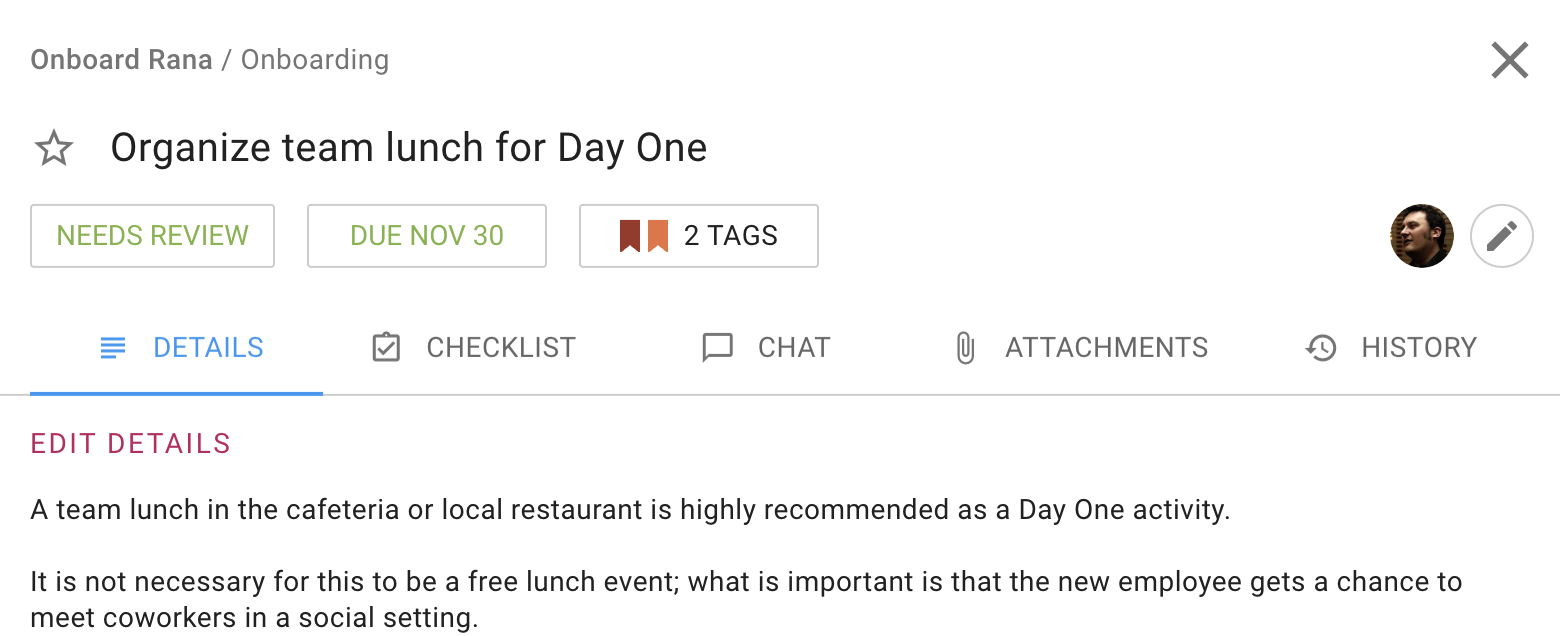
New employees should feel informed about their role, the company, and the team they’ll be working with. In the following example, the HR has organized a team lunch. This is a great to way to introduce a new employee, this gives a employees get to know each other well.
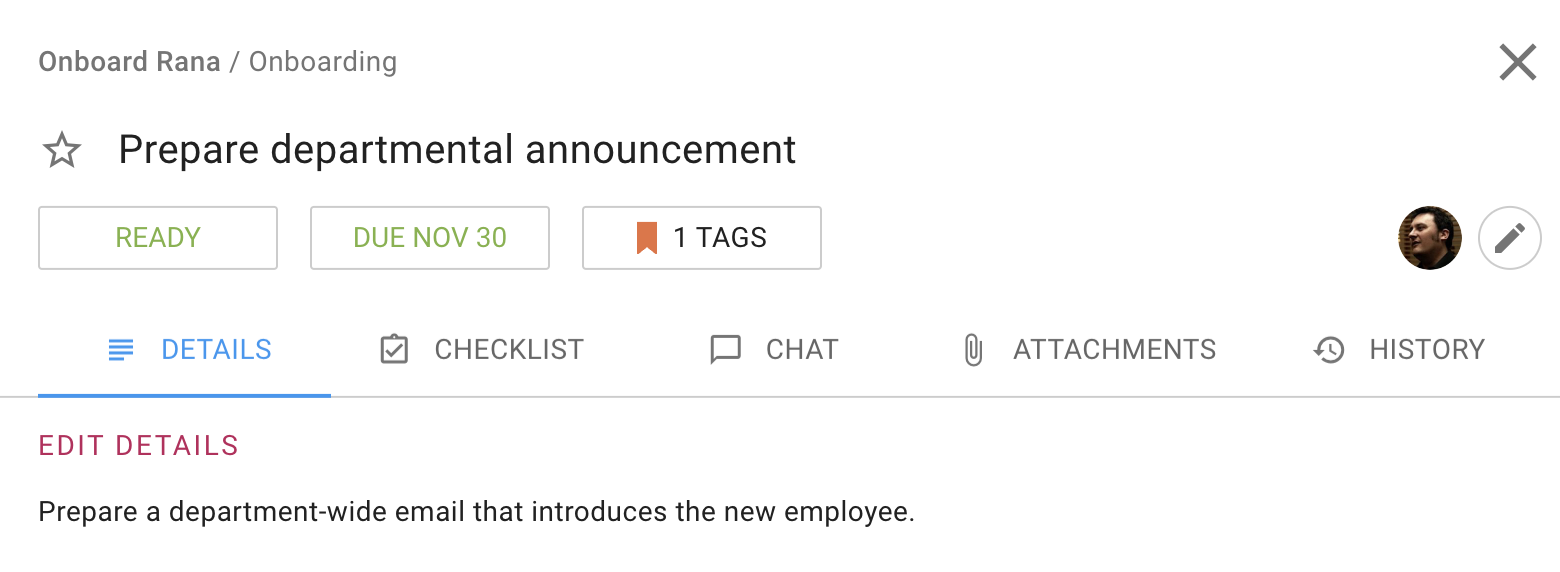
The department is also getting introduced to the new employee, and this is just as important. So a formal announcement about the new employee, helps existing employee know them better.
Prepare departmental announcement
And last, but not least, don’t forget a Team Lunch on Day One!
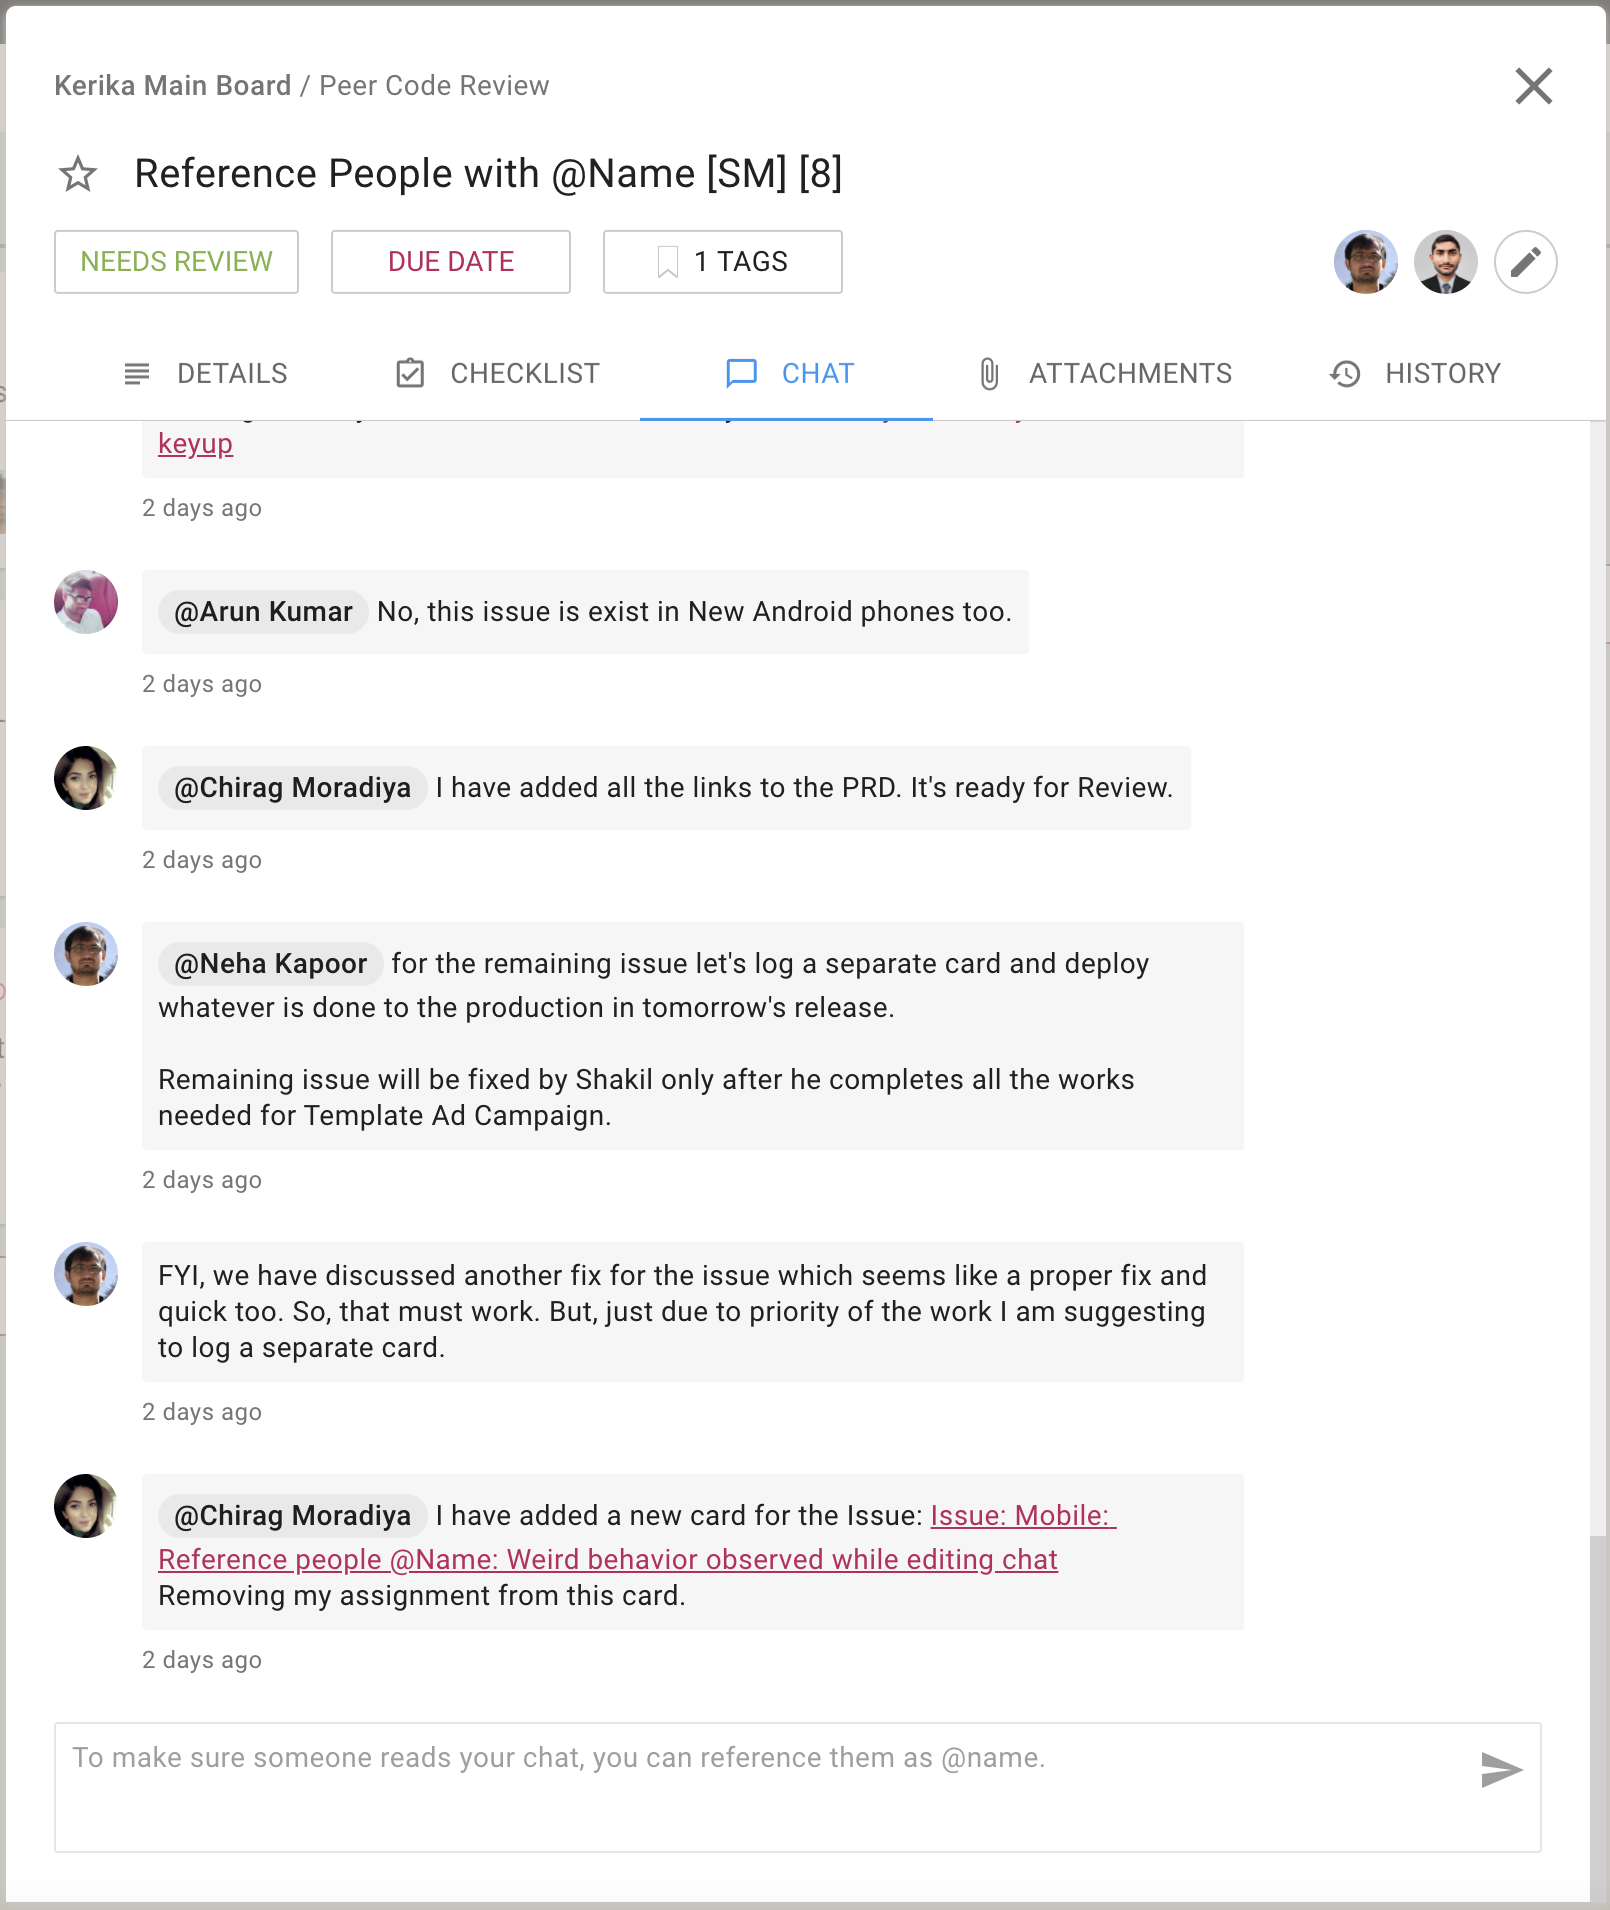
With our latest update we have made it easy for you to ensure that someone on a board team always sees your chat message, even if they are not assigned to that card.
The old rule was that everyone who is currently assigned to a card would get new chat pushed to them as emails. Now, you can make sure someone gets that email notification right away, even if they aren’t assigned to a particular card:
Directed chat
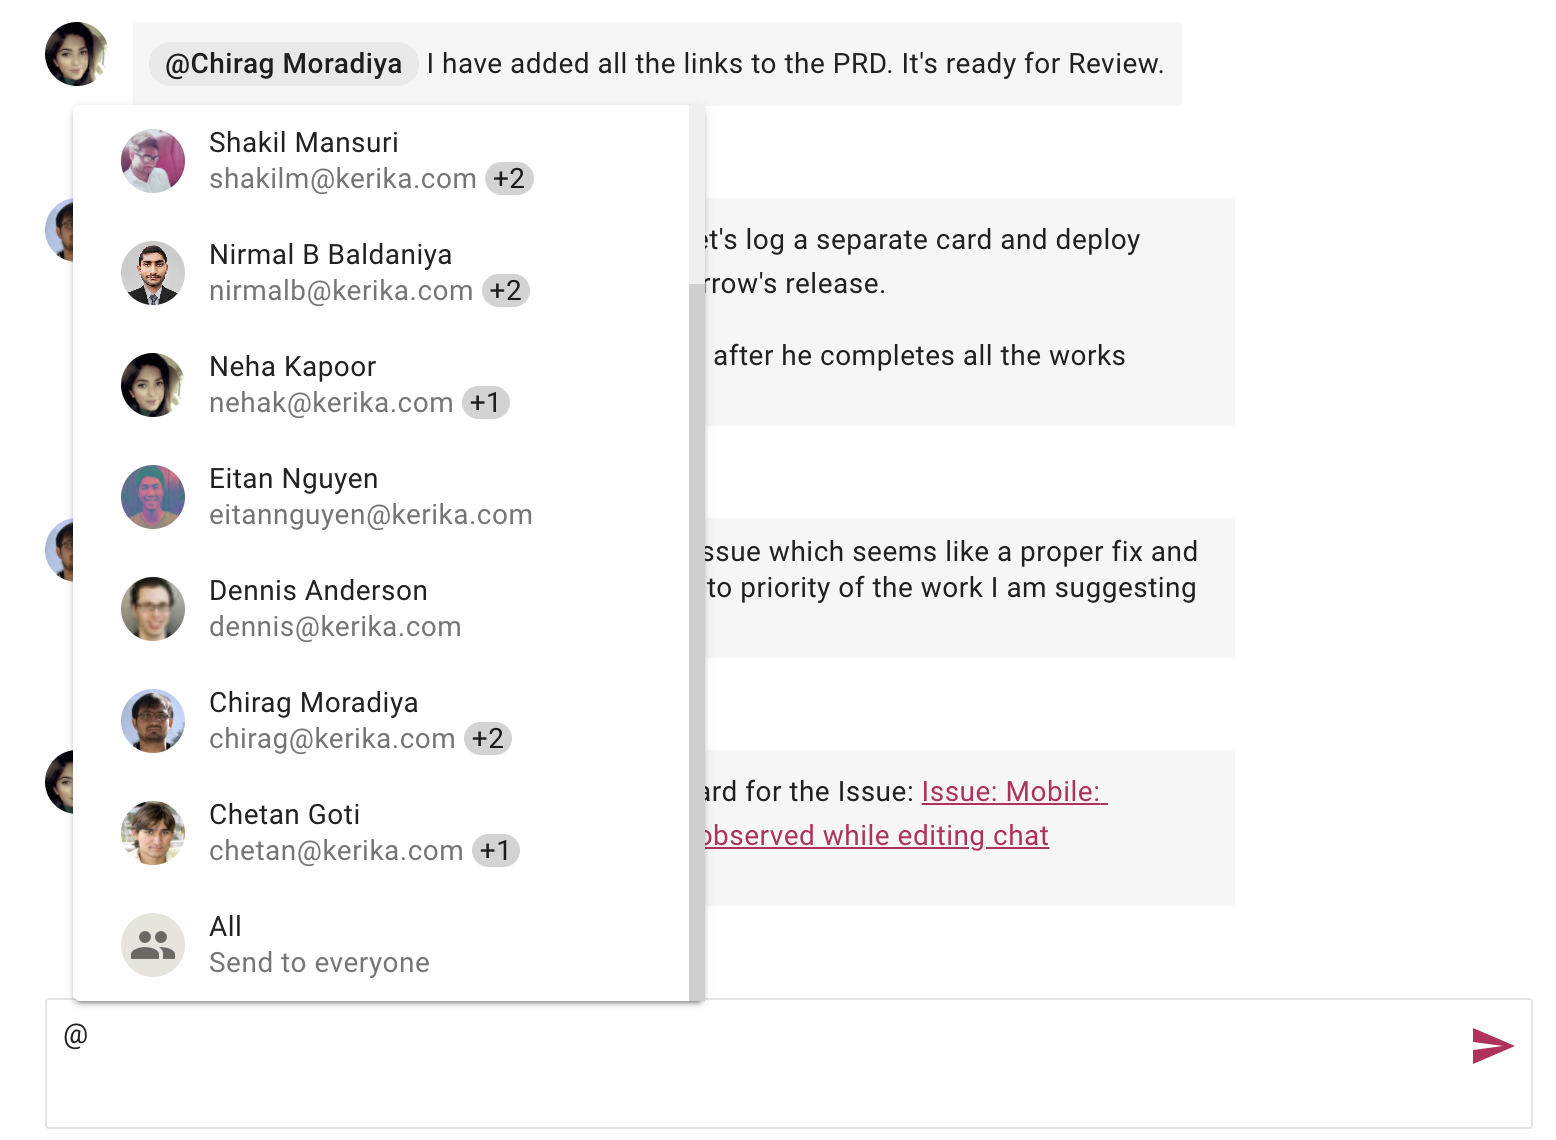
Using this feature is simple: just type the letter “@” anywhere in your chat message and Kerika offers all the matching suggestions:
Sending new chat
“@All” lets you push your chat to every Board Admin and Team Member — something you should do only rarely to avoid annoying people!
Try this feature and let us know if we can improve it.
We got feedback from some users after our last big release on how we could improve the user experience for folks who like to use the auto-numbering feature for Task Boards, and we have made these changes:
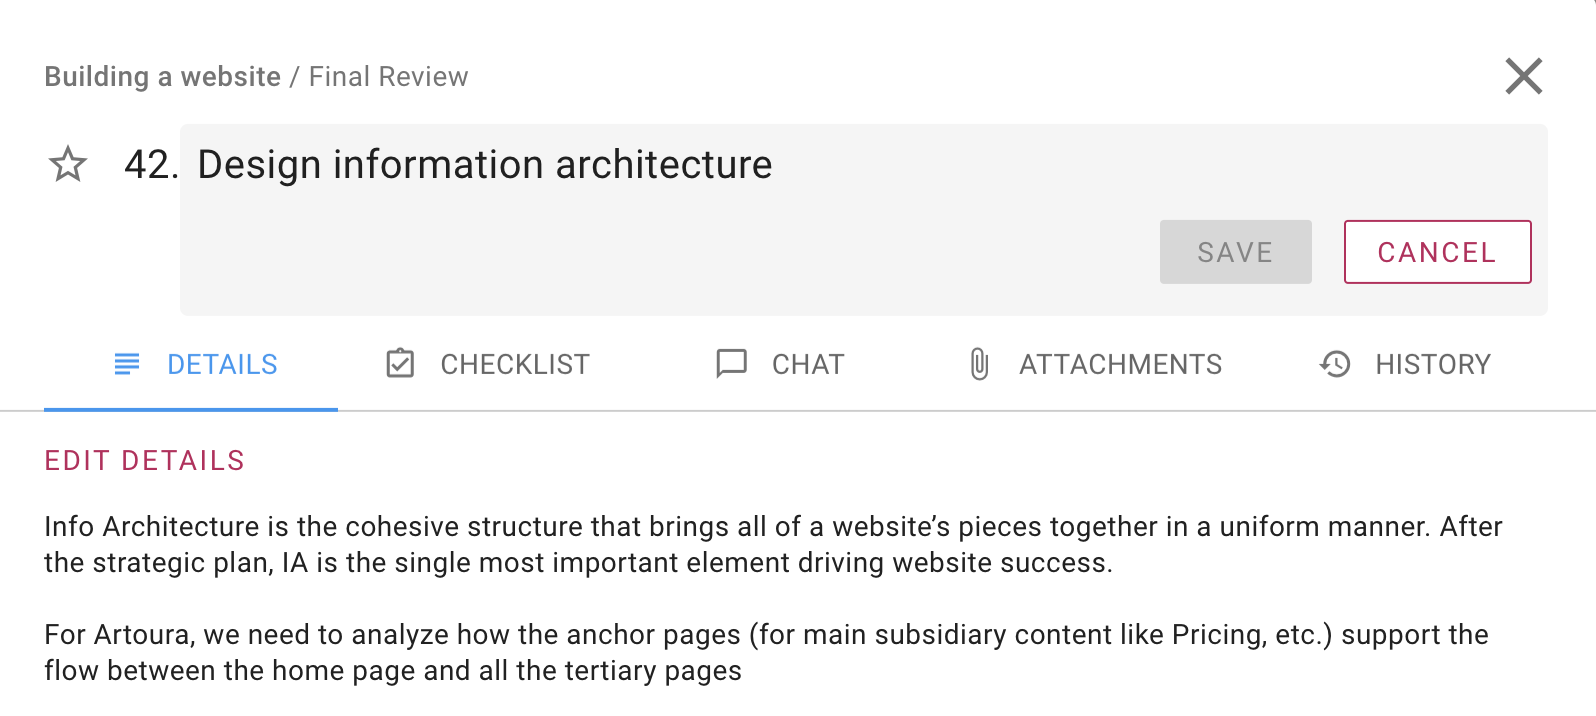
When you open a task, it’s number is shown (but can’t, of course, beedited)
Editing a Numbered Task
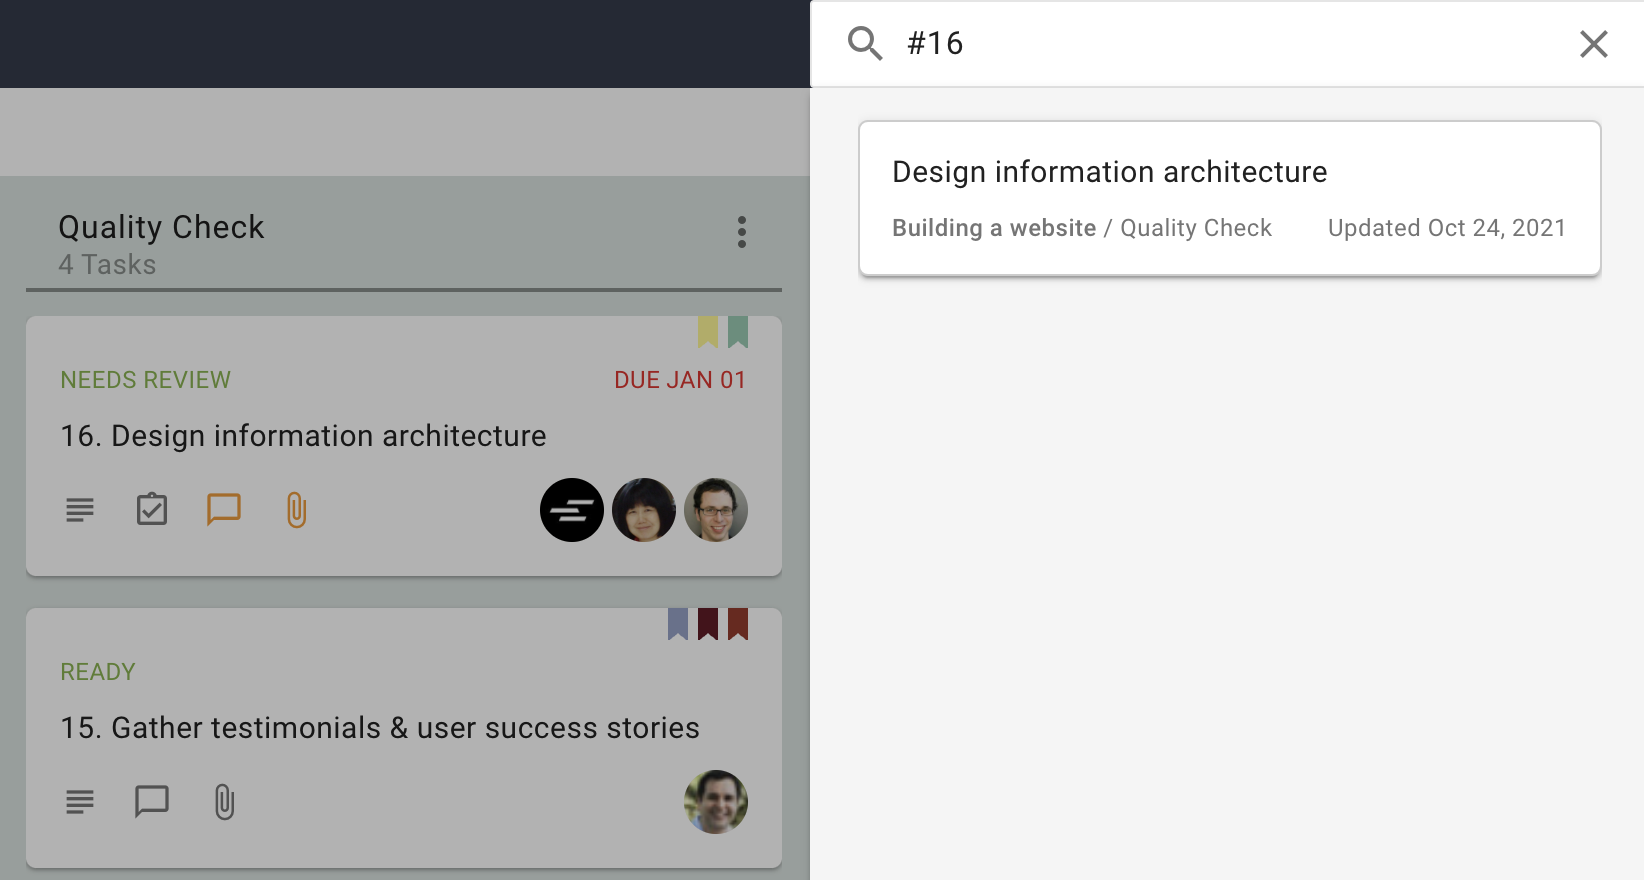
You can now search for a numbered task simply by typing “#number” in the Search box
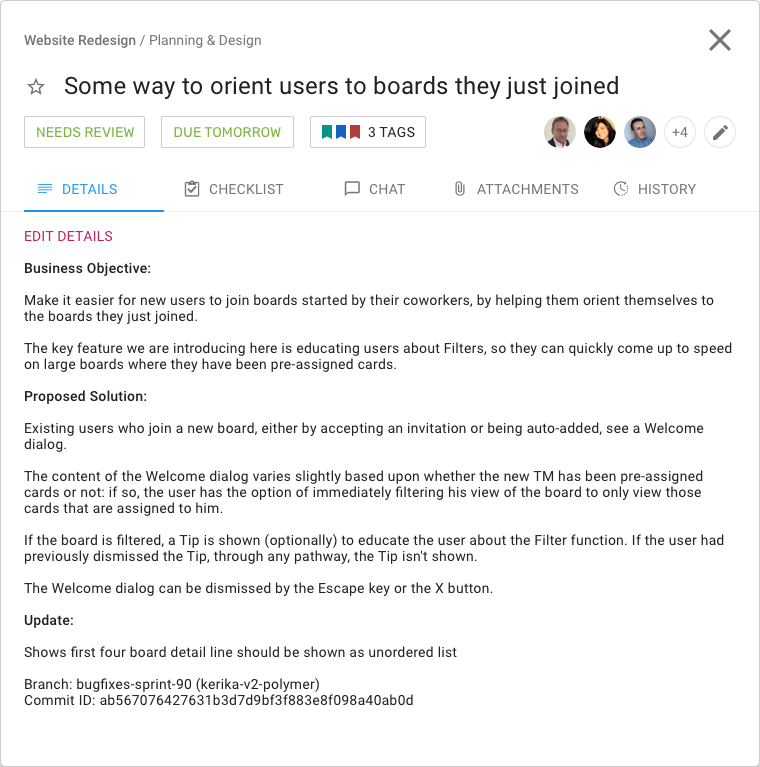
We have redesigned the Task/Card details dialog to provide a more space-efficient layout, so you can see more of what you need without having to scroll:
Task Details
What used to be vertical tabs for Details, Chat, etc., is now a compact horizontal tab; this frees up a lot of space to see the details of the tags.
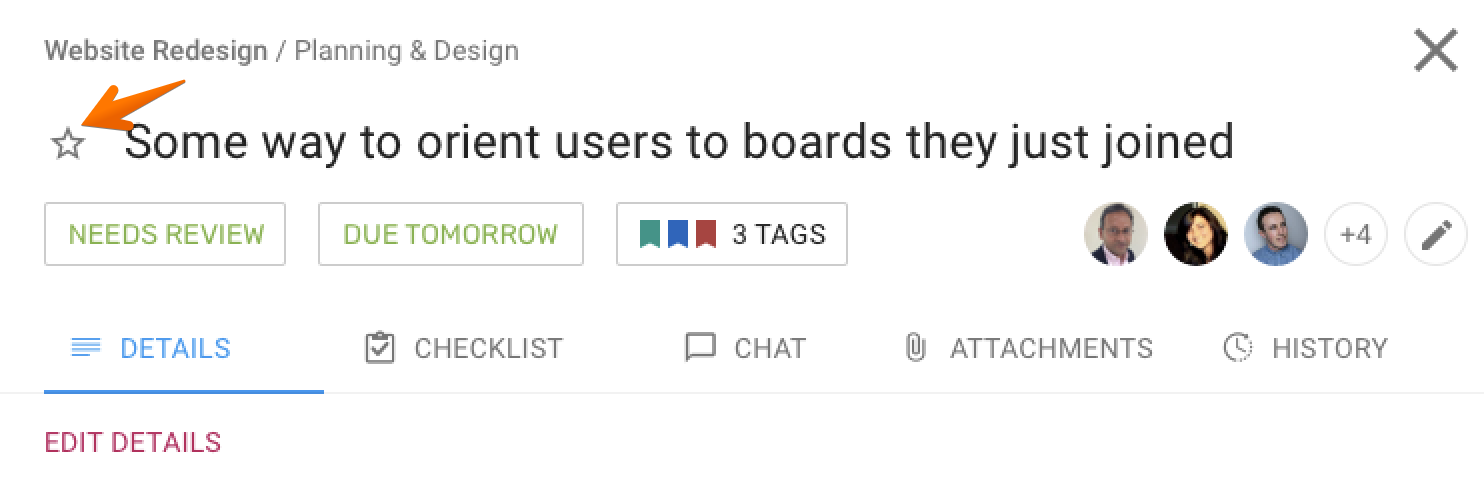
The other big change we made is to make the Priority setting separate from other Tags:
Task Priority flag
Clicking on the star will bring up your task priority options: