Kerika always sends emails to users in two scenarios:
- Someone chats on a card assigned to you. Any Team Member can write a message on any card, regardless of whether they are assigned that card or not.
If someone chats on a card that you own right now, an email gets pushed to you (again, after a 2-minute wait.) We figured that if someone has something to say about a work item that you are responsible for, you would want to know that sooner or later.
Kerika optionally sends emails to users in a bunch of other scenarios, all of which are determined by your user preferences (which you can set at https://kerika.com/preferences).
- If someone chats on the board itself (as distinct from chatting on an individual card), you can get this sent to you as email.
- If there are cards assigned to you that have due dates, at 6AM you can get an email that lists everything that is overdue, due today, or due tomorrow.
If you are a Project Leader on any board, this email includes all cards on those boards that are overdue, due today, or due tomorrow, regardless of whether they are assigned to you or not. (We figured that as a Project Leader you would care about overdue items even if you weren’t personally responsible for them.)
- If new cards are added to a board where you are a Project Leader, you can get notification emails if you want to keep track of all new work items.
- If cards are moved to Done on a board where you are a Project Leader, you can get notification emails if you want to keep track of completed work.
- If a card is reassigned from one person to another on a board where you a Project Leader, you can get notification emails if you want to keep track of how work is being handed off from one person to another.
So that’s emailed notifications in Kerika: just two types of emails are always sent, and they relate only to cards that you are personally responsible for; all the other emails are optional and can be turned on/off as you like.
What happens if people make changes to cards while you weren’t looking? (If you were looking at the board, you would see the changes in real-time, but even then, with a very crowded board, you might not notice that a card has changed in some way.)
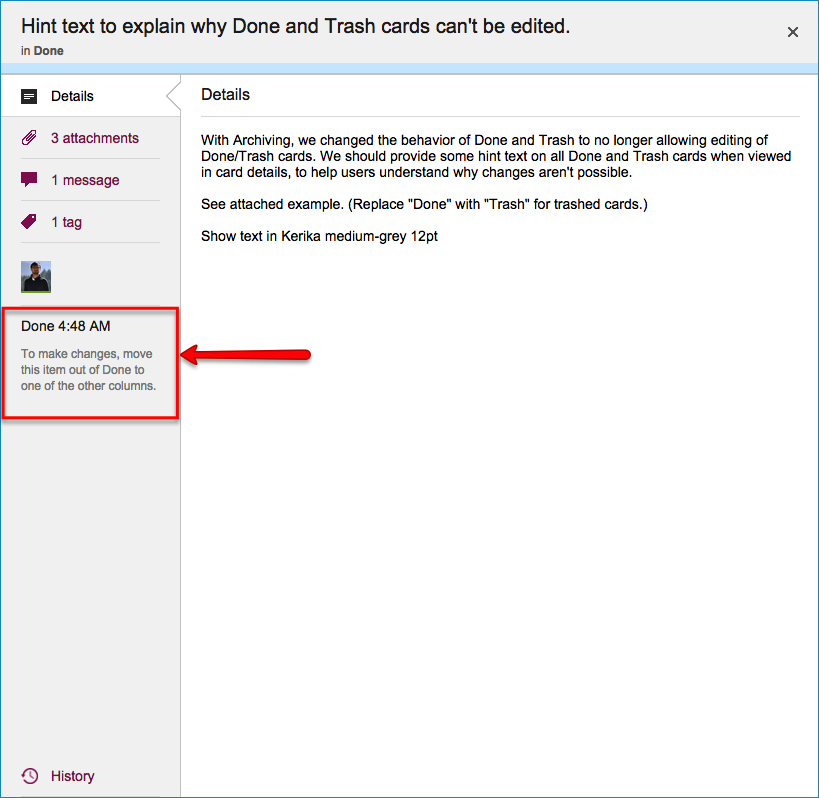
Kerika uses the orange color as a way to alert you of changes. You can learn more about this on our website, but the basic concept is simple: Kerika highlights, in orange, any card that has changed in any way since you last looked at it, and by “look at it” we mean that you opened up the card and looked at the specific details that changed.
For example, if someone adds new files to a card, the attachments icon (the small paper-clip) appears in orange. After you open the card and look at the list of attachments, the orange highlight disappears.
These orange highlights are very smart about making sure you know exactly what changed on a board; they even let you find changes that are outside your immediate visibility: e.g. changes on cards that are way down below the scrolled view of the board, or changes in columns that you have chosen to hide.