In many of our customers, we find there are specialists who get pulled into many different projects (boards) at the same time, to do very specific tasks.
An example would be an security specialist who is called in to do a vulnerability assessment on every development effort that’s underway within an IT organization. Or, corporate counsel who are asked to review final drafts of every contract, after everything else about the negotiation has completed.
In all situations it’s important to help new team members come up to speed as quickly as possible, but for situations where people are parachuting in to handle specialist tasks, the motivations are a little different: the specialists often don’t care about every detail of the board — which means they don’t care for most of the cards that are already on the Task Board or Scrum Board.
Instead, they want to quickly see what’s been assigned to them, get these work items done, and (hopefully) get out quickly.
So, how can Kerika help people who parachute into projects in mid-stream? By drawing their attention to what’s expected of them.
Here’s how it works:
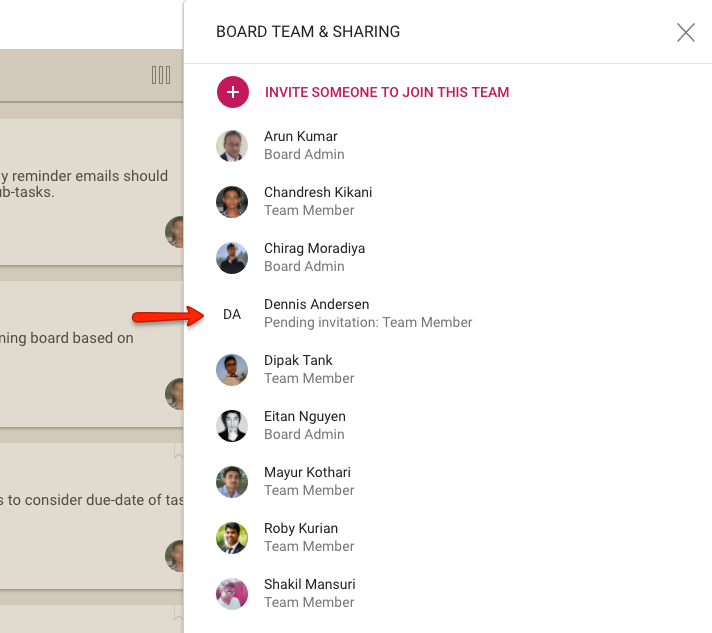
When you invite someone to join a board’s team, their status is shown as Pending invitation in the Board Team dialog:
Pending Invitation
Kerika lets you pre-assign cards while you are waiting for the new team member to join: in the example above, Dennis could be assigned cards while the team is waiting for him to act upon the invitation.
When Dennis does accept the invitation, the Kerika welcome dialog works to guide him to a fast start in his new project:
Welcome message for invited users
The welcome dialog starts by giving the new team member a quick overview of the project’s state: how long it’s been going on, how many cards are on the board — and, critically, how many cards are already assigned to the newly arrived team member.
Clicking on the See My Cards button in the welcome dialog provides a fast way for the new user to see what’s expected of him/her in this new project:
Highlighted cards
This feature will be especially useful for specialists who are called in to handle specific tasks on many simultaneous projects: they won’t care about all the cards on each board, just what’s assigned to them.
Get in quick, get your work done fast, and then get out again.
Some of our users are working on open-source, advocacy, or volunteering projects, and for these people privacy is less important than publicity: rather than hide their work, they would prefer to have as many people as possible view it, in real-time, so they can build momentum for their initiatives.
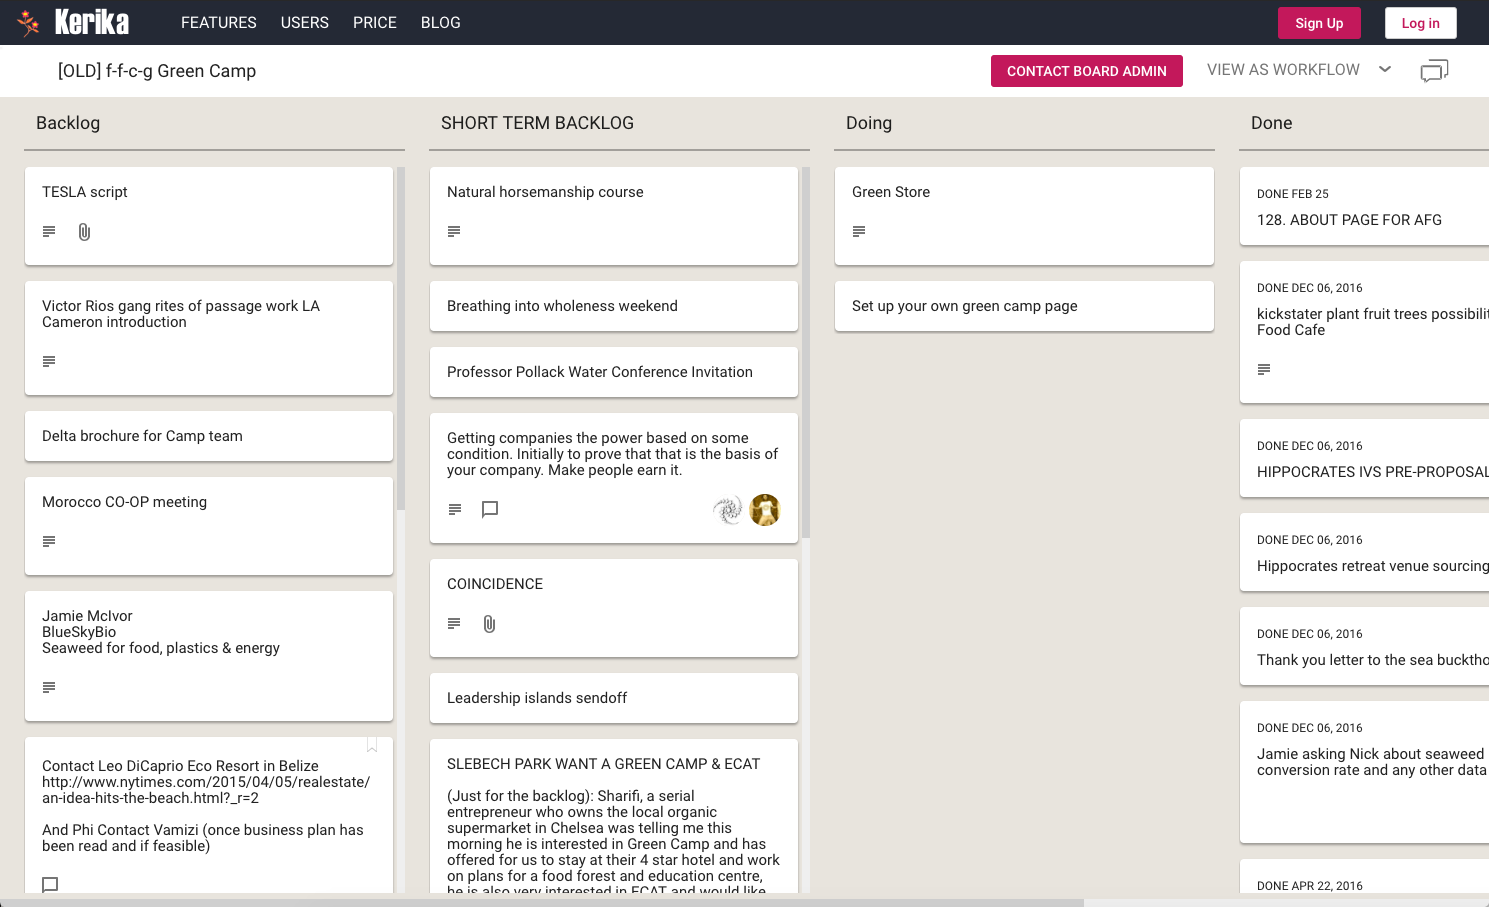
Here’s an example of a public board:
Example of public board
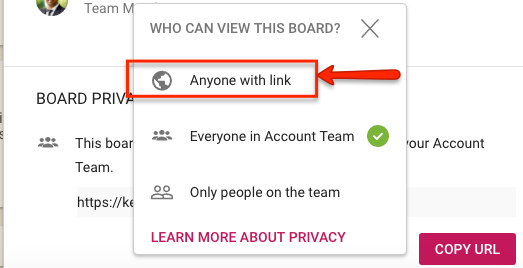
We have always accommodated such users, by offering an Anyone with link option that Board Admins can use to make their boards accessible by anyone who has the URL of that board, even if they aren’t Kerika users:
Making boards public
When a board is made public, all the files attached to and all the chat as well can be viewed by anyone.
As with any other Visitors, members of the public cannot make any changes.
Our latest improvement to this public boards feature has been to make the chat also viewable by anyone who has the URL of the board.
Note: a Board Admin can change their mind at any time, and revert a public board back to one that’s restricted to the board team or account team.
People usually don’t pay attention to the question of who owns a particular board, but it is an important question to consider when you create a new board: the Account Owner owns not just the board, but also all the files attached to cards and canvases on that board.
This is not always important (and often not important in day-to-day use of Kerika): our deep integration with Google and Box ensures that everyone who is part of the board team has automatic access to all the files needed for that board, with access permissions managed according to each individual’s role on the board: Board Admins and Team Members get read+write access; Visitors get read-only access.
(And, as people join or leave board teams, or their roles on a particular board’s team changes, Kerika automatically manages their access to the underlying project files, regardless of whether these are being stored in Google or Box.)
But when someone is planning to leave an organization, the question of ownership can suddenly become important: you don’t want an ex-employee to continue to own critical project files.
Changing ownership of boards was not something that was easily done in the past — there were workarounds, but they were fairly cumbersome and obscure — and we mostly handled these as special requests, on a case-by-case basis.
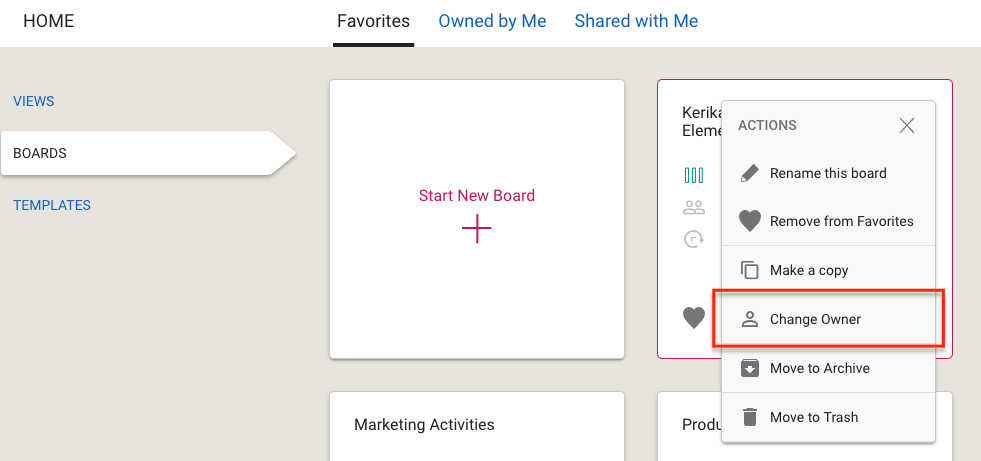
With our newest update to Kerika, this is no longer the case: changing the ownership of a board is a simple process that can be initiated at any time by the current owner of a board:
Change Board Owner
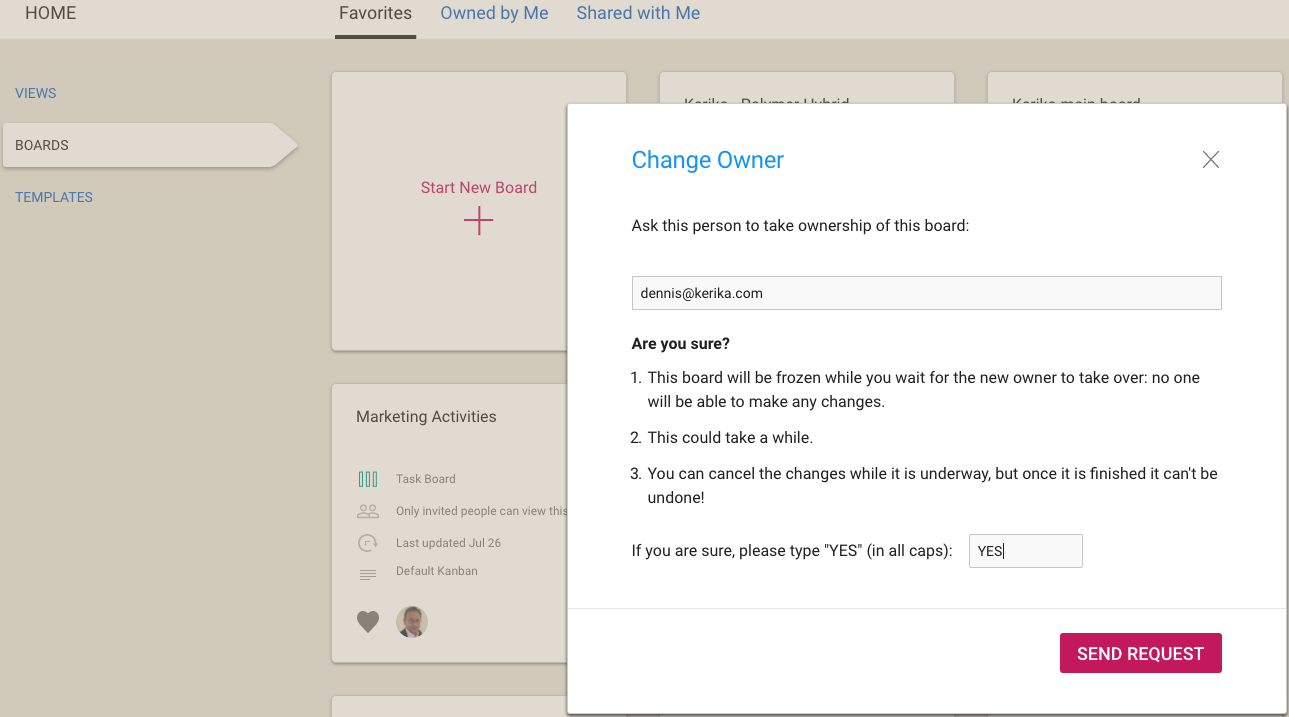
You can ask any other Kerika user, who has signed up the same way as you did (i.e. either as Kerika+Google, Kerika+Box, or by directly signing up) to take ownership of a board. Because this is a consequential action, not something you should rush into, you are asked to confirm your intention by typing the word “YES”:
Confirming change in ownership
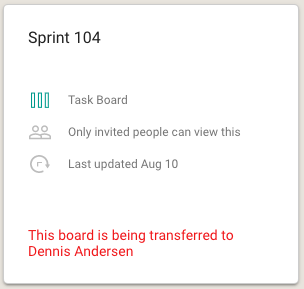
Once your request is sent off to the other user, the board is in a frozen state: existing members of the board team can continue to view the board, but no one can make any changes:
Board waiting for new ownerBoard frozen while waiting for new owner
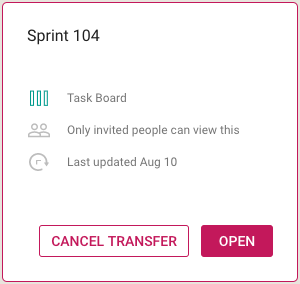
If you change your mind, you can cancel the request before it has been accepted. This can be done by selecting the board from your Home Page:
Cancel ownership request
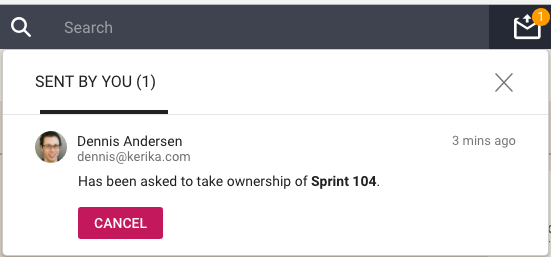
You can also find your pending request in your Sentbox, and cancel it from there:
Cancelling pending request
Note: once a board’s transfer is complete, it can’t be undone by you. If you really need to get ownership back of a board, you will need to ask the new owner to transfer the board to you.
An important caveat for Kerika+Google users
We try to ensure that files attached to a Kerika+Google board have their ownership changed at the same time as the board itself is transferred, but there are some limits to how Google will allow for a change in ownership:
All Kerika-related files are stored in a set of folders in a user’s Google Drive, organized by account and board.
Google let’s us change the owner of a folder, so we can make sure that when a board is transferred the ownership of the associated Google Drive folder is also changed.
However, for the individual files contained within the folder, Google only allows for a change of ownership of files that are part of Google Docs: documents, spreadsheets, presentations, forms, etc.
Files like images (.jpg, .png, .gif), zip files, and PDFs, for example, retain their old ownership between the Google API doesn’t let Kerika change the ownership of these “non-Google-formatted” file types.
A fun video we made recently featuring Faith Trimble and Kate King, from the Athena Group, talking about how a consulting company can function as a truly distributed team — and get great work-life balance as a result!
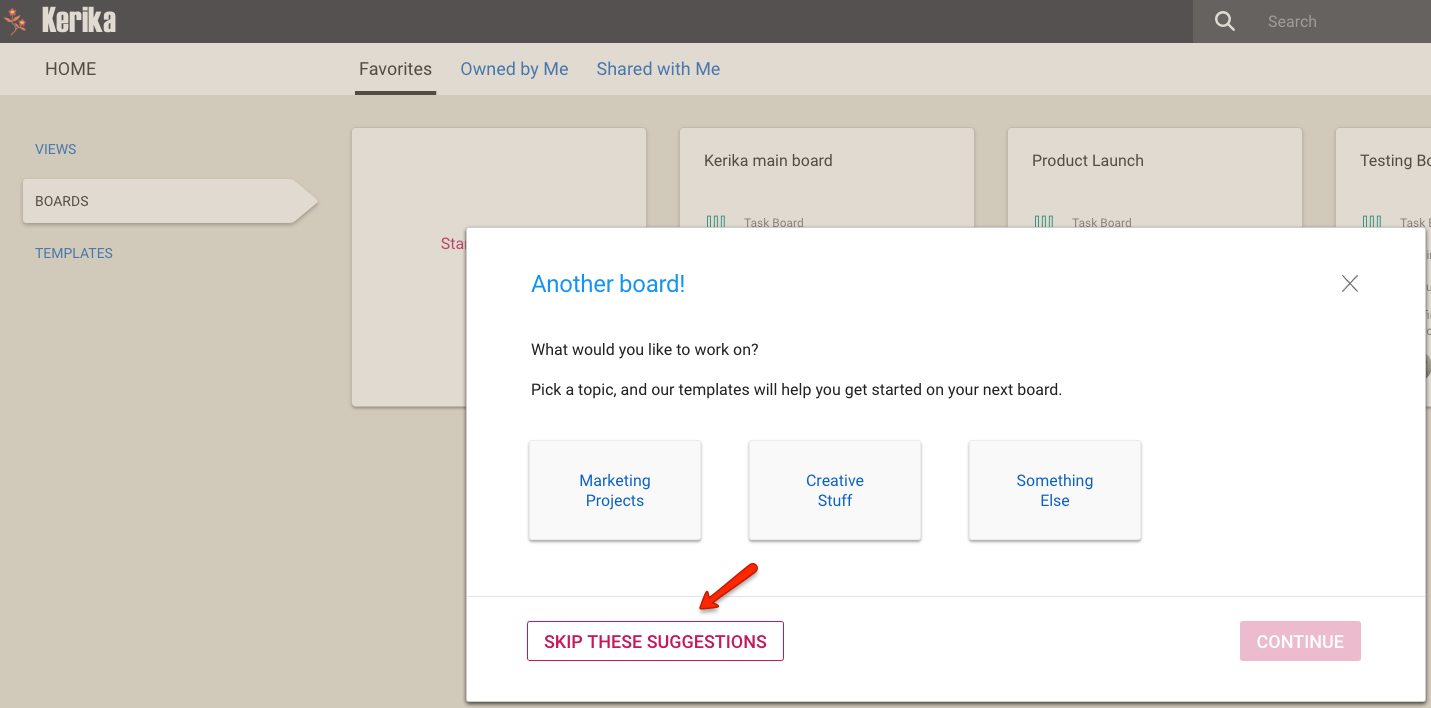
For experienced users who don’t need as much help in starting new boards, we are providing a faster mechanism that skips some steps that are currently shown to new users.
You can access this faster mechanism by clicking on the Skip Suggestions link in the current Start New Board dialog:
Skipping Suggestions
Once you click on Skip Suggestions, Kerika will recognize you as an experienced user who prefers a path like this:
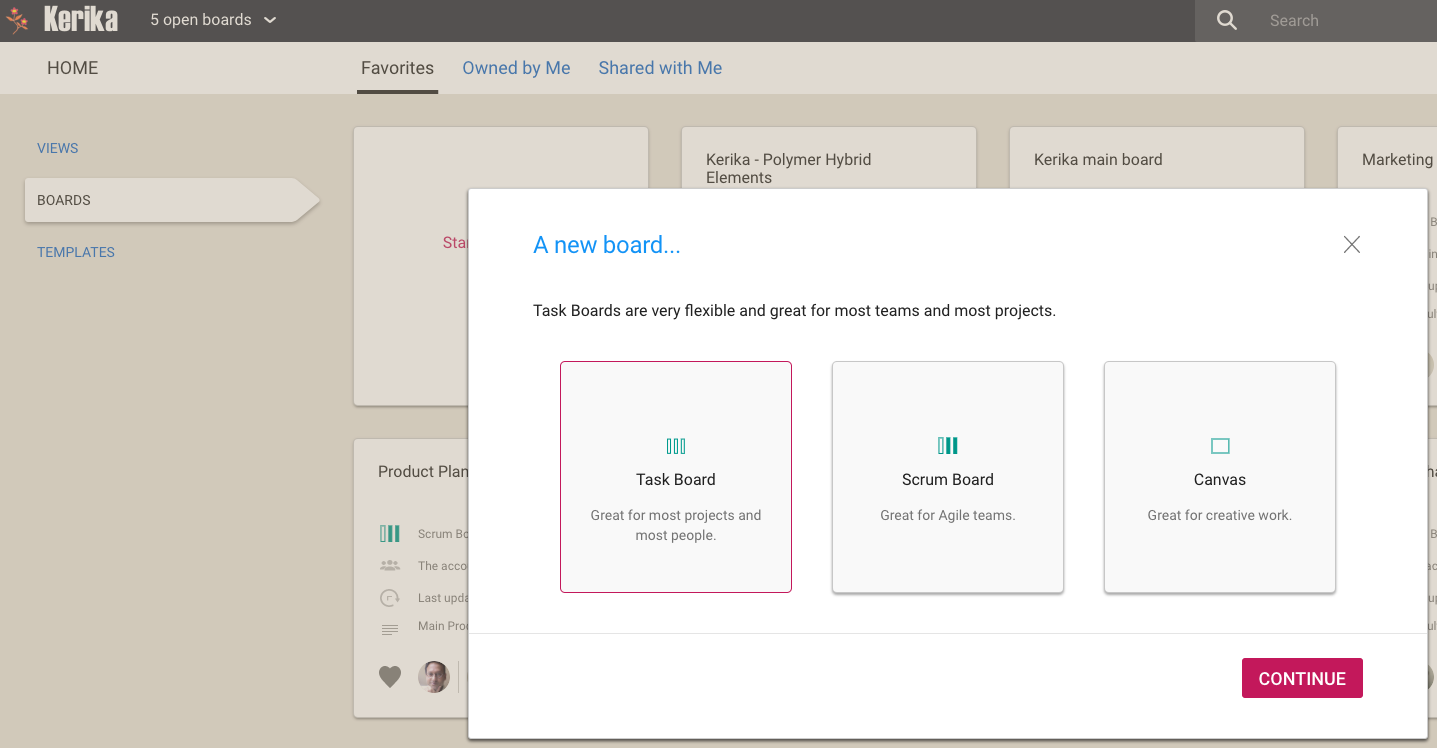
Starting a New Board
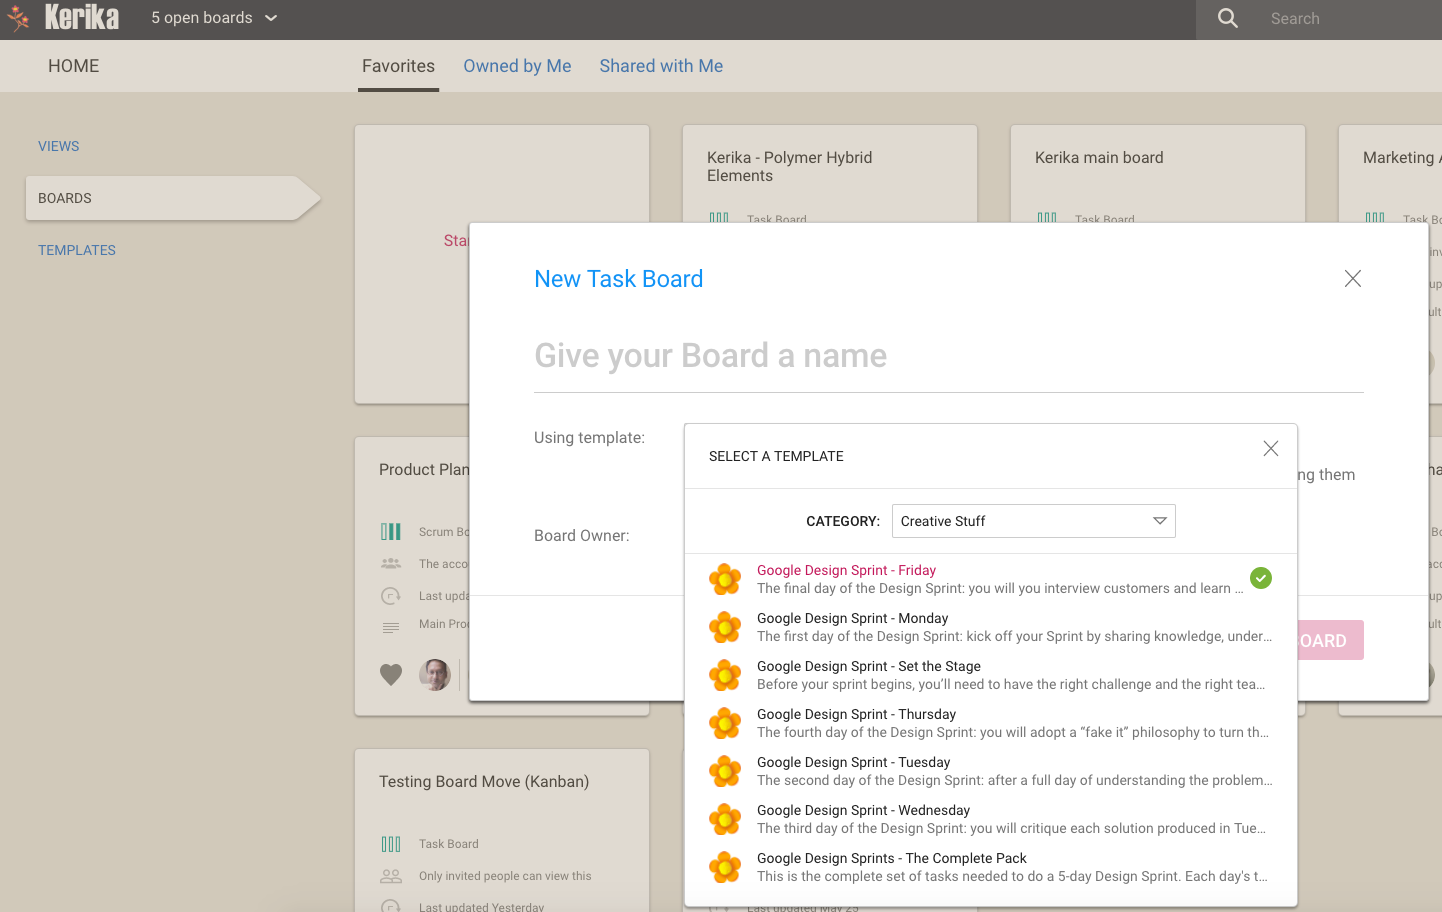
Once you pick the kind of new board you want — Task Board, Scrum Board, or Whiteboard — you can immediately name your new board:
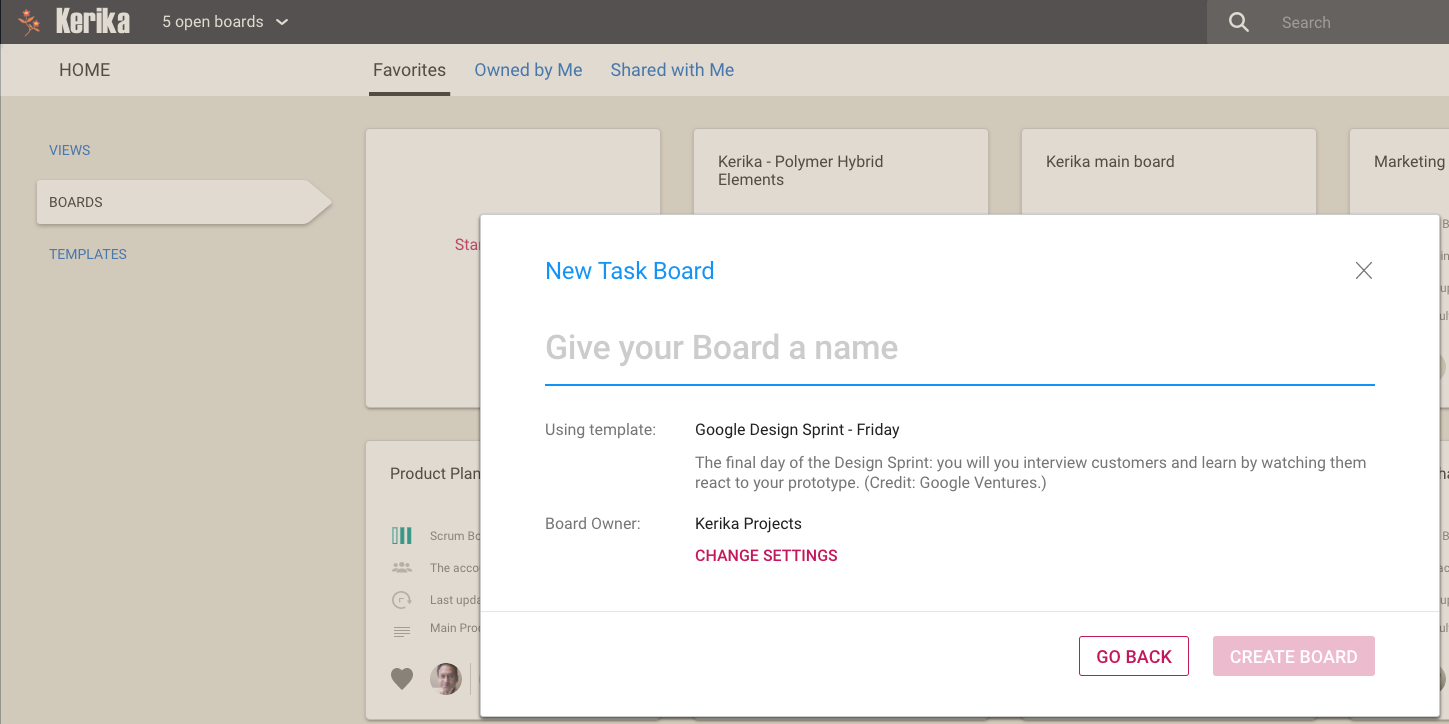
Starting a new Task Board
Kerika will assume your new board will use the same template that you last used, but if you like you can change to a different template by clicking on the Change Settings link:
Selecting a Template
This should save our experienced users a few clicks when they want to start a new board…
We made some user interface tweaks to make sure people are aware of a really great feature in Kerika that’s existed for a while, but was buried in a Preferences screen that not everyone paid attention to: you can have your Kerika Due Dates automatically show up on your Google, Microsoft or Apple Calendar.
Well, that’s buried no more: we have added a Calendar Synch button in a more prominent place on the top-right of the Kerika app:
Calendar button
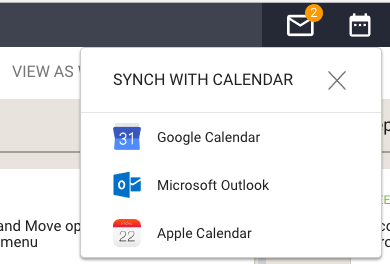
Clicking on this button will let you choose the type of calendar you want to synch with:
Calendar choices
(Hint: you can have your Kerika Due Dates synch with more than one calendar, if you like.)
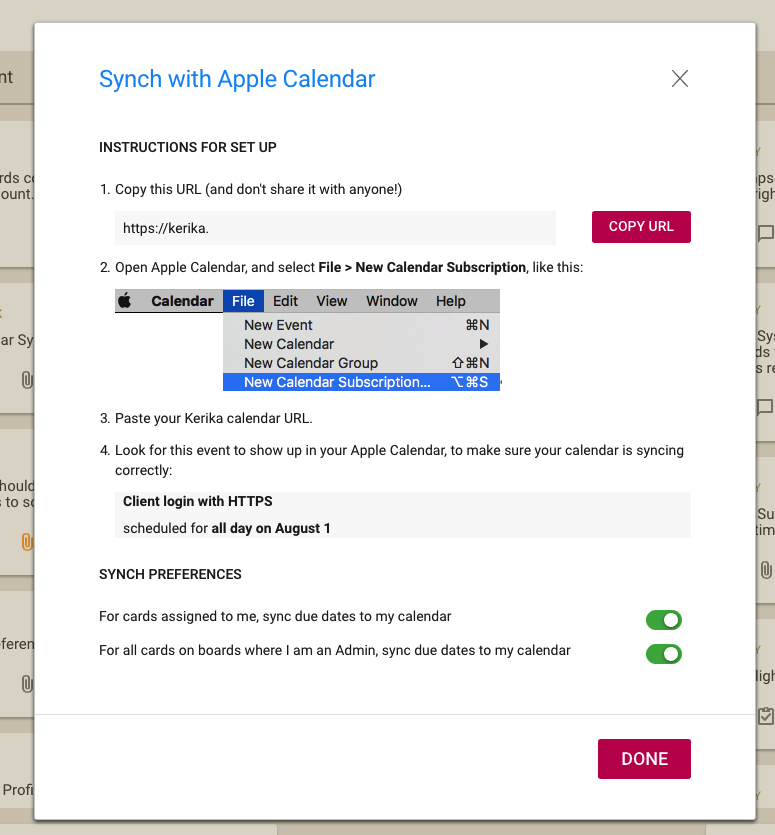
Pick your favorite calendar type, and you will see detailed instructions on how to set up syncing of your Kerika Due Dates. Here’s an example of syncing with Apple Calendars:
Calendar instructions
The URL is personal, and should be kept confidential. (That’s why we aren’t showing it in the illustration above.)
The URL is long and random so it will be impossible for others to guess, but it’s not a good idea to share it with others unless you really want them to know all your Kerika Due Dates, e.g. if you have an assistant or delegate that helps manage your daily schedule.
At long last, we have built Views — one of the most commonly requested features, and something that we had been obsessively designing and redesigning over years, trying to figure out the best way to handle this need.
We have done it now. Views has been built, and is automatically available across all your Task Boards and Scrum Boards, whether they are owned by you or shared with you.
We are starting off with four standard Views, and we will built more in the future, and add a way for you to build your own Views as well.
The Views we have built are:
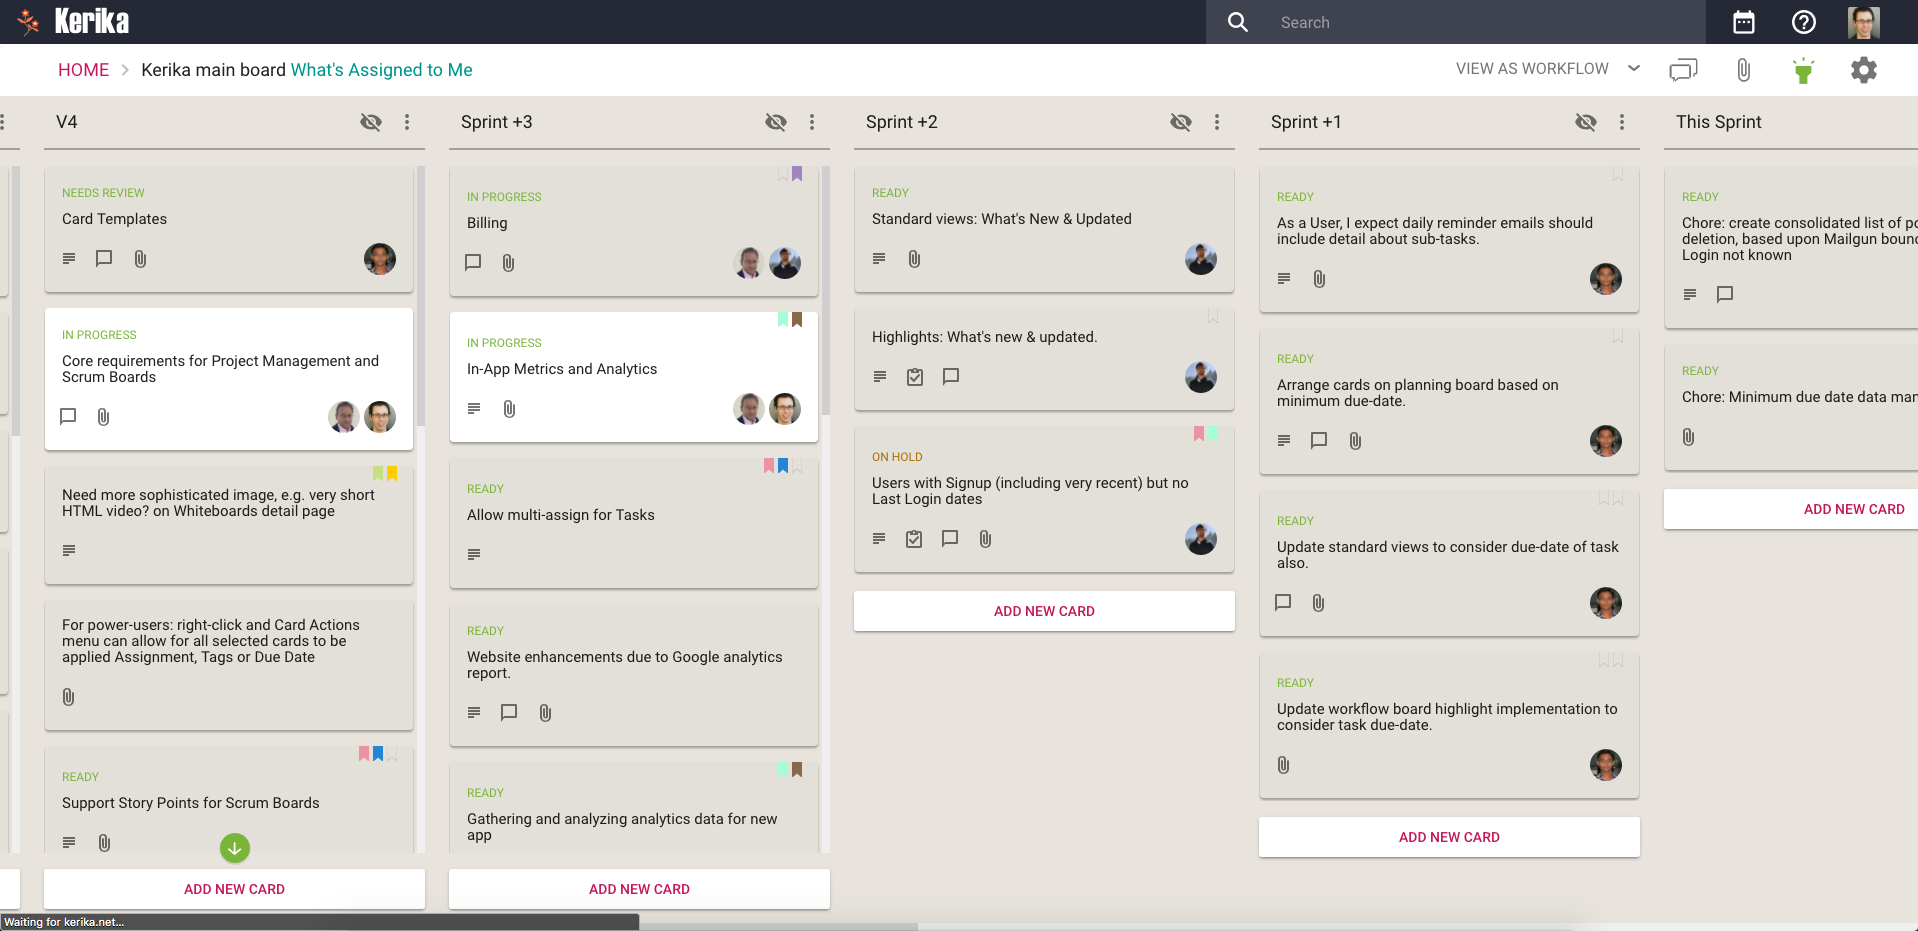
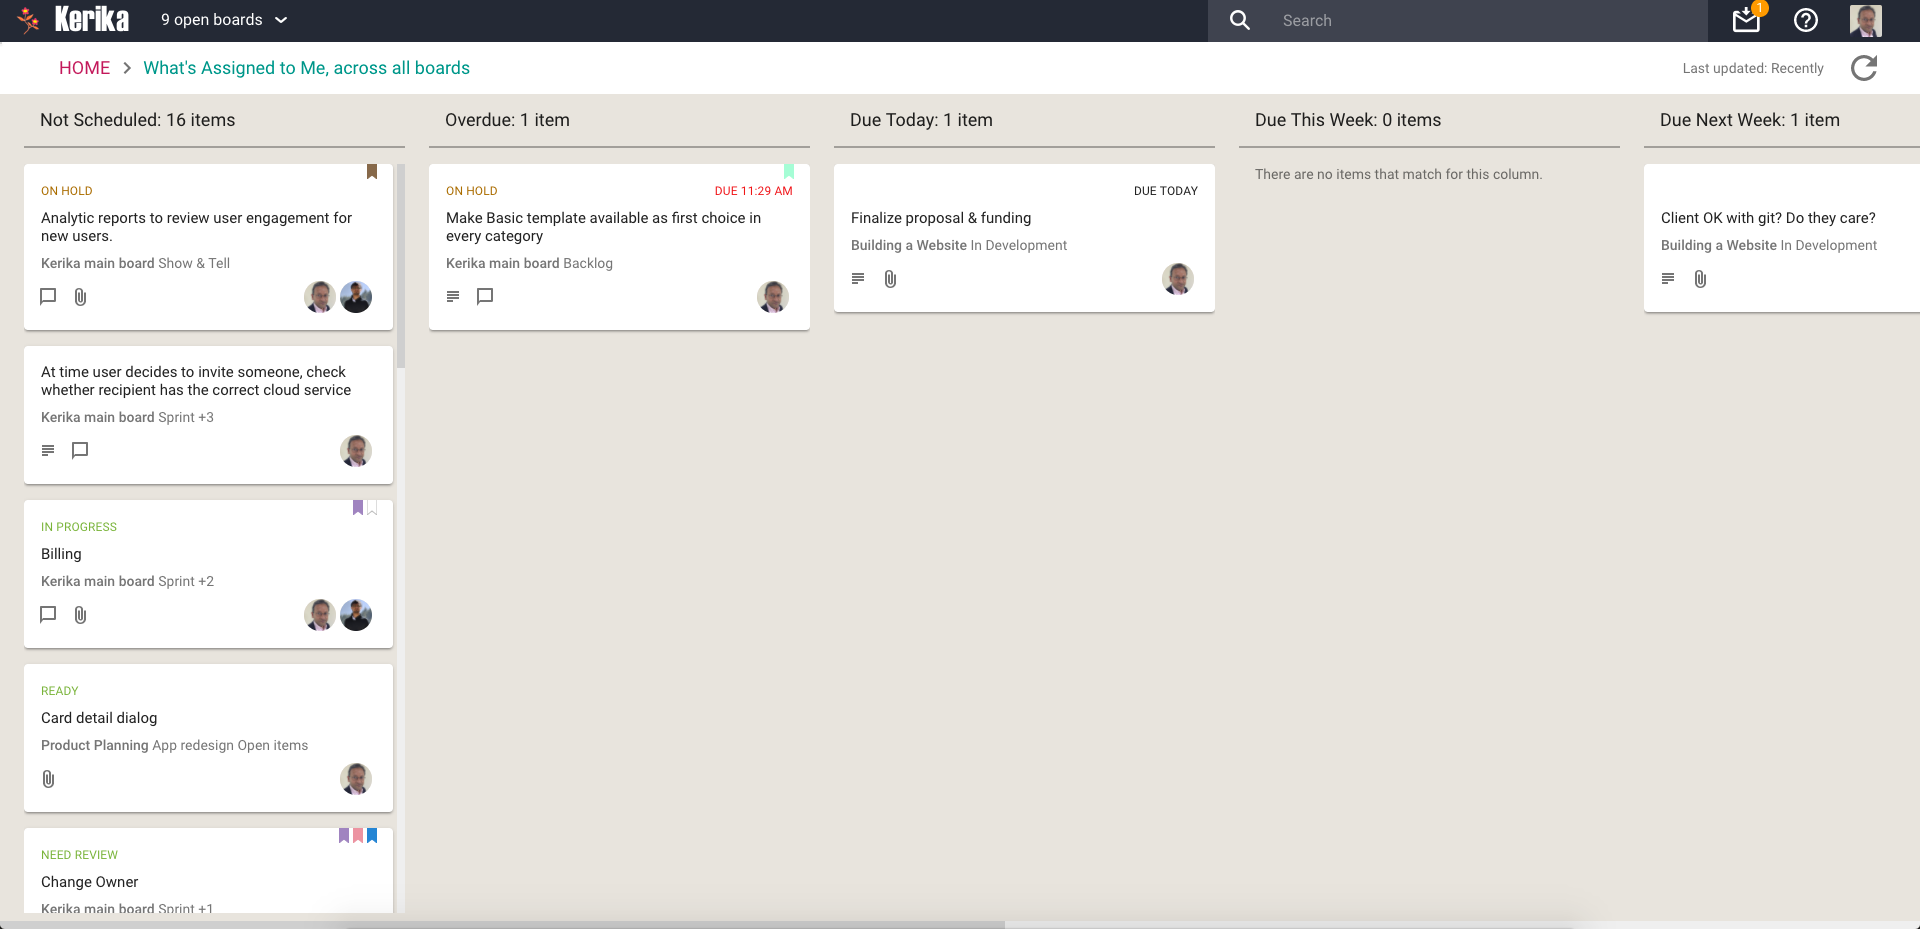
What’s Assigned To Me
The most commonly asked for feature by people who are working on several projects — and, hence, several boards — at the same time. This is what it looks like:
What’s Assigned To Me
Everything that’s currently assigned to, on all boards except for those that are in the Trash or Archive, are collected for you into a single View, where cards are organized as follows:
Not Scheduled
Overdue
Due Today
Due This Week (excluding what’s already included in Due Today)
Due Next Week
Due This Month (excluding what’s already included in Due Today and Due This Week)
Due This Quarter
Due Next Quarter
It is a comprehensive summary of everything you need to get done, and it will be invaluable for managers and anyone else who has to work on multiple projects at the same time.
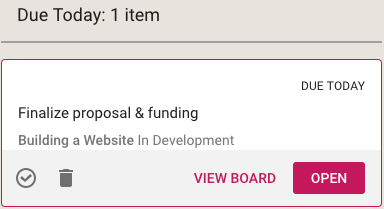
If you select a card in a View, like this
Selecting card from a View
You get quick access to key actions:
Move to Done
Move to Trash
View Board
Open
Open opens the card right there, inside the View itself. View Board, on the other hand, opens the card in the board in which it is located.
Both are useful, depending upon the card and what you want to do: in some cases you just need to update a particular card — e.g. reschedule it, add a comment or file — and opening the card in the View itself, which is very fast, is enough.
In other situations you might want to be sure you are understanding the context of the card, and it is better to see where it is on the board that contains it. This can be helpful for cards that you are not quite sure about.
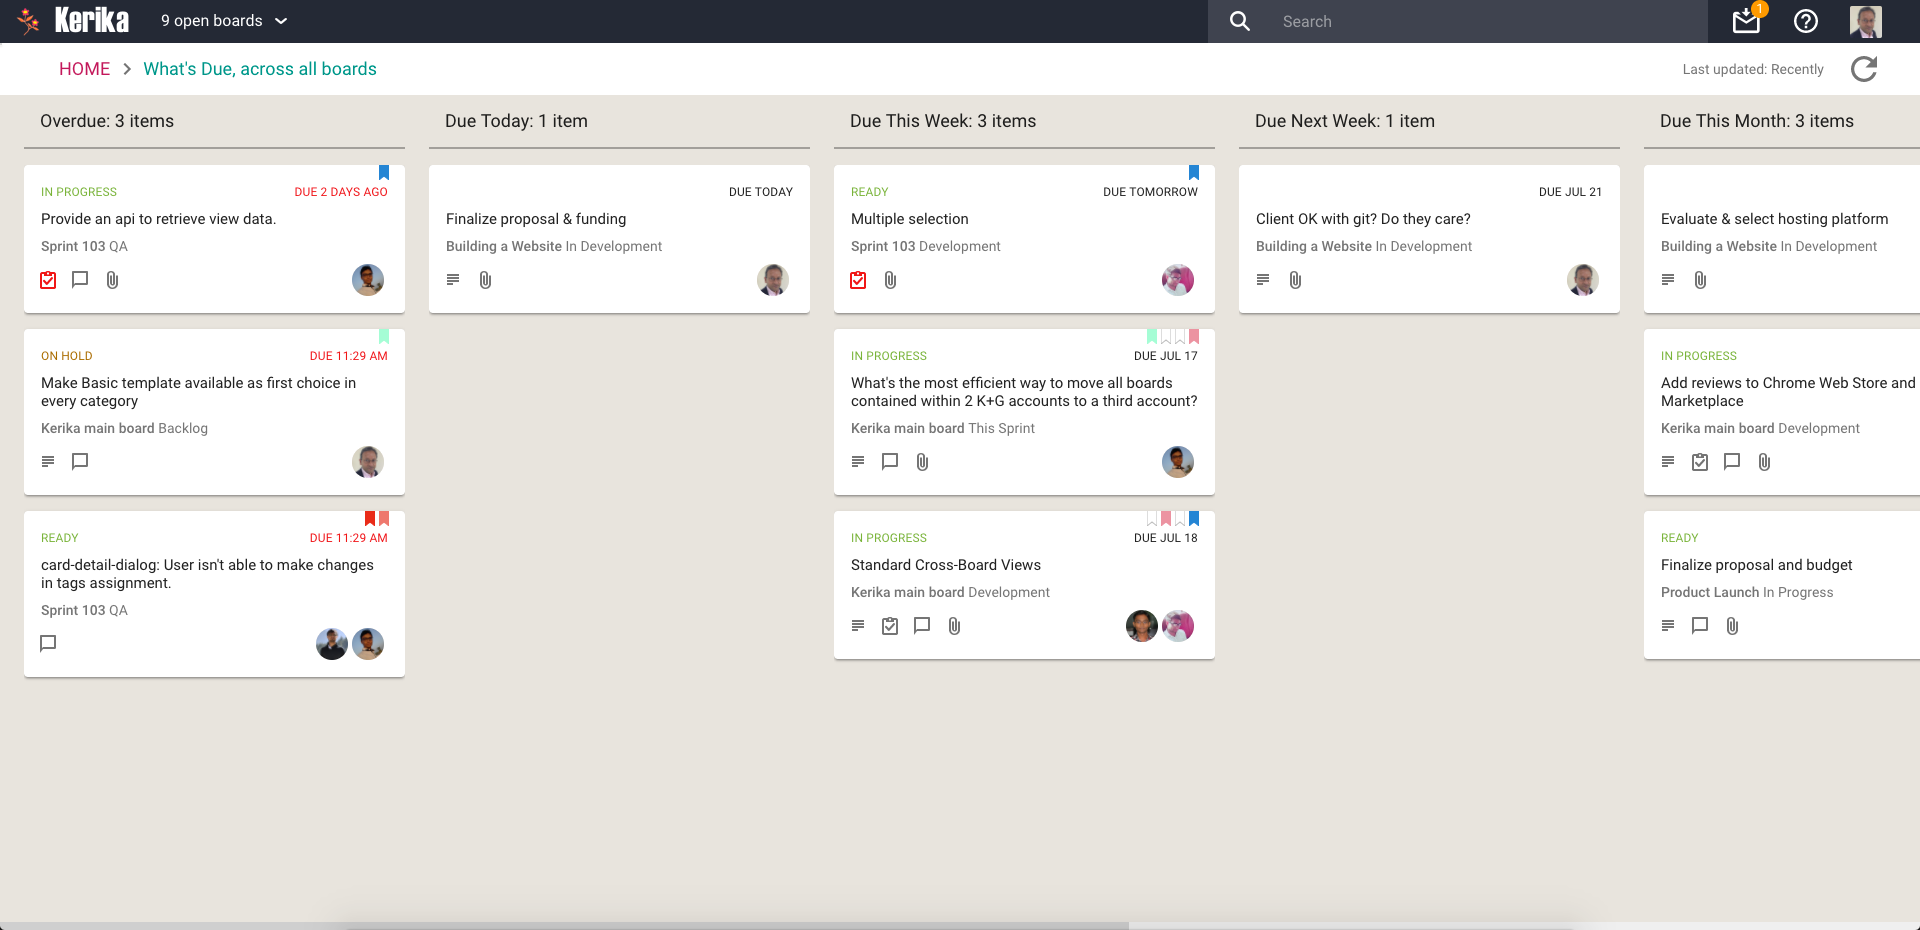
What’s Due
This View will be particularly helpful to managers (Board Admins): it summarizes everything that’s due, on all boards where you are one of the Board Admins:
What’s Due
This basically brings to life everything that you can also (optionally) get in your 6AM Task Summary email.
Cards are organized for you as follows:
Overdue
Due Today
Due This Week (excluding what’s already shown as Due Today)
Due Next Week
Due This Month
Due Next Month
For this View, as with the What’s Assigned to Me View, we try to be smart about not showing duplicate cards: if something is due today, for example, it will show up in the Due Today column, but not get duplicated in the Due This Week or Due This Month column.
This makes it easier for you to plan your schedule: you can see what needs to get right away, and what needs to get done later.
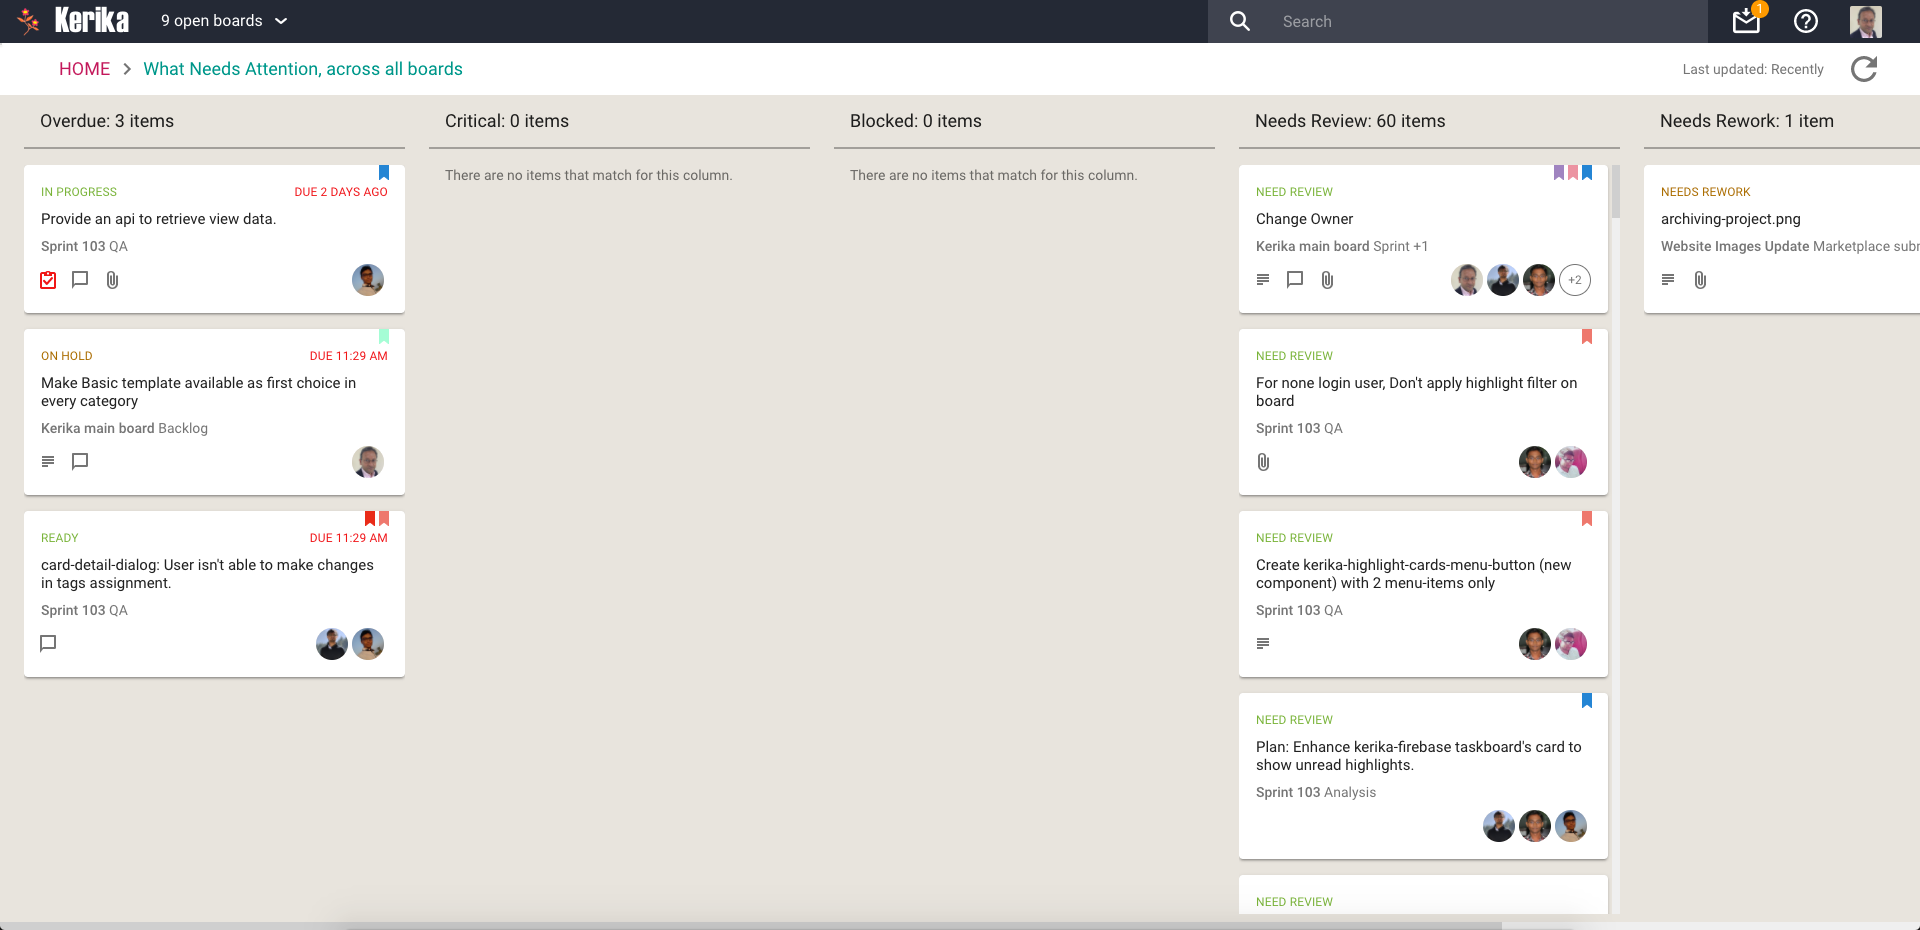
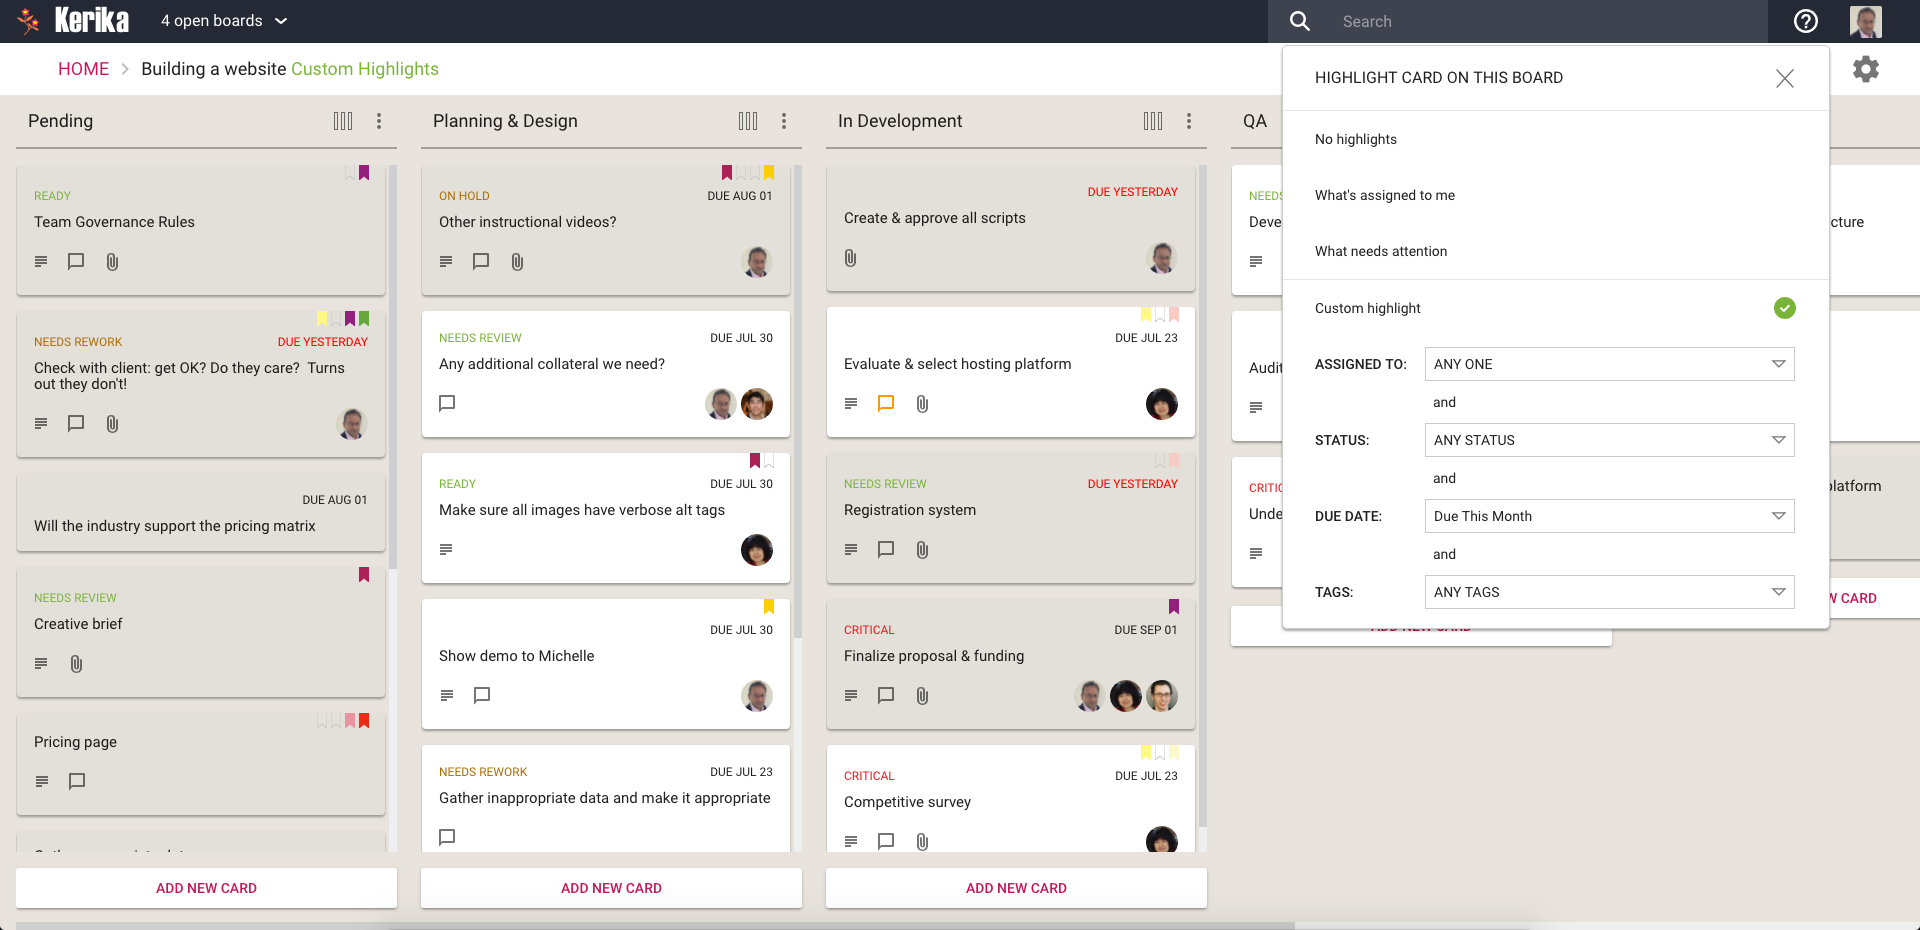
What Needs Attention
Again, a View that will be of particular interest to managers concerned with several ongoing boards:
What Needs Attention
Here, Kerika tries to show everything that needs a little extra attention: things that are
Overdue
Flagged as Critical
Flagged as Blocked
Flagged as Needs Review
Flagged as Needs Rework
Flagged as being On Hold
These items typically represent your risk profile across all your boards, and Kerika brings it all together in a single View.
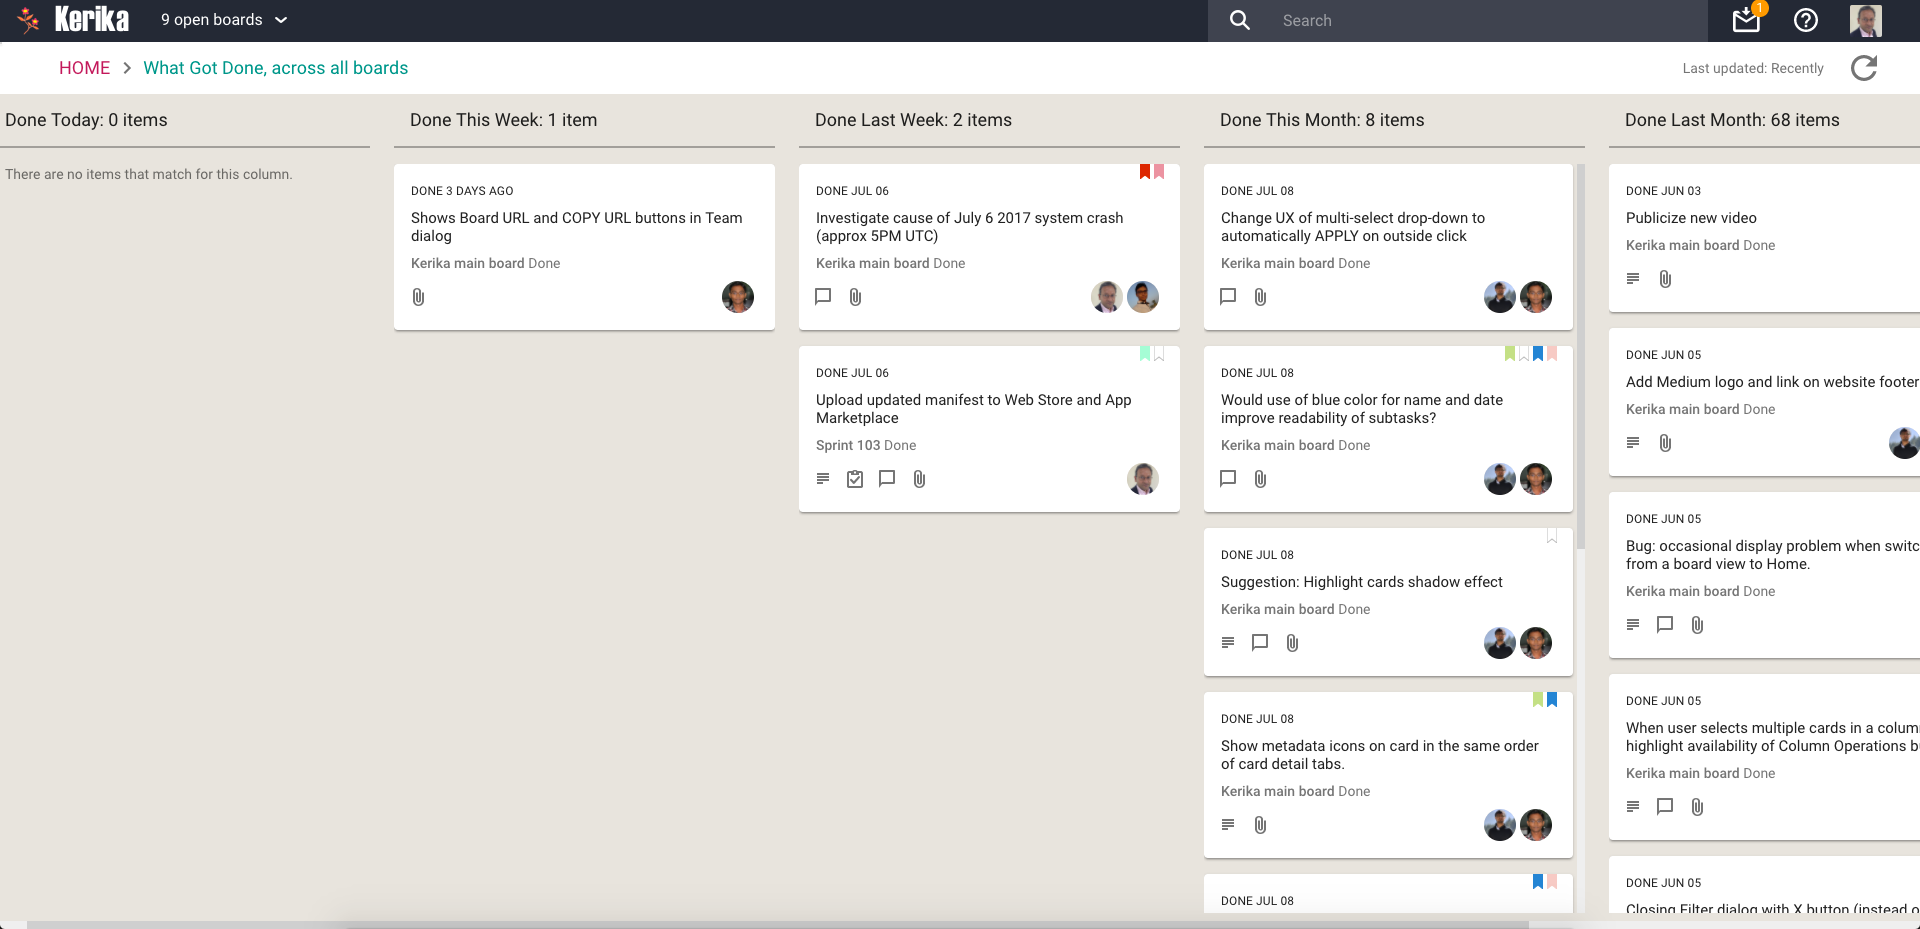
What Got Done
Great for anyone who needs to produce a status report, or any manager who needs to monitor progress across many different projects:
What Got Done
Across all boards where you are a Board Admin, this View summarizes
What got done Today
What got done This Week (excluding items shown in This Week)
What got done Last Week
What got done This Month (again, excluding items shown for Today and This Week)
What got done Last Month
What got done This Quarter
Accessing Views:
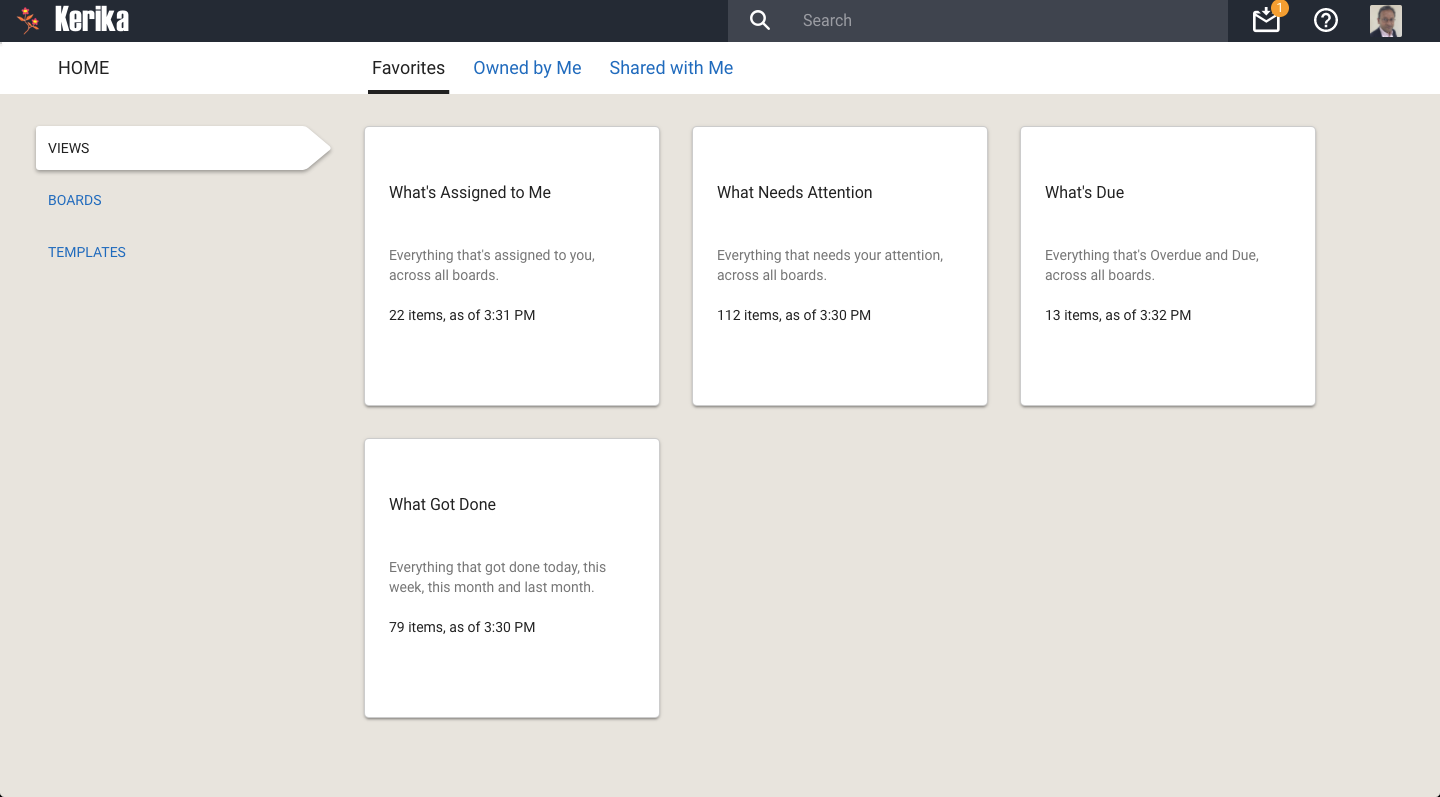
All your Views can be accessed from a new tab called Views (naturally) on your Home Page:
All your Views
On each View card, Kerika shows how many items are included in that View, and as of when. The Views are automatically refreshed when you open them, but in-between they are not updated because we do not expect the information shown to change on a second-by-second basis.
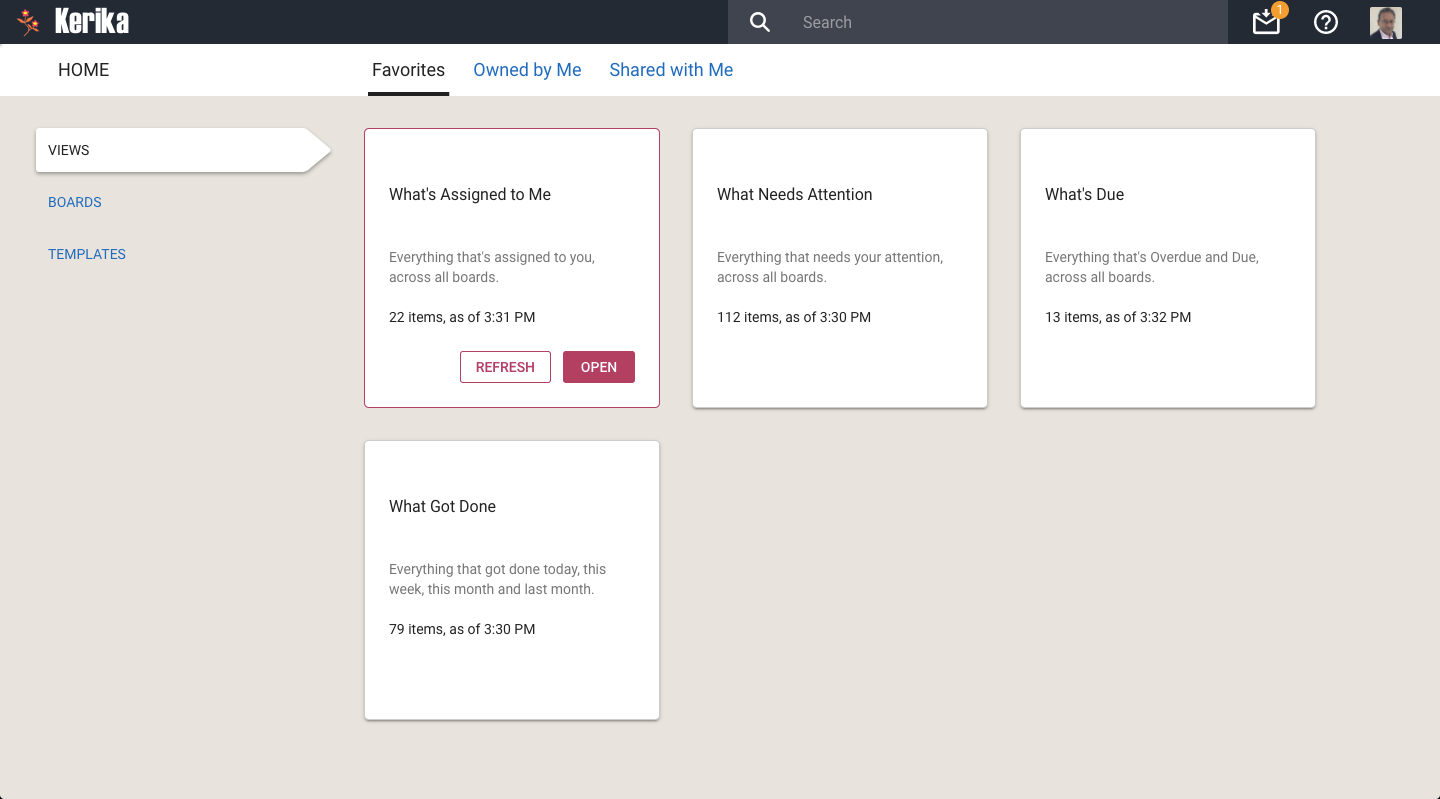
If you are worried that your View is out of date, you can update it by selecting it on your Home Page:
Refreshing a View
You can also update any View that you currently have open, by clicking on the Refresh button shown on the top-right of the View:
Refreshing a View
We will let you go crazy with these Views, for now. In the future we will add more (we already have some ideas on that front, but would love to hear from you as well!) and also add a Custom View capability.
We have done a bunch of small bug fixes and usability tweaks to the Tasks feature we introduced a few weeks ago:
When a user’s last Task within a card is marked as Done, the user’s name is removed from the list of people shown as being assigned to that card. (Previously you had to do this cleanup manually.)
When a Task that was previously marked as Done is changed to be “undone” (open/remaining), the user who had previously been assigned to that Task is added back to the list of people shown assigned to the card.
Bug fix: If someone is assigned to a Task, and this person had previously completed a Done Task, this user wasn’t getting added automatically to the list of people shown on the card. This has been fixed.
If you have signed up directly with Kerika, we use the Box Platform to store your files for you — Box is a secure, reliable cloud service and we have been a partner with them for several years.
But we do all this for you: efficiently, quietly and behind the scenes.
Which means you may never notice (and, really, you shouldn’t have to…)
However, we found that some users automatically block third-party cookies (this is a browser setting available in all types of browsers).
This was causing problems for the preview function for these users: when a user clicks on a file attached to a card or canvas, that’s getting stored in Box by Kerika for that user, we use Box’s Preview function in the form of an IFRAME.
Using an IFRAME enables us to add some Kerika-specific features, like automatic version tracking, to the standard Box Preview function.
This, however, requires users to allow Box.com to set a cookie, and this can fail if the user has never permitted Box.com to set cookies, or is automatically blocking all third-party cookies in their browser: when you are using Kerika.com, Box.com is effectively a third-party to the connection.
We want to make sure people understand this can be a problem, so we have added some smarts to Kerika to detect when people who have signed up directly are blocking Box.com.
If this is the case, a pop-up dialog box will appear explaining why the Preview function won’t work correctly without allowing Box.com’s cookies to be stored in the browser.