When working with Task Boards and Scrum Boards, you get a variety of options for quickly sorting a column of cards:
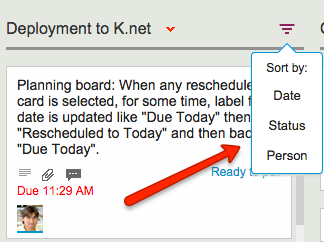
Sort options
Sort by Date is easy enough to understand, but what about sort by status?
Sort by Status organizes the cards in a column as follow:
Critical
Is blocked
Needs rework
Needs review
In progress
Normal
On hold
This sort order reflects the normal priorities of most projects: the most important stuff would ideally show up at the top of the column to get dealt with first.
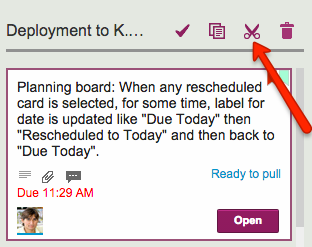
Cutting and pasting cards from one Task Board to another, or from a Task Board to a Scrum Board for that matter, is easy and simple with Kerika: just select the card, and then click on the “Cut” button that appears at the top of the column:
Cut button
You can cut several contiguous cards within the same column by shift-selecting them, and then clicking on the Cut button.
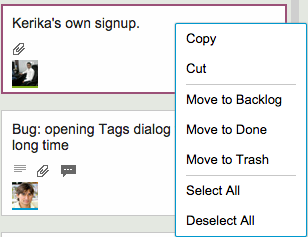
And, you can also access the Cut operation by using the right-click mouse menu:
Right-click menu
Cutting-and-pasting is effectively a move operation: it moves the card intact, along with its details, tags, attachments and chat, from one place to another.
You can cut and paste within the same board, of course, but this is pointless since it is much easier to drag cards from one column to another.
Cutting and pasting cards from one board to another is much more useful, and it doesn’t matter if the source is a Task Board or Scrum Board, and the destination is a board of different type — or even if the destination is a Template.
But what should you do if you click on the Cut by mistake? Well, that’s easy to undo: just click on the cut cards — which will appear slightly greyed-out — and the cut operation will be cancelled!
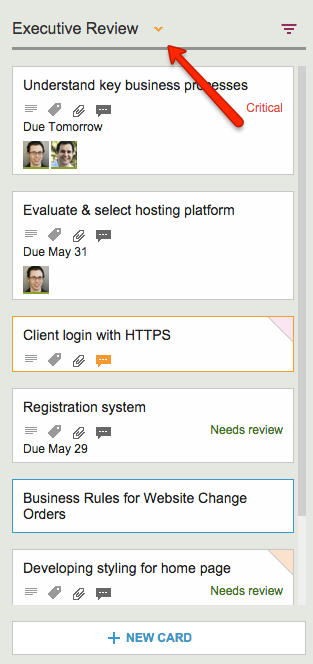
When working with a crowded Task Board or Scrum Board, you want to be sure that you haven’t missed any updates on cards that are out of view: for example, updates that are out of the scroll area because a particular column of cards is very crowded.
Kerika makes sure you don’t miss anything, and it does this will a handy little button in the form of a downward pointing caret that appears at the top of every column where there is at least one card that needs your attention:
Finding all the changed items in a long column
Clicking on this button will help you quickly find the next updated card in the column, and then the next, and so on.
The color of this caret (button) depends upon what sort of updates are present in a column:
If the column contains any overdue cards, the button is red, to alert you to the overdue problem. (We figured this is the most important information we could show you, particularly if the overdue card is out of sight.)
If the column contains any new cards, the button is blue. Unless, of course, the column also contains overdue cards, in which case the overdue condition is considered more critical than the fact that you have new cards, and so we show the red button.
If the column simply contains updated cards, and nothing that is new or overdue, the button shows in orange.
Regardless of the color, the button works the same way: clicking on it will help you find the next card of interest within that column, and then the next, and so on. The column will automatically scroll as necessary to show you updates that would normally be out of sight.
And when you have caught up on all the updates, the button goes away automatically. Neat, huh?
We are often asked how the Kerika team itself uses Kerika, and we freely share this through demos we have done in person for potential customers and at various events. For those who we haven’t met in person, here’s a blog post instead..
1. Kerika runs on Kerika.
Pretty much everything we do, from the smallest, tangential effort to our main product development is done using the Kerika software.
(It shouldn’t surprise you to hear that, given that we are a distributed team ourselves — spread out between Seattle and India.)
2. No email, limited phone calls
In fact, we gave up using internal email back in Dec 2013. (Email sucks, and Kerika is the smarter alternative to spam.)
Because our team is spread out over 10,000 miles, we do occasional phone calls, using Skype or Google Hangouts, to discuss product strategy, but we don’t have daily phone calls as a matter of routine.
We have a phone call only when there is something substantial to discuss, never to catch up on routine status. In other words, all our phone conferences are about interesting topics, like “What do you think about this idea…?” or “I met a customer today who brought up this problem…”; never about “Where are you with Task X?”.
Kerika keeps us in perfect sync across these 10,000 miles on all matters of routine status and project management, so our phone calls are all strategic in nature.
3. Scrum for Product Development
We work with a 2-week Sprint Cycle for the most part, although we have occasionally deviated from this — never with great results, so sticking to the cycle is usually a good idea!
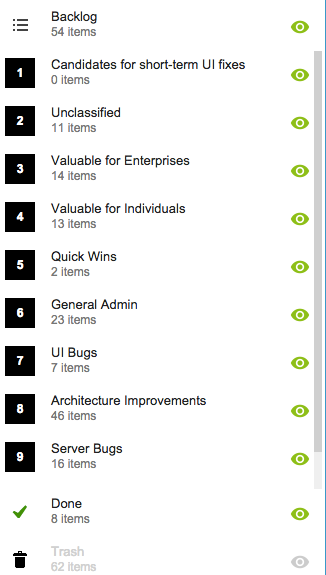
We capture all of our product ideas and feature requests in one large Scrum Board, which we call, simply, Product Planning.
This board organizes our ideas into various buckets, like Valuable for Enterprises and Valuable for Individuals:
Product Planning buckets
You might notice that the Backlog column is relatively small: only 54 items. That’s because not everything in the other buckets is ready to go into the Backlog, either because a feature isn’t well defined enough, or it isn’t considered important enough to deal with in the short-term.
(We have a lot of ideas that sit and gestate for months, even years!)
It’s also worth noting that the Trash contains 62 items: this means we reject as many ideas as we pursue!
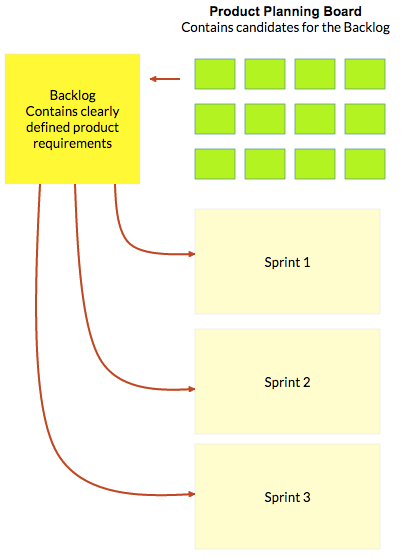
4. A Shared Backlog
As ideas for various features get prioritized — and, more importantly, defined clearly enough to be analyzed in detail by our developers — they get moved to the Backlog.
This backlog is shared by all the individual product development Scrum Boards:
Product Planning process
(And, by the way, the screenshot above is from a Kerika Whiteboard that we use to map out our product planning process.)
Each Sprint is organized as a separate Scrum Board, pulling items from the common Backlog.
As items get done (or not, as the case may be), the Backlog slowly shrinks over time.
But, as ideas for new features gets firmed up on the Product Planning board, this keeps feeding more stuff into the Backlog. So, the net result is that our Backlog has remained the same size for years: about 50-60 items.
We have been doing this for a while now, and are currently wrapping up Sprint 55, with each Sprint taking at least 2 weeks, and several taking 1 month to complete.
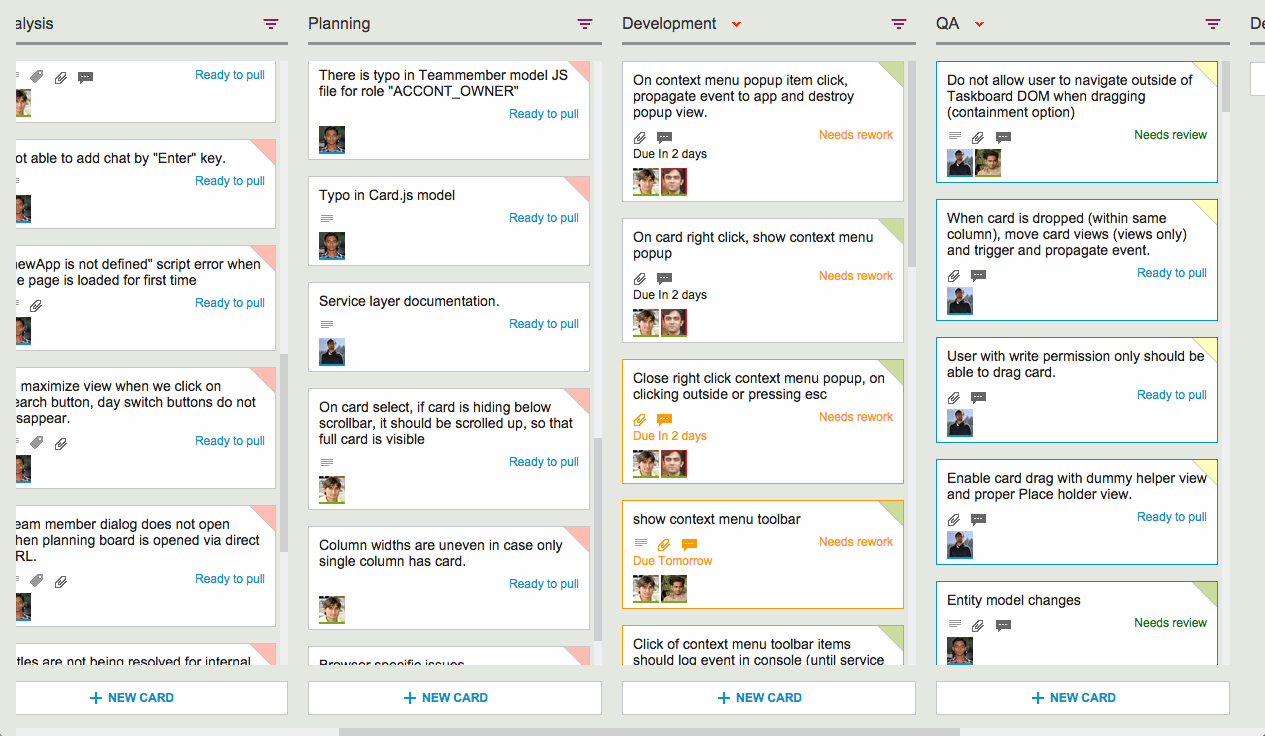
Here’s an example of one of our Scrum Boards:
Scrum Board
5. Kerika’s Smart Notifications
So, if we are a distributed team that doesn’t use email, and not that much phone either, how do we keep up with what’s happening? The answer is: Kerika’s smart notifications help each of us easily keep track of changes taking place across literally hundreds of cards each day.
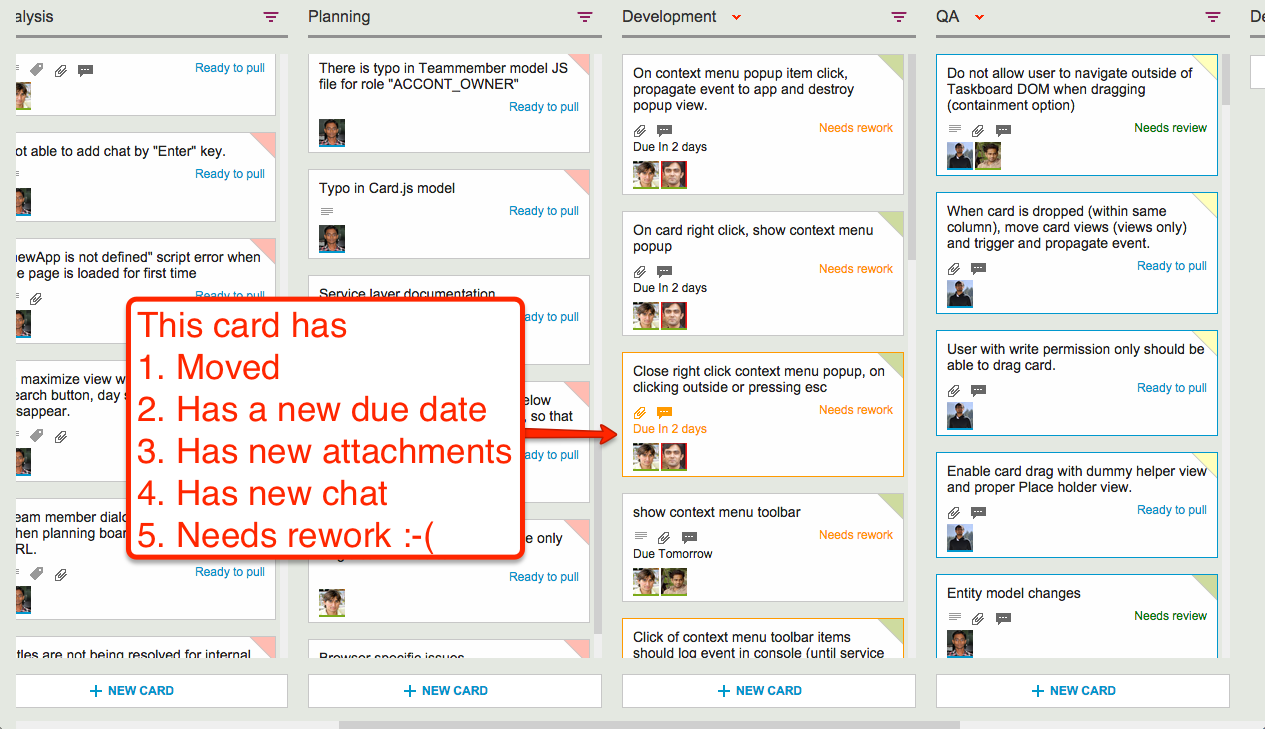
Here’s an example:
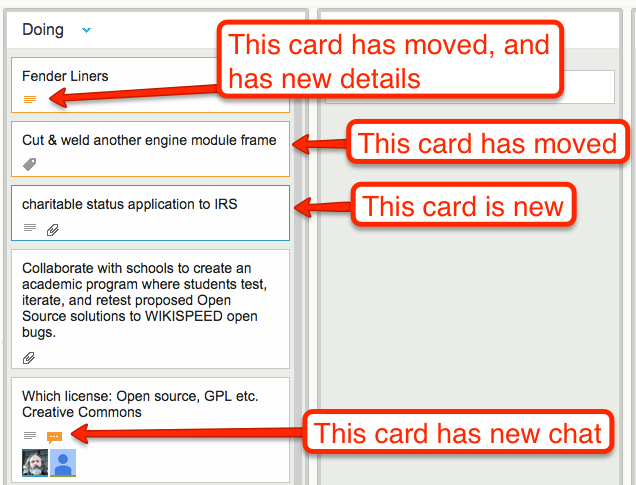
Smart notifications
At a glance we can tell that this card has
Moved
Has a new due date
Has new attachments
Has new (unread) chat messages
And, unfortunately, needs rework :-(
These smart notifications replace dumb email with a much more efficient mechanism for keeping everyone on the same page.
6. The Development Process
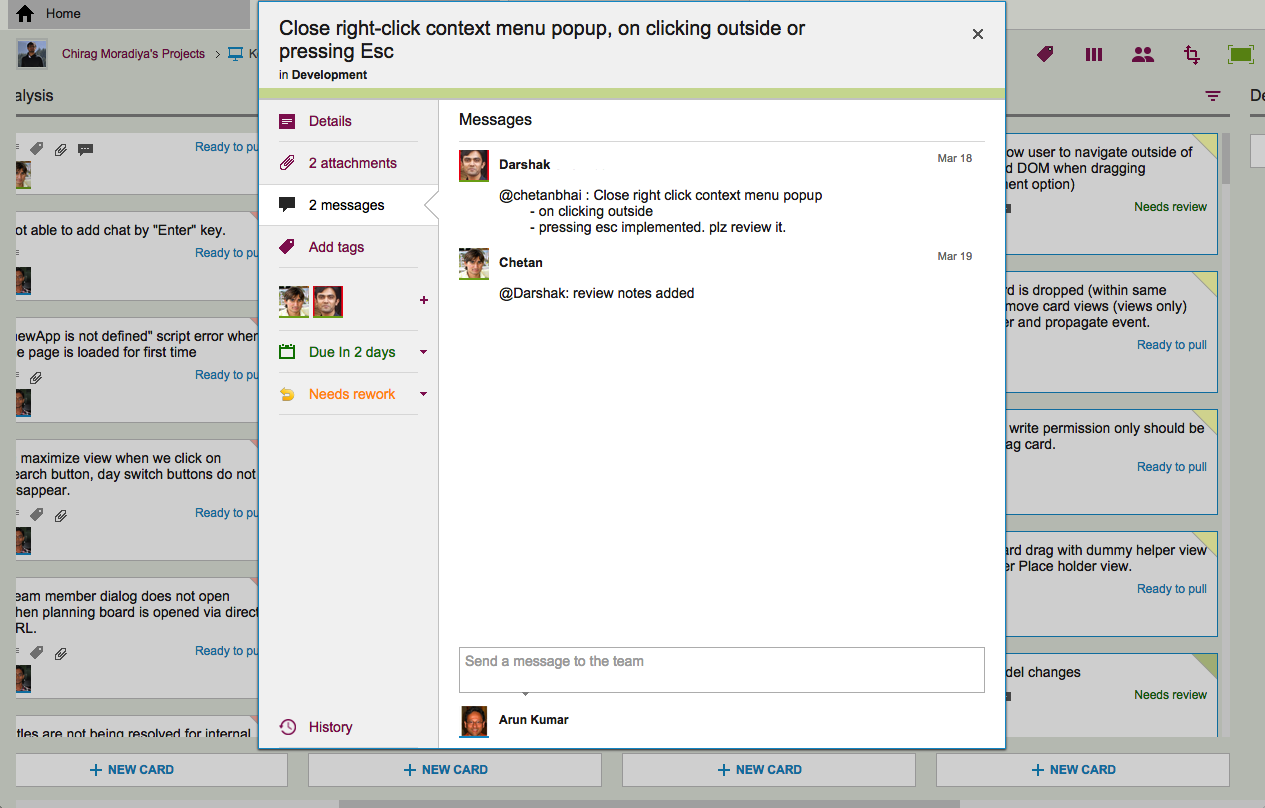
If we open up one of these cards, we can get a glimpse of the Kerika development process. Let’s start with the chat thread on this card:
Example of new chat
This chat shows a typical interaction between a junior developer and a technical lead: after writing the code for a particular feature, the developer has passed it on to the tech lead for code review.
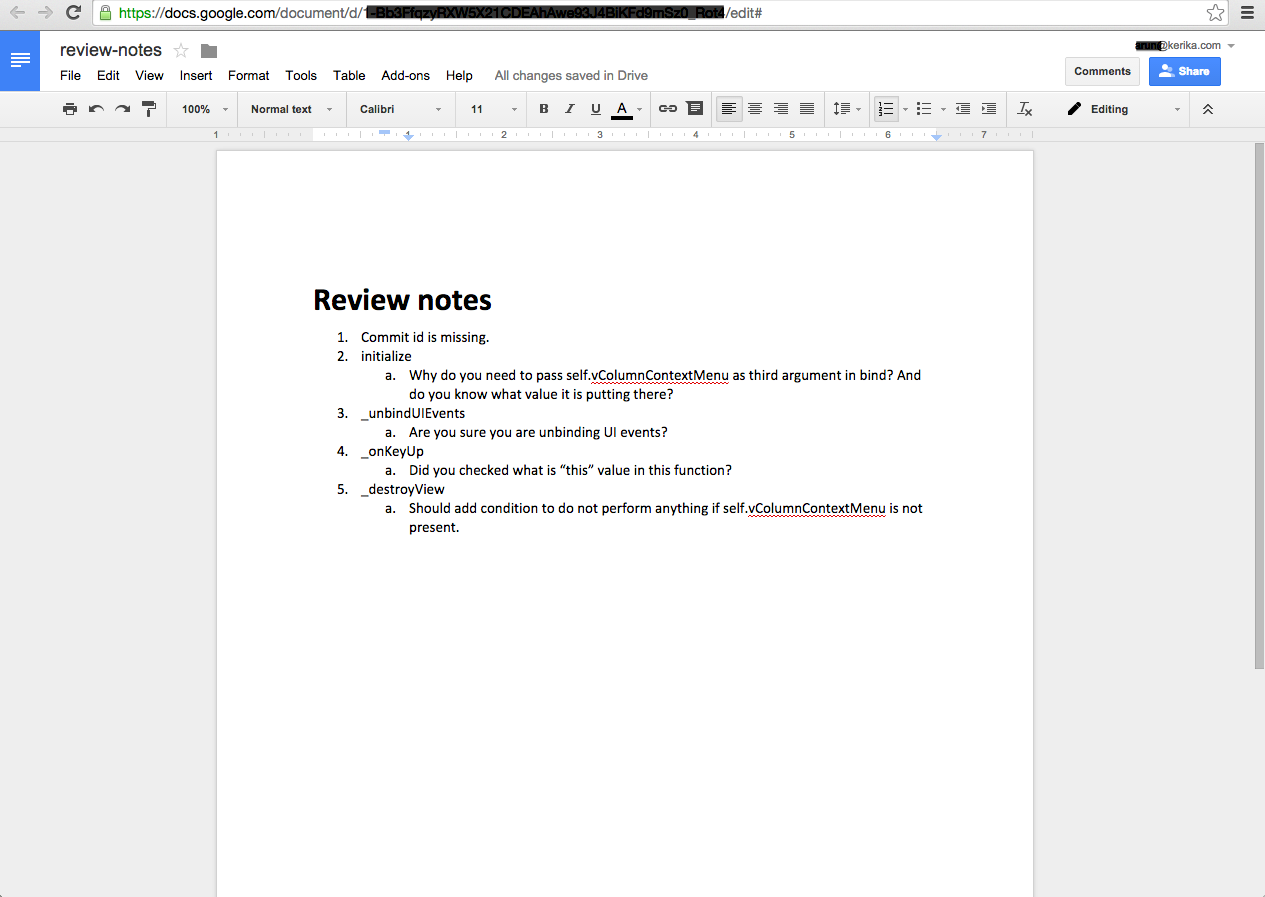
The code review itself is attached to the card, as an attachment:
Adding code review to a card
For each feature we develop, our engineers create a small work plan that outlines their design thinking.
This design/work plan is a critical artifact for good software development: it ensures that people can review the work more easily and effectively, and it also provides a reference for the future — if ever a bug is found in this particular feature, we can go back to the work plan to see where the design flaw may have originated.
The code review is typically very short, and attached (in this case) as a Google Doc:
Example of code review
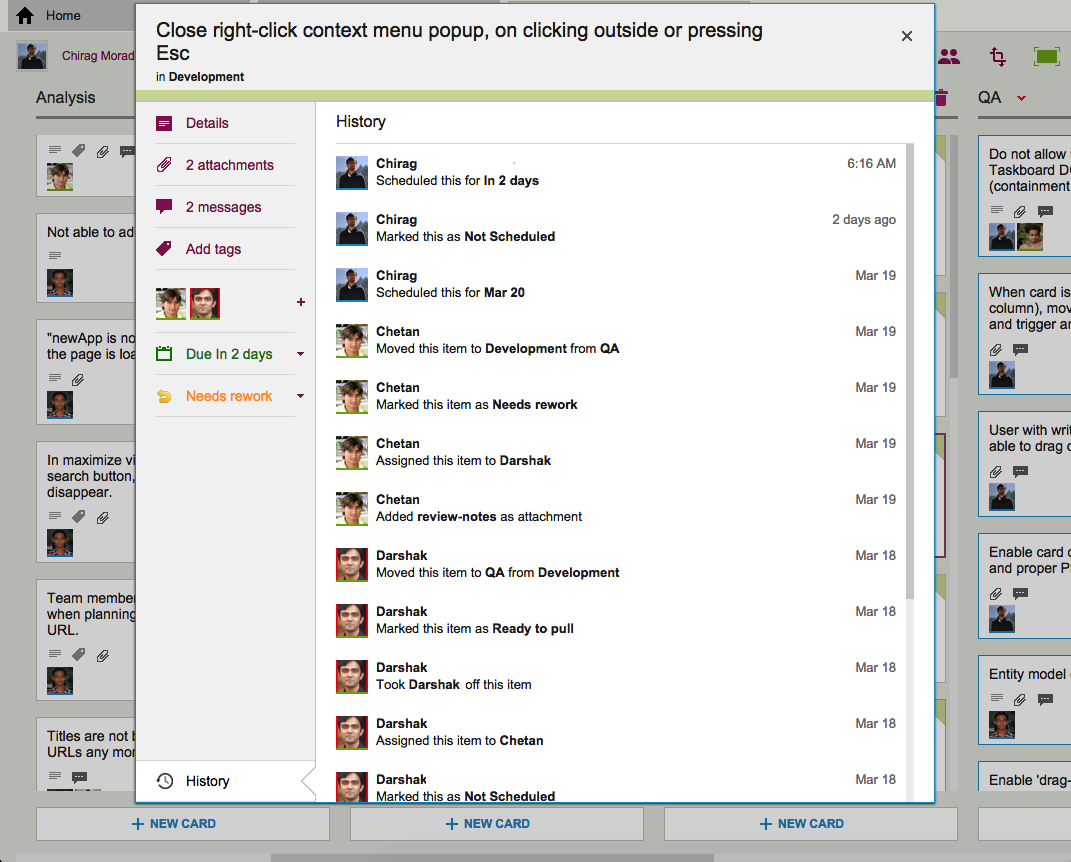
7. Card History
Each card in Kerika keeps track of its own history, which makes it easy for a distributed team to keep track of everything that happened. Frequently, a number of changes may have taken place on a single card during a workday, and someone who is 10,000 miles away is also about 13 hours away in terms of timezones, so the history feature is useful for understanding all the changes that took place when you weren’t looking.
History of the work
So, that’s a typical card, on a typical board. And, in a typical 2-week Sprint Cycle, our development team handles 175-200 cards!
We love Kerika, not just because we have built it, but because it makes our distributed team so very effective!
Well, the last time we saw Jason, we asked him how the wedding had gone, and he said it went beautifully!
Heather was new to the whole Kanban concept, but Kerika helped her understand all the moving parts that needed to come together just right for a great wedding, and she liked the experience so much that their house chores are now organized and managed online.
In other words, the “Honey Do” list has now gone online!
Here’s a new feature we are adding: when you copy and paste an entire project from one account to another, you can decide whether to take the team as well.
Consider these two scenarios:
Alice makes a copy of a project that she owns and pastes it right back into her own account. (Why? Well, maybe she wanted to make a backup copy, or maybe the actual project was going to split into two parallel efforts and so copying-and-pasting the entire project makes sense.)
Bob makes a copy of a project that Alice owns, and pastes it in his own account. (Of course, to do this Bob would need to have access to Alice’s project in the first place.)
In the first scenario, the duplicated project is showing up in the same account as it was before, so Kerika assumes that the team should be copied as well: in other words, “Project A” and “Copy of Project A” will both have the same team, at least to start with although each version of the board may then change its project teams independently of each other.
In the second scenario, however, it’s a little more murky: did Bob just want to copy the cards and canvases of Alice’s project, or is he trying to actually set up the same project in his own account? It’s hard for Kerika to make a really good guess in this scenario, so the system asks you:
If Bob responds “Yes” to this question, his copy of Alice’s project will also come with all the team members who were originally working on Alice’s project.
Of course, this might mean that Bob is now adding some folks to his account team: people he hadn’t worked with before. These people are added automatically to Bob’s account team if he wants to take the team along with the project.
One of the coolest features in Kerika is how well the system alerts you to changes made on your Task Boards and Scrum Boards that you haven’t seen — i.e. because you were working on another board at the time your coworkers made changes, or maybe because you were fast asleep in a different timezone!
Whenever a coworker makes any change to a card that you haven’t seen — moving the card to a different column, changing its description, changing its tags, leaving some chat, etc., the change is highlighted on the card using orange.
Smart highlights
And when you catch up on that change, e.g. open the card and read the new chat, the orange highlight gets turned off automatically.
(You can also mark a card’s changes as “read”, using the right-mouse-click menu.)
These smart highlights are great for distributed teams, and indeed for any person who is involved with multiple projects because it lets you catch up on what’s changed while you weren’t looking.
Now, these smart higlights are even smarter: if a card has multiple changes to it that you haven’t seen, e.g. it has a new attachment and it has new chat, Kerika keeps track of which changes you have caught up with, and which ones you haven’t.
In this example, if you read the chat, the orange highlight of the chat icon will go away, but the orange highlight of the attachments icon will remain until you catch up on the new attachments as well.
The Tags filter button, which appears on the top-right corner of your Task Boards and Scrum Boards, lets you filter your view of a crowded board by showing just those cards that match a particular tag that you are using (or a particular color coding):
Tags button
It used to be that when you were filtering your view of the board, you couldn’t add any new cards.
The reason made sense from a technical, geeky perspective, but it proved confusing and frustrating for our users, so we have added more flexibility by letting you add new cards even while you are using filtering.
The new cards will appear as you add them to the board, and stay there until you refresh your view of the board. At that point, whether the new cards continue to appear or not will depend upon whether they meet your tags filtering criteria or not.
That sounds complicated, we know, so let’s take a look at the original logic behind not letting users add cards while using tags filtering…
In the example screen shown above, the board has a bunch of tags defined, like admin, box, bug, canvas, and cleanup.
Suppose we were using filtering, to only show those cards that are tagged bug and box. With this filtering in effect, you are going to see only a small subset of all the cards that exist on the board — only those cards that have either bug or box as a tag. (Or both.)
So, what should happen if you add a new card to the board, which isn’t tagged bug or box?
From a strictly logical perspective, this new card shouldn’t be displayed, because it doesn’t match the filter criteria you are currently using — it should be displayed only if the new card had bug or box as one of its tags.
We originally dealt with this problem by saying that you couldn’t add new cards while using tags filtering, because the new cards would disappear immediately after you had added them, which we felt would make for a very confusing user experience.
(People would likely think they failed in their attempt to add a new card, and keep trying. Eventually they might turn off tags filtering, and then find they had added many copies of the same new card.)
So, that was one solution to the problem, but it still presented a user experience challenge because many folks would forget that they had turned on tags filtering, especially if they were bouncing around between multiple boards. (Yes, Barb, we are looking at you!)
If a user returned to a board and didn’t realize that they had tags filtering turned on, they would get confused as to why they were unable to add new cards.
We thought of a couple of different solutions to this problem, including the use of callouts (those balloon-like bubbles that appear to give you hints about how a page works) but we aren’t generally a fan of callouts — too many apps misuse them to excess these days.
So we have come up with what we think is a better solution: if you are using tags filtering, go ahead and add new cards. They will show up, but if you refresh your page, your tags filtering will be re-applied, and the new cards will be displayed only if they match the tags you want to show.
Here’s another new feature with our latest update: when a project is done, you can drag it to the Archive column on your Home page.
Archiving Projects
Archiving a project freezes it: no one can make any changes to it while it is in the Archive, so if you change your mind and want to make some changes to an archived project, you need to drag it back out of the Archive and into your Projects column.
All the documents attached to an Archived Project are frozen: the goal here is to preserve the final/completed state of a project and all its assets, so that later on if you need to investigate a problem — or deal with a FOIA request or some other legal disclosure requirement — you can do so with confidence.
All dates, status, chat and teams are also frozen: if someone was part of an Archived Project’s team at the time the project was moved to the Archive, they will continue to show up on that project team.
If a task had a due date and hadn’t yet been completed (i.e. the card hadn’t yet been moved to the Done column), that due date stays intact.
If the project was a Scrum Board, it will continue to stay attached to the Backlog it was using at the time the board got archived: when you view an archived Scrum Board, it will show that Backlog in it’s current state. This makes it easy to archive Scrum Boards that represent different Sprints that work off the same shared Backlog!
You can change your mind: If you need to work again on a previously archived project, just drag it out of the Archive column and drop it into the Projects column on your Home Page, and that will “un-archive” (restore) your project.
You can create templates from archived projects: if you drag an archived project and drop it into the Templates column on your Home Page, that will create a template based upon that project, while leaving the project in your Archive.