We have had both tags and color coding of cards on Task Boards and Scrum Boards for a very long time, but, unfortunately, these operated independently of each other.
There’s no good reason for them to have been separate aspects of working with cards other than simple history: we added color coding many months after we added tags.
Originally we expected color coding to be used in a limited way only: to highlight a few cards on a crowded board that needed special attention.
We had a limited set of 7 light pastels that were chosen to be “color-safe”, i.e. appropriate for use by color-blind people.
Over time, however, we found that people were using color coding a lot more than we had anticipated, and that in fact they were using colors as an alternative to regular tags.
And that was true for the Kerika team as well: we have a “bug” tag that we use to track all work related to defects, but some of us also like to use the red color to highlight cards related to bugs.
And while we could readily agree on the symbolic meaning of a few colors, e.g. Red as indicating something critical or broken, we couldn’t agree on the names or meanings of all the colors.
So, this obviously wasn’t a sustainable path for us: if colors and labels were simply alternative ways of managing your view of a large board, and for collating work across multiple boards, then clearly colors and tags needed to come together as a single concept.
And that’s what we have done with our latest release: colors and tags are now the same thing — all colors have names, all tags can have colors.
Here’s what your Kerika boards will look like, with the new way of showing tags:
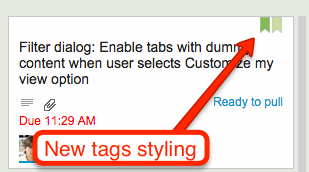
A couple of points to note:
- All your old tags are preserved with this change, so you don’t have to go back and fiddle with any of your old boards.
- We will show more than one tag on a card at a time; this will make it easier to visually scan a large board.
The dialog for managing your board’s tags has also been updated, to reflect the new merger of tags and colors:
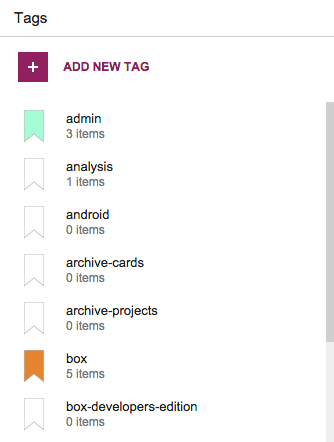
When you add a new tag, you have to use a different label from the ones you are currently using: as before, duplicate tags are not allowed.
And the same goes for colors: when you add a new tag, you can’t use a color that is already associated with a label, which means tags have unique colors.
One unique benefit we have added, along with this merger of tags and colors, is the ability to merge tags together.
Let’s say you had been using a tag called “bug” (if you are working on a software project). Some of your colleagues have been using a different tag called “defect”.
You decide that these two tags really reflect the same underlying concept — they are both being used to highlight problems with your software project — so it makes sense to merge these two tags together.
There used to be no easy way of doing this in the past, but now there is:
- You can merge tags by renaming one of them, e.g. renaming “bug” to “defect” will cause the system the ask if you want to merge “bug” and “defect” together to be same tag.
- You can also merge tags by recoloring on of them, e.g. by changing the color of the “bug” tag to be the same color as the “defect” tag will cause the system to ask if you want to merge these two tags.
We hope you like these changes :-)