We did a quick refresh to Kerika today, and we will be quiet for a while our development team — which is based in India — takes a well-earned Diwali break for about 2 weeks.
Kerika is welcoming and friendly for people who are already familiar with online project boards, but what about people who have never used anything like Kerika before?
To make Kerika more welcoming for new users, we have created a new Welcome Experience: a series of simple callouts that can orient new users to the Kerika user interface, within 30 seconds.
We understand only too well that these kinds of callouts have been misused by many apps and websites, and that — when badly implemented — they can be annoying and ineffective, so we have take a good deal of care to design the Kerika Welcome Experience:
It is short. Seriously. We timed it so that it will take well only about 30 seconds of a user’s time.
It is personalized and relevant: it figures out whether someone just signed up fresh at our website, or whether that person joined after accepting an invitation to someone’s else project.
If you are a new user, let us know whether it worked!
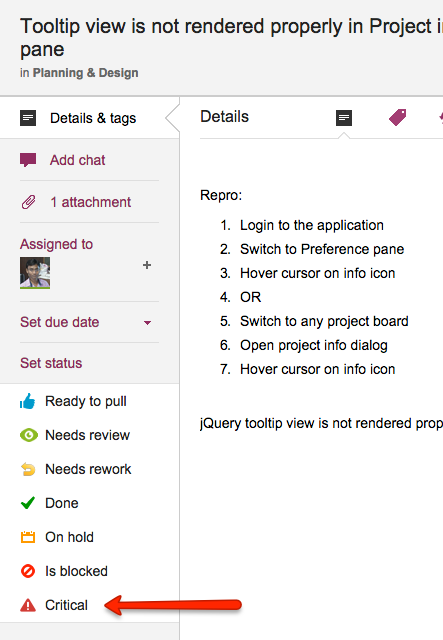
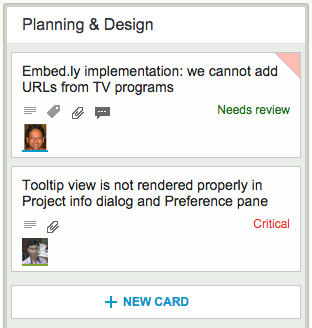
With our newest release, we have added a new status indicator that you can use to flag particularly important cards on a crowded board: “Critical”.
Critical status
The reason we added this was simple: no matter how cool and calm we try to be, every so often there’s a mini-crisis and we need to make sure that everyone takes note of some particular cards.
In the past we tried to accomplish this by use of color (e.g. Red), but this wasn’t a satisfactory solution since we want to use colors for other purposes as well.
We also tried marking critical cards as “Is blocked”, because this indicator appears in red text making it very eye-catching, but this too was not a satisfactory solution.
“Critical” works: you can highlight really important cards on a board by marking them with this status, and you can also search for Critical cards as part of Advanced Search.
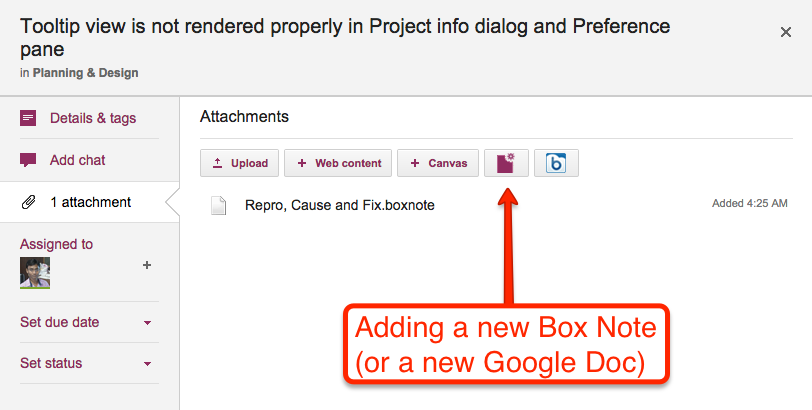
Here’s another new feature: you can create a new Box Note or Google Doc (depending upon whether you are using Kerika+Box or Kerika+Google) from within a card itself, and have that attached automatically to your card.
Adding a new Box Note
A single mouse-click is all that it takes to create a new Box Note or Google Doc, add it to your card (on any Task Board or Scrum Board), and open that Box Note / Google Doc and start using it.
When you are done editing your new Box Note / Google Doc, you can come back to Kerika and you will find it is already attached to the card where you were working!
All in one mouse-click!
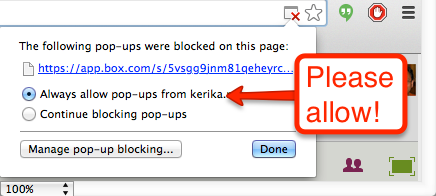
One small adjustment you might need to do: many browser will automatically block pop-up windows. When you create a new Box Note or Google Doc, Kerika tries to open it immediately in a new browser tab, so that you can start using it.
If your browser gives a warning about a pop-up window, please allow pop-ups from Kerika — this is the only use of pop-ups by Kerika, and it makes a great feature even better!
Secure Internet connections used to be implemented with SSL 3.0, which is actually a pretty old protocol now. (About 18 years old, in fact, which means it dates back to the Netscape era :-)
Over the years, SSL 3.0 was implemented by everyone who produced Web servers: e.g. Microsoft, Netscape, Apache, etc.
SSL 3.0 has since been supplanted with Transport Layer Security (TLS), which also comes in several flavors — TLS v1, v1.1 and v.1.2
And SSL was around for such a long time, everyone knew it worked. With TLS, however, bugs are sometimes found in different Web servers, depending upon who is producing (and maintaining) a particular brand of Web server.
In order to get around potential problems with the way a particular Web server had implemented TLS, browser clients (i.e. software that runs in a browser, like Kerika does) will also, very often, try to connect to the Web server using with SSL 3.0 as a fallback protocol.
Well, the good folks at Google found that SSL has a very fundamental vulnerability in it, that’s inherent in the protocol and cannot be patched: in an example attack called Padding Oracle On Downgraded Legacy Encryption (POODLE), an attacker can steal “secure” HTTP cookies or other bearer tokens such as HTTP Authorization header contents.
Angry Poodle
This problem is basically unfixable with SSL 3.0 because it uses RC4 ciphers for encryption, and RC4 is pretty darn old: it dates back to 1987!
(And, yet, according to Microsoft, even last year over 40% of Web connections were using RC4.)
The only way to secure against this vulnerability is to not allow SSL 3.0 as a fallback method for connecting to your Web server.
And that’s what Kerika does: we only support TLS connections.
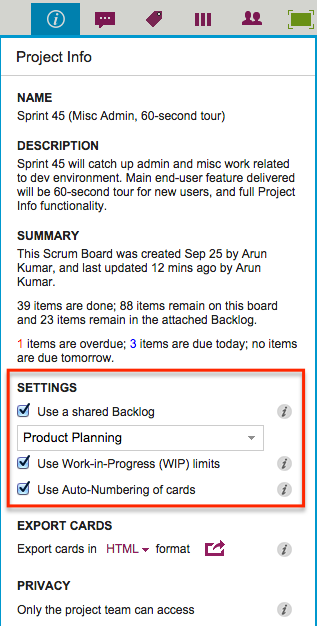
We have a new feature in Kerika: a simple way to add numbers to your cards, for both Task Boards and Scrum Boards.
Project Leaders (and, of course, the Account Owner) can access this feature by clicking on the Project Info button, which appears on the top-right area of a Kerika board:
Settings
Auto-Numbering can be turned ON or OFF at any time.
It is a simple feature, intended primarily to help manage large numbers of cards on a single board, e.g. a Help Desk team using Kerika as a ticket management system.
In ticket management or asset tracking scenarios, the titles of many cards may be similar, e.g. “User has trouble logging in”.
A more useful way of distinguishing between cards might be through the card’s numbers, e.g. “104 User has trouble logging in” and “242 User has trouble logging in.”
When Auto-Numbering is turned ON, Kerika will automatically insert a number as a prefix to new cards that are added to that board.
Numbers are sequential: for example, the first card would have “1” added as a prefix, the second card would have “2” added as a prefix, etc.
Auto-Numbering can be stopped at any time, and then new cards added to the board won’t have numbers added to the card titles.
Auto-Numbering can be resumed after a pause, the numbering will intelligently figure out how many cards are on the board by excluding the Backlog and the Trash, as well as looking at the last number used.
The numbers are simple text, added as a prefix: they can be edited by any Team Member, and even removed.
Most users work on private projects: i.e. projects that are accessible only to people added to the project team.
But some folks find it useful to have their projects viewable by everyone, typically because they are working on nonprofit causes, like WIKISPEED.
WIKISPEED publicizes its projects because it helps attract new volunteers to their cause, and this is actually a pretty smart way for nonprofits to showcase their work.
Kerika has always had an option for people to have all their projects made viewable by the public, but even nonprofits, for example, may have some Kerika boards that they don’t want to share with the rest of the world.
Well, with our newest release, it is possible for the Project Leader (or Account Owner) to make individual projects open to the public to view.
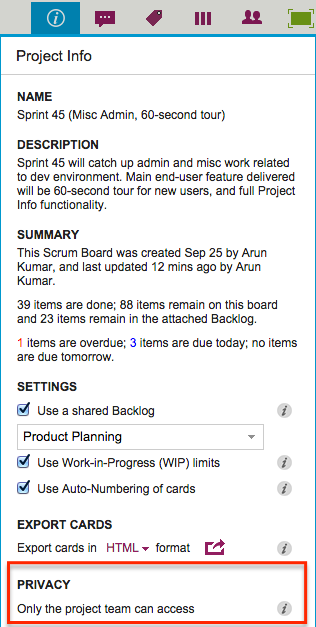
A project can be easily switched from Private to Public, and back again, using the Project Info button that’s available on the top-right of every Kerika board:
Privacy
The privacy choices are as follows:
Only the project team can access: this is the default setting, and it means that unless people are added to the project team, they won’t be able to view it — or even find it using the Search function.
Anyone, anywhere can view: this means the project is “public” — it can be found through search, and anyone who knows the URL of the project can view it. (But, they still won’t be able to make changes.)
When a project is made Public, all the documents contained within it — on all the cards and canvases that make up that board — are also made viewable to the public.
This means, for example, that if your Kerika+GoogleWhiteboard or Task Board is made available to the public, all the documents in that board’s Google Docs folder are also made viewable by the public.
(And Google indexes all public Google Docs, the project could be found in more than one way, depending upon who is searching for it.)
One caveat: users of premium Google Apps, e.g. Google Apps for Business, cannot make their projects open to the public, because of limitations imposed by Google.
When we first started working on Kerika, it seemed to us that everyone who wanted to use an online project board fell into one of two camps that didn’t overlap:
Kanban users, who wanted a simple Task Board, perhaps with nothing more than To Do, Doing, and Done columns.
Scrum users, who wanted to share Backlogs across multiple Scrum Boards, with each Scrum Board representing a different Scrum iteration (i.e. “Sprint”).
Folks who wanted to work in Kanban-style – typically business users – seemed to have little use for Scrum, and people who wanted to work in Agile-style – typically IT folks – didn’t show much interest in Kanban.
So, we built Kerika with support for Task Boards, for Lean/Kanban users, and Scrum Boards, for Agile users.
What we are seeing more recently, however, is spectrum of usage patterns and styles within organizations:
A project that starts off as a Kanban Board might need to become a Scrum Board in the future: as the team works on the project, it may conclude that a series of Sprints/iterations is a better model than a continuous flow/Kanban model, and they may need to transform their Kanban Board to a series of Scrum Boards.
A team might start off working with Scrum Boards, thinking that Agile is the ideal model for their work, and then find that a Kanban model of continuous flow is better suited for their needs, in which case they may need to change from a Task Board to a Scrum Board.
A Scrum team may need to pull items from multiple Backlogs: there may be items from a Marketing Backlog and from a Product Development Backlog that need to get worked on in the same Sprint, so the team may need to switch from one Backlog to another.
This kind of flexibility wasn’t available in Kerika before — and is certainly not available in Trello, Asana, Basecamp or any other tools that compete with Kerika — and that’s exactly the problem that we have fixed with the new release!
Use the Project Info button, on the top-right of the Kerika menu bar, to switch a board from Kanban to Scrum, or vice versa:
Settings
If you check the “Use a shared Backlog” box, you can then select the Backlog you want to use for your board: if you had been working in a Kanban board, it automatically switches over to a Scrum Board.
At any time you can switch between any of the Backlogs that exist in the Account, that you have permission to access.
If you want to go back to working in Kanban-style, just uncheck the “Use a shared Backlog” box and the Backlog will disappear from view.
It’s now that simple to choose between Kanban and Scrum!