With the implementation of our shiny, new and fully automated billing system, it’s become a little more important for our customers to make sure that all the users within their organization are working in the right accounts — preferably, a single account.
Working in a single account, rather than a bunch of separate accounts, has advantages:
It makes it much easier to pay for subscriptions: if all the Kerika users within a department are working on boards owned by a single account, then only that account needs to purchase subscriptions. This means less invoicing and payment stuff for you to worry about.
It also ensures that all project assets — boards, documents, canvases, etc. — are owned by a single entity. And ideally this single entity would be a service account rather than an individual. Many of our customers are using service accounts, set up using emails like kerika@example.com.
We have done a ton of improvements to the new user sign-up process to help guide people to working with their coworkers, using accounts that the coworkers have already set up, instead of creating new accounts.
But, there are still situations where an organization may find that, across all of its Kerika users, there are too many different accounts. If this is the case for you, we can help: we can consolidate multiple accounts into a single account if you ask us.
This consolidation preserves all the existing boards, content, and project teams: it just changes the ownership of everything to be a single user ID.
We used to have a feature that let you get a task summary email from Kerika everyday at 6AM that summarized all the things that you were responsible for that are overdue, due this week or due next week.
When we introduced the Views feature, we thought perhaps this 6AM email was not needed any more, so we took it out of the user interface for a few months — although people who had previously been using this feature continued to get their daily emails.
It seems like we underestimated the usefulness of this feature: new users started asking for something just like it, so we have brought the feature back. (And thanks for helping us understand we had screwed up in taking it away.)
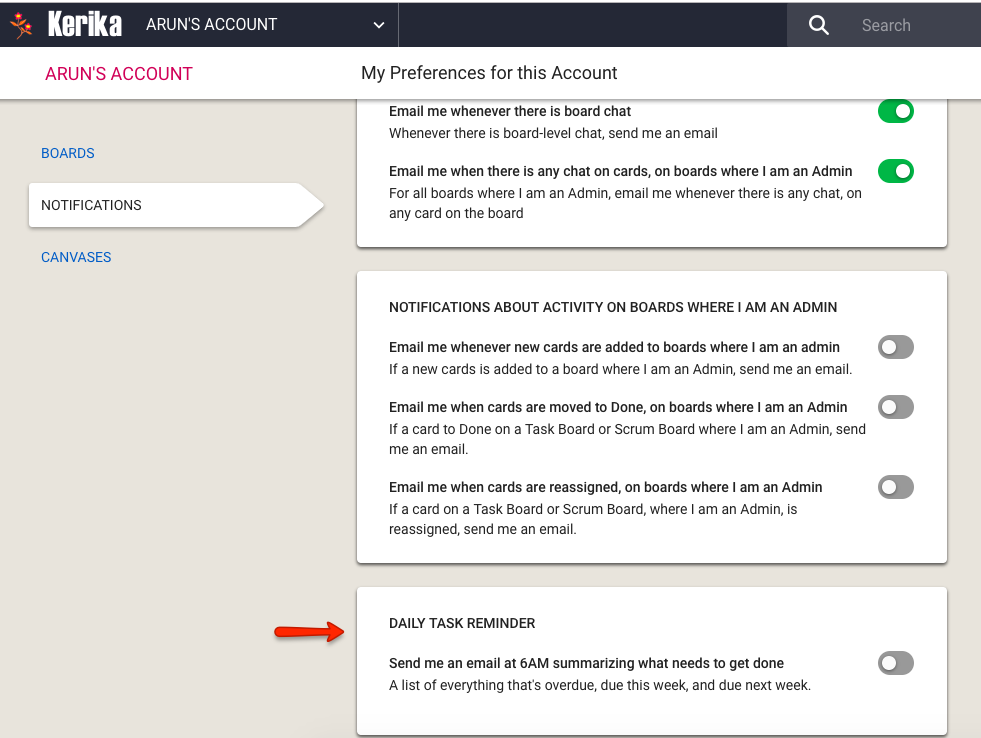
You can access this feature from your Preferences page:
Daily Task Reminder Preference
“Responsible for” includes not just the items that were assigned to you, but also items on boards where you are a Board Admin (and, presumably, have some responsibility for.)
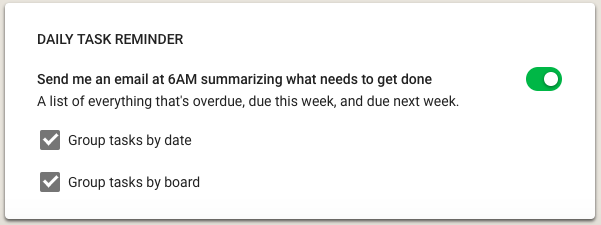
This email can show your tasks organized in two different ways, and, if you like, you can get both sent to you every day:
6AM Task Summary Options
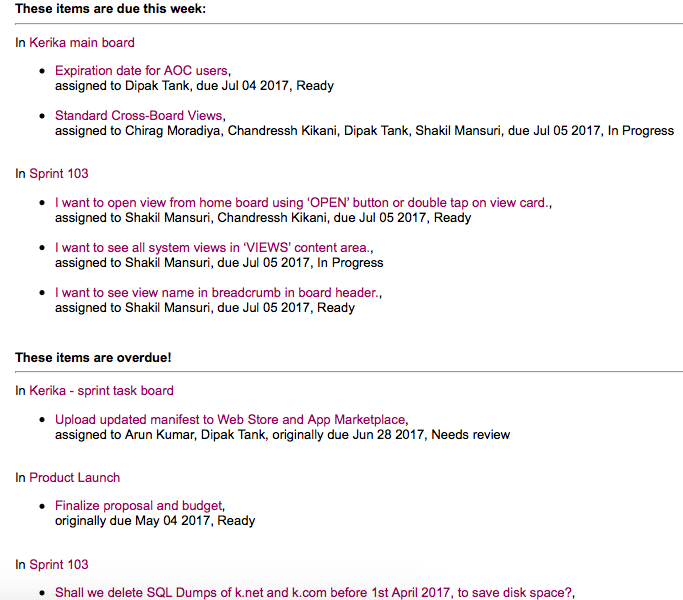
A typical task summary, where tasks are grouped by date, would look like this:
Example of 6AM Task Summary
The board names and card names are also links that you can use to open the relevant work item.
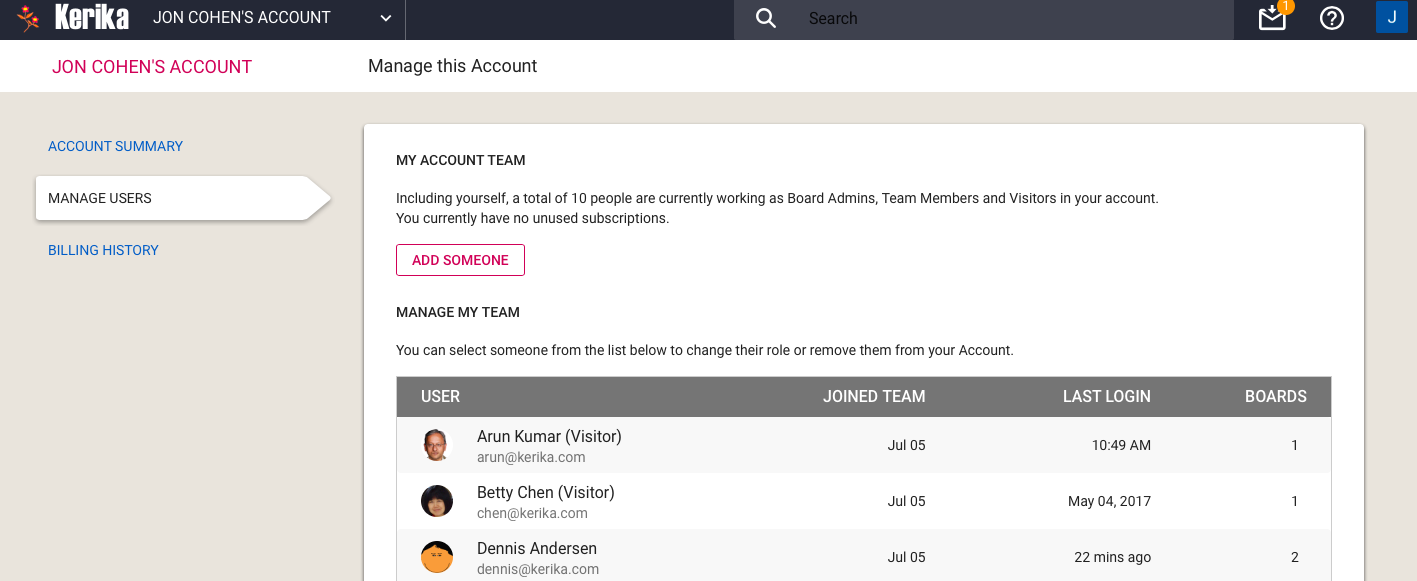
The rollout of our new billing system seems to have been smooth — so far, fingers crossed! — and with this you now get better controls over who is part of your Account Team:
Manage Users
Please note that you don’t get charged for Visitors: if someone is only a Visitor on your boards — i.e. is not a Team Member or Board Admin on any board you own — you don’t need to pay for this person.
It doesn’t matter how many boards this person “visits”.
Visitors do show up on your Manage My Team list in the Manage Users tab, so you are reminded that they have access to some, possibly all, of your boards, and you can remove a Visitor entirely from your Account in the same way that you might remove a Team Member or Board Admin.
As part of our next release, which will include a new billing system, we will make it easier for you to move boards that you own to another account.
This can help in several scenarios:
If someone is leaving a team, it’s good practice to have their boards transferred to someone who will remain, so that ownership of project assets — the boards and all the content in the boards, including documents — remains with the team.
More importantly, it is good practice to stay away from having individuals own boards, and instead use service accounts to be the single Account Owner in your organization.
A service account is an omnibus account, typically set up with an email address like kerika@example.org, that isn’t associated with a single individual. A service account will never quit, never get fired, or take a vacation because a service account is not a real person — it is simply an account/ID used to be the permanent, omnipresent, owner of project assets so that team turnover doesn’t disrupt anyone.
If you own a board, you can move it to another account, i.e. effective change its ownership, by selecting the board on your Account’s Home, and clicking on the Board Actions button which appears on the top-right corner of the board card:
Board Actions Menu
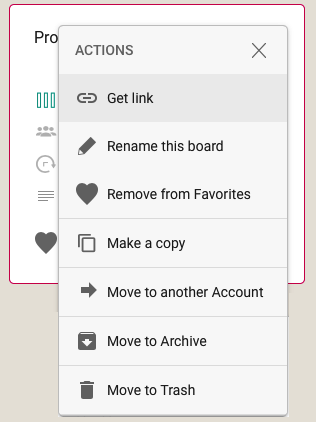
This will bring up a small menu of actions that are available to us as the board’s current owner:
Board Actions
(Note: this menu can also be accessed using the right mouse button.)
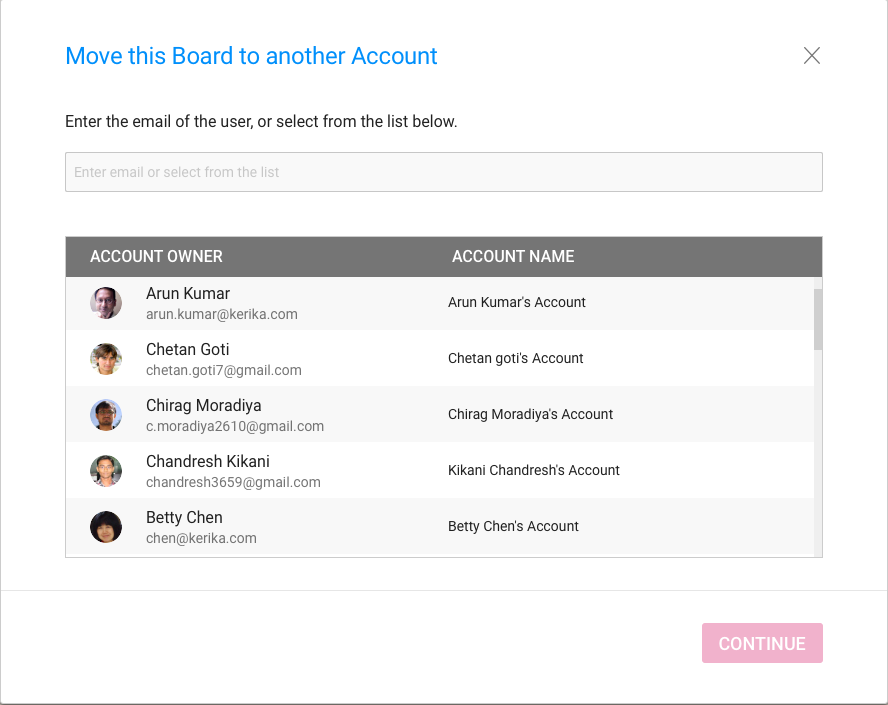
When you select the Move to another Account action from this menu, we will present you with this new dialog box:
Move Board dialog
A list of “known collaborators” is presented to you by Kerika to make it easy to select a coworker with a single mouse click, but you can also move the board to someone else, who isn’t part of your current Kerika collaboration network.
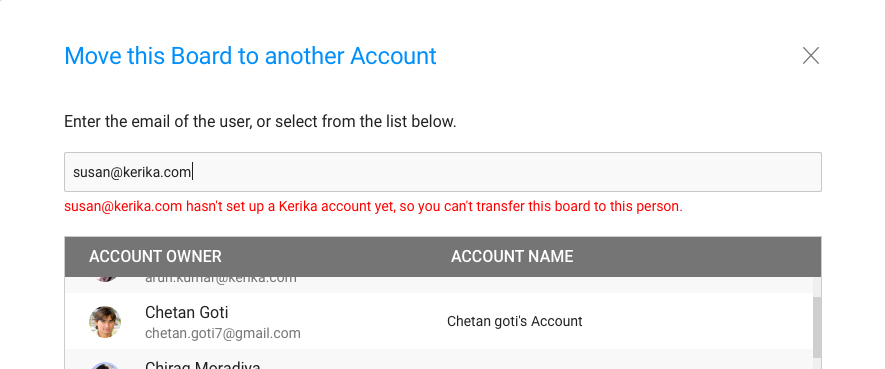
If you type in an email address, Kerika will immediately check to see whether this email address is that of a known Kerika user, before letting you proceed further:
Checking if new owner is a Kerika user
We think these improvements will make it easier for our users to manage their organizations boards, and move towards consolidated ownership for easier asset management.
Kerika offers a great deal of control over how each board is shared:
A board can be made public to everyone. This makes sense for open-source projects and many nonprofit and advocacy groups, where the goal is to get maximum visibility and publicity rather than to hide the details of what the project is about.
Making a board public means that anyone who has the URL of the board can view it, even people who are not Kerika users. Note: we are talking about viewing the board; viewing doesn’t mean anyone who isn’t part of the board team can make changes.
If a board is viewable by the public, it can be found by anyone using Kerika’s search function.
A board can be viewable by everyone who is part of the account team. This is the default setting, and it makes a lot of sense for most organizations: you want your coworkers to be aware of what your team is doing, unless the project is particularly sensitive.
As people get added to individual boards, they are also automatically added to the account team. When someone is removed from every board owned by an account, they are automatically removed from the account team as well.
As with public boards, described above, we are talking only about viewing, not changing: only people who are Board Admins or Team Members on a particular board’s team can make any changes to that board. (And, of course, the Account Owner who owns the board.)
If you use Kerika’s search function, you can find boards that are being shared with the account team, provided you are part of that particular account team.
A board can be kept private. This means that only the people who are listed on the board’s team — as a Board Admin, Team Member or Visitor — can view the board. (And, of course, the Account Owner who owns the board.)
This is appropriate for any sensitive projects, e.g. stuff related to personnel matters or confidential contracts.
Private boards can’t be found by Kerika’s search function either, and it doesn’t matter if you know the URL for the board: only the specific people listed on the board team can see anything related to that board.
For each board owned by an account, the Account Owner or Board Admins can manage the board’s team: decide who is part of the team, and what sort of role (Board Admin, Team Member, or Visitor) each person has.
Board Admins and Team Members can make changes to all the items on the board, including any documents attached to the board.
Visitors have read-only access to the board and all its documents.
A person’s role can be changed at any time by the Board Admin or Account Owner: the effect is immediate, and extends to all the documents associated with the board as well regardless of whether you are using Google or Box for your file storage, or whether you are storing your files with Kerika.
A board’s team and current privacy settings can be viewed by clicking on the Team button that appears on the top-right of the Kerika app, when viewing a board:
Board Team button
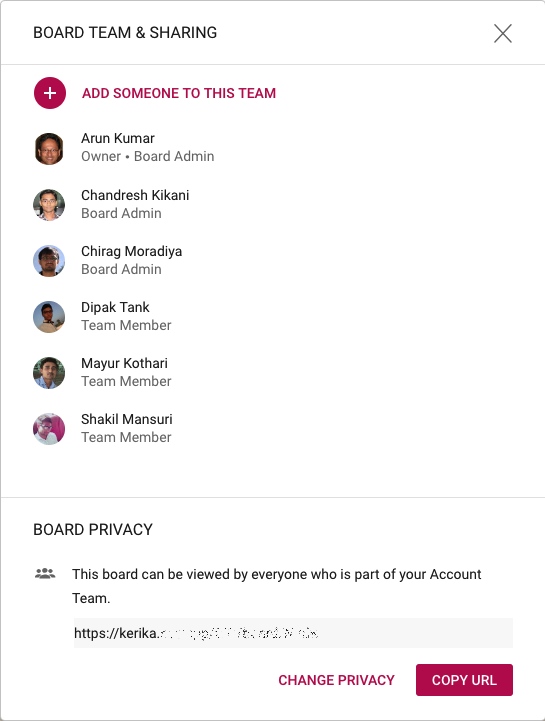
Clicking on this button brings up the Board Team dialog:
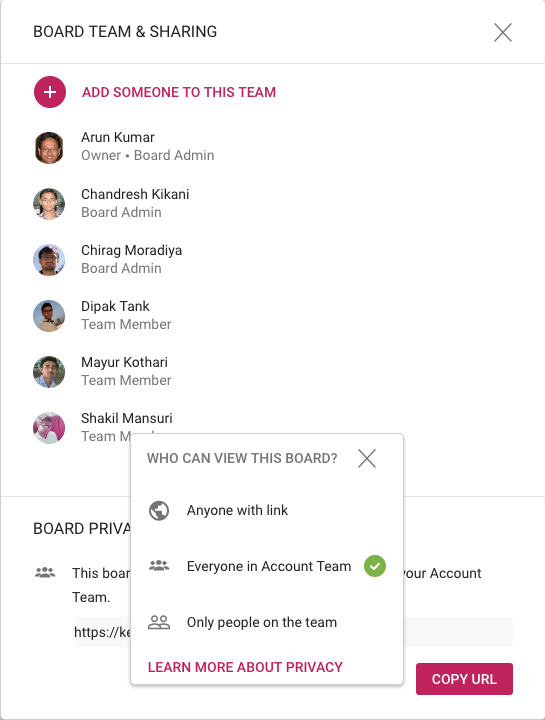
Board Team dialog
Each person who is part of the Board Team is listed in this dialog, in alphabetical order along with their role.
At the bottom of the dialog is the board’s current privacy setting: in the example shown above, the board is being shared with everyone who is part of this user’s account team. (We have obscured the URL in the screenshot for security reasons.)
If you are a Board Admin or the Account Owner, you can change the privacy of the board using the Change Privacy link that’s shown on the bottom of the dialog:
Board Privacy options
So, every board can have it’s own privacy settings: private, shared with account team, or public.
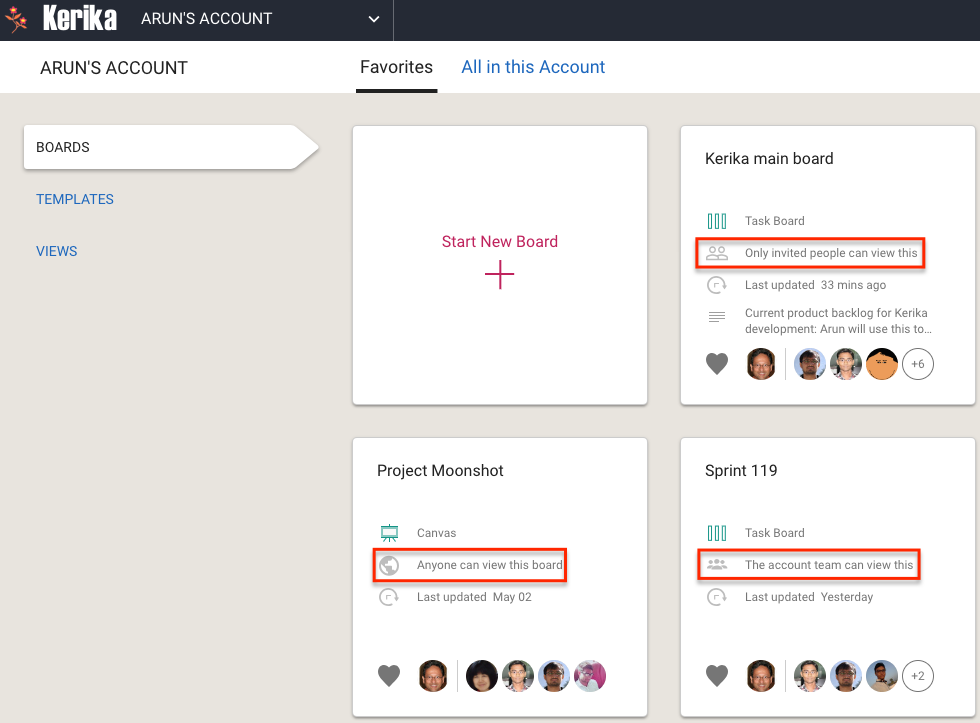
When you are viewing the boards in an account, Kerika shows clearly what the privacy setting is for each board:
Privacy settings, at a glance
If you are part of someone’s account, you will be able to create new boards in that account: you will automatically be a Board Admin on those new boards, but the owner will always be the account you are working in.
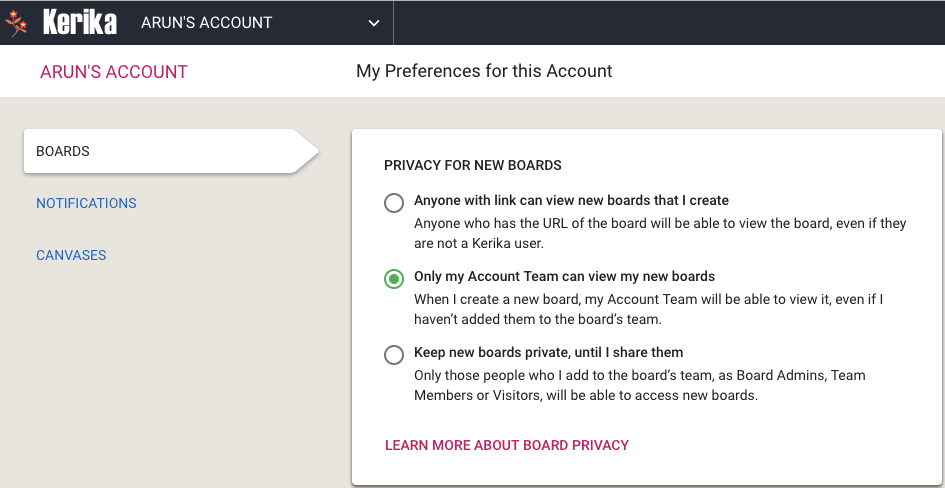
You can set your privacy preferences for each account; this will determine whether new boards you create are automatically shared with your coworkers or not:
Privacy preferences
All your preferences can be set at https://kerika.com/preferences. The default setting is Share with Account Team, which works well for most people, most of the time.
For some segments of our users, e.g. college students using Kerika for their course projects, it makes sense to treat each user as an independent entity, since the relationships between these students will vary from class to class, from semester to semester.
These collaboration networks are very dynamic, and it’s impossible to predict whether a team that got together to work on a three-month class project will stick together after that project is over, or work as the same group of people on the next class project.
In business environments (companies, nonprofits and government agencies), however, the teams are more stable: people don’t change jobs every few months. But, turnover can still be a problem: if Joe leaves your company, how can you be sure that all the boards and documents that Joe had created are not lost along when Joe is gone?
The simple solution to this is to use service accounts to own all the boards that are being used by a community of users, like a department or even the entire company (if the company is small enough).
A service account looks like any other Kerika account — it is associated with it’s own email, e.g. kerika@example.com — but it isn’t actually a real person: the email will have been set up by the organization’s IT staff or management, and the password is typically shared between a small handful of supervisory people.
Unlike real people, service accounts will always stick around: they won’t retire, resign, or get run over by a bus…
This means the organization has continuity and security with respect to it’s Kerika boards and documents: because the project assets are owned by kerika@example.com, rather than joe@example.com, it doesn’t matter whether Joe is still working at the company or not.
We encourage all our professional users — people working in companies, nonprofits and governments — to set up service accounts as a best practice, and we can help you: just email us at support@kerika.com and we will do all the account consolidation for you:
All the boards owned by the people in your organization will be transferred to the ownership of the service account instead.
Everything about each board is preserved as part of the transfer: all the cards, canvases, due dates, etc. remain the same after the transfer; it’s just that the boards are no longer owned by joe@example.com and susan@example.com, but instead are now owned by kerika@example.com
You can decide who to consolidate within the service account: typically it is everyone in the organization, but if you have different departments or cost centers, it will make sense to have more than one service account — one for each department or cost center.
After the consolidation, individual users within your organization will no longer have separate accounts: their Kerika identity, preferences, history, etc. are all preserved, but instead of working in several different accounts, they will all be working in a single service account, that’s under the control of your organization.
All this can be done by us, overnight: the next day your users can come into work and login as they did before, and have access to all the boards they had the previous day. All the boards will look the same, and your users can pick exactly where they left off.
When users have been consolidated within a service account, any new boards that they create will automatically be owned by that service account, rather than by the individual users. This ensures that all current and all future project assets are owned by the service account, i.e. by the company, rather than by individual users.
It’s still possible for individual users to have privacy within the service account: for sensitive work (e.g. personnel matters) they can adjust the privacy of individual boards to be “share with board team only”. When the privacy is set to board team only, the board will be visible only to the people who are specifically added by the Board Admins to the board’s team.
The Account Owner, i.e. the service account, will always have access to every board within that account, regardless of the board’s privacy settings. This is consistent with how other organizational assets are currently managed: if you have a work email, for example, you expect to have privacy from your coworkers, but you know that the company’s IT department will always have access to your email if they need it — and your email doesn’t really belong to you, but to your employer.
We have long had a deep, excellent integration with Google Apps: you can sign up with your Google ID and have all your Kerika-related files stored in your own Google Drive, where you can access them independently of the Kerika app.
We are now taking that one step forward, with seamless integration with Google Team Drive.
Google Team Drives are shared spaces where teams can easily store, search, and access their files anywhere, from any device.
Unlike files in My Drive, files in Team Drive belong to the team instead of an individual. Even if members leave, the files stay exactly where they are so your team can continue to share information and get work done.
You don’t need to do anything different: the integration is built-in with the latest version of Kerika (and, since we are software-as-a-service, everyone always uses the latest version of our product!) and the integration is seamless.
It will come as no surprise to our users that the Kerika team uses the software for every aspect of the company’s internal operations, including, of course, our product development.
(There really isn’t anything better on the market for planning and executing product roadmaps — we know, because we have checked and made sure we are better than everybody :-))
We are sometimes asked about our own internal workflow: how we plan releases and manage our Sprints, and in particular how we have gone without using regular old email for over 4 years now!
Well, here’s a glimpse at our internal workflow:
Kerika internal workflow
We work in two-week long Sprints; we have found two weeks to be the ideal Sprint length since it provides enough time to produce something — at least some usable part of a new feature — while not being so long that we forget we are supposed to be working as a Scrum team.
Planning
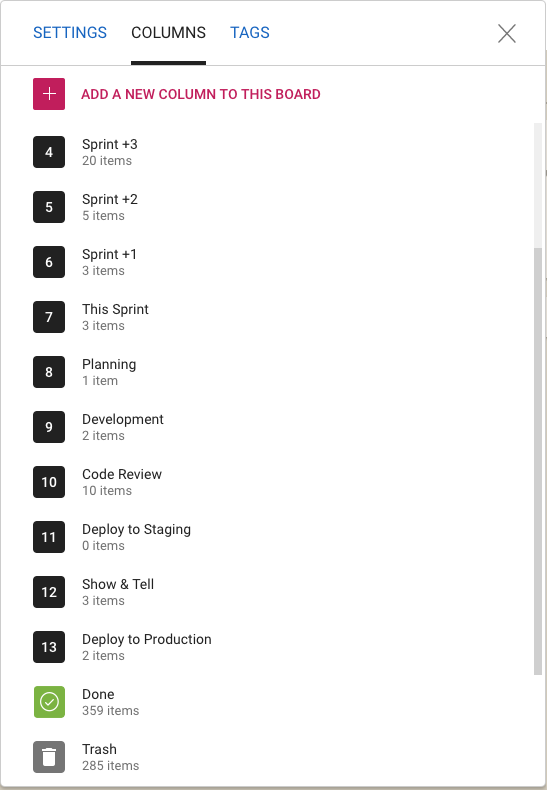
Whenever we plan a new Sprint, we are always also looking forward as well: hence the columns titled “Sprint +1” (i.e. the Sprint that will come after the current Sprint), “Sprint +2” (the Sprint that will come after the next Sprint), etc.
This gives a view into the next several weeks of our product roadmap which makes sure we don’t approach any single work item with tunnel vision.
Now you might notice that “Sprint +3” in the list above is way larger than “Sprint +1” or “Sprint +2”: that doesn’t mean that we expect a sudden spurt in productivity (i.e. increase in team velocity) in 4 weeks time. It just means that as we go further out in our planning there is more uncertainty about priorities and so the Sprints that are well into the future are not well defined — and that’s perfectly OK.
Quality Assurance
Within each Sprint we have a fairly conventional flow: Planning, Development and QA. The QA step actually consists of three separate stages:
Code Review: we try to make sure we review all the code we are writing in any Sprint, unless it is a really trivial change we are making (e.g. changing the label on a button).
Deploy to Staging: we have a separate set of servers where we test our new releases. This also happens to be where we have all our real projects running: we believe very much in the idea that “developers should eat their own dogfood”, so we run out entire business on the latest build that went past Code Review.
This can be a little scary or frustrating at times: if there was a bad release to our staging environment, it can bring every project and board to a screeching halt. But, from our perspective, that’s the whole point: make it everyone’s business to ensure that we produce high-quality code, and make it everyone’s priority to fix any problems that come up.
This model of living on the bleeding edge of our product gives us a really good incentive to write good quality code!
The final QA step is Show & Tell, where the team formally presents the new features or bug fixes to the Product Owner. With each new feature we will have identified a set of test cases, as part of the Planning phase, and these are used to formally check the new feature in a meeting attended by everyone on the team.
Very occasionally something will get rejected at the Show & Tell stage, in which case the card gets moved back to Planning or Development and flagged as “Needs Rework”. It’s more common for work to get rejected at the Code Review phase, not because it is buggy, but because it might not meet our internal coding standards.
Deployment
Once a feature or bug fix has passed Show & Tell, it is ready for Deployment to Production.
We have a continuous integration process for handling code changes — pulling them from our internal git code repository — but we don’t do continuous deployment. Instead we prefer to deploy on the last day of each 2-week Sprint. We usually time this for Friday morning, Indian Standard Time, so that our developers in India can take one final look at the system working in production.
Documentation
We have an unusually strong emphasis within the team on creating documentation at the same time as we write code. Many small companies skip documentation because they think it will slow them down.
In our own (sometimes bitter) experience, skipping documentation is false savings: if there are problems to be fixed later, or even if a feature simply has to be extended in the future, it’s very hard for even the original developer to recall the logic that she used to write the code in a particular way.
What’s important to note, however, is that we don’t have very big documents: most documents are less than a page long, because they refer to very specific work items. But we have thousands of these small documents, since every feature we have ever produced, and every bug we have fixed, has been documented.
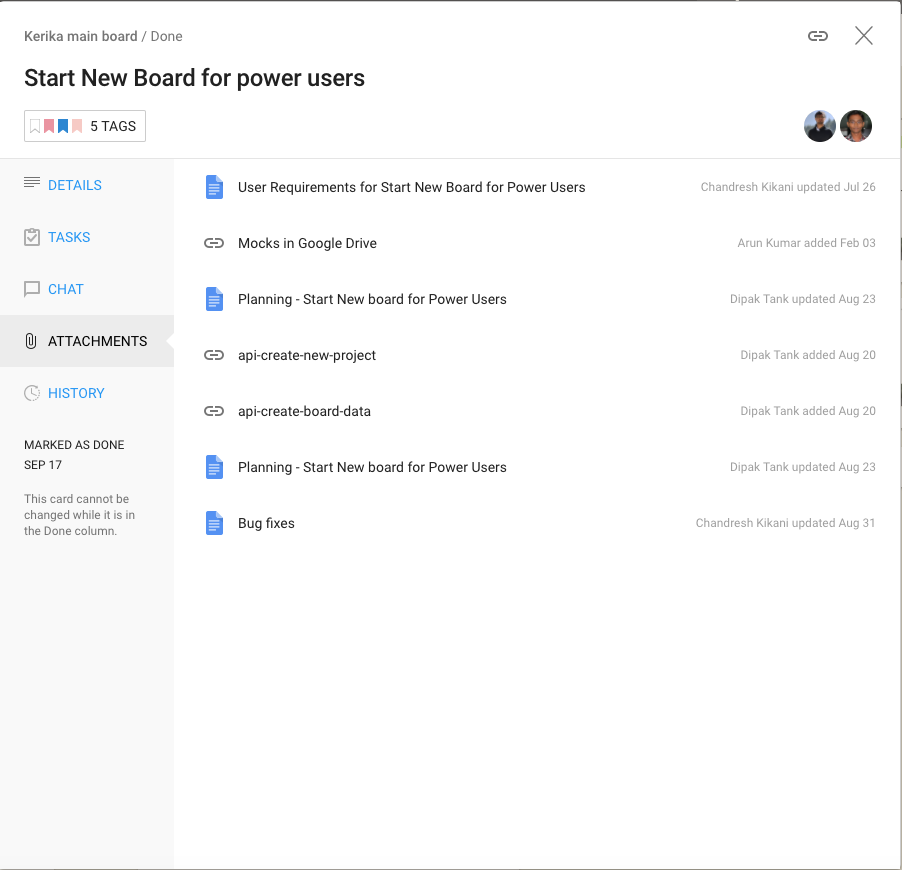
And thanks to Kerika’s very cool integration with Google Docs (we use Kerika+Google), managing these thousands of documents is very easy: just open the relevant card for a specific feature or bug fix and you will find all the relevant documents as well:
Documents attached to cards
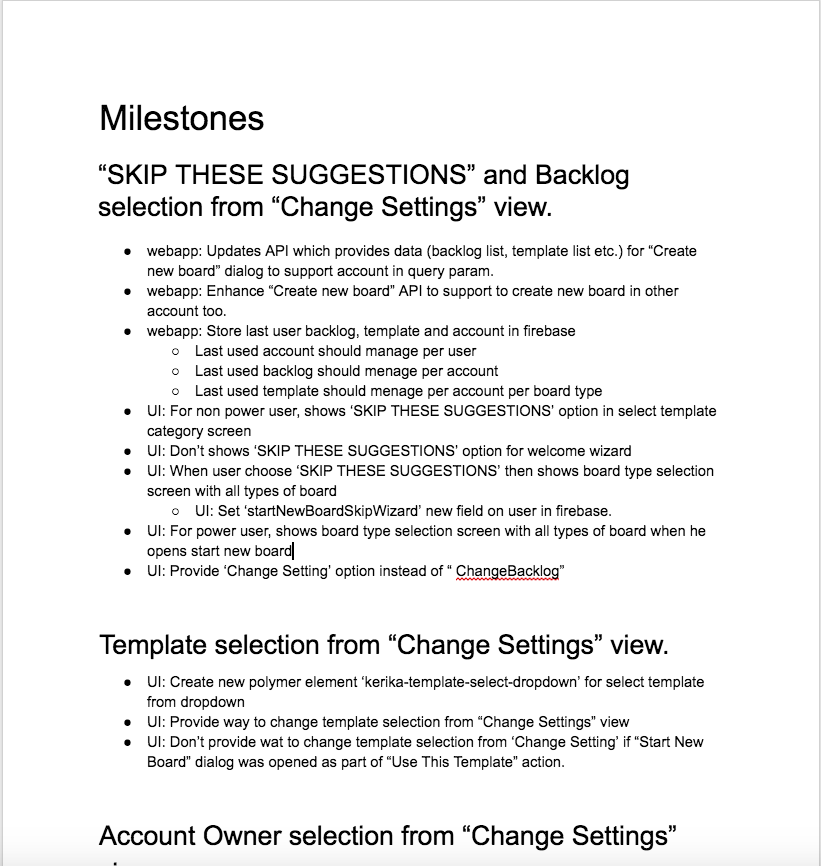
For new features we always have a short Planning Document that identifies any existing modules that will be affected and provides an outline of the new code that will be written. Here’s an example:
Example of a Feature Planning document
There may be other documents created, depending upon the complexity of the new feature, but even the smallest new feature will have at least one planning-related document that’s written before the code is written.
Bug Fixes
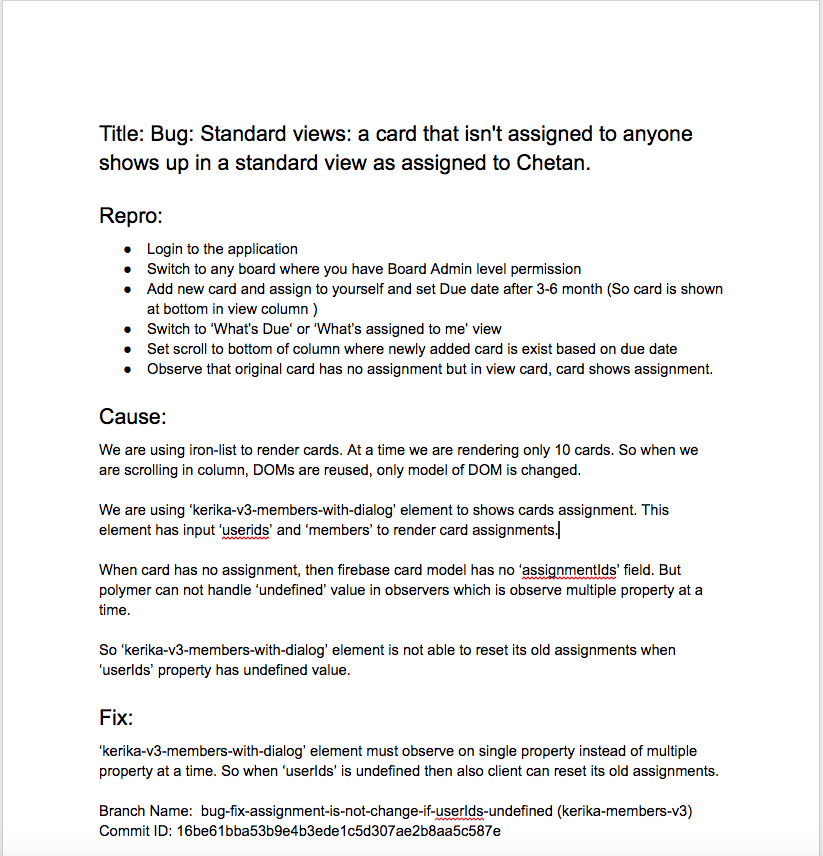
For bug fixes, we have a Repro, Cause & Fix document that methodically analyzes the cause of a bug:
Root Cause Analysis
The most important section of this document is the Introduced Since piece, where we trace the origin of the bug back to its source, to understand what new feature or bug fix we were originally working on that resulted in this new bug appearing.
This methodical root cause analysis, which we do for even the most minor bugs, helps us identify patterns in our code writing that we need to improve. Sometimes it can even point to bugs that we haven’t discovered yet: the root cause analysis may identify an assumption that we have applied in other places, all of which need to be looked at to make sure there aren’t other variations of the same bug that haven’t been identified yet.
After the bug has been fixed, the Repro, Cause & Fix document is updated to reference the git branches where the code fix can be found. This completes the circle of careful analysis, careful execution, and methodical review that we strive to adopt (and improve continuously).
The End of Email
We stopped using regular email towards the end of 2013. There was never any formal decision to renounce email; instead there was a formal decision to “eat our own dogfood” in a very serious way.
And as we started to build our entire company using our own product, we found that using Kerika is so much better than using email that there really wasn’t any need for email any more.
So people simply started drifting away from email. There was no explicit decision or formal movement to do so, people just realized, on their own, that email is an exceptionally poor way of managing work within a distributed team.
Conclusion
Considering the size of our team — and entire company, for that matter — you may be surprised by the degree of formalism we have adopted, and the heavy emphasis on analysis and documentation.
We spend at least as much time on analysis and documentation as we do on “pure coding”, and if we add in the Code Reviews and other elements of formal QA, the actual coding time is a relatively small portion of our total expenditure.
But trying to skimp on analysis and documentation really doesn’t pay off, in our experience: if you are building a company and product for the long-run, as we very assuredly are, you need to build it right, not just fast.