Some of our users are working on open-source, advocacy, or volunteering projects, and for these people privacy is less important than publicity: rather than hide their work, they would prefer to have as many people as possible view it, in real-time, so they can build momentum for their initiatives.
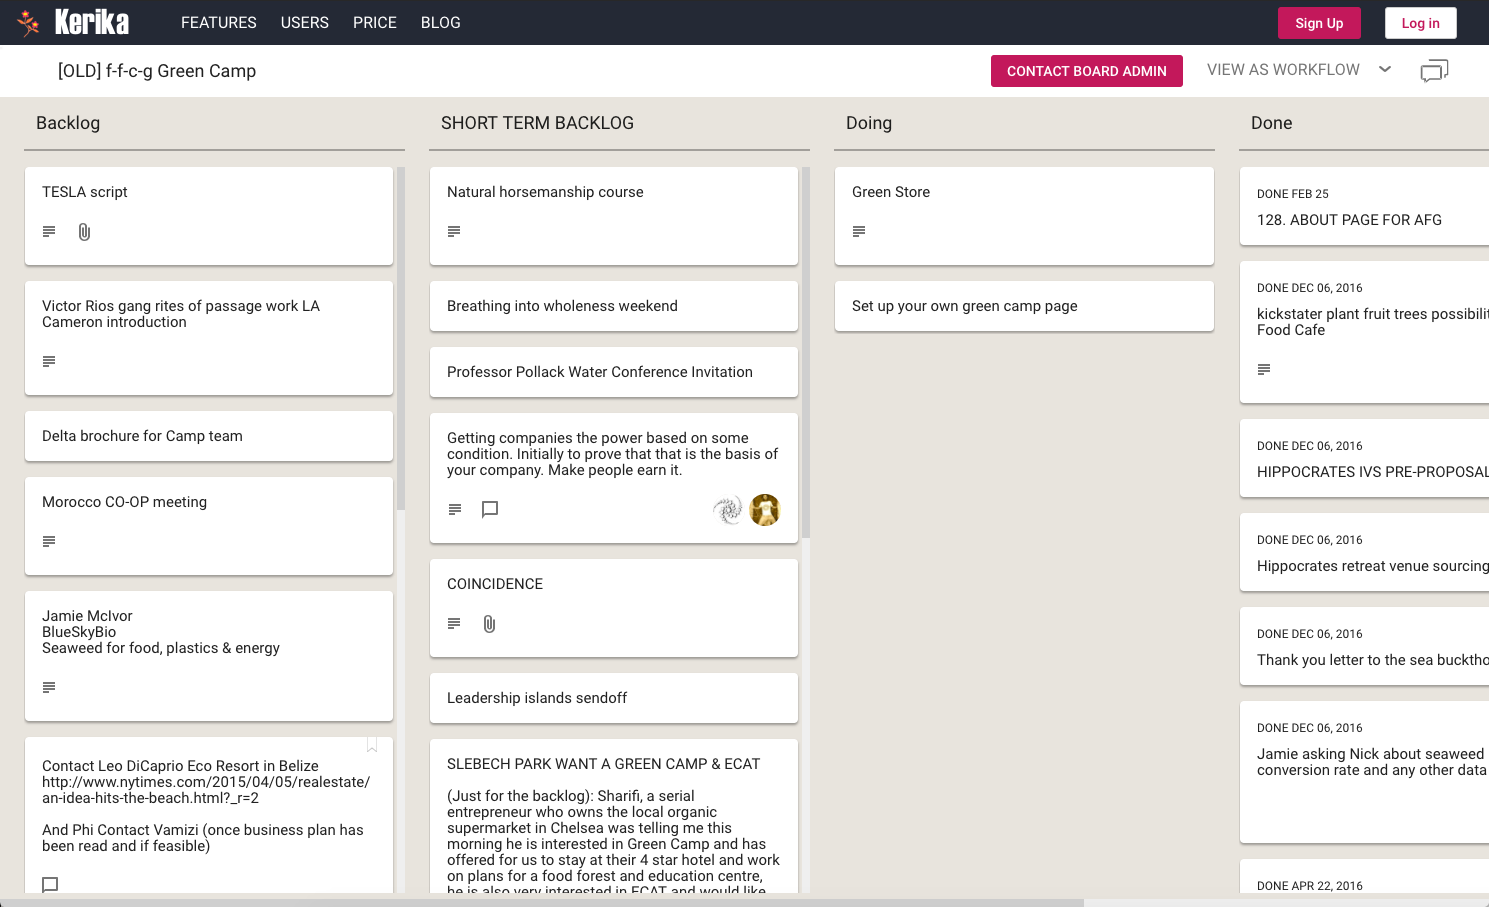
Here’s an example of a public board:
Example of public board
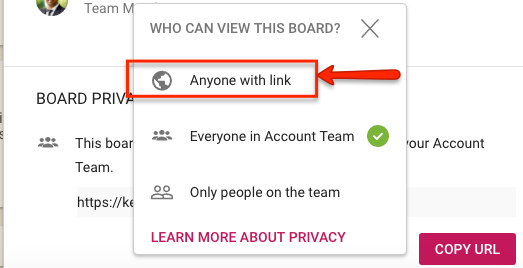
We have always accommodated such users, by offering an Anyone with link option that Board Admins can use to make their boards accessible by anyone who has the URL of that board, even if they aren’t Kerika users:
Making boards public
When a board is made public, all the files attached to and all the chat as well can be viewed by anyone.
As with any other Visitors, members of the public cannot make any changes.
Our latest improvement to this public boards feature has been to make the chat also viewable by anyone who has the URL of the board.
Note: a Board Admin can change their mind at any time, and revert a public board back to one that’s restricted to the board team or account team.
People usually don’t pay attention to the question of who owns a particular board, but it is an important question to consider when you create a new board: the Account Owner owns not just the board, but also all the files attached to cards and canvases on that board.
This is not always important (and often not important in day-to-day use of Kerika): our deep integration with Google and Box ensures that everyone who is part of the board team has automatic access to all the files needed for that board, with access permissions managed according to each individual’s role on the board: Board Admins and Team Members get read+write access; Visitors get read-only access.
(And, as people join or leave board teams, or their roles on a particular board’s team changes, Kerika automatically manages their access to the underlying project files, regardless of whether these are being stored in Google or Box.)
But when someone is planning to leave an organization, the question of ownership can suddenly become important: you don’t want an ex-employee to continue to own critical project files.
Changing ownership of boards was not something that was easily done in the past — there were workarounds, but they were fairly cumbersome and obscure — and we mostly handled these as special requests, on a case-by-case basis.
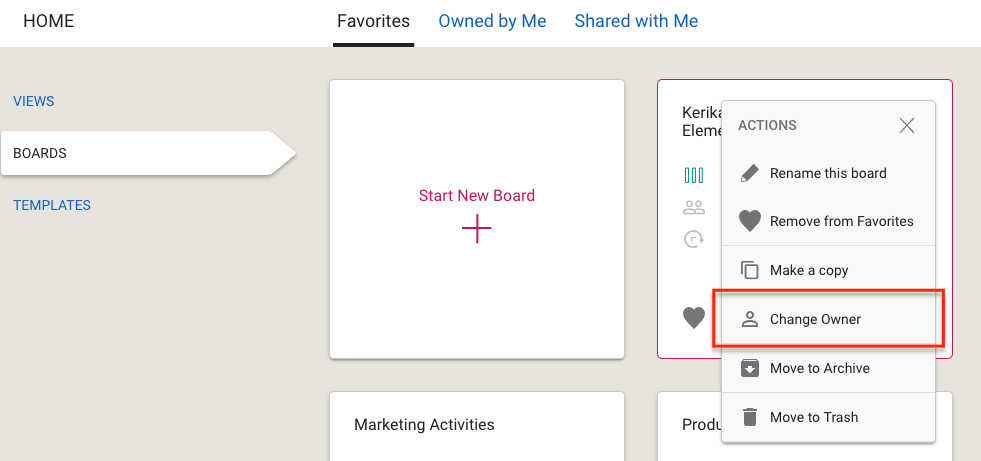
With our newest update to Kerika, this is no longer the case: changing the ownership of a board is a simple process that can be initiated at any time by the current owner of a board:
Change Board Owner
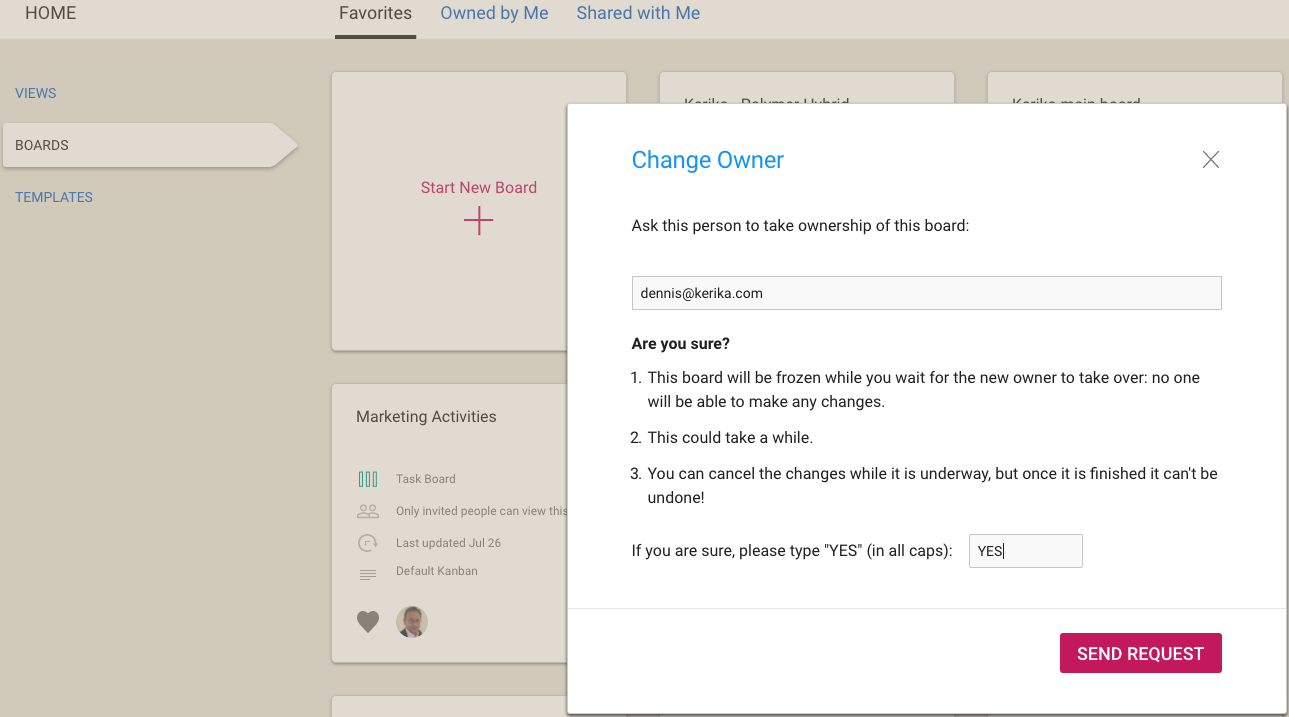
You can ask any other Kerika user, who has signed up the same way as you did (i.e. either as Kerika+Google, Kerika+Box, or by directly signing up) to take ownership of a board. Because this is a consequential action, not something you should rush into, you are asked to confirm your intention by typing the word “YES”:
Confirming change in ownership
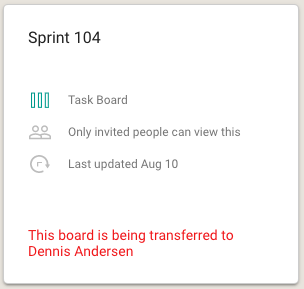
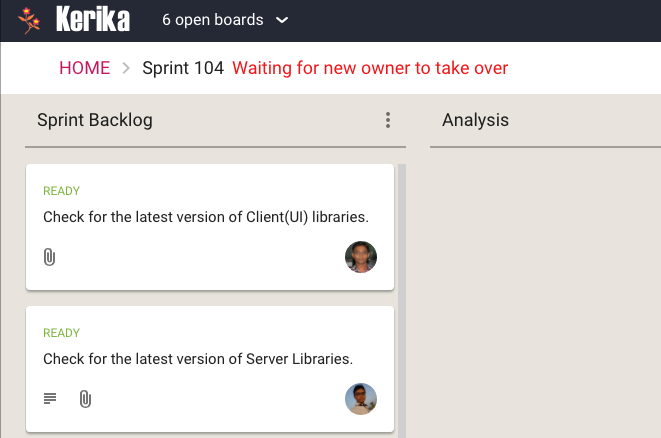
Once your request is sent off to the other user, the board is in a frozen state: existing members of the board team can continue to view the board, but no one can make any changes:
Board waiting for new ownerBoard frozen while waiting for new owner
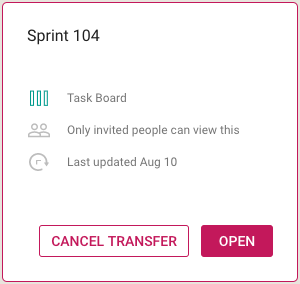
If you change your mind, you can cancel the request before it has been accepted. This can be done by selecting the board from your Home Page:
Cancel ownership request
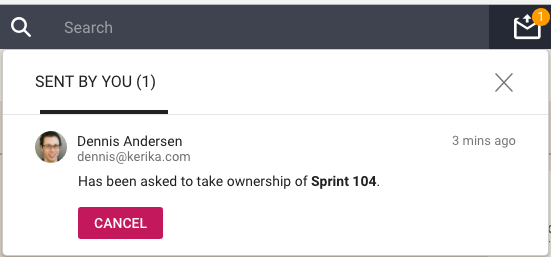
You can also find your pending request in your Sentbox, and cancel it from there:
Cancelling pending request
Note: once a board’s transfer is complete, it can’t be undone by you. If you really need to get ownership back of a board, you will need to ask the new owner to transfer the board to you.
An important caveat for Kerika+Google users
We try to ensure that files attached to a Kerika+Google board have their ownership changed at the same time as the board itself is transferred, but there are some limits to how Google will allow for a change in ownership:
All Kerika-related files are stored in a set of folders in a user’s Google Drive, organized by account and board.
Google let’s us change the owner of a folder, so we can make sure that when a board is transferred the ownership of the associated Google Drive folder is also changed.
However, for the individual files contained within the folder, Google only allows for a change of ownership of files that are part of Google Docs: documents, spreadsheets, presentations, forms, etc.
Files like images (.jpg, .png, .gif), zip files, and PDFs, for example, retain their old ownership between the Google API doesn’t let Kerika change the ownership of these “non-Google-formatted” file types.
A fun video we made recently featuring Faith Trimble and Kate King, from the Athena Group, talking about how a consulting company can function as a truly distributed team — and get great work-life balance as a result!
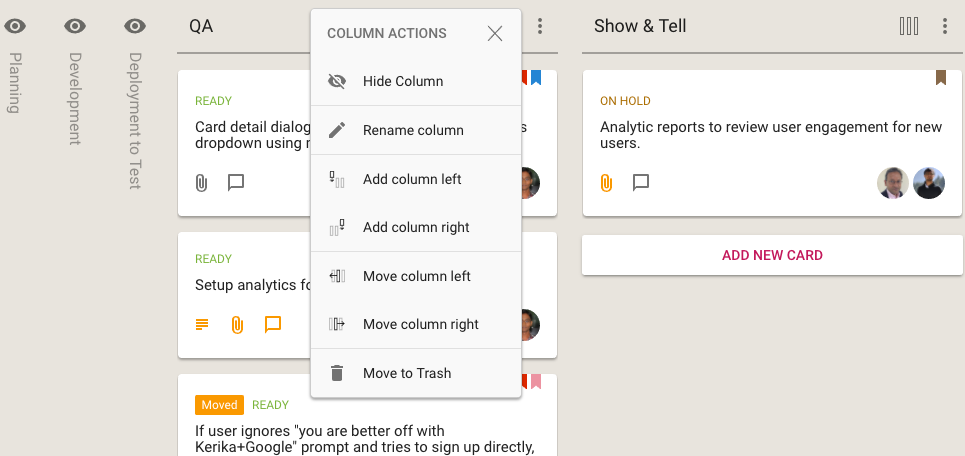
We are extending the Column Actions menu (featured in a previous post) to provide a quicker, easier way to hide (or show) individual columns on your Kerika Task Boards and Scrum Boards:
Option to hide column
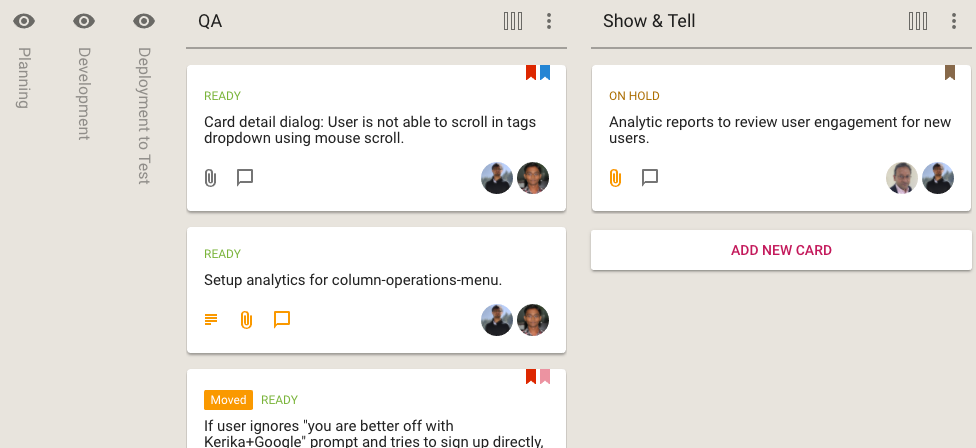
When a column is hidden, it’s name is shown vertically, so you can easily remember which columns you have hidden at this time.
Hidden columns
Revealing columns that are hidden is easy: just click on the “eye” button and the column immediately comes back into view.
Every Team Member can decide whether to show or hide individual columns: their choices won’t affect the way other Team Members choose to view the same board.
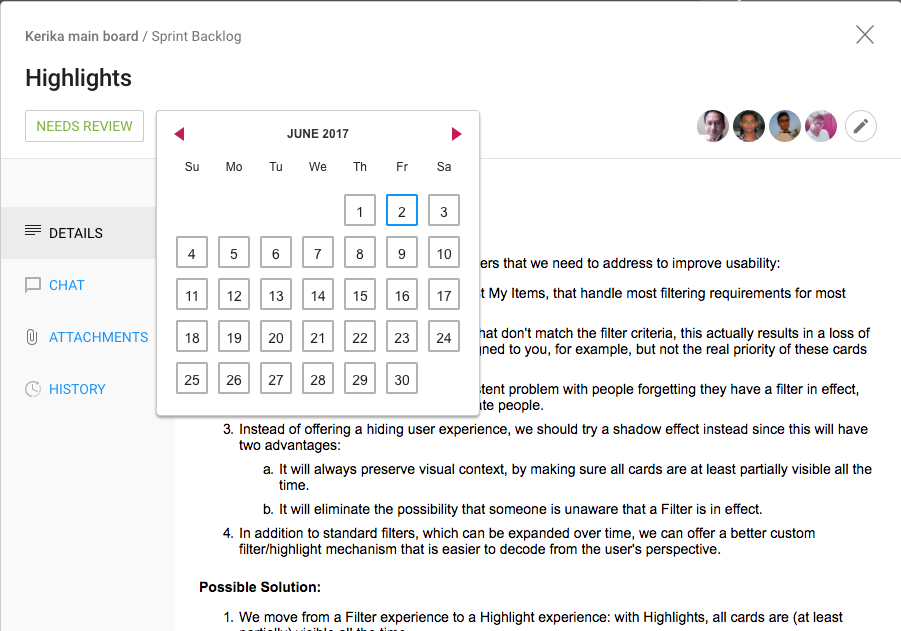
When you schedule cards on a Kerika Task Board or Scrum Board, we offer a simple way to pick a date:
Setting due date
We don’t support setting a specific time (e.g. 5:00PM) along with the time: these times are generally useless in most work settings and add unnecessary complexity to the user experience.
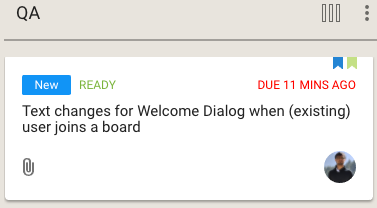
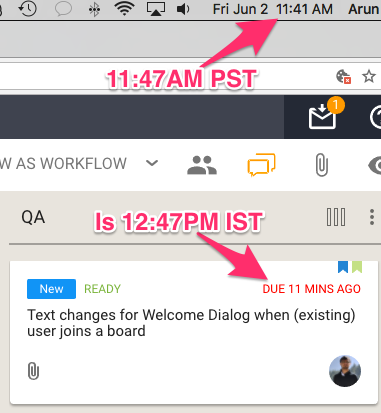
And, yet, it’s possible that Kerika reports a specific time for a due date, like in this example:
A specific time for a due date
So, how did happen?
Well, Kerika took note of the fact that person making that time commitment (“I will get it done today”) was based in India.
And midnight in India is 11:30AM in Seattle — at least now, with Daylight Savings Time in effect.
So Kerika shows the Indian team member’s commitment of “I will get it done today” in terms that make sense to a colleague in Seattle:
Handling timezone differences
11:47 AM Pacific Standard Time with Daylight Savings Time in force is 12:47PM Indian Standard Time; something that Kerika figures out automatically.
This simple, elegant way of handling timezones eliminates the frequent disagreements over “I meant my today, not your today…”
An example of the incredible attention to detail that Kerika brings to the needs of distributed teams.
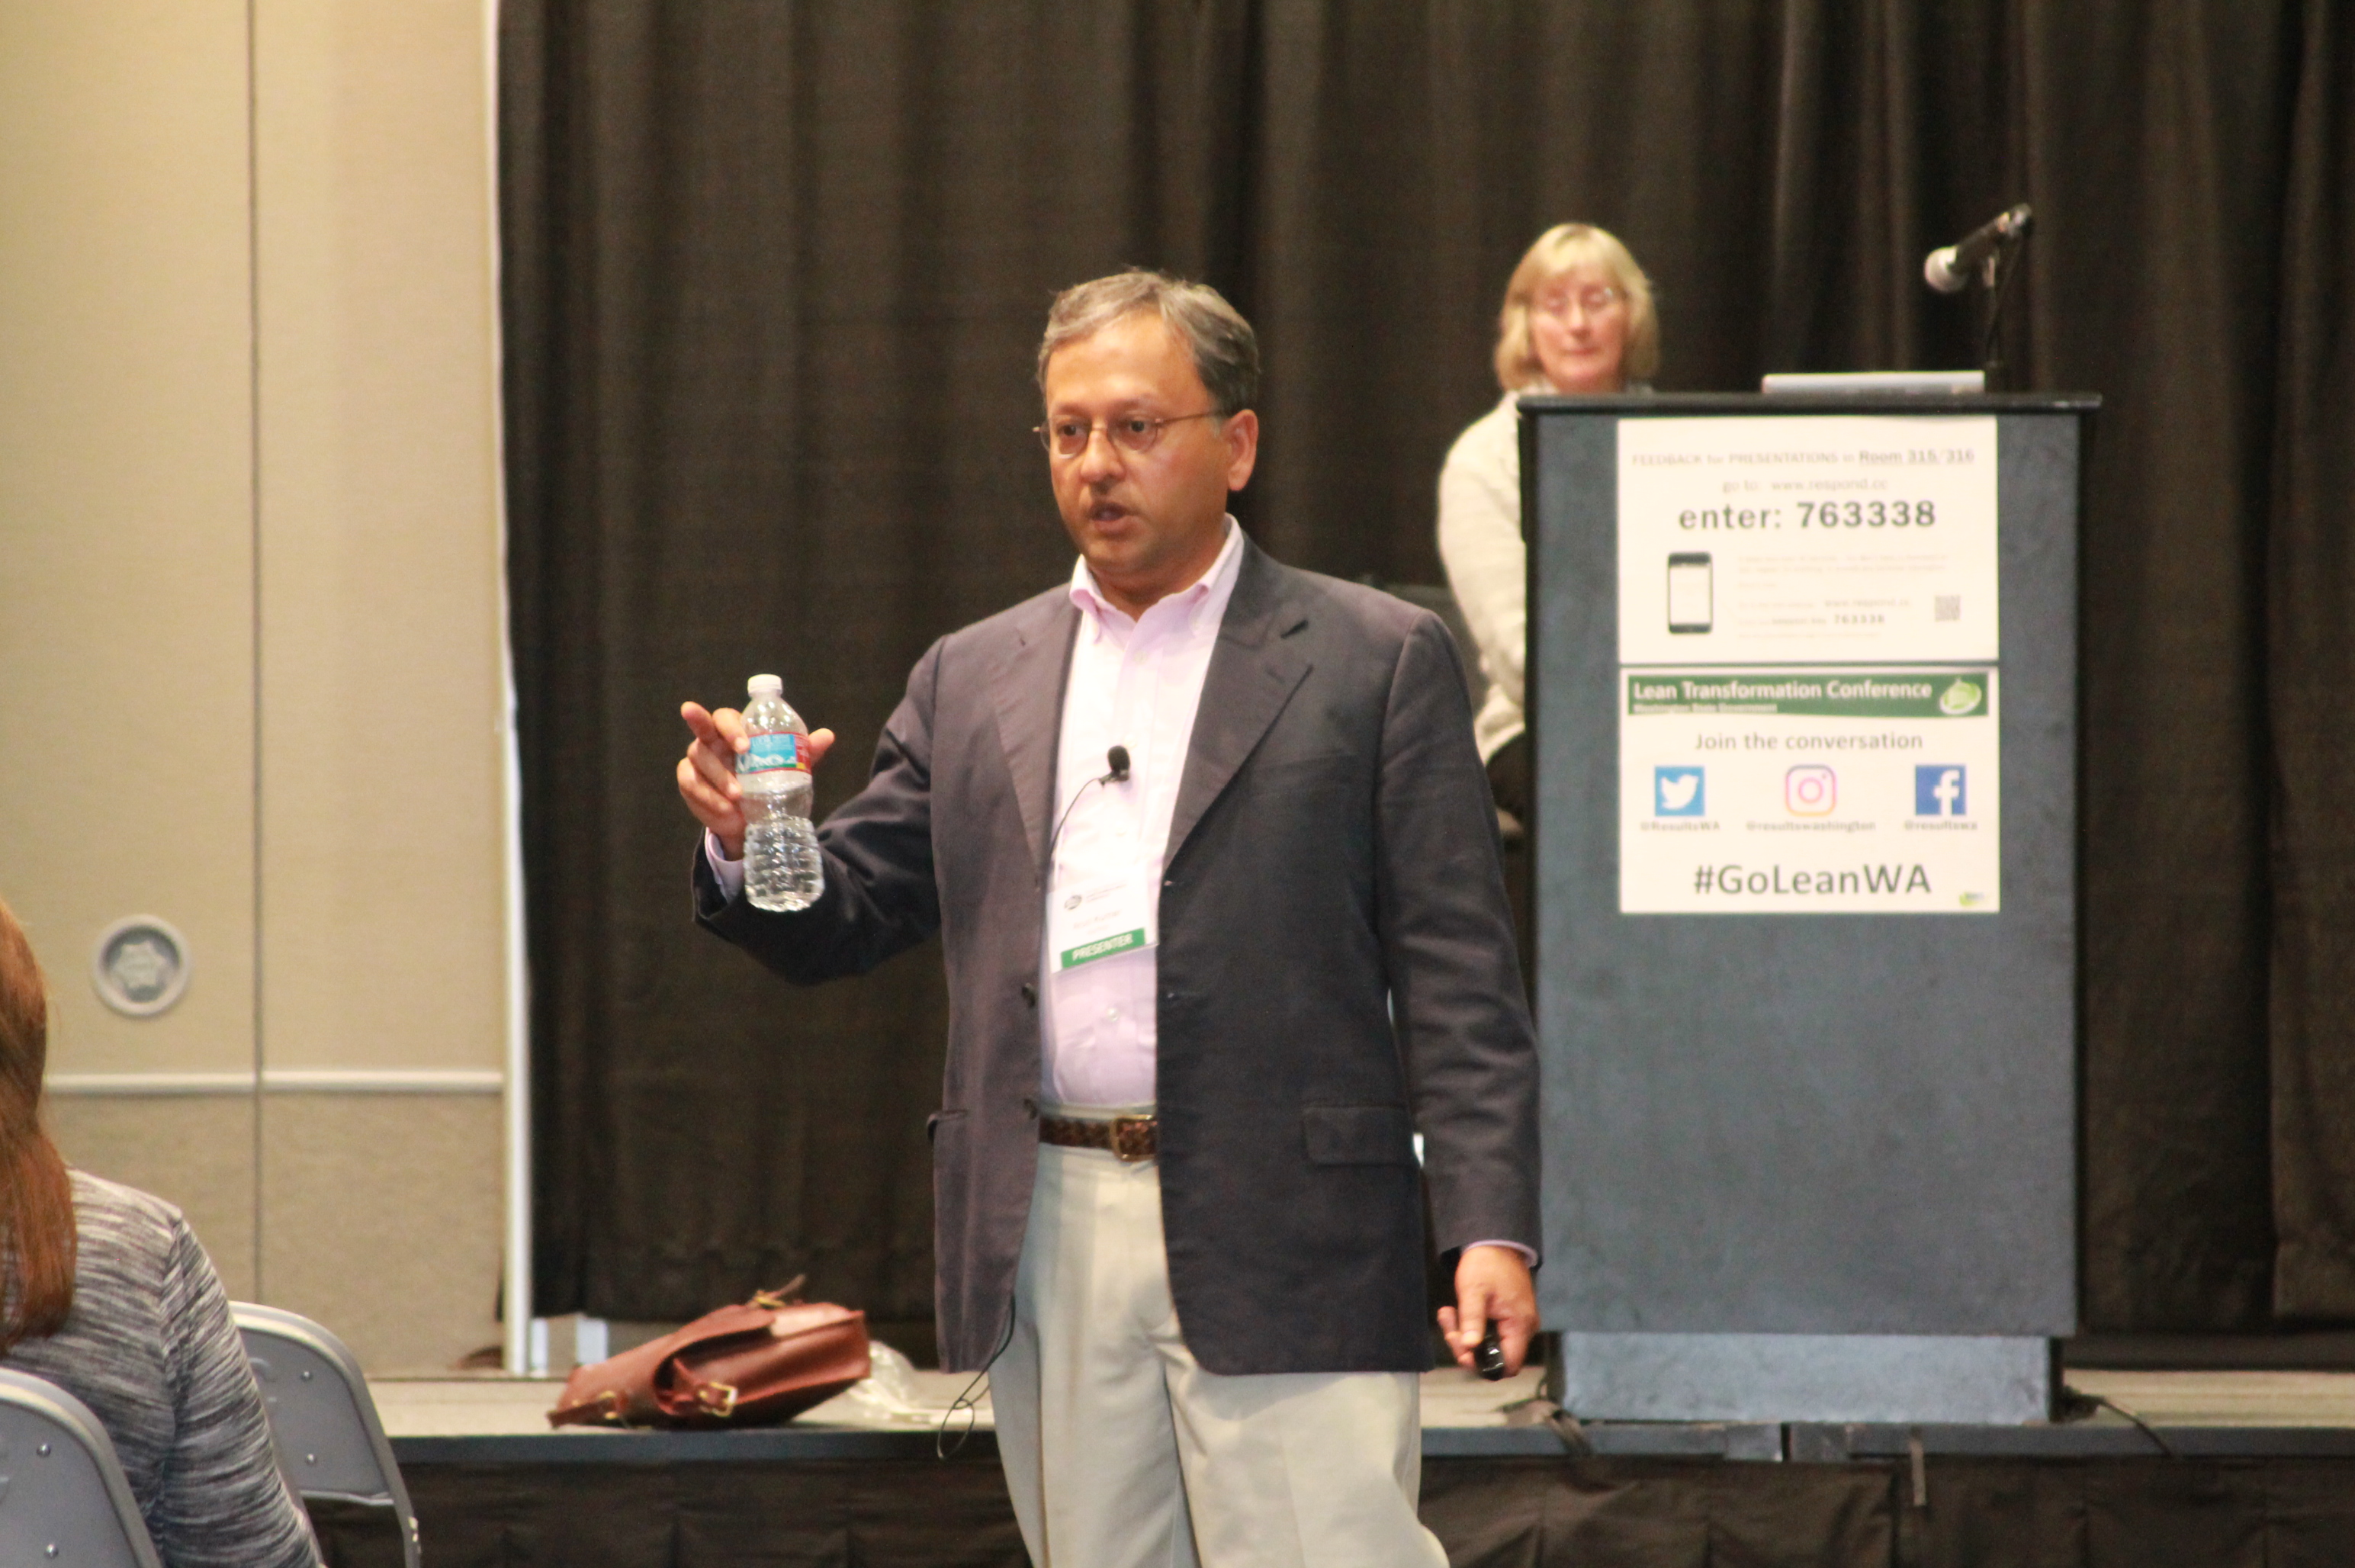
Arun Kumar, CEO of Kerika, and Joy Paulus, Senior Policy and Program Manager for the Washington State Office of the CIO, delivered a joint presentation at the Lean Transformation 2016 Conference.
The subject of the talk was “Collaboration Across Organizations: Big Results with Small Teams”. Here are the slides from the talk:
Interested in using Kerika for software development? Here’s a practical example, taken from one of our own boards, that highlights best practices for tracking, investigating and fixing bugs.
First, a look at our Workflow
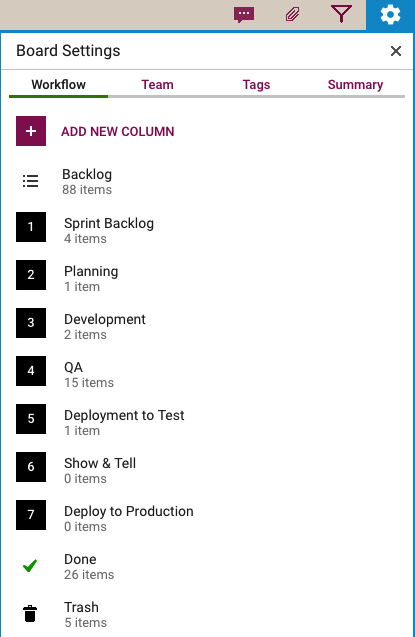
Every software development team will want to set up its own workflow, of course, reflecting its internal dynamics and available resources. Here’s the Scrum Board workflow we use in our team:
Scrum Workflow
Our Scrum Boards are organized with these columns:
The Backlog contains all the ideas, large and small, that we have on our product road map: in Scrum terminology, it’s our Product Backlog.
The Sprint Backlog is the set of cards that we pulled from the Backlog at the start of this Sprint: right now, only 4 items are left as we are close to the end of our 2-week Sprint Cycle.
Within each Sprint, cards are picked up developers and first moved into the Planning column, where detailed analysis of the work to be done is completed.
Depending upon the complexity of a particular work item, a developer may request a design review before moving the card further into the Development column.
Developers do their own unit testing as part of the Development phase, but then the work item moves further down to the the QA column which frequently includes formal code review. (More on that below…)
After a bug has been fixed, had its code reviewed and passed unit testing, it gets Deployed to the Testenvironment.
We usually wait until the 2-week Sprint is over before asking the entire team to present the entire Sprint’s output to the Product Owner for the Show & Tell; this avoids distracting the team midway through the Sprint.
Once the output of a Sprint has passed the Show & Tell, it can then be Deployed toProduction.
The Done column shows all the work that got done in this Sprint. That’s where all cards are supposed to go, but sometimes a work item is abandoned and moved to the Trash.
(Side note: we sometimes use WIP Limits to make sure that people are not over-committed to work, but this is not a consistent practice within our team.)
Logging the bug
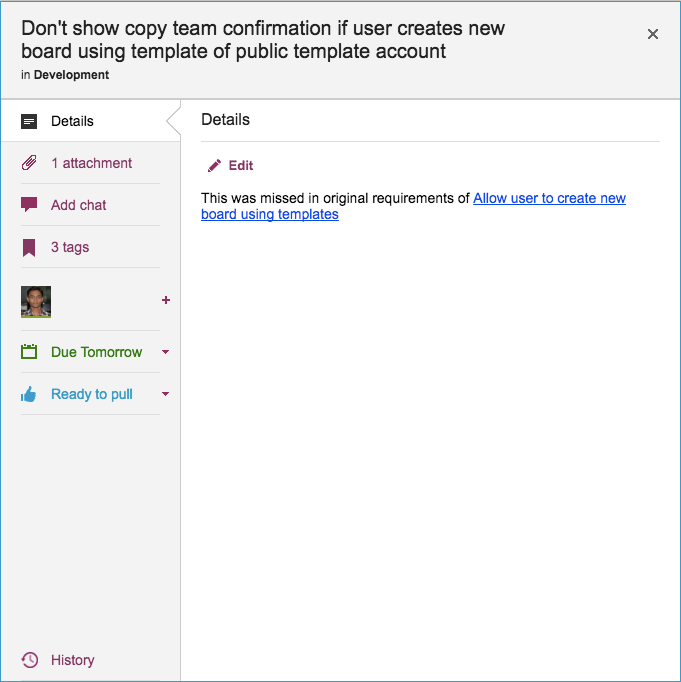
Now, let’s take a look at an example of an actual bug card that was worked on by our team:
Example of a bug tracked as a Kerika card
(This particular bug doesn’t have a lot in the details, because it is related to another task that is currently underway, and Kerika makes it easy to link cards, canvases or boards.)
Some bugs go into the Product Backlog, if they are not considered especially urgent, but others go straight into the Sprint Backlog if they represent serious production problems that might affect user’s access or the reliability of their data.
Adding bugs to the Product Backlog lets us process bugs along with other development, e.g. of new features, in the same way: everything can be prioritized by the Product Owner and handled through a consistent workflow.
Documenting the bug
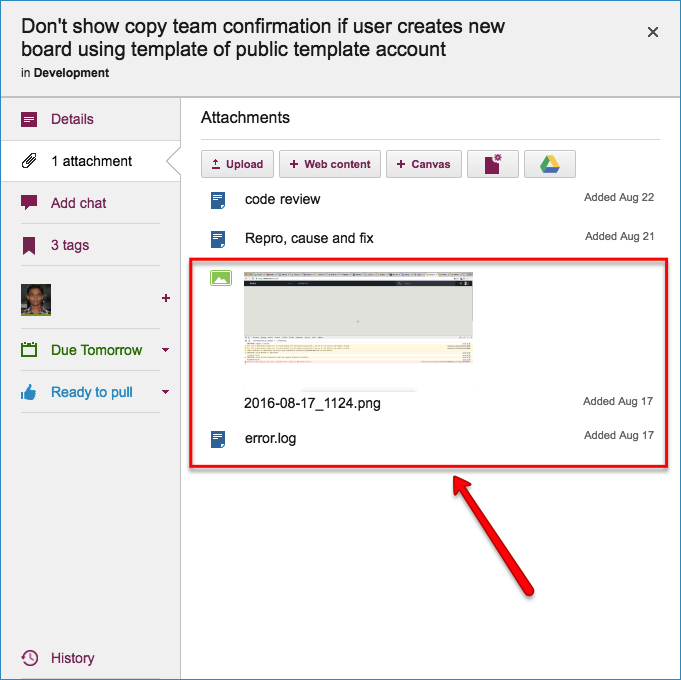
Our bug reports typically come with two attachments; at least one of these should always be included so that the developer has a clear starting point for her work:
A screenshot showing the user experience (if the bug can be observed directly by the user.)
An excerpt from the error log, if the server reported any errors around the time the bug was observed.
Original bug report documents
Kerika makes it easy to attach any kind of content to any card, canvas or board: for bug fixing, particularly in the analysis phase, this is very useful if the user needs to include URLs, material from Sourceforge or similar sites, links to Github, etc.
Repro, Cause & Fix
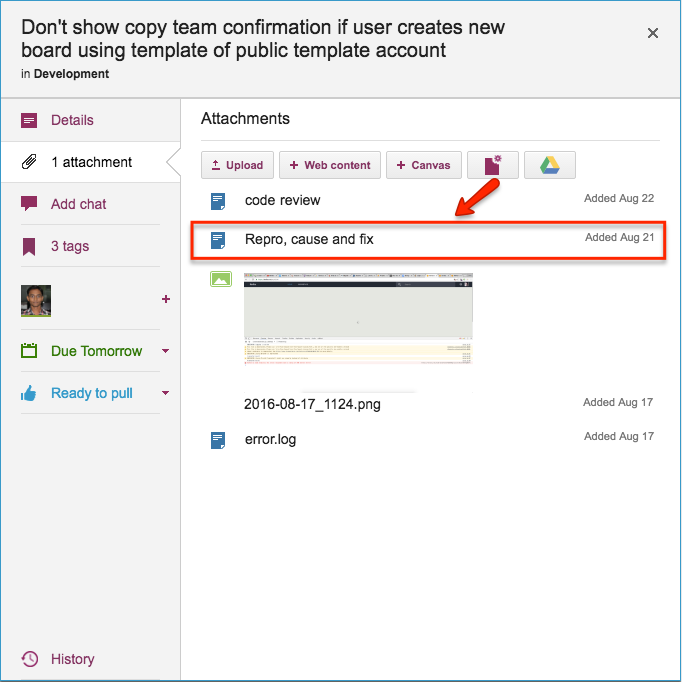
Before any bug is fixed, our developers always add a standard document we call Repro, Cause and Fix as an attachment to the card:
Repro, Cause and Fix
This document is added no matter how trivial the bug.
Why? Because, on average our team goes through about 30-40 cards a week, and has been doing so for years now. If we don’t document our analysis now, we will never recall our logic in the future.
Repro, Cause and Fix
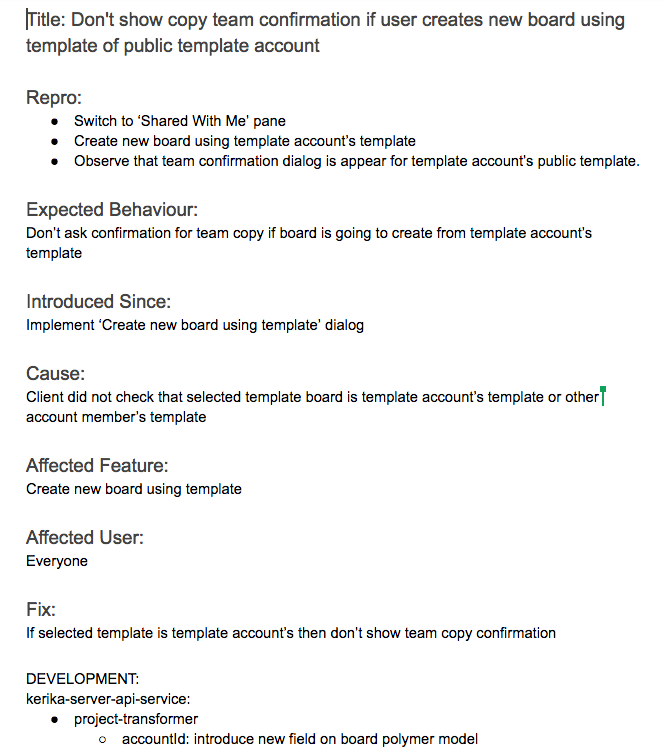
Our team adopts a consistent layout of the Repro, Cause & Fix document, which we adhere to even for trivial bugs:
The Repro Steps are the steps needed to trigger the bug: usually they consist of a specific sequence of actions taken by a user that cause the bug to appear, but they can also consist of a sequence of events in the background, like specific server activity or memory/CPU utilization conditions, or overall network traffic, that trigger the bug.
The Expected Behavior helps clarify the developer’s understanding of the how the software should behave in this situation. It’s not uncommon for a developer who is new to the team to misunderstand how a particular feature is expected to behave, which could lead to more bugs being introduced. Clarifying Expected Behavior in this document provides an easy way for the Product Owner and the Team Lead to confirm that the developer is not going to go down the wrong track.
Introduced Since: our developers try to pinpoint the specific point in the software’s life where the bug was introduced. This helps the developers reflect upon how errors are created in the first place: the blind spots lie in their analytical patterns that need to be strengthened.
(In this particular example, the developer has been able to point back to some of her own work on an earlier feature implementation that caused this bug to appear.)
Root Cause is not the same as the Repro Steps. While a specific sequence of actions or events may reliably display the effects of a particular bug, they only provide the starting point for the analysis; the Root Cause itself is discovered only when the developer examines the code in detail and determines exactly what is breaking.
Affected Feature: all of our code goes through code review, which we view as one of the most effective QA processes we could adopt, but it can be very challenging when you are processing 30 cards each week, each affecting a different part of the software.
Identifying the Affected Feature helps with the code review process, since the reviewer can consider the bug fix in the larger context of the feature that’s being modified. Without this, it is doubtful that we could review so many changes each week.
Affected User: in most cases, this is “everyone” we offer the same Kerika to all our users, whether they are on free trials or have paid for professional subscriptions.
Identifying Affected Users is useful, nonetheless, when dealing with bugs that are browser-specific, or service-specific: for example, determining that a particular bug affects only Kerika+Google users, or only Internet Explorer users.
The Fix: OK, this might seem obvious, but this section really refers to identifying the specific modules in the software that will be changed as a result of the bug fix being applied.
Like many others, we use Git for managing our source code — along with Maven for builds — since our server environment is all Java-based.
The Fix
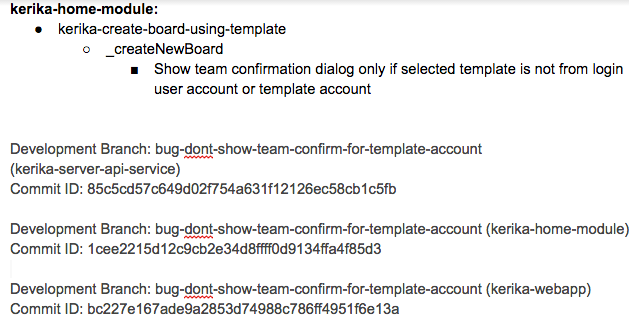
The Fix section usually includes references to Git checkins: this helps with future bug fixes, by making it easy to traceback sources of new bugs — part of the Introduced Since section described above.
We use separate Git branches for each feature that we develop so that we can decide precisely what gets released to production, and what is held back for future work.
This helps with the Show & Tell phase of our workflow, when the developers demonstrate the output of the Sprint to the Product Owner, who has the option to accept or reject specific features (i.e. cards on the Scrum Board).
Code Review
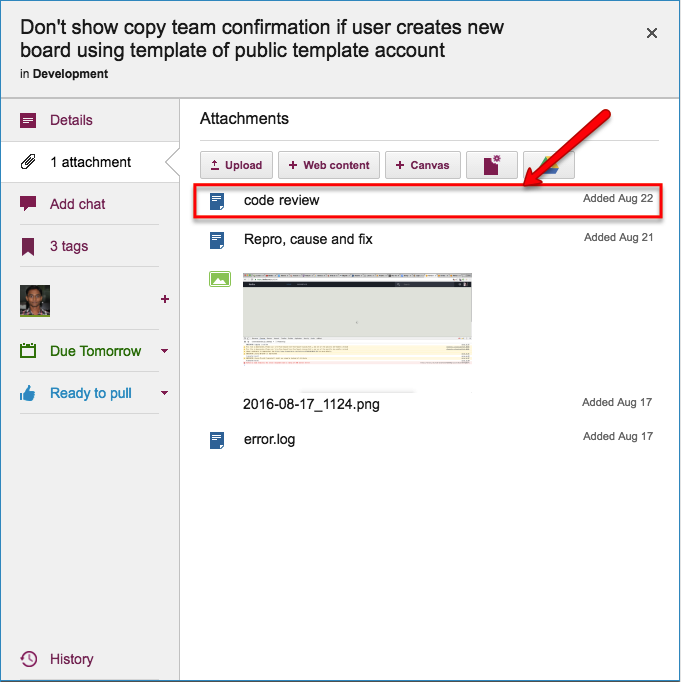
All of our code goes through code review, no matter how trivial the change:
Code review
We really believe that code reviews are one of the most effective QA practices we could adopt: having a second pair of eyes look over code can very considerably reduce the chances of new bugs being introduced.
So…
Kerika is great for distributed software teams: our own team is spread out between Seattle and India (roughly 10,000 miles apart!), and all of our work is done using Kerika for task management, content management and team collaboration.
Of course, an added benefit of “eating our own dogfood” is that we are highly motivated to make sure Kerika is the best tool there is for distributed teams :-)
Kerika helps you (and your team) manage multiple versions of a document, and it does this so smoothly that you might not even have noticed…
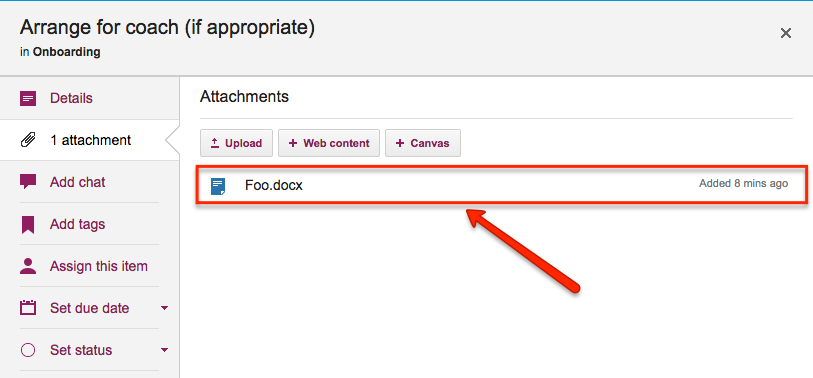
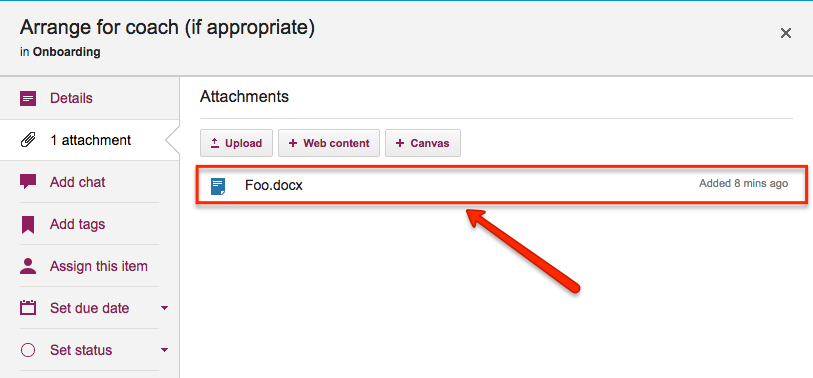
Here’s how it works: when you add a file to a Kerika card or canvas, it shows up in the list of attachments, like this:
File attached to a card
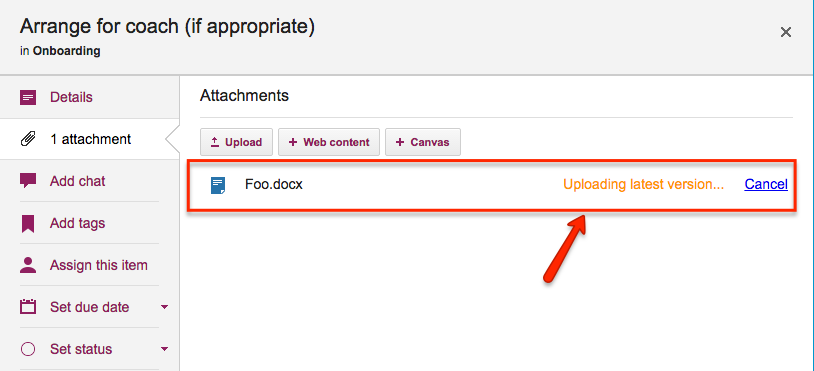
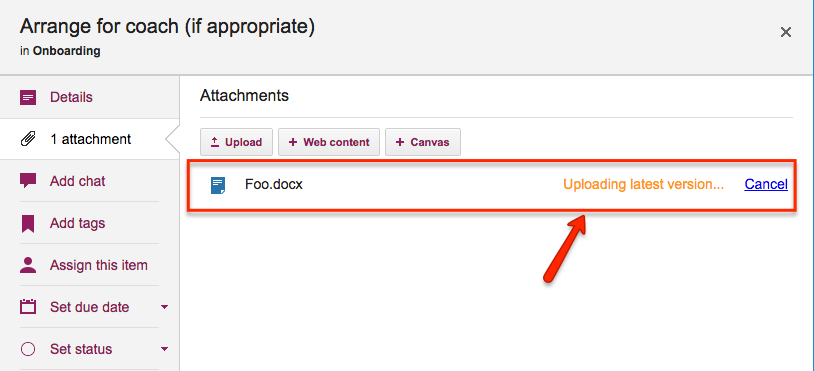
If you then attach another file to the same card or canvas that has the same name and file type, Kerika automatically treats it as a new version of the same file, rather than a completely different file:
Uploading a new version
In the example above, when a Team Member adds another document called Foo.docx to a card that already has a file attached to it with the same name and file type, Kerika treats the new document as a new version of the old Foo.docx rather than as two documents called Foo.docx.
How you access all these old versions depends upon how you set up your Kerika account:
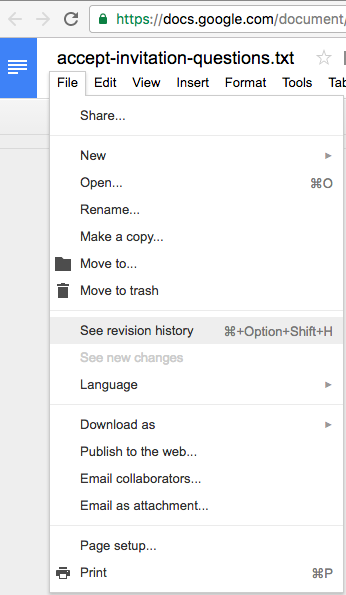
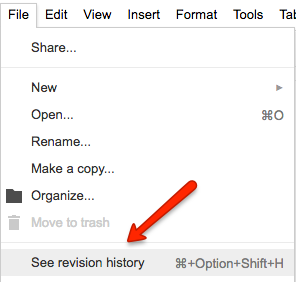
If you are using Kerika+Google, these files are being stored in your Google Drive, and Google will manage the versions for you: you can find this under the File menu in Google Docs
Google Docs versions
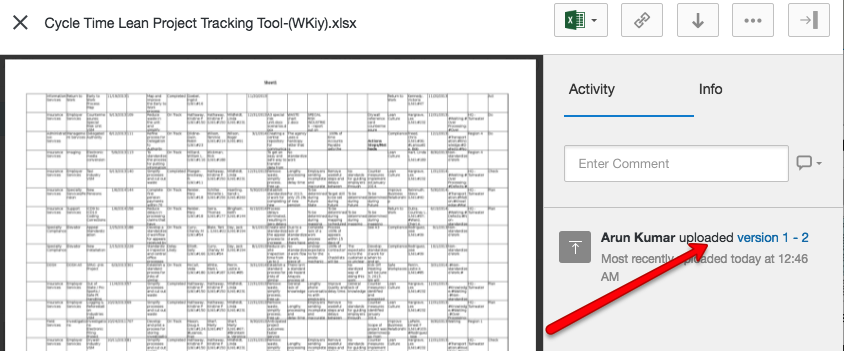
And pretty much the same thing is true if you are using Kerika+Box: Box will take care of the older versions automatically, although their user interface is slightly different
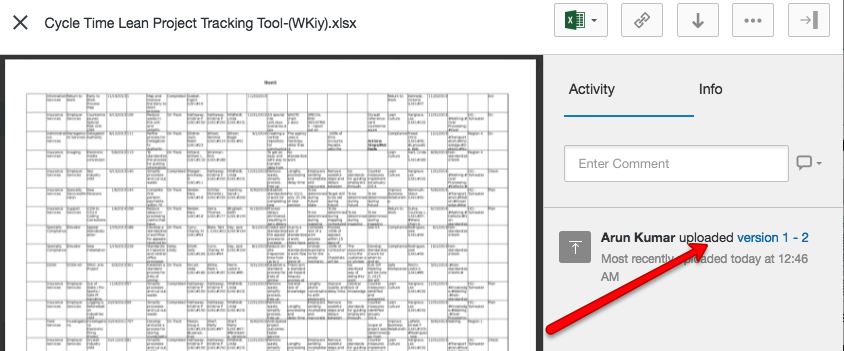
Box version history
And what if you signed up directly with Kerika, without using a Google or Box ID?
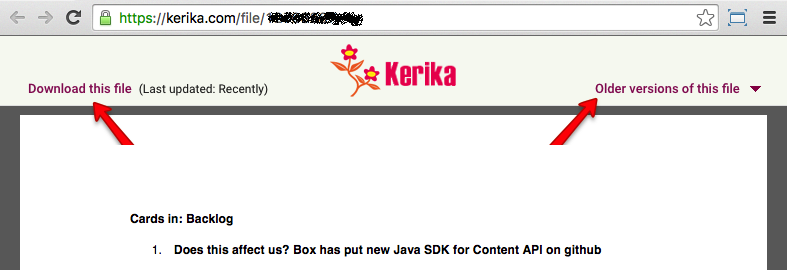
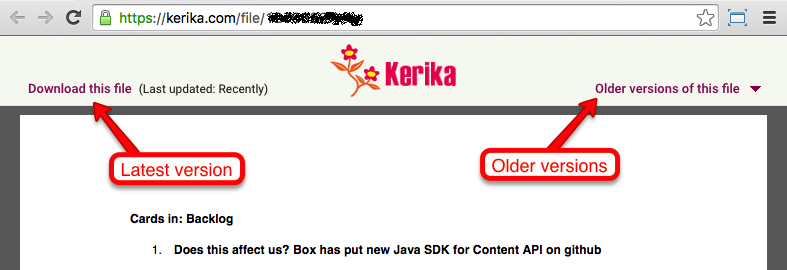
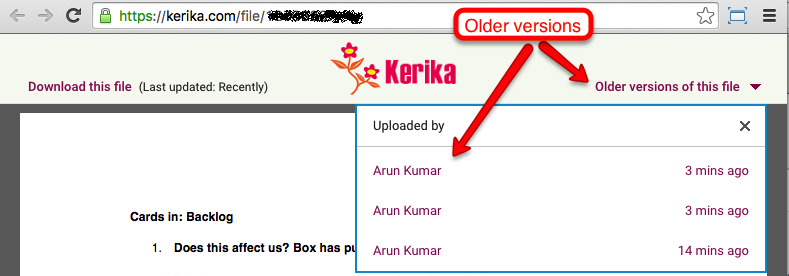
We provide an easy way to get to older versions of a file for users who signed up directly: when you are previewing a file, click on the Older versions of this file link on the top-right.
File preview
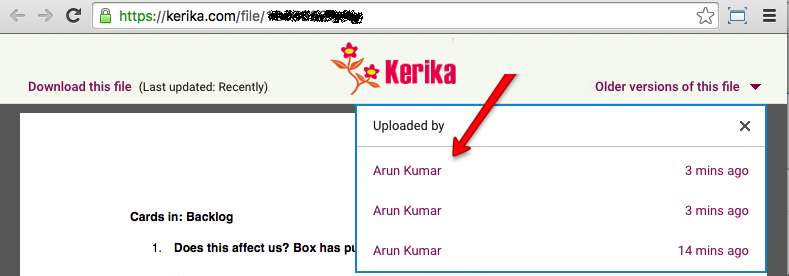
Kerika will show you a list of all the old versions that are available for that file, along with details on who uploaded those versions, and when:
Another great new feature: if you upload a file on any card, canvas or board with the same name as a file that’s already attached to that particular card, canvas or board, Kerika will automatically keep track of these as being different versions of the same file. This makes it even easier to organize all your Kerika project files.
There’s no limit to the number of files you add, nor any limit on the size of these files.
When you add a file, to a card, board or canvas, Kerika automatically uploads that file and shares that with everyone who is part of your board’s team. You don’t have to do anything: Kerika makes sure that all the Team Members have read+write permission, and all the Visitors have read-only permission.
These files are stored in your Google Drive, if you are using Kerika+Google, or in your Box account, if you are using Kerika+Box, or with Kerika if you have signed up directly with an email address.
That’s how Kerika has always worked; what we have added is an automatic versioning feature that checks when you add a new file to see if has the same name, and type, as a file that’s already attached to that particular card, canvas or board.
If the file name and file type match something that you have already added, Kerika automatically treats that new file as a new version of the old file, rather than as a completely different file. This makes it really easy to manage your Kerika project files.
Here’s an example: this card has a file attached to it called “Foo.docx”.
File attached to a card
If a Team Member adds another file to this same card, also called “Foo.docx”, Kerika will treat that new file as a different version of the same Foo.docx, rather than as a completely different file:
Uploading a new version
Accessing these older versions is easy: if your Kerika files are in being stored in your Google Drive, you can get the older versions using the Google Docs File menu:
Google revision history
If your files are being stored in your Box account, you can access the older versions from the menu on the right side of Box’s preview window:
Box version history
If you signed up directly with Kerika, you can access the older versions from within Kerika’s file preview:
File preview
Clicking on the Older versions of this file link on the top right of this preview will give you a list of all the old versions of this file that Kerika has:
Older versions
So, that’s it: simple, easy, automatic tracking of multiple versions of your project files! Brought to you by Kerika, of course.